Adobe Photoshop 2020 is out. With it, Adobe has launched so many new features and one of them is the brand new Object Selection Tool. Let’s see what we have got in this brand new Object Selection Tool in Photoshop.
Let’s begin the tutorial.
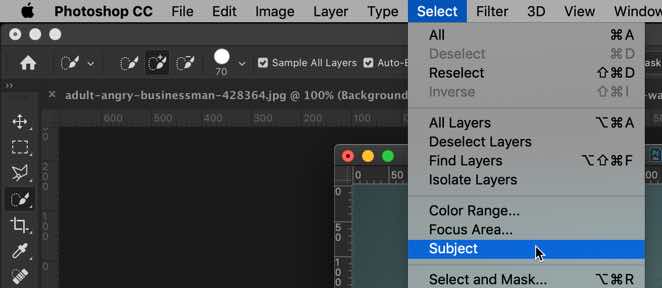
What is the Object Selection Tool in Photoshop?
The Object Selection Tool in Photoshop is a tool to select anything in Photoshop. It can be a face, car, tree, house, or basically anything. As of November 2019, the accuracy of the selection is not that perfect for complex edges like hair, but it works pretty well for sharp edges like a house, car, etc.
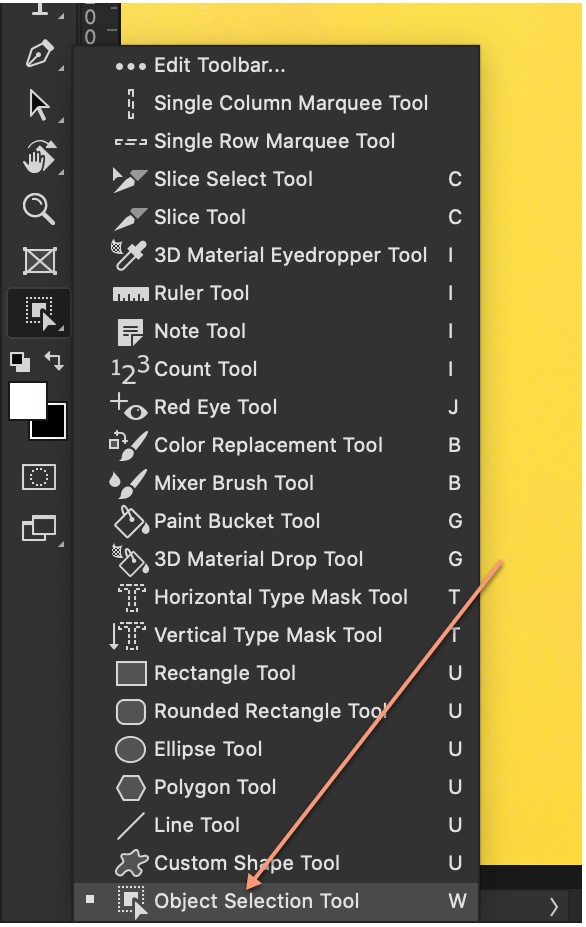
Where do I find the Object Selection Tool in Photoshop?
You can find it on the tool panel. It’s present along with the Quick Selection Tool or press Shift + W again and again until it activates.
How to use the Object Selection Tool in Photoshop?
The Object Selection tool in Photoshop is easy to use. Though it’s not as easy to use as the Select Subject, but it gives better results than the Select Subject.
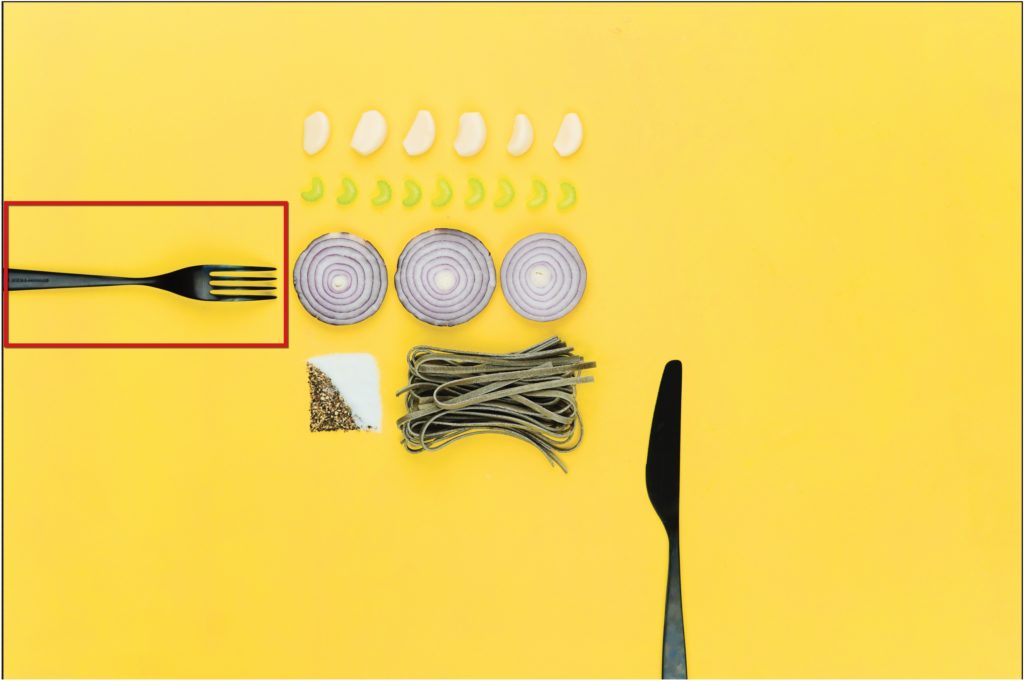
In the below photo, I am going to select the fork.
Step 1 – Select the Object Selection Tool in Photoshop
Either press Shift + W or grab the Object Selection Tool from the tool panel.
Select the rectangle from the option panel. I’ll explain the rest of the features in the option panel later.
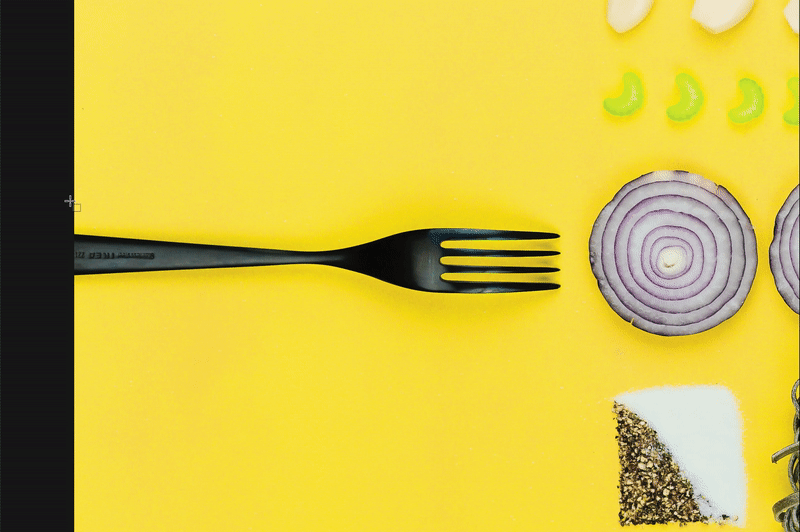
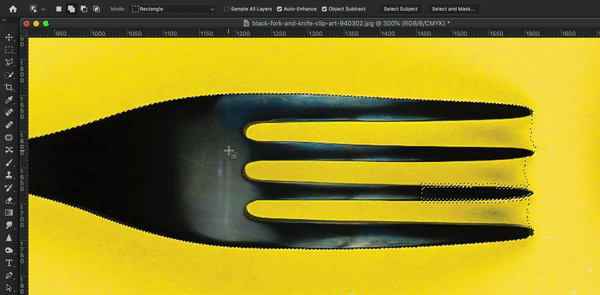
Now, draw a rectangle around the fork.
This is the result. You can see that it’s nowhere perfect.
Step 2 – Refine the selection using the Object Selection Tool in Photoshop
It seems that Adobe knows that the result doesn’t give perfect results always. So, it has added one more feature in this tool. You can add or subtract something to or from a selection using the same Object Selection Tool.
I am going to show you how you can do it.
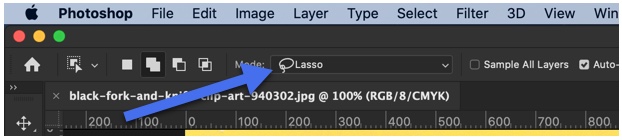
Firstly, change the mode to Lasso.
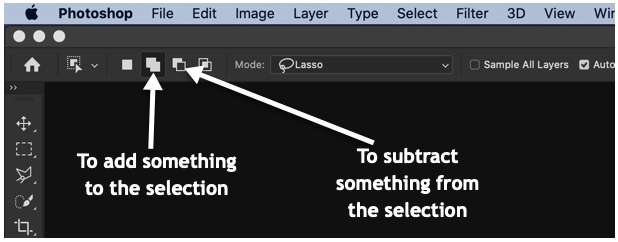
In the option panel, you’ll see four icons on the left side. These icons come handy now.
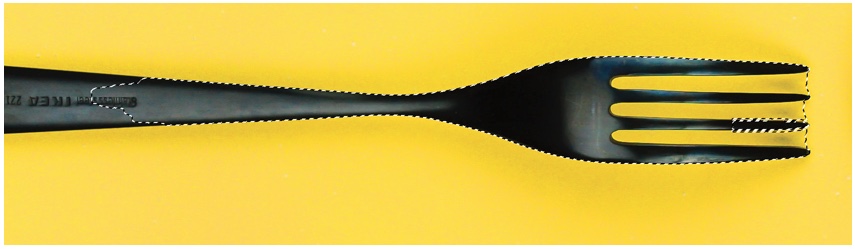
If you look at the screenshot below, you’ll see that I have marked the things that we want to add to the selection or subtract from the selection.
Fixing the handle
The handle of the fork needs to be added and the slots between the points need to be subtracted from the selection.
We’ll first add the handle to the selection. Click on the second icon in the option panel. See the below screenshot.
When refining the selection, I found it really hard to use the Object Selection Tool because of its inaccuracy. I needed to use it multiple times and had to spend a lot of time which could easily be saved using the Quick Selection Tool.
So I decided to use the Quick Selection Tool instead.
Fixing the slots
Again make use of the Add to Selection and Subtract from Selection icon to do this.
See the below GIF. Yes, you could do the same work in probably half of the time using the Quick Selection Tool. But, I stuck with the Object Selection Tool because this tutorial is on it. Give some time to Adobe and I know that it’ll optimize this tool.
An image speaks a thousand words, right? And with social media becoming more image-based, it is a proven fact that people respond to compelling imagery. There are many tools out there, such as Photoshop which facilitate image-making that is tailored for social media sites.
Posts accompanied by a good image are to be far more engaging than text-only images which is why you should get acquainted with tools that simplify the process of creating images for social media campaigns.
Even Twitter, which was once only text-based, has been pivotal in transforming how we use images on social media. Here are some online tools you can use to create stunning online imagery to keep your audience engaged.
1. Canva
Canva is one of the simplest software to use out there for novice designers. It comes complete with templates and beautiful layouts for social media images. Canva is simpler to use than Photoshop and it is also a great foundation to get to know the basics if you are graduating to Photoshop any time soon.
No project is too big or small for Canva and it is versatile. The only snag with Canva is that photo quality can tend to be compromised and images might not be suited for printing due to a low resolution.
2. BeFunky
BeFunky is an online software similar to Canva that allows you to customize images for different uses. You can also create beautiful collages and it is relatively simpler to use than Canva. It also allows you to add elements to a photo, and make special effects on a photo.
For instance, you can turn an image into a cartoon. Similar to the transform feature in Photoshop. BeFunky is an easy tool to use because it allows the user to create headers and social media images with ready-made templates in the right sizes.
3. Creative Market
As its name implies, Creative Market is a digital resource filled with assets that are assembled by creators from all over the world. The features are an excellent way to become more acquainted with designs for social media graphics and include amazing fonts, stock photos, patterns, graphics, clipart, and mockups.
The creative market is designed to put aside the hard work for you and simplify image making for any social media platform. It offers a wide range of options, meaning that there is a variety for the average user.
4. Adobe Stock
Adobe Stock offers a wide range of assets that you can use in your social media for your products or services. The online service offers a collection of 90 million assets including photographs, drawings, videos, and templates.
With these, you can easily change background with Photoshop to suit your brand and establish unique visibility. As a digital marketer, it is important to acquaint yourself with using tools like this because it is less time-consuming. Your online campaigns are sure to shine using this amazing tool.
5. iStock
iStock presents a beautiful range of royalty-free photography, drawings, and videos that you can employ in your social media campaigns. To find plenty of photos and drawings that look great, yet not so mainstream.
iStock offers less mainstream products, and more artistic ones to suit your needs for your brand. You can also save images for future use, and mark things that you like to create a storyboard.
6. GIPHY
Gifs have become an excellent way to easily create animations, as well as download free animated gifs. This is an exciting way to broaden your audience and amplify your brand voice and engage your social media audience.
These moving images can be humorous or serious, but they can make a huge impact on your audience. However, it is important to use these images wisely to avoid overwhelming your viewer. The GIF is an excellent way to solicit chuckles and brighten up the day for clients who follow you on social media.
7. Infogram
Infogram is an excellent way to visualize information, statistics, and reports and it is an app that exists online. The online software includes charts, graphics, dashboards, and maps and it is ideal for creating images that share information.
Infographics are also a way to show off your knowledge, thus securing confidence in the client that you know what you are doing. It is also an excellent way to display, for example, a dissertation writing service. There are over 35 types of charts to choose from that ease working with data. Infogram has a free package and three options for a paid upgrade.
8. Hootsuite Composer
Hootsuite is one of the most established tools out there for social media managers and digital marketers. It allows you to edit images and schedule posts for different networks. The advantage of using Hootsuite is that you get to manage both your social media and image-making in one place.
The ease of not having to log in to all your accounts to upload content one by one makes it very easy to use and saves time. Hootsuite also offers a library of images you can use and customize. Posting is as simple as setting a time or posting it immediately.
It also recommends sizes and dimensions for certain images. The platform is free to use and comes with a host of features that make digital marketing much simpler.
9. Stencil
Stencil is an ideal image editor for marketers, bloggers and small businesses which is very easy to use and features millions of images, backgrounds, icons, and graphics. It also features thousands of quotes and fonts, as well as hundreds of templates.
Stencil is easy to use and in as little as a minute, you can create amazing images using features such as drag and drop, image editing and font editing. Stencil also allows you preselect the platform the image will be featured on so you can select a pre-sized format.
10. PicMonkey
PicMonkey is an excellent way to completely transform a bland photo into the quality and attractive image. The online app allows you to work with a wide range of features to create an effect you are looking for.
The app features amazing editing features that include color blending, exposures, filters, and more editing features. You can either choose to use a template or create your own image. PicMonkey is a paid-for service, and it costs between $7.99 to $39.99 per month.
Conclusion
As a digital marketer, your brief varies from time to time, and these tools accommodate various projects you are briefed to complete. These tools are amazing, but it is always important to expand on your knowledge, and understand that Photoshop is ultimately the best tool to create and edit breathtaking imagery.
About author
Tiffany Harper is a talented writer from New York, an extremely active woman, and a real leader. She began her career as a journalist and later proceeded as an educational writer and editor. Now she works as an experienced subject matter expert with best writing services, sometimes she works as the content consultant dissertation writing service and thesis writing service, like essay writing service in UK, mostly in technology, business, and marketing area. Please do not hesitate to contact her on Twitter.
Not all of us can become professional photographers; neither can we keep providing every picture to one of the pros out there. The era of smartwatches and iPhones has made lives easier for all of us with emerging technologies and handy apps designed for everyday peeps. Similarly, we iPhone lovelies keep thinking of ways pictures get in control without the involvement of any experts.
The crazy vacation photos you captured with your family are most of the time blurred because of the backstories they carry with them. More probably, you can’t bring a DSLR everywhere, especially when you’re not planning to take any snaps.
Photography is the story I fail to put in words.
Carrying an iPhone in hand is always about photography no matter what you like. The hobby gets interesting every day because we have countless apps that can edit pictures for us. Nonetheless, not every app comes up with all the features possible. For this reason, you need to look into these seven iPhone photography apps that can make you a capture pro in no time.
Table of Contents
1. Snapseed (Rating 3.8 out of 5)
Snapseed is one of the best recognized online apps that can entertain iPhone users very effectively. Its latest version is the 2.19.3 and supports iOS 12, iPhone XR, XS and XS Max, iPad Pro 11 and 12.9. With the help of swiping gestures, you can effectively add diversified effects and enhancements to photos anytime.
It lets you rotate, crop, and straighten images for iPhones and also makes it worthy for iPhone users with a free download. It also has brushes and healing tools that can add more to its texture filters. A beginner can quickly get familiar with this app and have fun.
2. VSCO (Rating 4.4 out of 5)
It’s properly pronounced ‘Visco’ and is one of the most utilized apps used by iPhone users for editing photos. The latest version of this app is 136.0 that involves the fix to stop crashes. The app is a favorite among pro photographers and is highly-rated among iPhone users. It also comes with the feature of a classical look filter.
Moreover, it’s a free app that has a subscription fee for additional tools and filters. You’ll be enticed to know its subscription can unlock more than 130 filters for you to use anytime you like. It will always let you fine-tune the pictures and effects you’ve added to the photos.
3. Halide Camera (Rating 4.6 out of 5)
Supportive and surprising, the Halide Camera app includes high-tech tools for thoughtful photo capturing. Any user will love to download this must-have app in their sets of latest iPhone models. Appreciably, the app is updated according to trends and has a fast lens switcher in its most recent version 1.15.0 especially designed for the iPhone 11 pro.
It allows you to manually control the white balance, shutter speed, and ISO. You can always review your last few shots quickly with this app and work on live histograms to the peak of excitement. It captures TIFF, HEIC, JPG or RAW for users.
4. ProCam 7 (Rating 4.6 out of 5)
Similar to other advancements and features of photo editing apps, an iPhone user can opt for ProCam 7 with the latest version being 12.1.4. You will be enticed to find out about all the bug fixes and improvements of this app along with its four different photo shutter options like self-timer, anti-shake, screen shutter, and interval.
The app supports seven different shooting mods for adding an excellent touch to your picture and has sixty impossible-to-believe filters. Moreover, the app comes with an attractive feature that adds good background music for you in no time.
5. Enlight Photofox (Rating 4.7 out of 5)
Of all the iPhone apps, this is one of the most artistic. You’ll always find Enlight Photofox to be one of the most recommended iPhone apps of the year because it has a feature that can turn a picture into a drawing or painting.
Though it’s a paid app, it has the option for photomontages, double-exposure, and tilt-shift. Its best function involves multi-layer creative editing through which you can find any picture in the transparent and blend mode. You can add a doodle onto your image or create impressive graphic designs to your images anytime.
6. Adobe Lightroom (Rating 4.7 out of 5)
Downloading an app with such good ratings, free of cost, has always been an exciting idea. The latest version of this app is 4.4.1, and it has been adding further advancements for iPhone people on every step. It also has an iPad version for iPad users.
With the help of the premium version of this app, you’ll always find exciting features to edit photos. With a single tap, the app allows you to manage magically striking changes to your profile pictures. Its premium version comes with an AI power that harnesses and sharpens people and objects.
7. Instagram (Rating 4.8 out of 5)
Instagram is one of the most utilized apps for photography nowadays. Of course, who doesn’t know about Instagram and use it one way or the anther? A photographer may know all the types of cameras and their use in photography, but anyone will be familiar with the purposes of Instagram along with its benefits for photo editing.
The latest version of this app (117.0) includes a bunch of black & white filters along with a great selection of colorful filters, plus it has sharpening adjustments and high-quality exposure. You will always add the last edit to your picture before uploading it on Instagram. The option of adding boomerang, canvas, collage, and reposting also exists on Instagram.
Conclusion
Using an iPhone is a luxury in itself but handling it is a harder step. You will always find these apps on the app store whenever you plan to edit pictures. Capturing an image is something everyone wishes to do all day; therefore, such apps have always been useful for everyone around the world. As they say,
Photographs are return tickets to moments otherwise gone.
About Shane
Shane Radcliffe is a passionate blogger who writes for the sake of providing information about everything related to the virtual market of today. He works with Couponado, an online coupon website platform, and lets people save time by writing about everything a customer wants. Reading and gaming are his main hobbies.
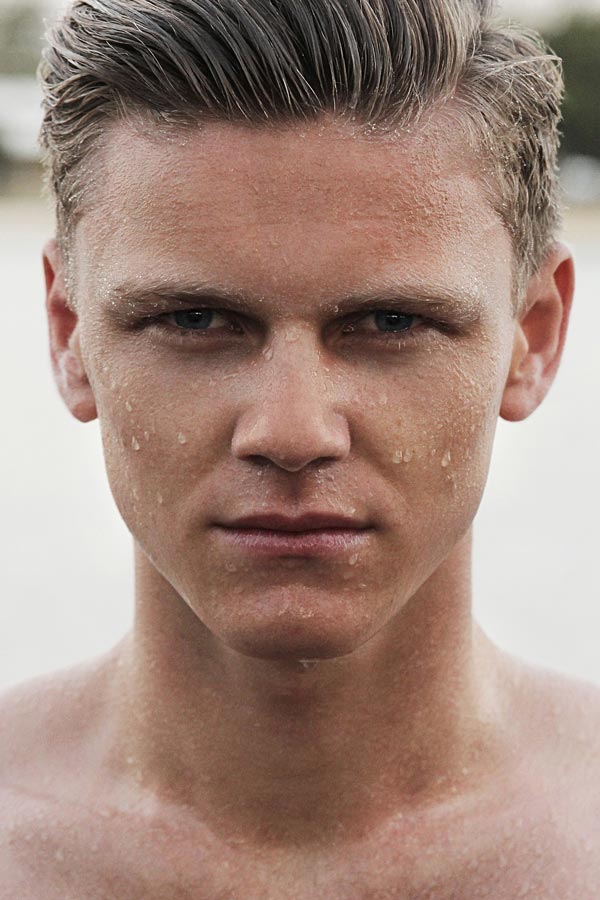
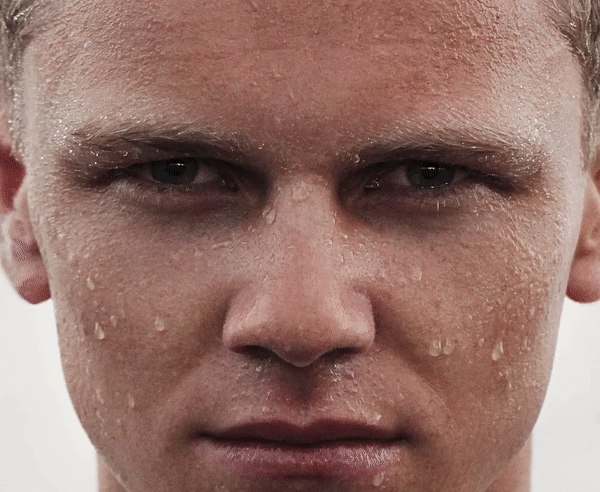
Some of us have puffy eyes or eye bags. Some of us grow as we get older and some of us have it since our birth. Today, I am going to show you how you can reduce puffy eyes or eye bags in Photoshop.
You can also remove it but that’d look too much photoshopped. So, it’s better to reduce it.
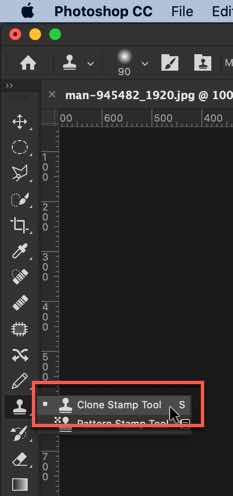
Grab the Clone Stamp Tool from the tool panel or keep on pressing Shift + S again and again until it comes.
Step 2 – Reduce puffy eyes or eye bags in Photoshop
The next thing we need to do is to remove the eye bags or puffy eyes.
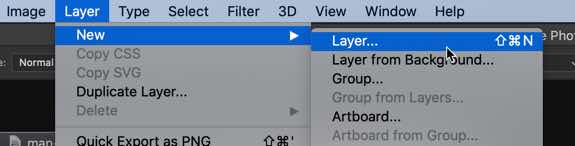
Create a new layer by going to Layer > New > Layer or by pressing Cmd + Shift + N / Ctrl + Shift + N.
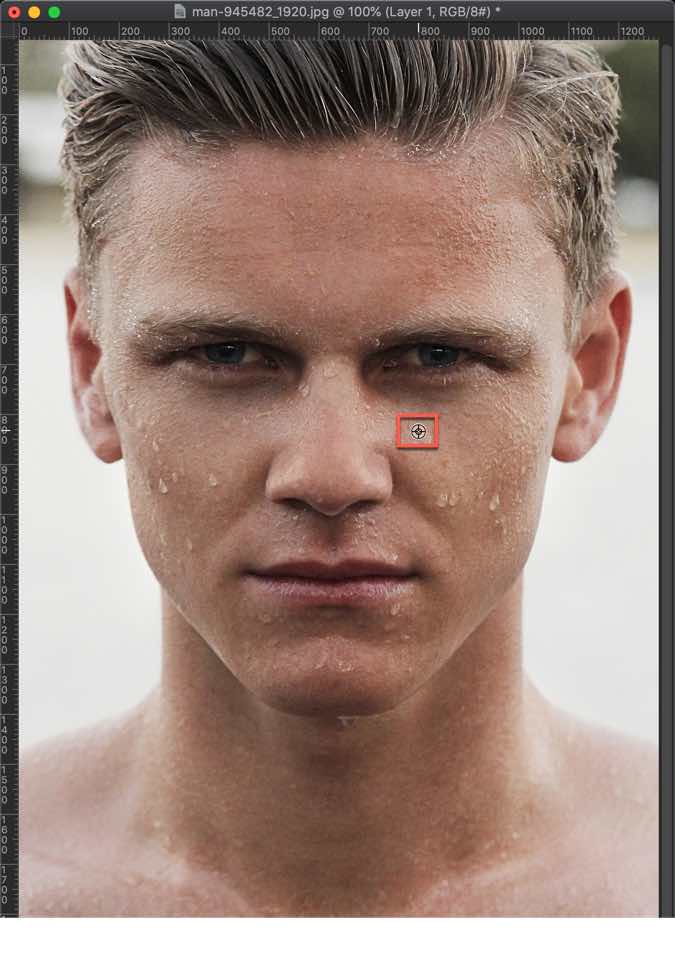
Step 2.1: Define the Source
The Clone Stamp Tool is used to copy pixels from one part of the image and paste them on another part. To use the Clone Stamp Tool, you first need to define the source pixels. This will be pixels that are going to be copied. You can do them by holding down the Opt/Alt key.
Once you hold it down, the cursor will change to a sniper cursor.
I’ll paint the skin from this location on the eye bags.
Step 2.2: Paint the Target
Now that I have selected my source, I am going to paint those pixels onto my target. When you do that, you’ll see a cursor that moves synchronously with your cursor. This cursor denotes the pixels that are being copied.
This GIF is of 7 MB in size. So, give it some time to load.
Simply, do this all over the eye bags.
For the best result, you may need to define your source multiple times as I did in the GIF.
This is how the photo will look.
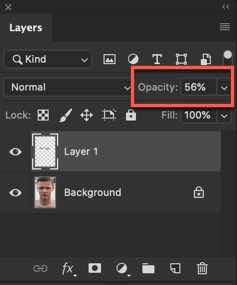
Step 3: Reduce the opacity
Open the layer panel by pressing F7 or going to Window > Layer.
There are hundreds of thousands of businesses that sell online through eCommerce platforms like Shopify, Woocommerce, Amazon, BigCommerce. etc. So, I decided to collate the product photo uploading requirements for all major eCommerce platforms.
Let’s start.
There are some astonishing facts that you’d be interested in it.
A simple LinkedIn search shows that
There are 15,000+ fashion and apparel companies in the US alone
What does this mean to you?
This means that your photos have to be of top-notch if you want to perform better than your competitors. Because
76% people say that product photos influence their buying decision.
I get frequently asked by my client that what should be the ideal size of the photo. I tell them that
the ideal size is 3000 x 3000 pixels with a resolution of 72 dpi.
the photo size should never cross 150KB.
But, we’ll see today what does eCommerce platform suggests
1. Shopify photo uploading requirements
Maximum upload size: 4472 x 4472 pixels with a file size of up to 20 MB
Amazon is pretty strict when it comes to the requirements. My Amazon clients always have the toughest time getting their photos approved.
Minimum size to zoom in: Images should be at least 1000 pixels in either width or height
Recommended size: 2056 pixels wide
Image frame: The product should fill 85% of the frame
Background color: ALL product photos should have a white background
File format: You can upload JPEG, PNG, GIF or TIFF files.
File names: The file name must include the product identifier (this is your Amazon ASIN, JAN, EAN, 13-digit ISBN or UPC). After that, a period and a file extension (see accepted file types listed above). For example, 1234567890123.tif or A987654321.jpg. You may not include dashes, spaces or other characters in the file name.
Design: You can’t include any text, borders, logos, mannequins or watermarks in your images.
WooCommerce is basically a plugin for your WordPress site. It does not have its own platform. It simply converts your WordPress site into an eCommerce site.
So, there’s no defined set of rules for the product photos. You should check your WordPress theme guidelines for the photo uploading requirements. But, I’ll give you a rough idea.
Minimum size to zoom in: Depends on the WordPress theme
Recommended size: 2056 pixels wide
Maximum file size: 64 MB
Recommended file size: 100KB
Image frame: The product should fill 85% of the frame
File format: You can upload JPEG, PNG, GIF or TIFF files.
4. BigCommerce photo uploading requirements
Maximum upload size: Nothing defined by BigCommerce
Recommended size: 2056 x 2056 pixels
Minimum size to zoom in: 1000 pixels on the longest side
Magento is also a highly customizable platform. Unlike Shopify and BigCommerce, it’s a kind of software that installs on your web server. But, unlike WooCommerce, it doesn’t need WordPress to run.
So, there’s no defined set of rules for the product photos. You should check your WordPress theme guidelines for the photo uploading requirements. But, I’ll give you a rough idea.
Minimum size to zoom in: You can customize it
Recommended size: 2056 pixels wide
Recommended file size: 100 KB
Image frame: The product should fill 85% of the frame
File format: You can upload JPEG, PNG, GIF or TIFF files.
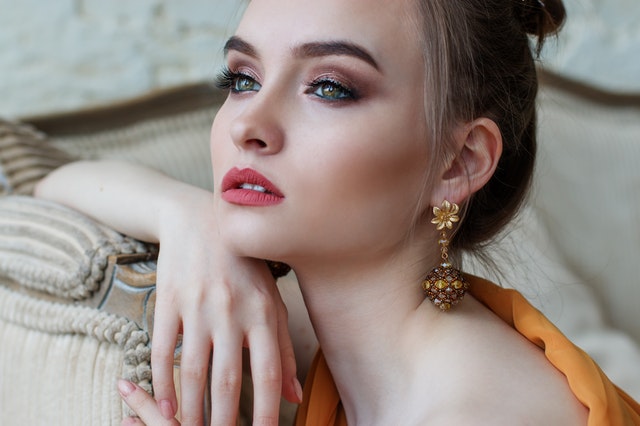
Photographing small objects like jewelry yields very important things to focus on. This includes aspects of photography like lighting that illuminates the object, making details stand out, avoiding deformation by astute composition, and using the focus in an effective way to increase the sharpness of the jewelry. You do not need a professional studio to create the perfect portrait. Working at home with your jewelry may be your best bet as a photographer, just make sure you have a nice table and a white background. Here is a guide to taking professional shots of your jewelry at home.
1. Tips for lighting
Make sure your light source is soft. A large-sized diffuser and a studio flash are warranted. Your camera may be able to enact the work needed to be done. Using an umbrella with absorbing fabric as a diffuser window and the flash of your camera can be optimal. White feather cardboard acting as a white reflector is great for the lighting stage.
2. Working on reflection
To photograph your jewels, the configuration of your lighting set should be this: the flash, with the camera having a window pointed at it while having an adequate angle on the table. With the light in front of the camera, make sure to not have the light shining directly onto the lens. The white reflectors will need to need to be on the sides of the camera as the light shoots off the reflectors and makes the jewel pop.
Your jewelry is typically shiny, that’s what it makes it extremely appealing. This means that they may reflect light as a mirror would. An idea to combat this is to have the white reflectors that were set on the sides of the camera make the jewel mirror.
Use natural light if you do not have flash, and modify your exposure depending on the amount of natural light given by the sun. To measure lightness without a photometer, look at your camera’s histogram and use that to make the changes.
3. Composing the photograph
Consider if the picture you have taken will be a stand-alone or if it is part of the whole series of photographs. Mainly just focus on attention to detail as well and remember why you are shooting the photograph. Is it for an advertisement, your own portfolio for your photography business, or just a passion project?
Using the longest focal length your camera supplies are a great way to avoid imperfections. 105mm focal length will be the catalyst for a close focus or hold the camera at different lengths away to adjust the picture. Giving “air” to the object as well as paying attention to lines is important. Place the jewelry in a natural position to give it a more authentic look.
When dealing with jewelry that hangs, a frontal view to simulate the look of a necklace by hanging it is the right call. Incline a ring that is on the surface, with the tilt providing a lot more. If you are interested in standing the ring right up with the use of a box or bulky object, use a dollop of wax.
4. Optimizing the macro focus
You are all set up with the proper background, the jewelry is on an appropriate surface, and the camera’s framing is optimal. It is time to look at the camera’s focus. Knowing the rules of depth is important to take full opportunity of the focus and to get the best image possible.
Using a closed diaphragm for depth is recommended even if there is a loss of quality when the image is reproduced. Stacking or joining different shots when editing can help alleviate this problem. To give the picture an extended depth of field, use different focus points.
5. Taking advantage of a rail
Hugh Wright, a photography writer from Australia 2 Write and Next Coursework offers you this tip: “A millimeter rail for macro photography is vital for these kinds of shots. The camera can move without touching the focus and once all of these pictures are taken, head to your digital workshop.”
6. Using Photomerge
Align the images for your first step. To do this, the Photomerge tool can be used, followed by deselecting the part where is said Merge Images. After this, select all layers, head to the Edit Menu, and then select on Merge Layers Automatically. Selecting this will create a layer mask by joining all the focused parts of the image, showing all these images together.
Because you are working with an object of high value and quality, make sure it is clean and shining the way it should be. You want to exemplify the beauty of the jewelry, and when using functions in macro, these characteristics will be illuminated. After all of this, use your digital work station to make the background as white as you can. This will make the jewelry look as good as possible.
7. Using the proper background
The most popular way to shoot jewelry is by using a white or neutral infinity curve. If you want to emphasize the elegance, using a black mannequin may be exactly what you want to do. Pick one up at a craft store near you. Do not forget however, the background must still be white, so drape a white cloth over the top of it and remove the background later.
This end goal of photographing your jewelry at home is to manufacture a soft light while mitigating the number of shadows. Using a black background may be easier. Tina Waverly, who is a design blogger at Write My X as well as Brit Student reminds you to be creative; “You can always experiment with different backgrounds the most experienced you get. Try a pastel color palette to help express your art or a certain mood you are trying to get your image to exude.”
Follow these tips in the comfort of your own home. These will ensure that your jewelry photo-shoot is everything you want it to be and more.
A father of 3 boys, Michael Dehoyos is a content marketer and editor at PhD Kingdom and Academic Brits. Helping firms with their marketing strategy concepts, while contributing to countless sites and publications, Dehoyos is a true professional. When he’s not working as a content marketer or editor, he is writing at Origin Writings.
Today I am going to show you how to create an Instagram Lo-Fi filter in Lightroom. This is going to be an epic tutorial. If you like the Lo-Fi filter on your photos but don’t like using Instagram for all your photos then this tutorial is for you.
Plus, I am going to give you the preset for free also. No signup and email are required, just one click to download the preset. This button will scroll you to the bottom of the page.
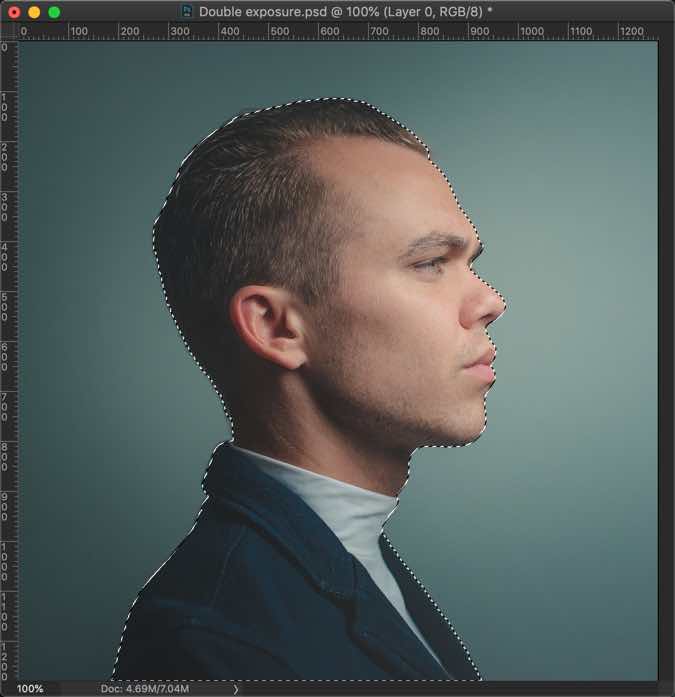
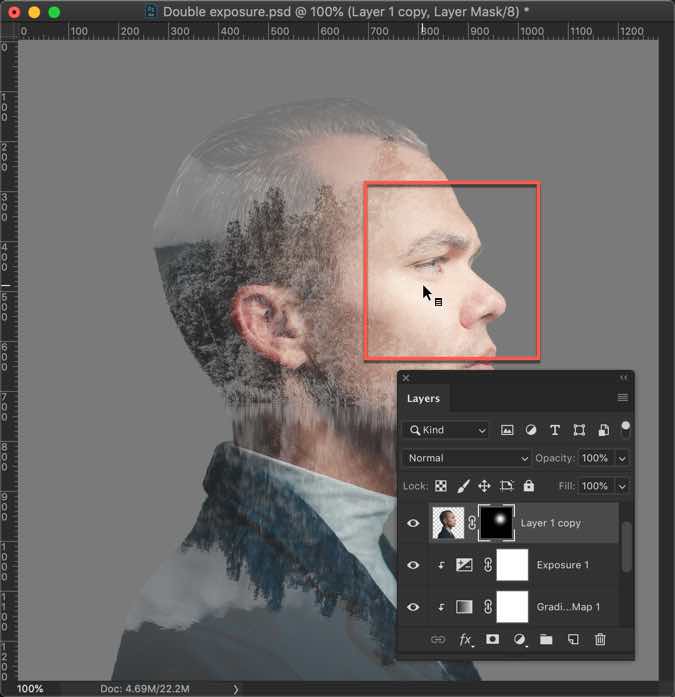
You’ve seen double exposure effect somewhere and now you want to know how to do in Photoshop, right? You’ve wondered how do I do it and that’s why you’re reading this tutorial. Today, I’ll show you how to create a double exposure photo in Photoshop.
Look no further because this is the tutorial where you’ll know everything.
Before we begin, let me show you the after and before.
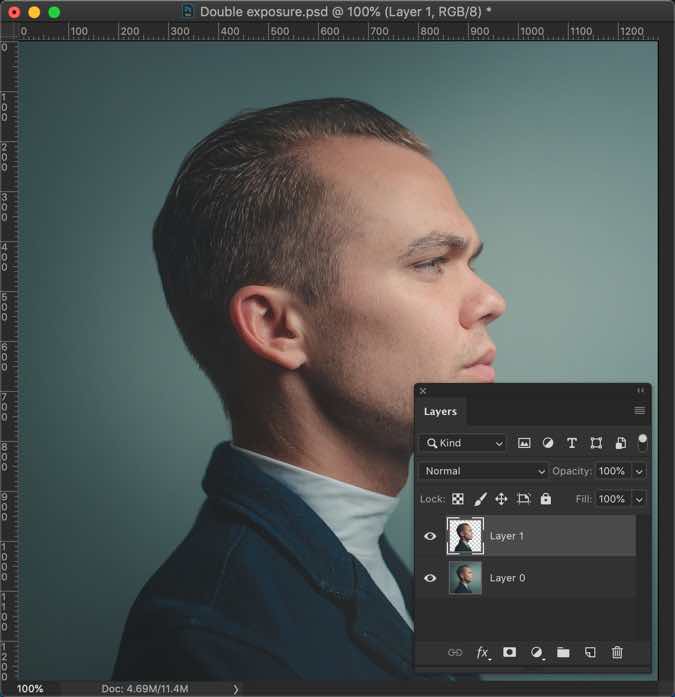
Press Cmd + J / Ctrl + J to copy the selection to a new layer.
Step 2: Open and select the other photo
Time to open the other photo.
We’ll select the portion which we’d like to use as the double exposure.
Grab the rectangular marquee tool from the tool panel or press Shift + M again and again until it comes.
Draw a rectangle on the part which you want to use for the double exposure. I am going to use this part.
Copy the selection by pressing Cmd + C / Ctrl + C.
Go back to the original photo and paste it by pressing Cmd + V / Ctrl + V.
Step 3: Align the landscape photo
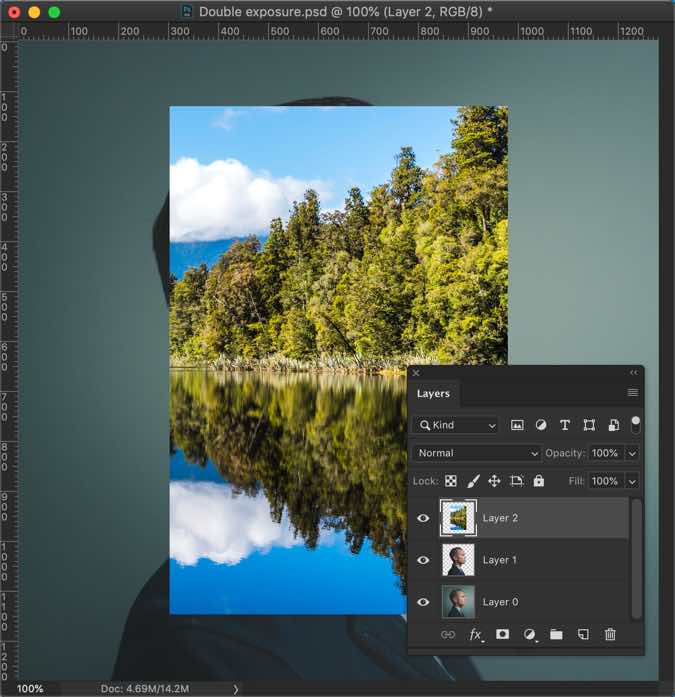
Drag the landscape layer below the man’s layer.
Activate the Free Transform Tool and align the landscape photo in such a way that it covers the entire body of the man.
Press Return/Enter.
Step 4. Change the background
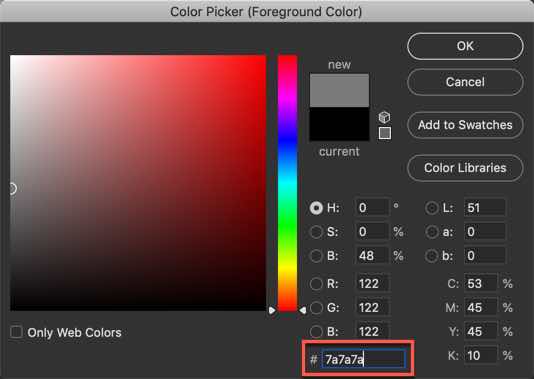
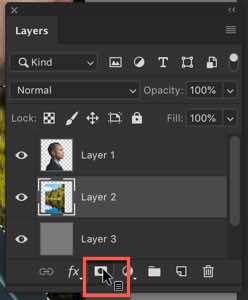
Create a new layer below the landscape photo by pressing Cmd + Shift + N / Ctrl + Shift + N.
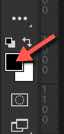
Click on the foreground color.
Write #7a7a7a in the box. Press OK
Press Opt + Delete / Alt + Backspace to fill the layer with the newly selected layer.
Step 5: Create double exposure photo in Photoshop
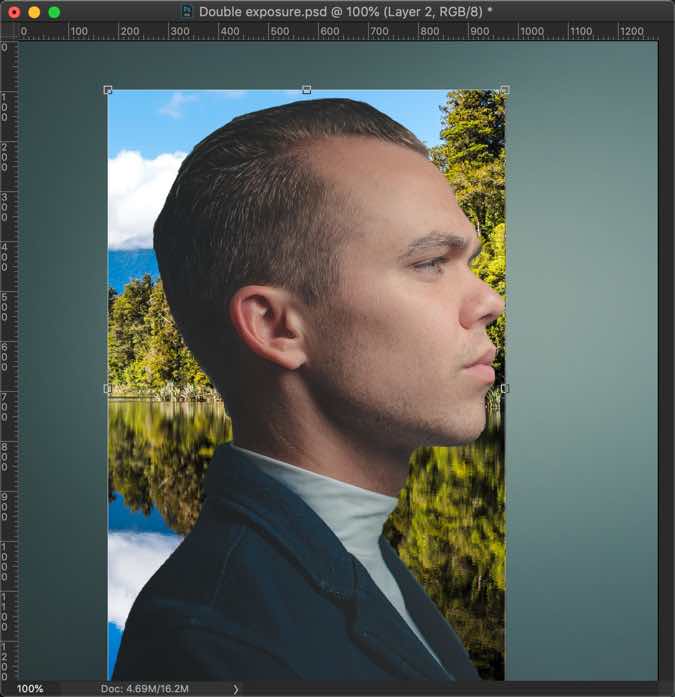
The first need we need to do is to make sure that its edges totally align with the face.
Hold down Cmd/Ctrl and click on the thumbnail of the photo. This will select the man.
Click on the landscape layer and then click on the Layer Mask.
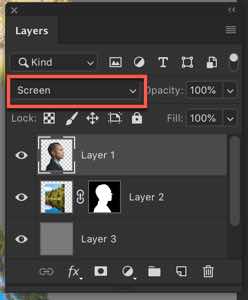
Now, the landscape photo aligns with the man’s photo.
Change the blend mode of the man’s photo to Screen.
Again activate the landscape layer.
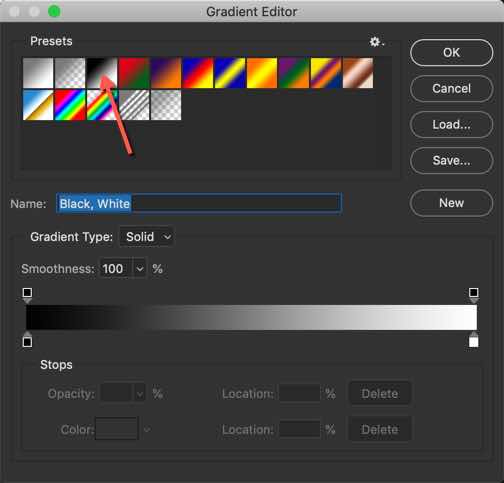
Go to Image > Adjustment > Gradient Map.
Click on the box.
Choose the black to white gradient and press ok.
This will convert the landscape photo to black and white.
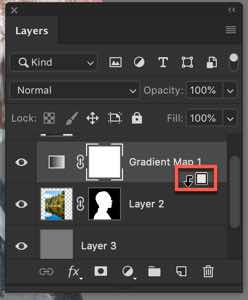
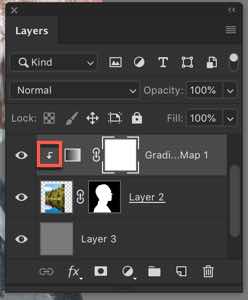
But, there’s a problem. The gradient map is affecting all the layers below it including the background. We need to fix it.
We’ll clip the gradient map layer to the landscape layer. Hold down Alt/Opt and place the cursor just at the edge of the layer. You’ll see that cursor changes. Then click.
This arrow would come up which means that the gradient map is affecting only the layer below it.
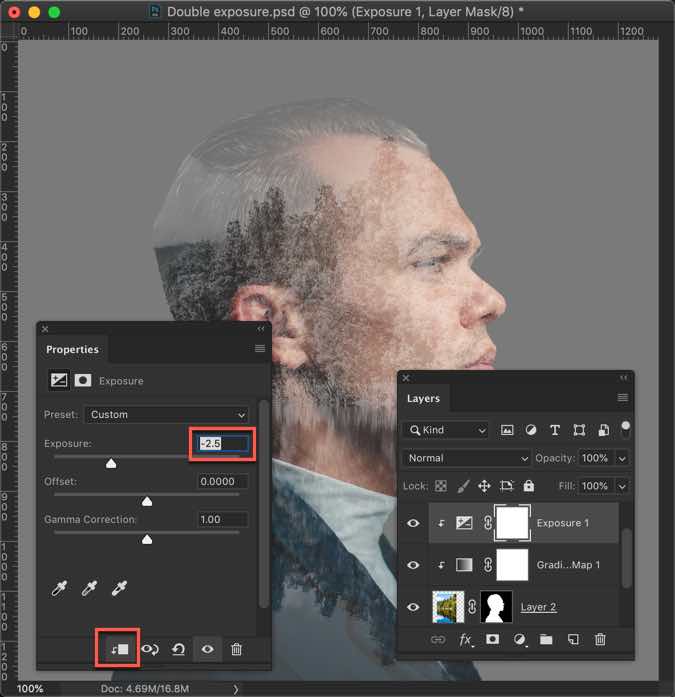
Time to reduce exposure. Click on the adjustment layer button and choose Exposure.
Reduce it to -2.5. Also, click on the clipping mask button.
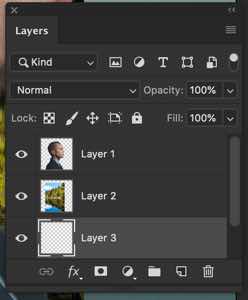
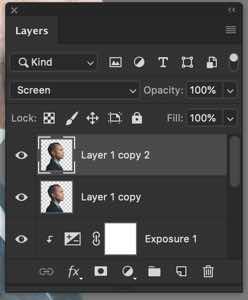
Step 6: Give effect to the man’s photo
Click on the man’s photo layer. Duplicate it by pressing Cmd + J / Ctrl +J.
Change the blend mode of the below layer to Normal.
We all want beautiful photos. Who doesn’t strive towards the perfect Instagram profile? Who doesn’t want to improve those vacation photos that are supposed to get printed?
But most of us are too busy. We have our jobs, our homes, and an exercise routine to take care of. Hey, students even buy assignment help because they can’t handle all the pressure. Time for complex photo editing on Photoshop? Not so much. So we opt for the usual Instagram filters that make our photos look tacky.
What if I told you there was a better solution? Lightroom has some pretty cool presets that are just as quick as Instagram filters. The tool is simpler than most people assume. So let’s get out of our tiny little boxes and do something cool to our photographs for a change.
1. Start by Choosing the Best Photos
Do you remember the good old days when we had to use photographic film for our cameras? We could take a limited number of photos on it. It was expensive, so we were saving it. We’d stage the scene, get our model to strike the perfect pose, and snap. That was it. No second attempts, since the film was too precious to use for similar photos.
The digital world is so much better! We can take as many photos of a scene as we want. We have tons of memory, so we don’t mind snapping several similar photographs. But when the time for choosing the one comes, it’s a problem. Lightroom has a simple feature to help us solve it.
Highlight all similar photos in a folder.
Press N – a shortcut key that takes you to Survey view mode.
You’ll see all similar photos in a single window, so you can eliminate them one by one until you end up with the perfect shot to edit.
2. Try Different Presets
Did you choose the right photo? Cool! Are you ready to start editing it?
When you choose the photo to edit on the Lightroom smartphone app, you’ll see the option Presets in the bottom menu. Tap it. It will lead you to cool effects that work exactly like Instagram filters. The difference? They are better and they don’t look like the majority of Instagram photos.
Play around with these presets. You know how to do that. Experiment with different ones (you’ll just press the X if you don’t want to save the last one you tried). The cool thing about Lightroom is that you can layer on different presets, so you get a unique effect for your photo.
3. Adjust the Features
The preset will do a lot for you. When chosen properly, it will brighten up the photo. Light is Lightroom’s forte!
But why don’t you try to make it even better? Most of the work is done; you just need to adjust a few elements to see if you can improve the result.
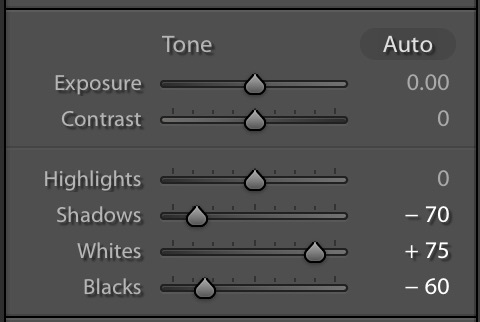
When you choose Light, you can play with the highlights, contrasts, shadows, and exposure of your photograph.
4. You Want to Maintain a Theme? Save Your Settings!
Why would you stick to the same style of photographs when there are so many opportunities to experiment? No one is forcing you to do so. If you like versatility, you can play with lightness and darkness and make a unique story out of each image you post. But if you want your Instagram profile to be impressive and recognizable, that’s not the right way to go.
Instagram stars engage in the branding process. The photographers and editors to help them with the photos, and they hire writers from a college paper writing service to create the perfect captions. You don’t have to go that far. But you can maintain a theme, which will make your visuals recognizable for your followers.
Before you set a theme, you should play around with Lightroom. Try different settings on your favorite photos, so you’ll see how they look. Is there a particular style of editing that you love? Save those settings! Once you’re sure you got a photo to perfection, click on the + button (located in the Presets panel when you’re using Lightroom on a computer). Name your preset and click OK.
When you have a new photo to edit, apply your very own preset. It’s your style. It’s your character expressed through image features. You can’t do that on Instagram!
5. Make Subtle Adjustments
There’s a thin line between professional-style editing and absolute tackiness.
For example, if you try to brighten the model’s skin on a portrait photo, the Adjustment Brush will do a good job. But if you go too far, the photo will lose its vibe.
The difference between an amateur and a pro photographer is in the dose of edits. The amateur is so excited with the new features they discover that they want to use them all… on a single photo! There’s a word to describe this result: kitsch. Look it up.
The pro, on the other hand, will invest in high-quality gear and do minimal editing once the photo is taken. Their photography looks more natural, even if there’s a fantasy vibe to it. It looks real. Even average cameras and smartphones take good photos today, so there’s no need to brush the realism layer away. Do the needed editing, but keep them real!
Lightroom Gets Better As You Practice More
Like any other editing tool, Lightroom also has a learning curve. But it’s not Photoshop. It’s way simpler and less overwhelming. If you don’t understand how it works when you first use it, don’t despair! Just practice. It’s fun to play with your photos and see where you can get them with a couple of edits.
Presets are the coolest thing for beginners. If you know how to apply filters on Instagram, you’ve got this! From there on, you’ll build upon your photo editing skills and the results will keep getting better!
Lauren Adley is a writer and editor at Australia writings and best paper writing service. She is dedicated to her family, work and friends. She is keen on reading, playing the guitar and traveling. She is interested in educational, marketing and blogging issues. Feel free to connect with her on Twitter if you need bestessays review.