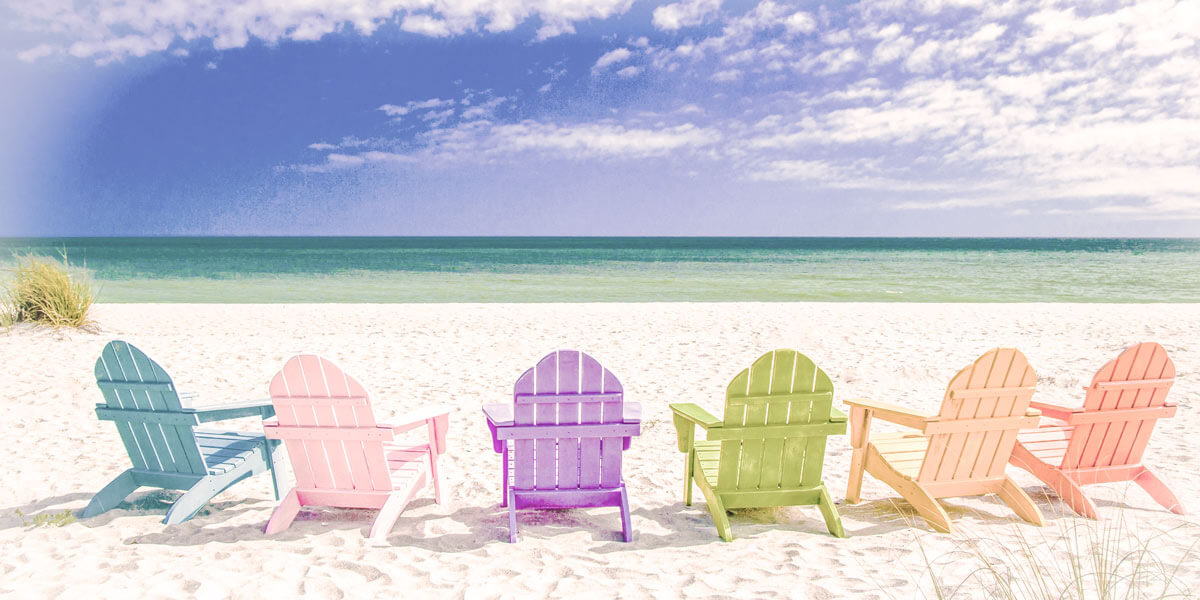
Today I am going to show you how to create an Instagram Lo-Fi filter in Lightroom. This is going to be an epic tutorial. If you like the Lo-Fi filter on your photos but don’t like using Instagram for all your photos then this tutorial is for you.
Plus, I am going to give you the preset for free also. No signup and email are required, just one click to download the preset. This button will scroll you to the bottom of the page.
Nowadays Instagram is kinda like a portfolio of a person, a modern resume if you will. That is why we are so obsessed to take that amazing photo of yourself and to post it on your feed. However, taking a great shot is no longer enough, filters are what matters right now. Having cool filters means that you kinda have it all in the Instagram world: likes, comments, and popularity.
Of course, there may be negative comments, cause you know, there will always be haters. The worst thing that can happen is that such comments may affect the minor audience and there are few ways to prevent it such as turning off the comments on Instagram or blocking unfriendly users or using the KidSecured app.
This article is not about already known presets, this is about your own vision of a photo, your own filter to show the real you and that what makes you special despite the number of likes on your photos. There is only one thing you need to understand in this life is that you don’t have to be liked by everyone, the only person who should accept you is you.
Anyway, if you are interested in giving the photos a little gloss here are some tips on how to create your own Instagram filter in Photoshop. Get inspired and be that inspiration!
The first step is, of course, to download Adobe Photoshop if you haven’t done it yet. Next, you need to open a photo to start work, you can do this two ways: tap File and then Open or with the help of Photoshop hotkey Ctrl+O.
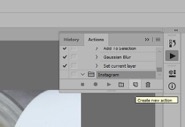
When the photo is into Photoshop go to Window and then tap Actions or use the hotkey Alt+F9 to make sure that your every step will be recorded and saved for your convenience. Later you can use the recorded filter on other photos to get them a makeover with a few seconds.
By hitting the Actions the Actions panel has brought out and now you can press the folder icon to create a new set. Give whatever name you want to this set and press ok. It would be easier if you name it with the word or phrase that refers to your actions, e.g. My own Instagram filter or Presets for Instagram, etc.
Next to the folder icon is the paper icon that you want to select and name it as well to create a new action. After that you hit record and you ready to begin, it will automatically record everything you do. Don’t be afraid to make a mistake, you can always tap the hotkey Ctrl+Z to undo.
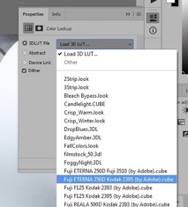
Now we need to create a layer, so your step is to find Layer on the control panel and press New Adjustment Layer and then Color lookup. Once the layer opens you pick the Soft lightmode that will open the Properties panel to select Fuji ETERNA 250D Kodak 2395, it will give more definition to your photo. Obviously you can select any mode you like to change the color and shade of a photo.
Once again you open a New layer and to do this you can press the paper icon in the right corner and fill it with the green color or whatever color you like using the Paint Bucket Tool. We use green one to make the leaves more vibrant and then set this layer on Hue to soothe a greenish tint and with the 50% Opacity, we lower the saturation.
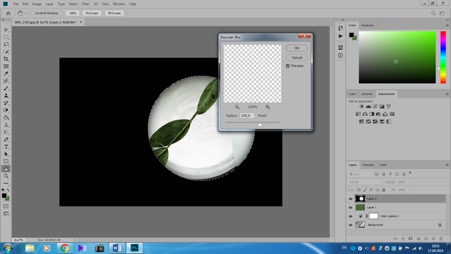
To give the emphasis to some objects in a photo is easy to create with the help of a slight vignette. Create a New layer, fill it with black color as we did with the green one. Use the Elliptical Marquee Tool to make a circle the size you want it to be and press Delete to remove its center. Try to decide where you want to have a center, then draw a circle on it and there you have a focus on a picked object in a darkened frame around.
Go to Filter to Blur to Gaussian Blur or use the hotkey Alt+Ctrl+F and select the Radius of 100 pixels to make the edges blur so that it won’t look so obvious. There are few things left and your own filter is done.
Get back to the Layers panel where you need to lower the Opacity to 15% and choose Overlay to make it more softer. As soon as you ready with it use the hotkey Ctrl+Shift+Alt+E to create a new layer with all the editing you made and press Stoprecording on the Actions panel. Congratulations, you’ve created your own very first filter in Photoshop.
And now, let’s see the before and after a look at the photo we’ve been working with.
See the difference, right? So now you can apply this recorded filter to any photo you like without even editing it. All you need to do is use your imagination and be creative by selecting different settings to make your photos look unique and outstanding.
We think it’s great to have an opportunity to instantly transform your photo from ordinary and plain to almost a piece of art and not just somebody’s but your own piece of art. And what is even greater is that using Photoshop to create filters you can apply and customize the effects the way you like it without repeating ready-made presets on Instagram. Besides, you are not only can download your photos to Instagram but in any other social network as well.
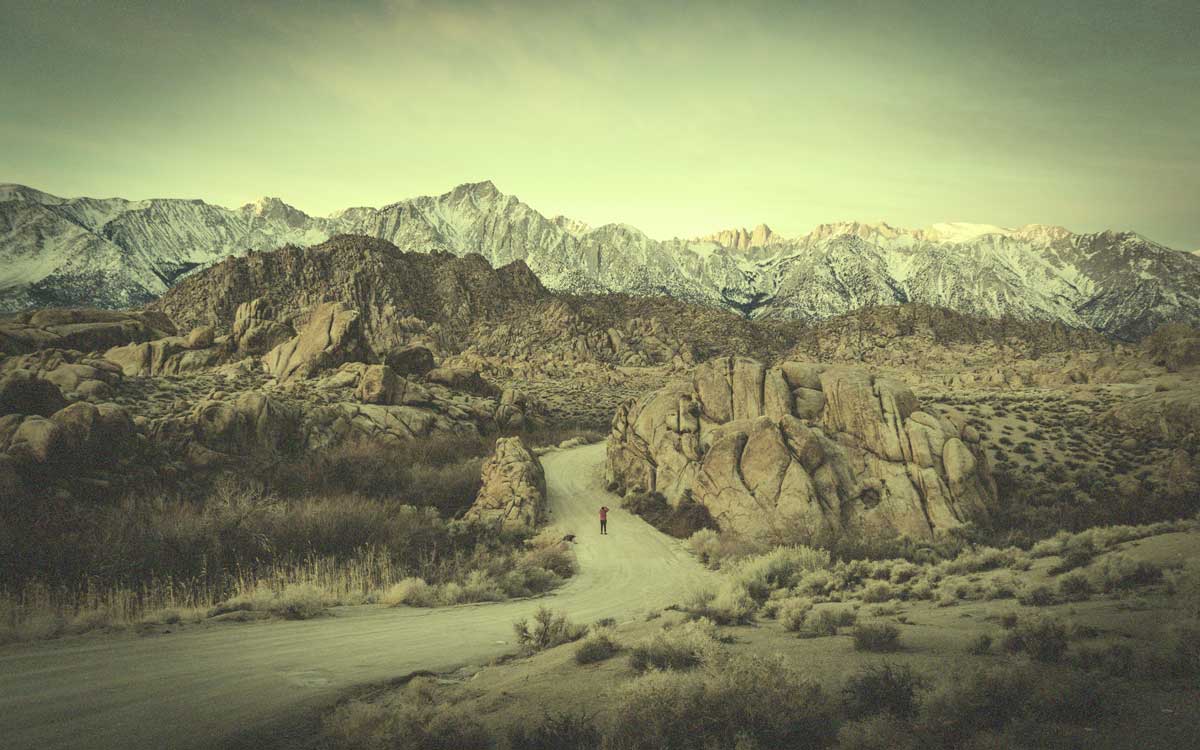
Lately, I have started posting more on Instagram Filters because I see a rise in people who want to create Instagram filters in Photoshop. More and more users are reading Instagram filters on my website every month. Today, we’re going to see how to create Instagram X-Pro II filter in Photoshop.
Download the Instagram Charmes Filter Photoshop action – click here to download the action. It will scroll you down to the bottom of the page.
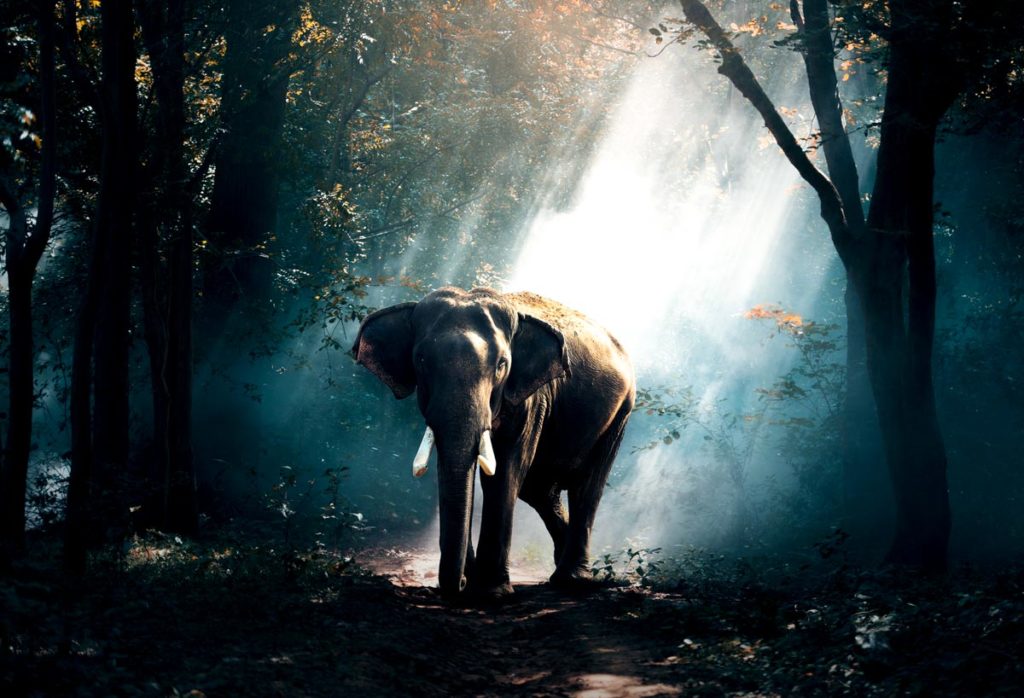
Let’s begin the tutorial. But before we begin, I want to show how the final image would look like.
Final
Initial
Video
If you like watching videos, here’s the video for you.
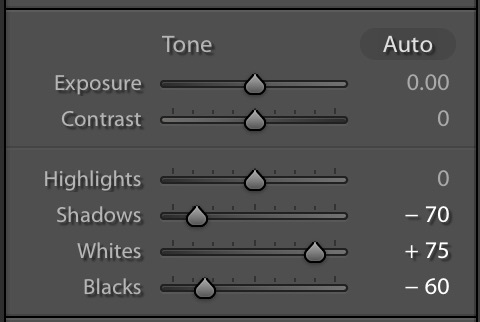
Step 1: Create a Black Vignette
Instagram X-Pro II filter has a black vignette. So, we’re going to create one. There are many ways to create a black vignette and we’re going to use the easiest way. Yes, we’re going to use the inbuilt Vignette slider in Camera RAW.
Duplicate the layer by pressing Cmd + J / Ctrl + J.
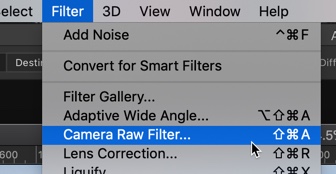
Go to Filter > Camera Raw Filter or press Cmd + Shift + A / Ctrl + Shift + A.
Go to the Effects tab. Decrease the Amount slider to -70. Press OK.
This will create a nice black vignette.
Step 2: Add Multiple Photo Filters
Instagram X-Pro II filter has a greenish yellow tint. Guess what? We’re going to give a similar tint to our photo.
Go to Layer > New Adjustment Layer > Photo Filter.
Change the Filter to Green and increase the density to 42.
This will give a nice green tint to our photo.
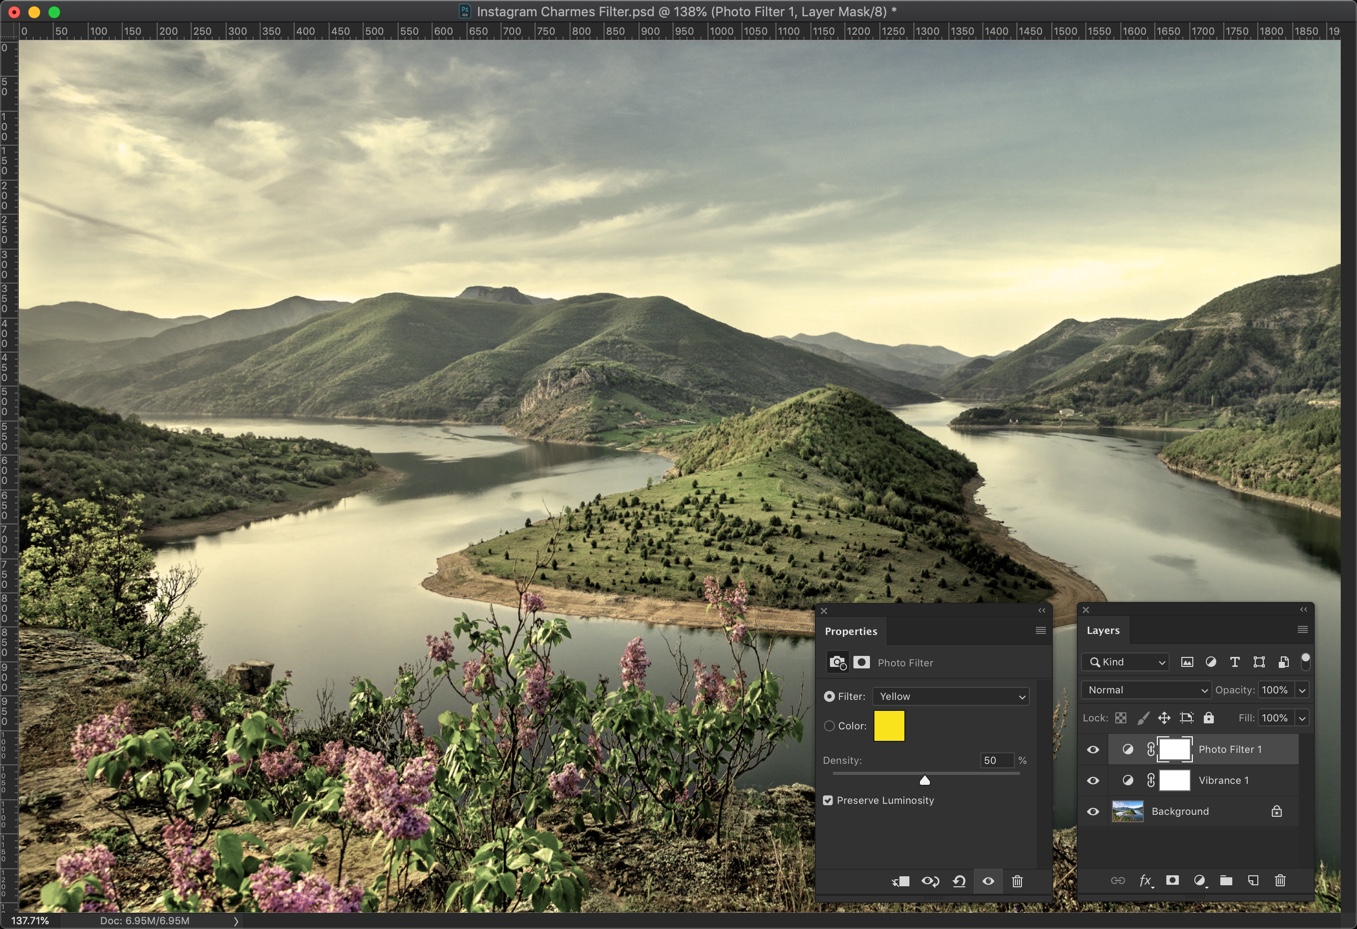
We’re going to give a yellow tint now. Go to Layer > New Adjustment Layer > Photo Filter.
Change the Filter to Yellow and increase the density to 77.
With an addition to the green filter that we added earlier in this step, this will give you a greenish yellow tint.
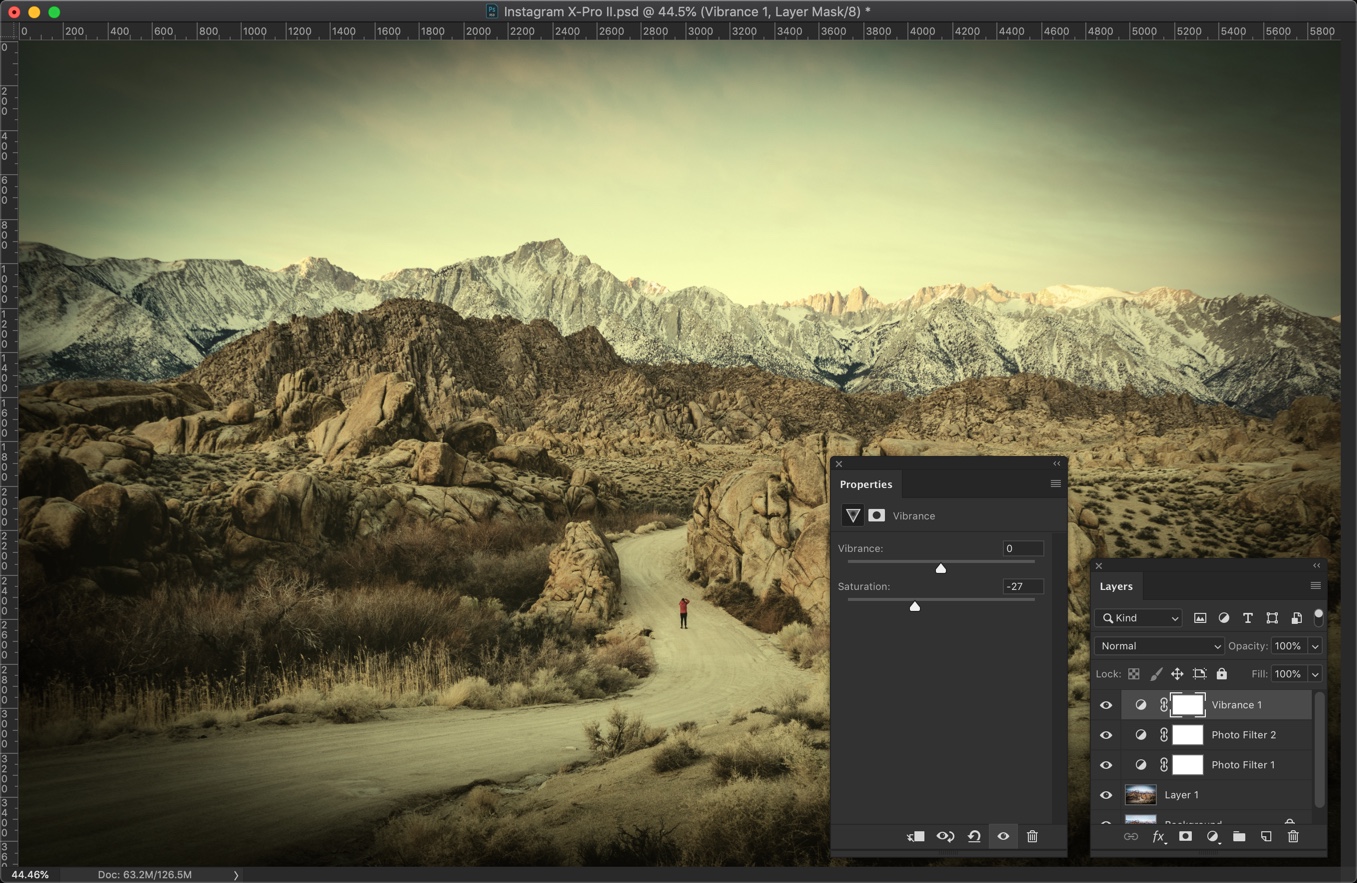
Step 3: Decrease the Saturation
I personally feel that the image is very saturated. I think that we need to decrease some saturation.
Go to Layer > New Adjustment Layer > Vibrance.
Decrease the saturation to -27.
This will desaturate the colors and give you a nice looking retro effect.
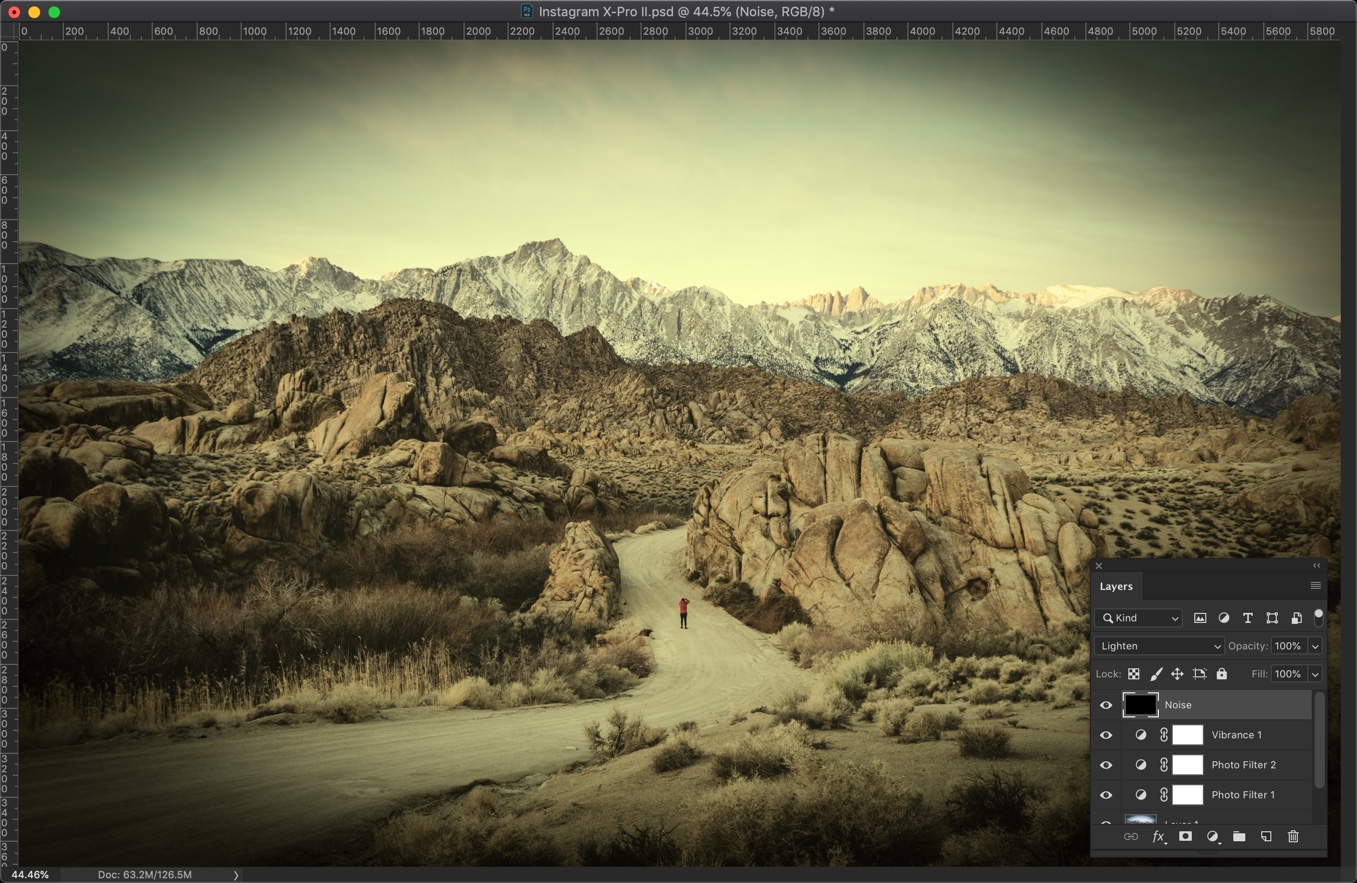
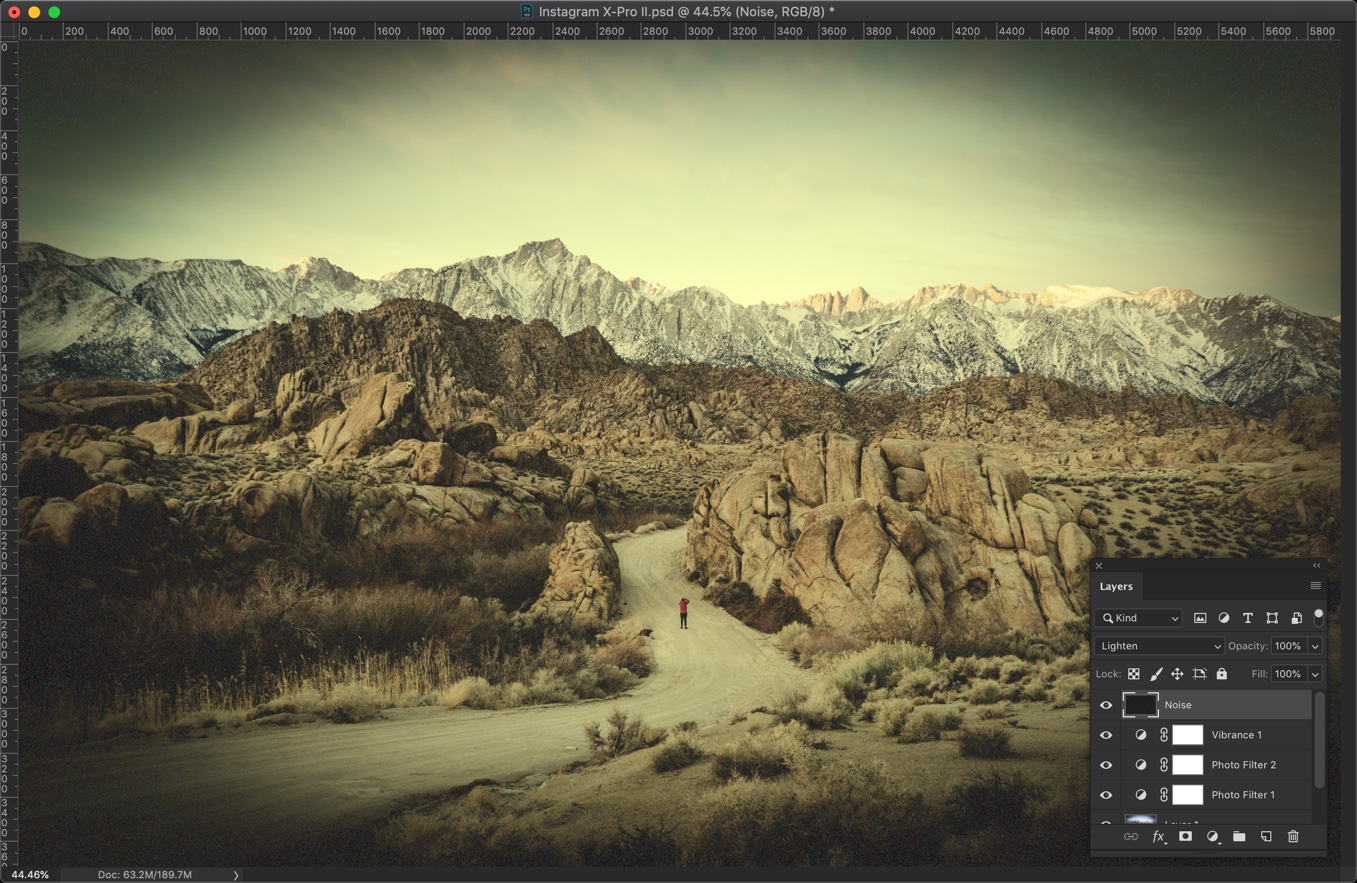
Step 4: Add Some Noise
The last step is to add some noise.
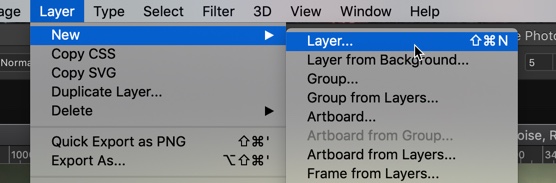
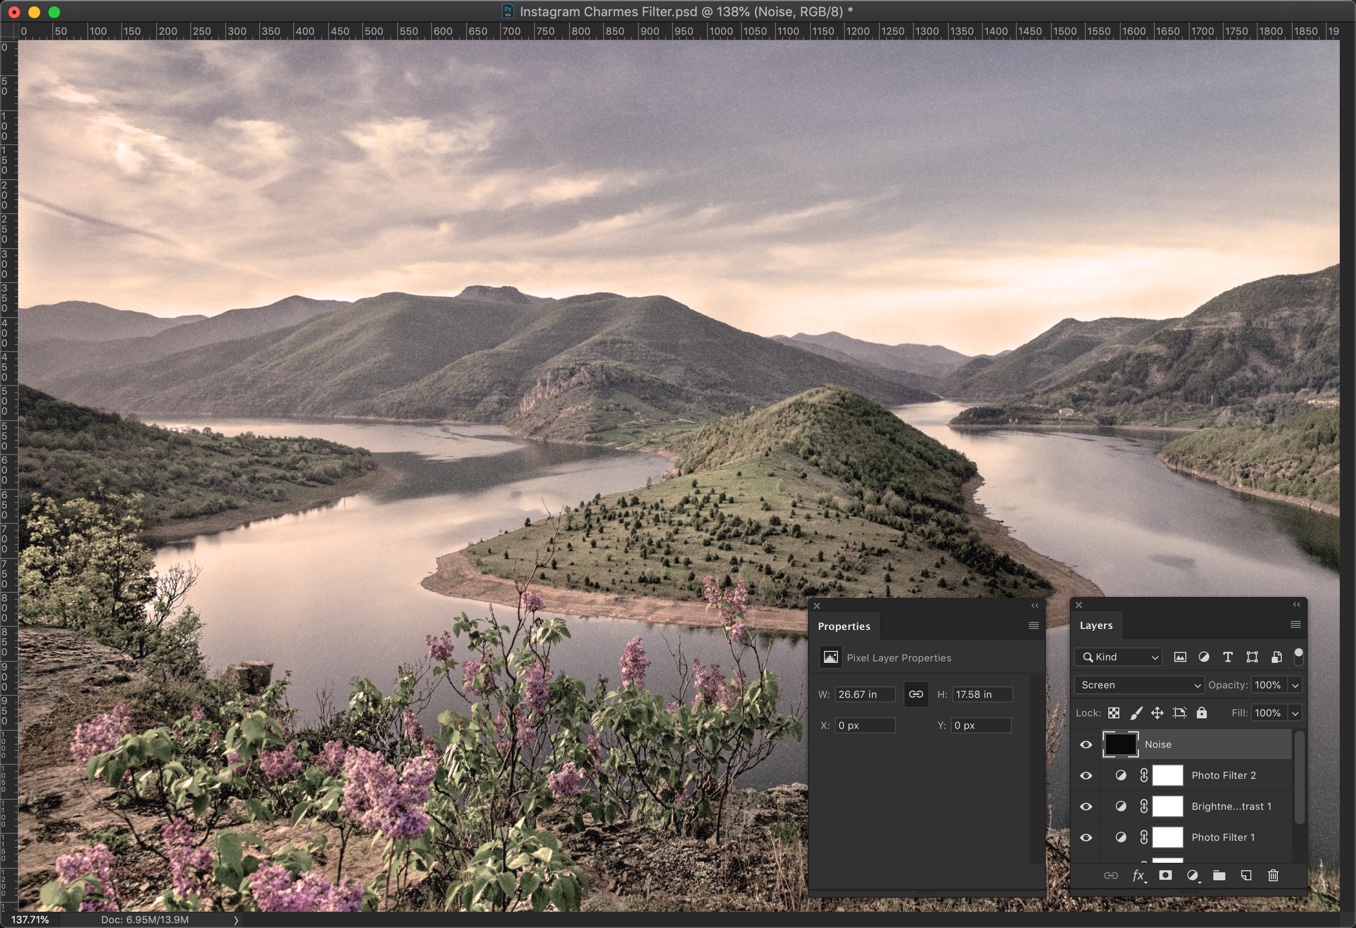
Create a new layer by pressing Cmd + Shift + N / Ctrl + Shift + N or by going to Layer > New > Layer.
Name it Noise.
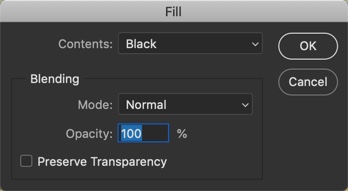
We’re going to fill black color in this layer. Go to Edit > Fill.
Change the Content to Black. Press OK.
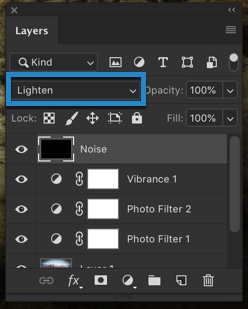
This will fill tha layer (and also the image) with black color.
Change the blend mode to Lighten.
Lighten blend mode compares each pixel of the current layer and the layer below it, and shows the pixels that are lighter. If you want to know more about Lighten blend mode, read the lighten subtopic (point #7) on blend modes in Photoshop.
This will bring back the original color of the photo.
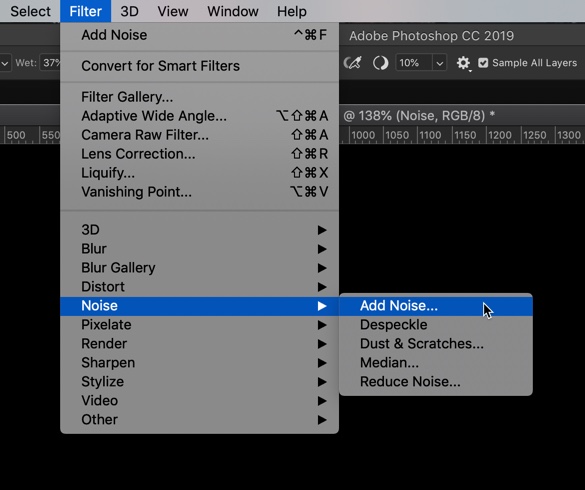
Go to Filter > Noise > Add Noise.
Change the distribution to Gaussian.
The amount depends on the size of the image. My photo is 5700 pixels wide. So, I am choosing 30%. If your image is bigger then choose a higher amount. If it’s smaller then choose a lower amount.
For example, if your image is 3000 pixels wide, you may want to go with 20.
Press OK.
This is how the image should look. The goal was to add the noise but made them barely visible.
Download The Photoshop Action For Instagram Charmes Filter
If you’re interested in the Photoshop action for the Instagram Charmes filter, download it from the below link.
Instagram is growing day by day and so are the number of Instagram filters. I see that Instagram regularly adds new filters in its app. LoFi is still one of the most popular filters in Instagram, but there are other filters also that people use. Today we’re going to see how to create Instagram Charmes filter in Photoshop.
Chames filter gives a retro look to the photo which basically means desaturating the image, adding a yellow tint, and adding some noise. We’re going to do the same thing in Photoshop. But, we’re going to do it in a better way.
And yes, don’t forget to download the action.
Download the Instagram Charmes Filter Photoshop action – click here to download the action. It will scroll you down to the bottom of the page.
Before we go ahead, let me show you the before and after image.
Before
After
Video
If you like watching a video, here’s the video for you.
Step 1: Reduce the colors
The very first thing that you and I are going to do is to reduce the colors. This is the first step to give a retro look to an image.
Go to Layer > New Adjustment Layer > Vibrance. Reduce the saturation to -55.
If your layer panel is not opned then press F7 to open or you can go to Window > Layers.
Step 2: Give Yellow tint
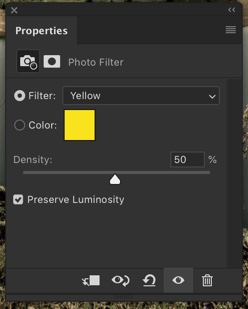
The second step in giving a retro look is to give a yellow tint. This is a very important step in creating Instagram Charmes filter in Photoshop.
Go to Layer > New Adjustment Layer > Photo Filter. Change the Filter to Yellow and increase the denisty to 50%. Make sure that Preserve Luminosity is turned on otherwise your photo will get dark.
This will give a good looking yellow tint to your photo.
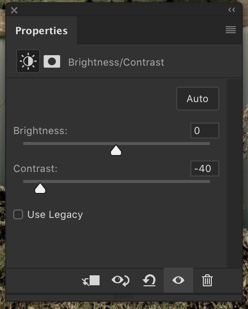
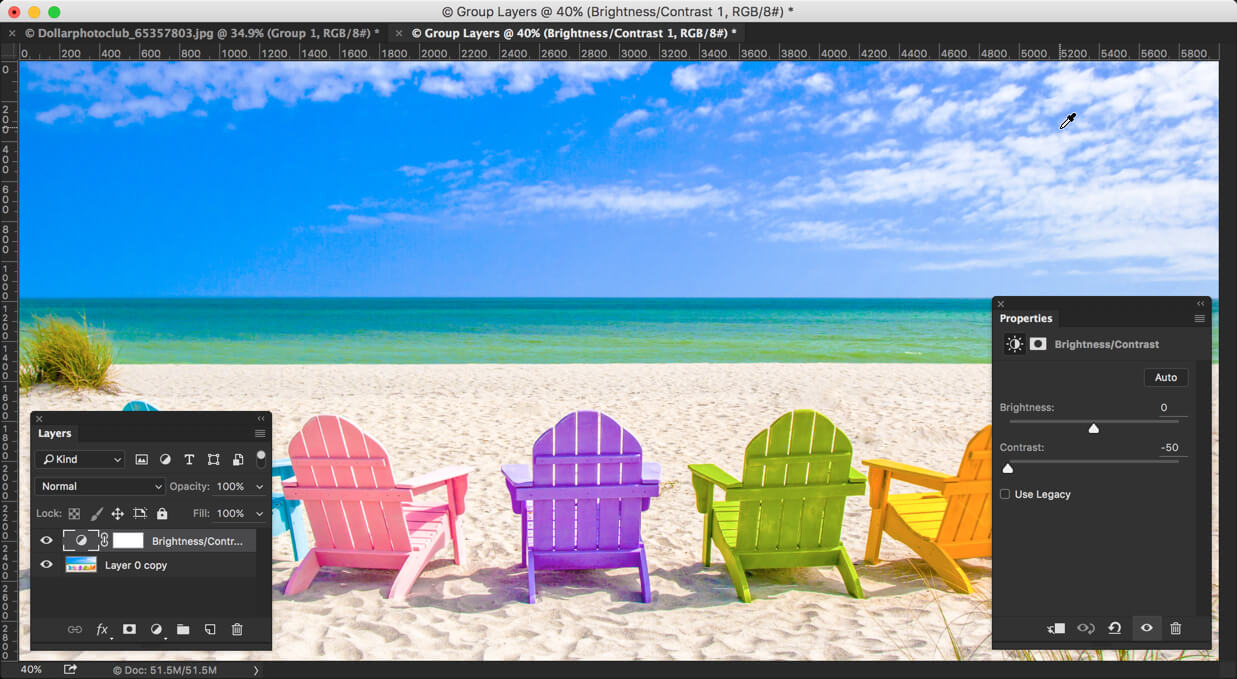
Step 3: Decrease the Contrast
The next step in creating Instagram Charmes filter in Photoshop is to reduce the contrast.
Go to Layer > New Adjustment Layer > Brightness/Contrast. Reduce the contrast to -41.
This will reduce the harsh contrast in your image.
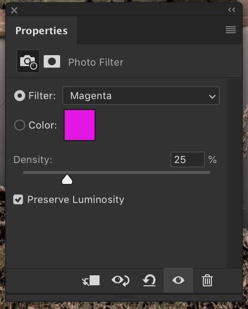
Step 4: Give Magenta Tint
The next step is to give magenta tint.
Go to Filter > New Adjustment Layer > Photo Filter. Change the filter to Magenta and increase the desity to 25%. Make sure that Preserve Luminosity is turned on otherwise your photo will get dark.
This will add a magenta tint to your image.
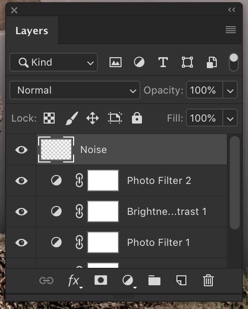
Step 5: Complete Creating Instagram Charmes Filter in Photoshop by Adding Noise.
The last thing that we need to do it to add noise.
Create a new layer by pressing Cmd + Shift + N / Ctrl + Shift + N or go to Layer > New > Layer. Name that layer Noise.
Change the foreground to black. You can also press D to make black as your foreground color.
Press Opt + Delete / Alt + Backspace to fill the newly created layer with the foreground color which is black.
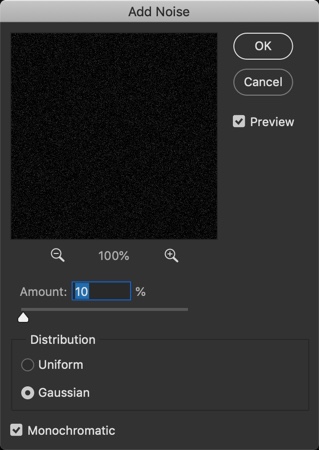
Go to Filter > Noise > Add Noise.
Change the Distribution to Gaussian and turn on Monochromatic.
The Amount depends on how big your image is. My image is 1920 by 1080 pixels and I am going to choose 10%. If your image is lesser in dimension, choose a lower value and if your image is larger in dimension then choose a bigger value.
For example, if your image is 3600 pixels wide then you may want to go with 20%.
Screen blend mode looks at each channel’s color information and multiplies the inverse of the blend and base colors. The resulting color is always a lighter color. Screening with black leaves the color unchanged. Screening with white produces white. The effect is similar to projecting multiple photographic slides on top of each other.
This is all, guys.
Here’s The Photoshop Action For Instagram Charmes Filter
If you’re interested in the Photoshop action for the Instagram Charmes filter, download it from the below link.
Perpetua filter reduces the Red color and increases the Cyan color in the photo. It also increases the highlights and shadows which ultimately decreases the contrast. We’re going to do the same thing with Photoshop.
If you want to download the action in Photoshop, you can do it with the below link.
Download the action – click here to download the action. It will scroll you down to the bottom of the page.
Hey, guys! It’s been few months since I wrote about Instagram effects. Since then, Instagram has introduced tons of new filters. One of them is Clarendon. So, let me present you my new tutorial on how to create Instagram Clarendon effect in Photoshop.
I must say that all these Instagram effects are easy to replicate in Photoshop. You just need to know which adjustment layer to use and when to use. For this tutorial, I am going to use three unique adjustment layers which are photo filter, levels, and brightness/contrast.
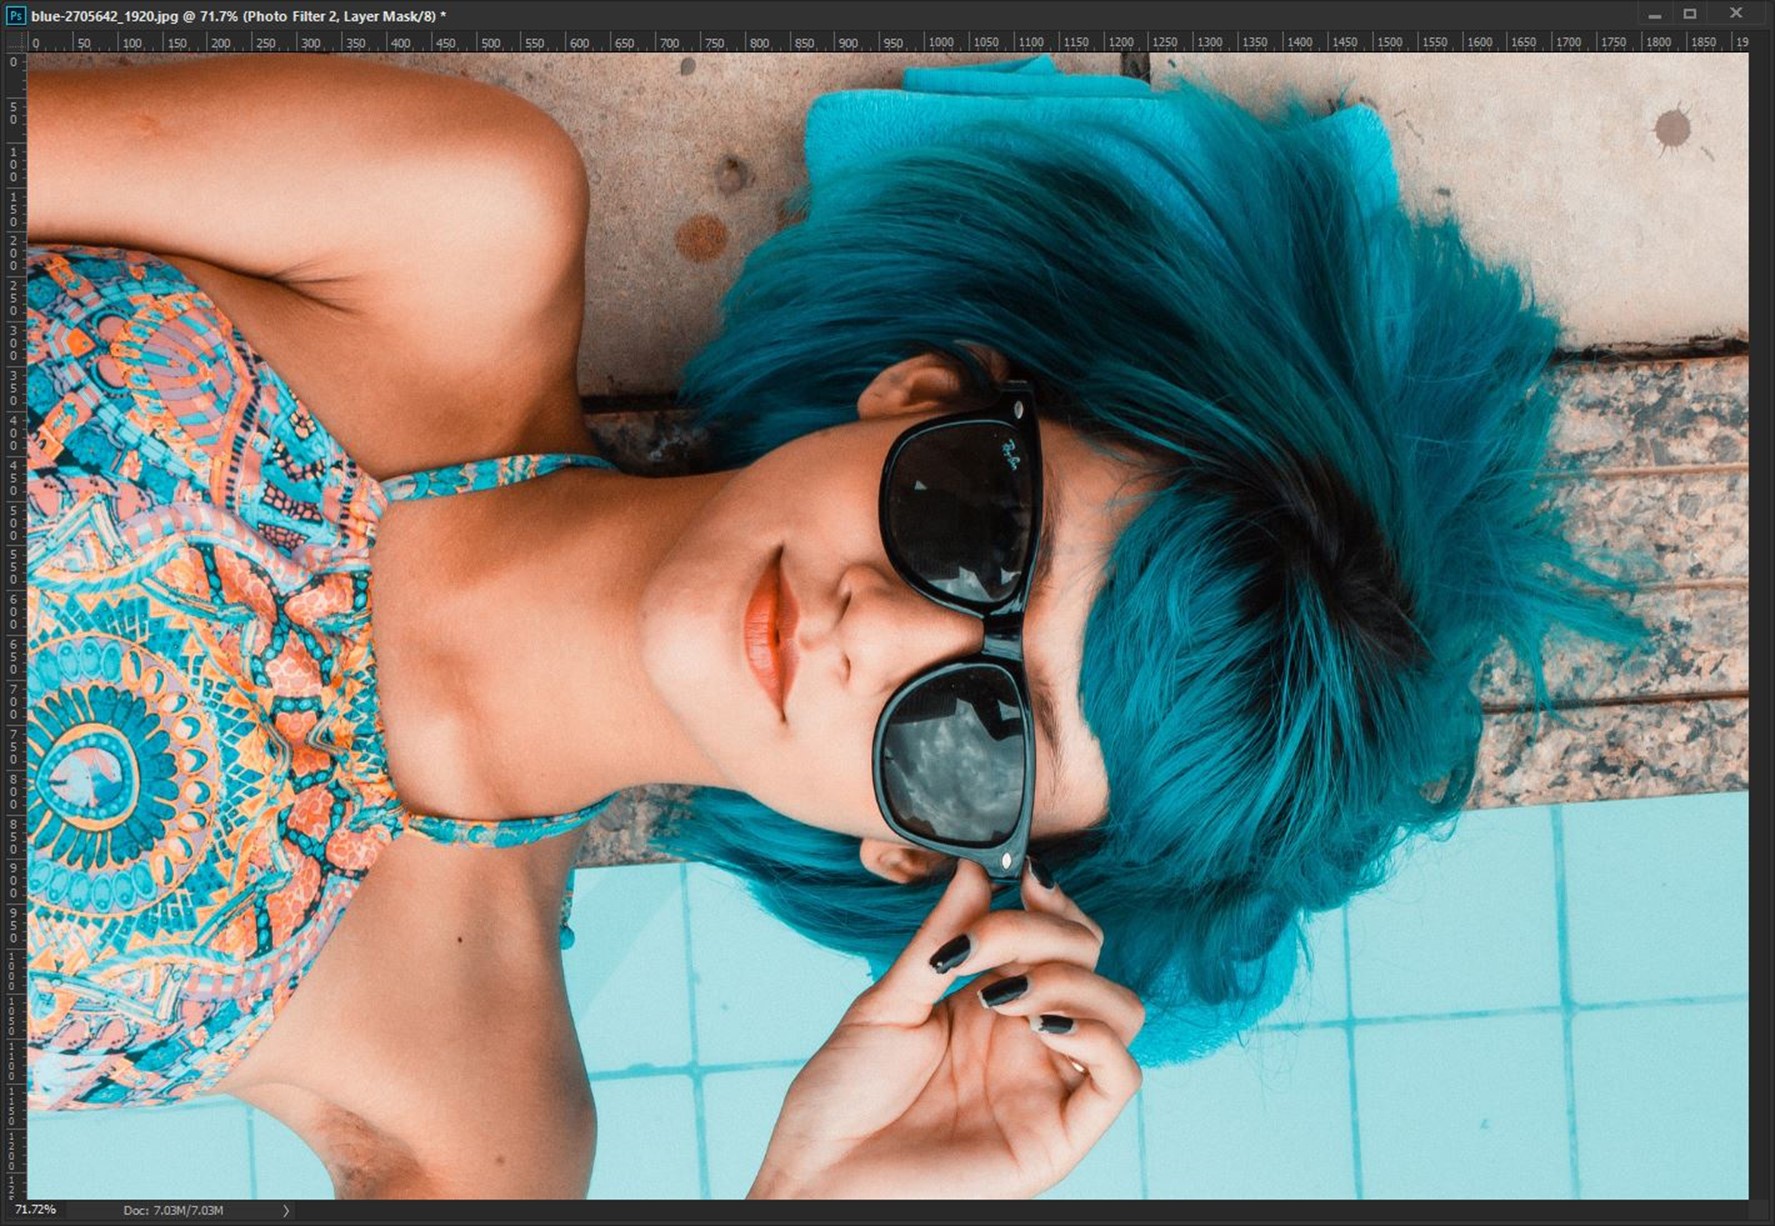
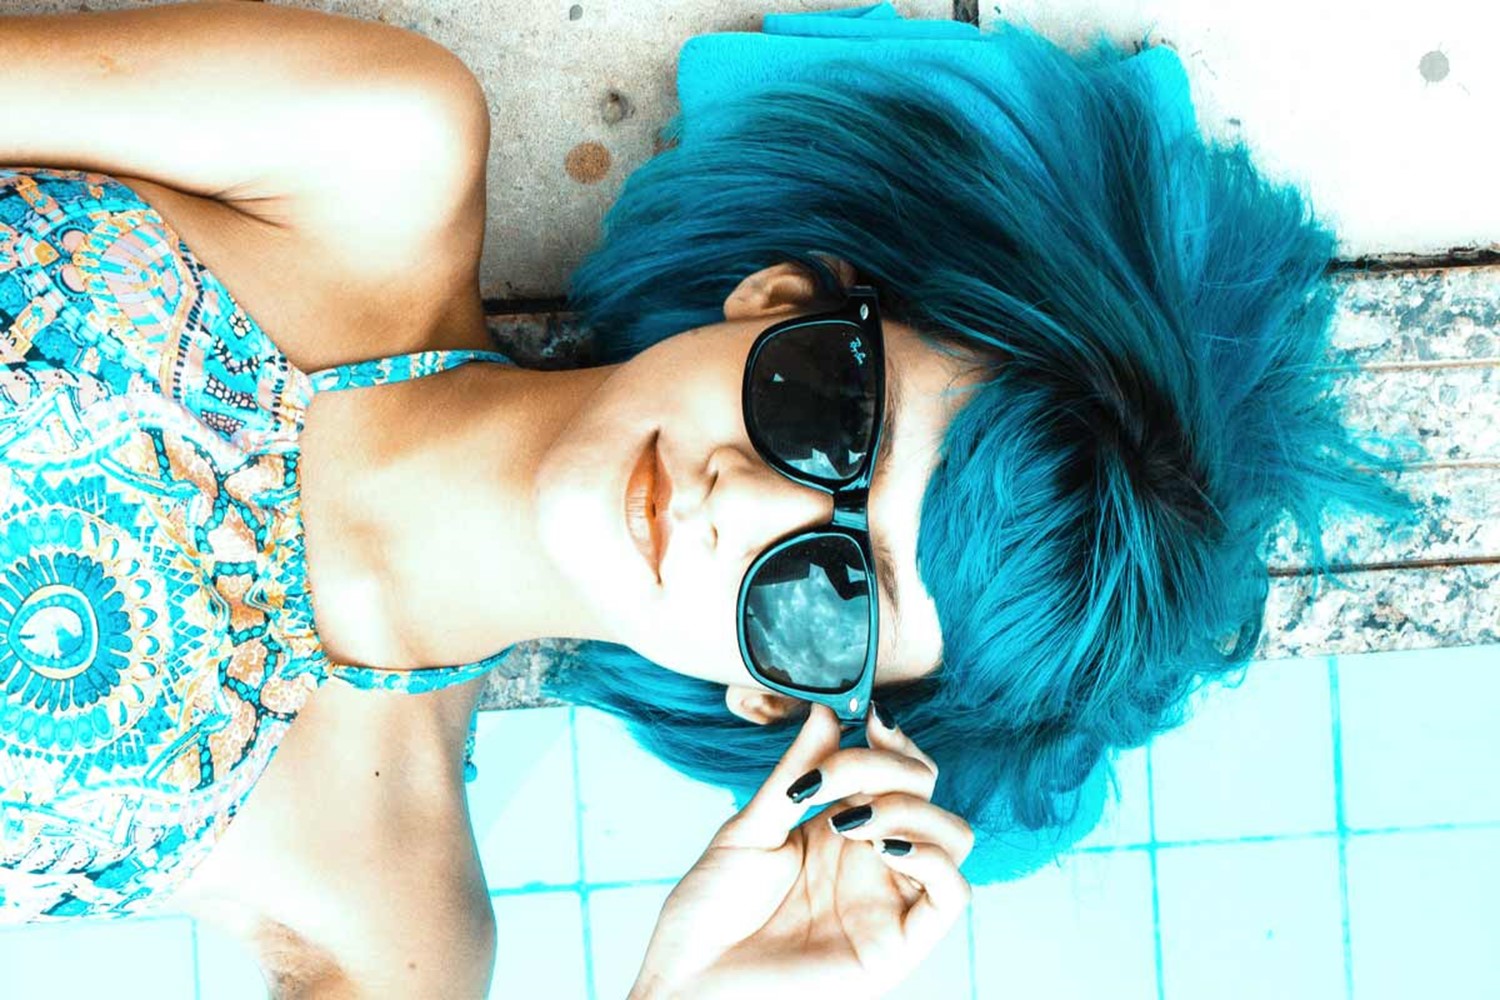
Without further ado, let me bring to you the tutorial. But before that, let me show you the before and after photo.
Final
Initial
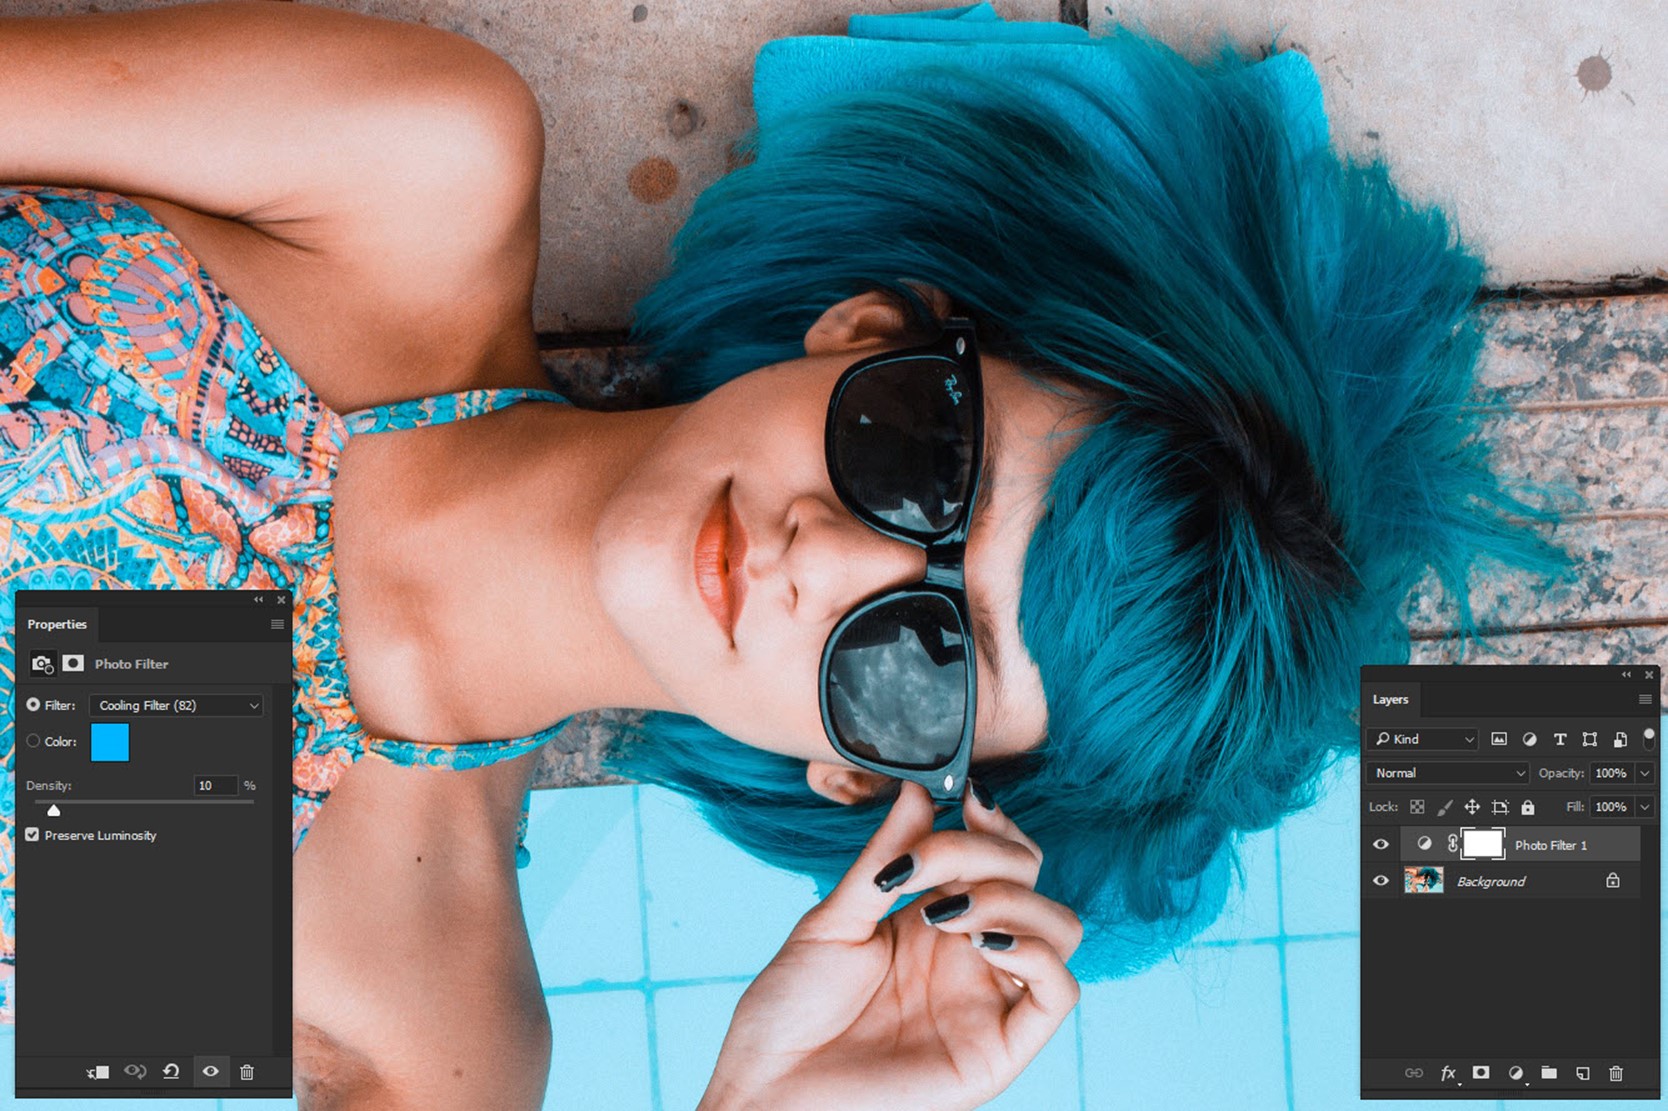
Step 1: Bring the Blue Effect with Photo Filter.
Go to Layer>New Adjustment Layer>Photo Filter.
Change the filter to Cooling Filter (82) and increase the Density to 10%. Please keep the Luminosity turned on.
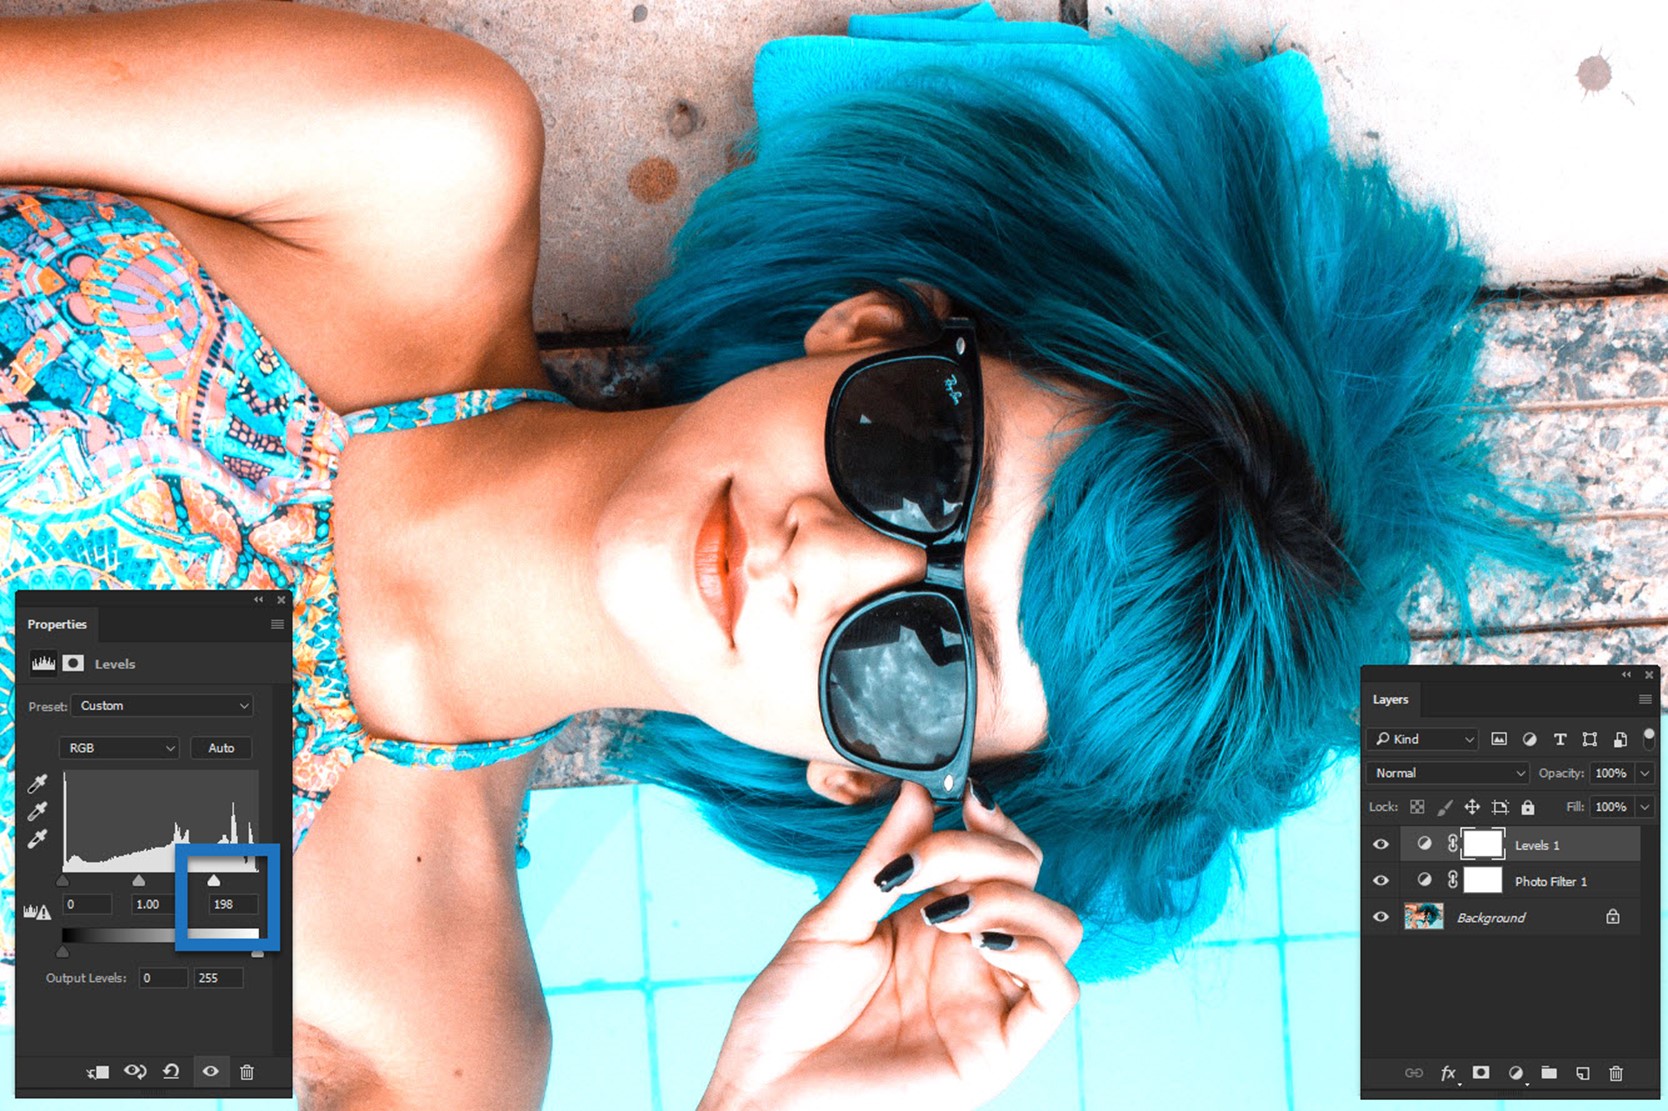
Step 2: Increase the Whites with Levels
Clarendon effect overexposes a photo. Your highlight turns into something extraordinarily white. We’re going to do the same thing here. We can either use Levels or use Curves. But I think that Levels is better for this job because you get better control of your settings.
Slide the white bar to the left such that its value is 198. Please refer the screenshot below for better understanding.
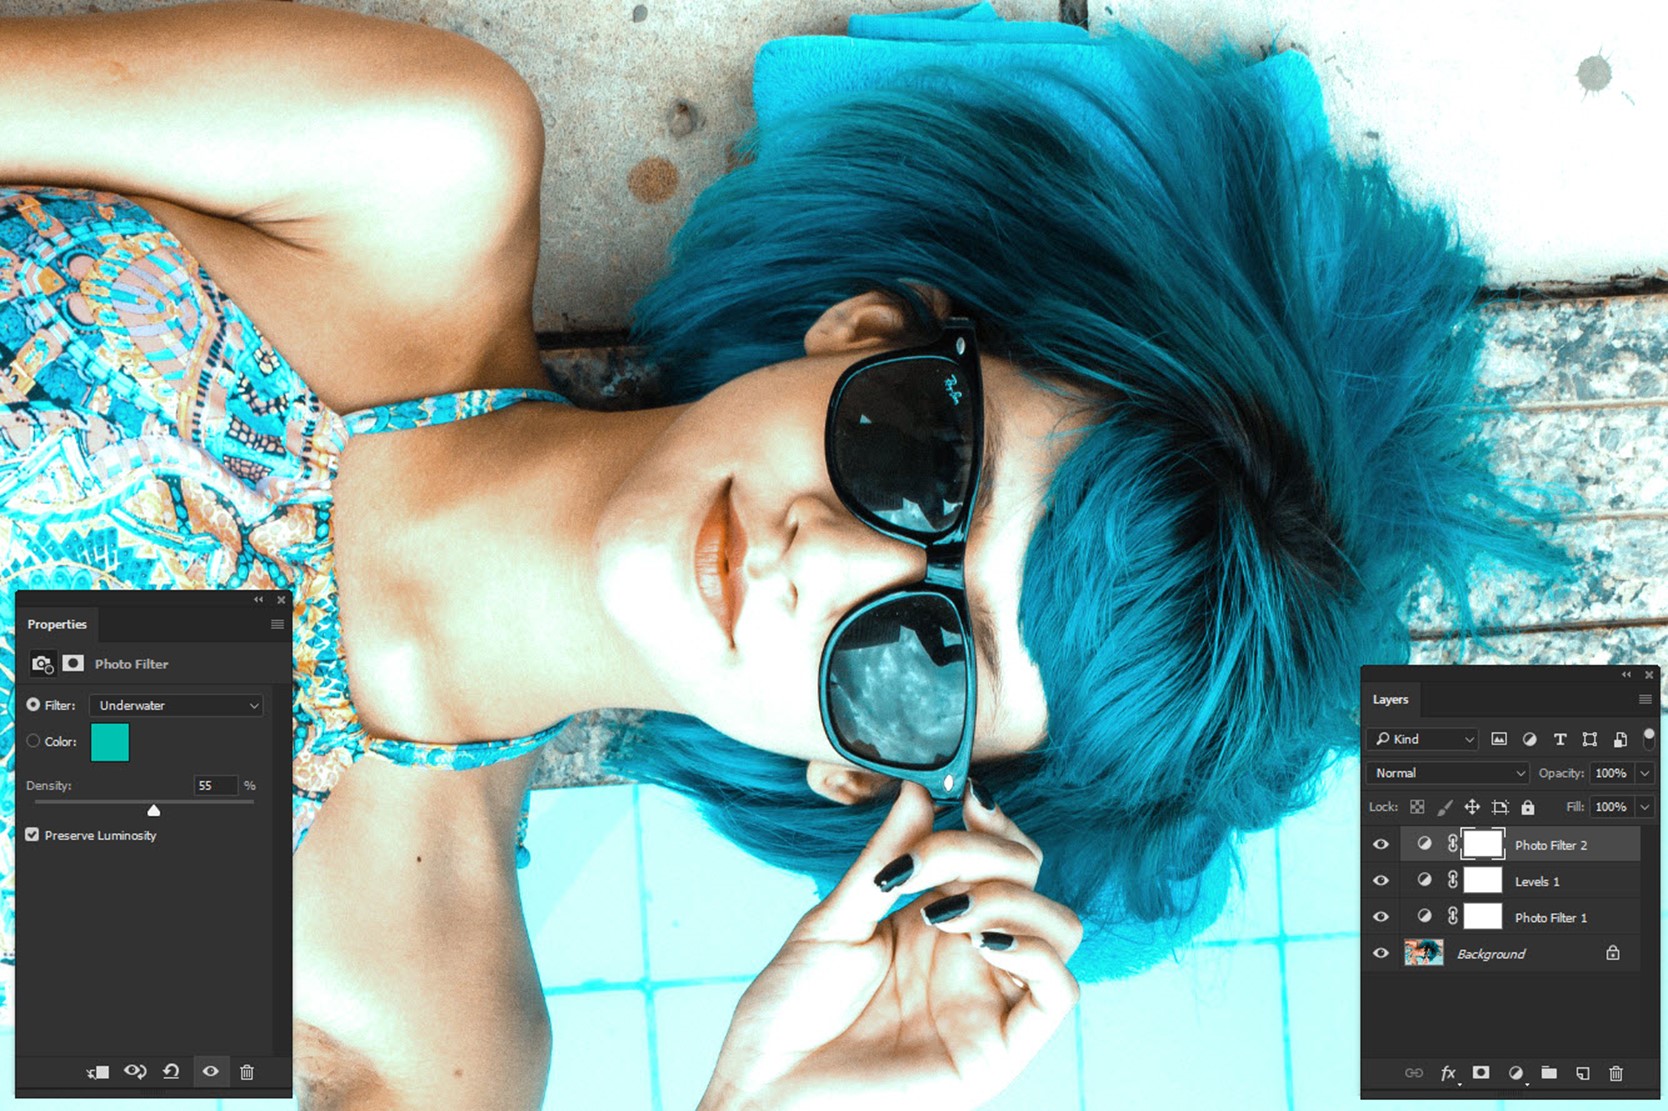
Step 3: Again, Use Filter for Aqua Color
Now, we’re going to use Filter again. But this time we’re going to give some aqua color effect to the photo.
Go to Layer>New Adjustment Layer>Photo Filter.
Change the Filter to Underwater and increase the density to 55%. Make sure that the luminosity is turned on.
Unfortunately, we don’t have any aqua filter so we should be satisfied with the Underwater. Yes, we can choose a custom color but underwater serves our purpose.
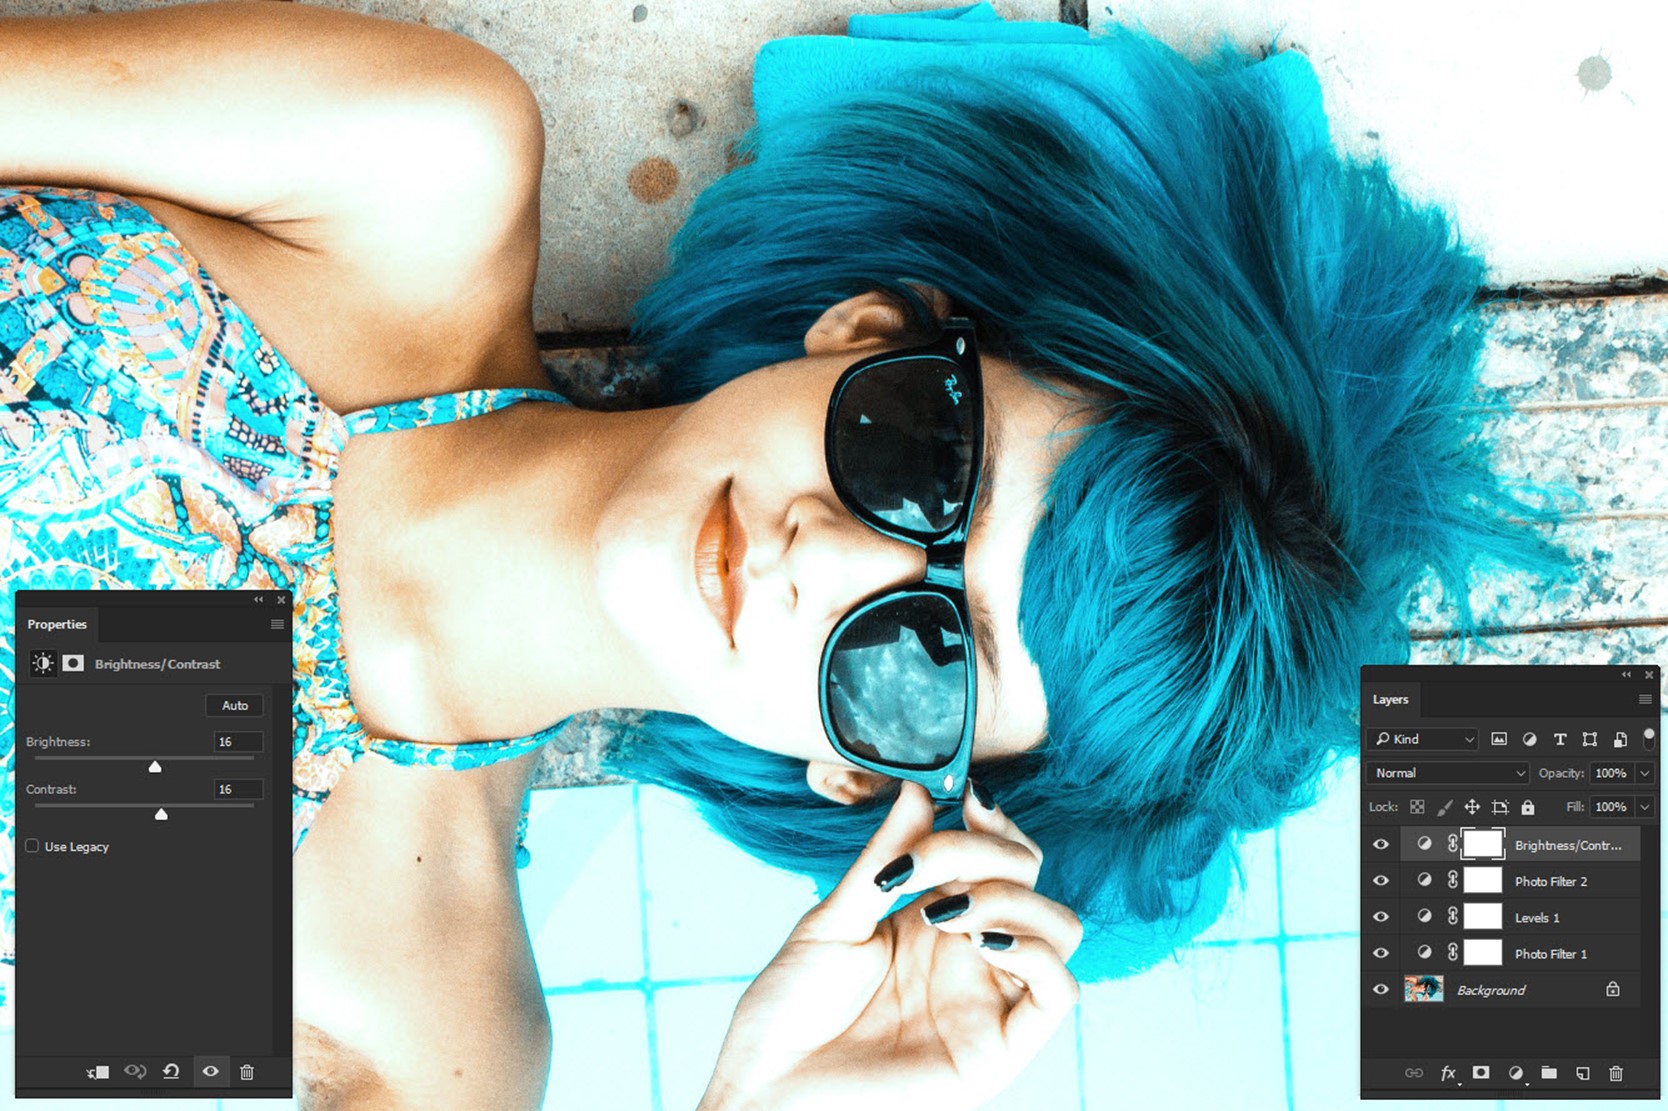
Step 4: Increase the Brightness to Finally Create the Instagram Clarendon Effect in Photoshop
Now, we’re going to brighten the photo to give it the final touch.
Go to Layer>New Adjustment Layer>Brightness/Contrast.
Increase both brightness and contrast to 16.
Now, this all you need to do to create the Instagram Clarendon Effect in Photoshop.
I hope that you enjoyed the tutorial. Please share this tutorial with your friends on Facebook and show them that they can create Instagram Effects in Photoshop also.
Hey, guys! How are you? Welcome to another Instagram tutorial. Last time I showed you how to create Instagram Crema filer in Photoshop. This time, let me show you how to create Instagram Ludwig filter in Photoshop.
Ludwig filter adds a bit of redness and yellowness in the photo and boosts up the contrast. We are going to do the same in Photoshop with the easiest way possible. This is a short tutorial and should not take more than 10 minutes to complete.
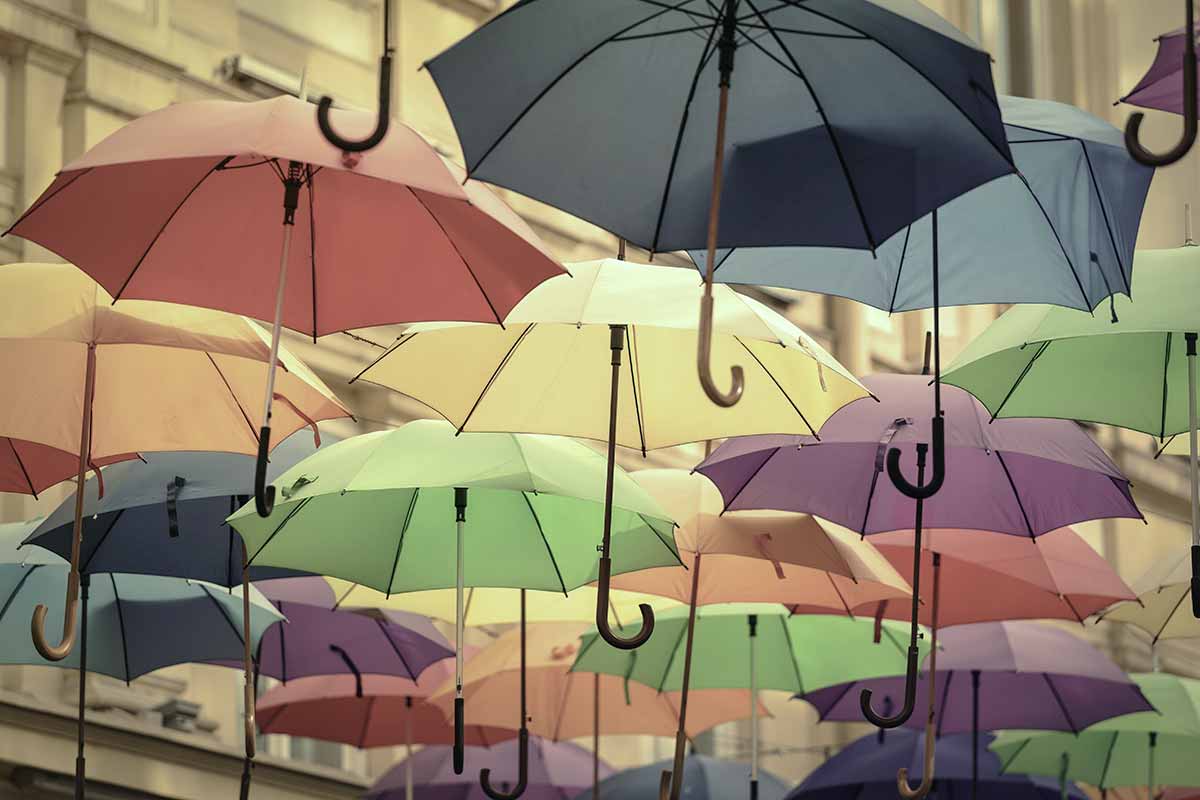
But before we begin, let me show you the final image:
Final
Video
If you like watching videos, here’s the video tutorial for you.
Step 1: Tweak Brightness and Contrast
Let’s increase the brightness and contrast of the image.
Go to Layer>New Adjustment Layer>Brightness/Contrast.
Increase the Brightness to 23 and Contrast to 100.
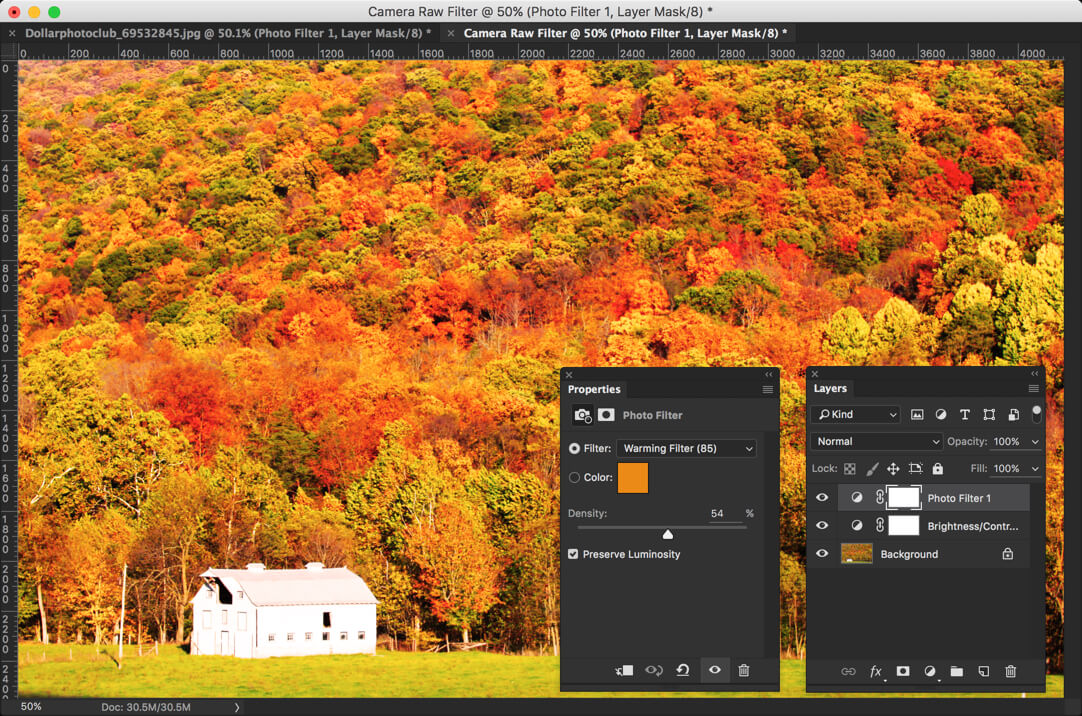
Step 2: Insert Warm Effect
Time to give a warm touch to the photo. Let’s make use of Photo Filter.
Go to Layer>New Adjustment Layer>Photo Filter.
Choose the filter as Warming Filter (85) and increase the density to 54%.
Step 3: Add Redness to the Photo
Let’s give a reddish tone to the image.
Again head back to Layer>New Adjustment Layer>Photo Filter.
This time, choose “Red” as filter and increase the density to 25%.
Isn’t the photo start to look exactly same as Ludwig filter? But still there’s one more step to do.
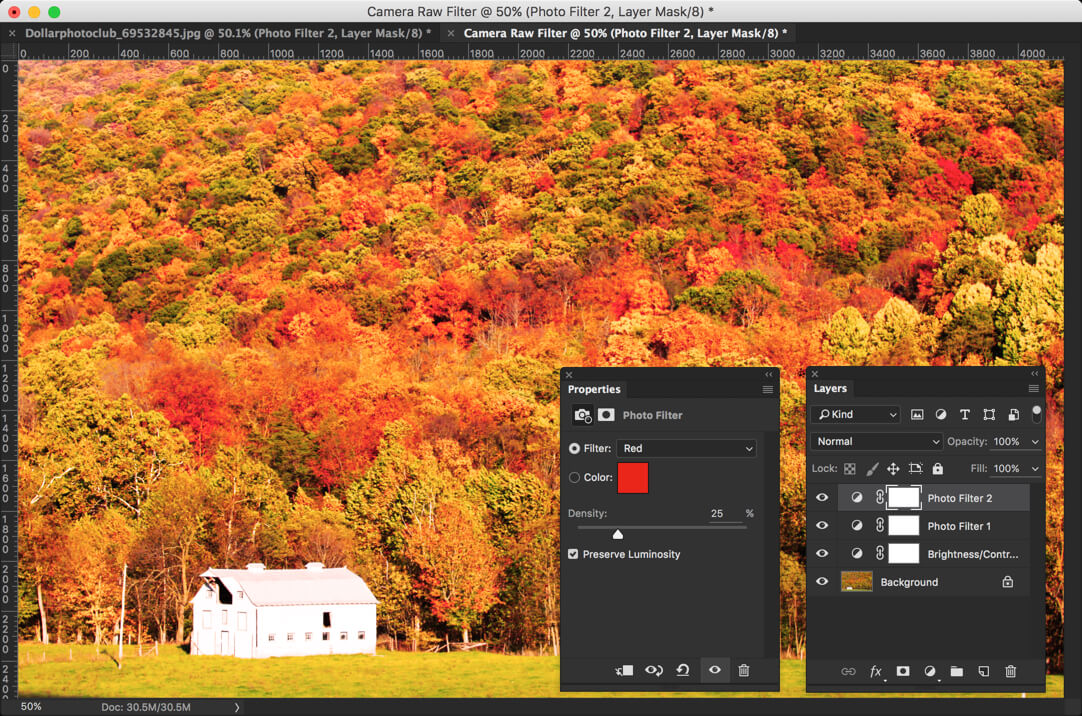
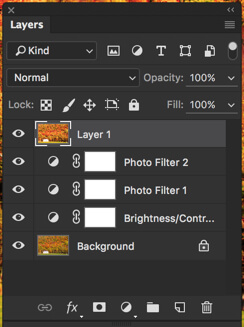
Step 4: Add Vignette Effect
Let’s add vignette effect. The easiest way to do it by using Camera RAW filter. But before using that, we need to stack all the layer onto a new layer. Press Cmd+Opt+Shift+E/Ctrl+Alt+Shift+E to do it.
This will create a new layer at the top of your layer panel. To make you understand better, the newly created layer is just a merger of all layers.
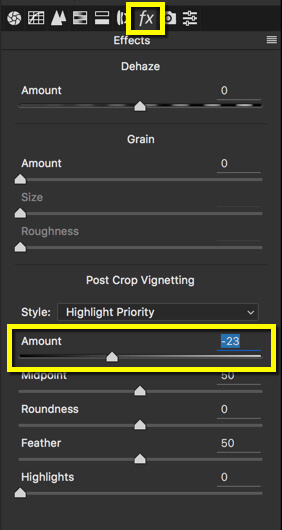
Time to open the Camera RAW. Press Shift+Cmd+A/Shift+Ctrl+A to open the image in Camera RAW.
Straightaway move to the Effects tab and decrease the amount to -23. This will add a nice looking vignette to the photo.
And now we’re done with the tutorial. Here’s the final image again for your reference.
Please support TrickyPhotoshop by sharing this tutorial with your friends and family on Facebook and Twitter.
Hey, folks! How are you doing? It’s been a while since I am writing only Instagram Filters related tutorials. Today’s is no different. Today I am going to show you how to create Instagram Crema filter in Photoshop. Like most of the Instagram filters, Crema is not much different. With the help of few adjustment tools, we can replicate a filter as good as Instagram Crema Filter.
Throughout the tutorial, we’re going to use adjustment layers. Every layer has its own importance and plays a vital role. We are going to use Levels, Photo Filter, Brightness/Contrast, and Vibrance.
So let’s begin the tutorial. But before we begin, I’d like to show you how the final result would look like.
FINAL
Step 1: First Remove Colorcast
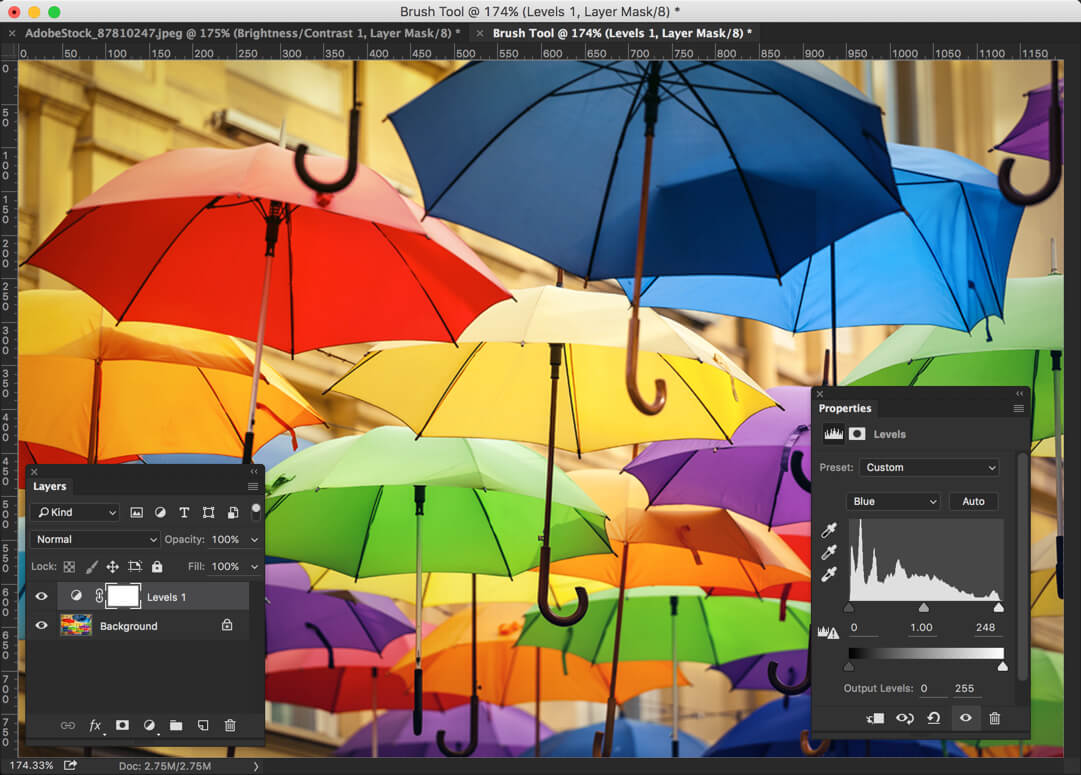
The first thing we need to do is to remove colorcast if your image has any. This is a very much crucial step, otherwise your final result may get imbalanced. The best method I know to remove colorcast is the one with the Levels.
Open your image in Photoshop. Go to Layer>Adjustment Layer>Levels. Now change the channel from RGB to Green. Now you would see a slider with three buttons just above 0, 1.00 and 255. Try to place the black and white buttons with the starting and ending of the histogram. To put it in simpler words, your black button should be placed exactly where histogram starts and your white button should be placed exactly where the histogram ends.
Now change the channel to Blue. Do the same.
Switch to Red channel and do the same. Now you should not have any colorcast or tint present.
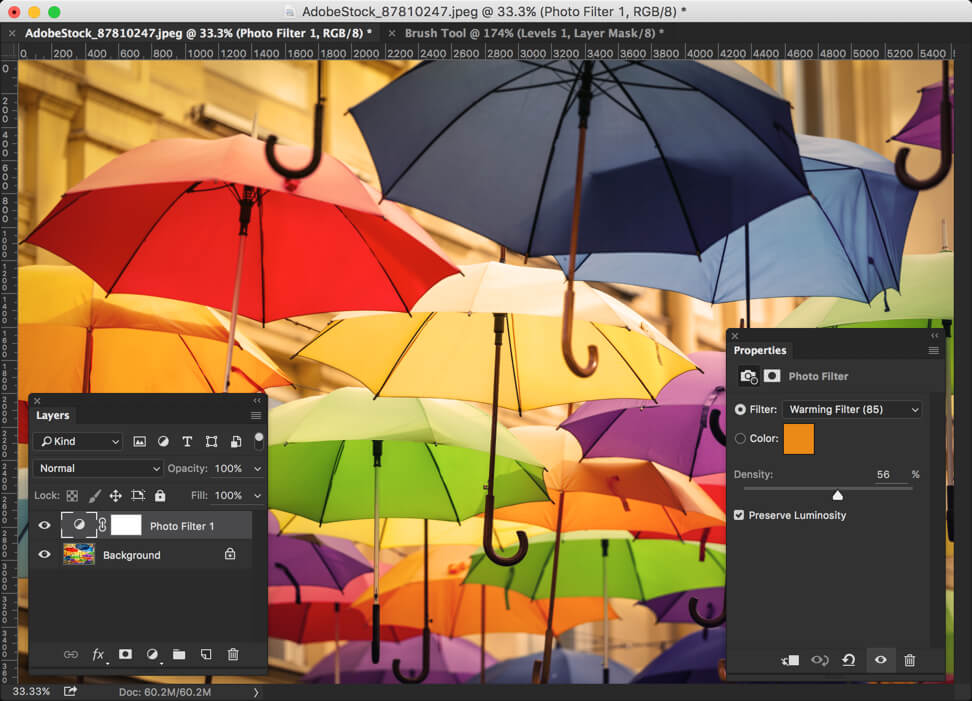
Step 2: Add Warm Effect
Now we are going to add yellow colorcast to give warm effect.
Go to Layer>Adjustment Layer>Photo Filter. Change the filter to Warming Filter (85). Increase the density by 56%.
Step 3: Add Green Colorcast
Again go to Layer>Adjustment Layer>Photo Filter. Change the filter to green. Increase the density by 40%.
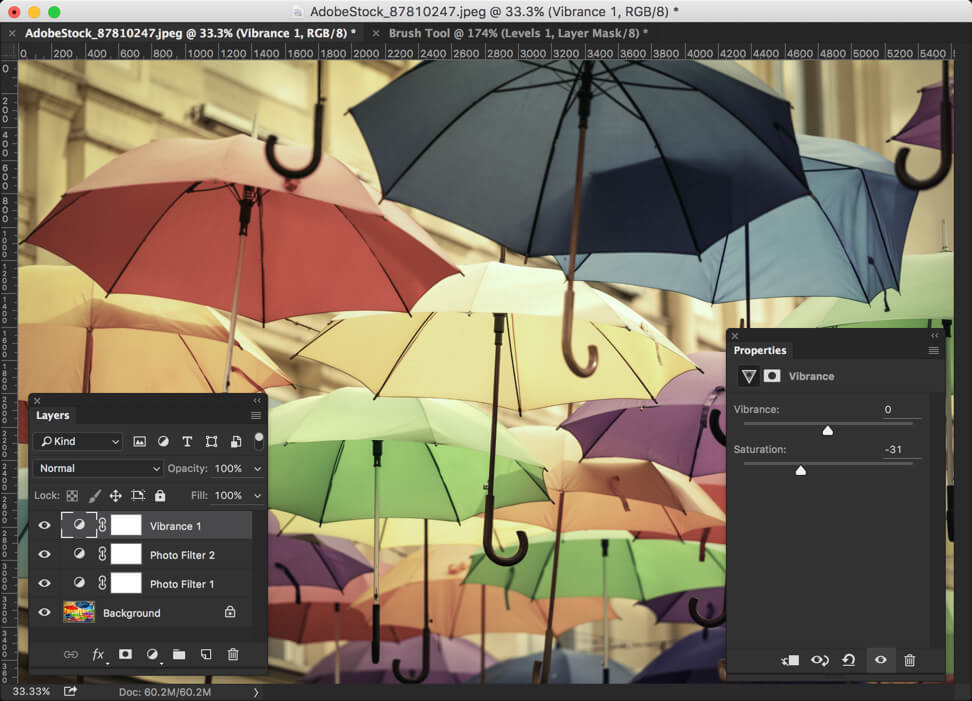
Step 4: Reduce Saturation
Don’t you think that photo is very much vivid? Let’s decrease the saturation. Go to Layer>New Adjustment Layer>Vibrance.
Reduce the saturation to -31.
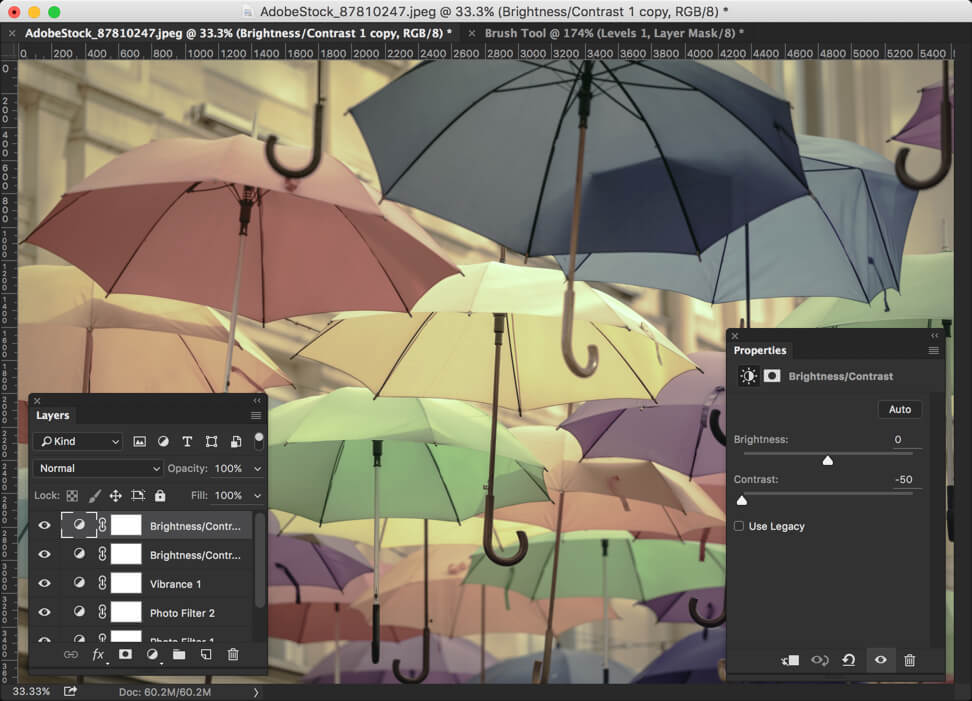
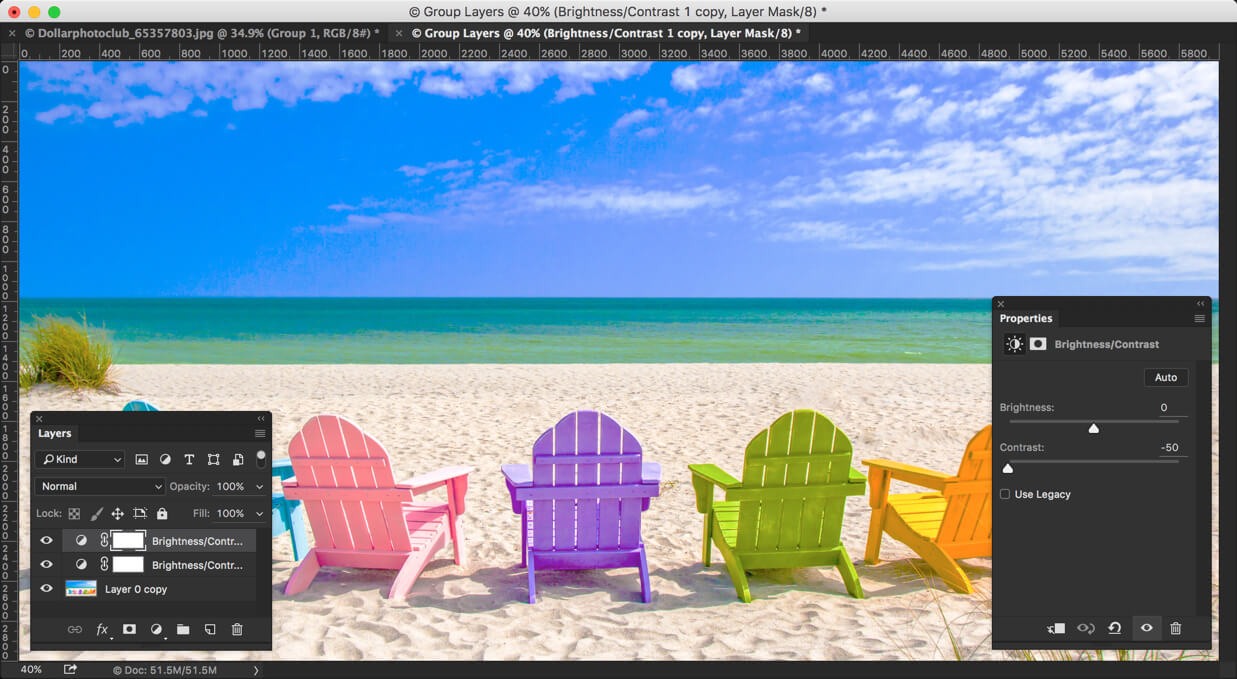
Step 5: Reduce Contrast
Time to reduce contrast. Go to Layer>Adjustment Layer>Brightness and Contrast.
Reduce the contrast to -50.
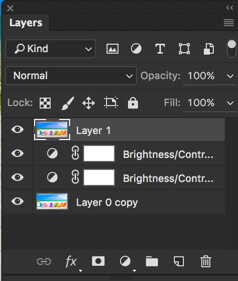
Still there’s too much contrast. We can simply duplicate the layer we just created. Press Ctrl+J/Cmd+J to duplicate a layer.
Now it’s looking perfectly like Instagram Crema filter. Don’t you think so?
Hey, folks! How are you all? I hope you are having a great weekend. You might remember the article that wrote last time i.e. Creating Instagram Juno Effect in Photoshop. This time, I am going to write another tutorial on Instagram effect. How about writing on How to Create Instagram Slumber Effect in Photoshop?
When you have used Instagram Slumber effect, you must have noticed that it generally gives yellow to an image and reduces the contrast but it manipulates an image much more than that. It adds a vignette, reduces colors, adds black & whitish effect (not much visible though).
So let’s dive into the steps. But before we proceed, I’d like to show you the final image.
FINAL
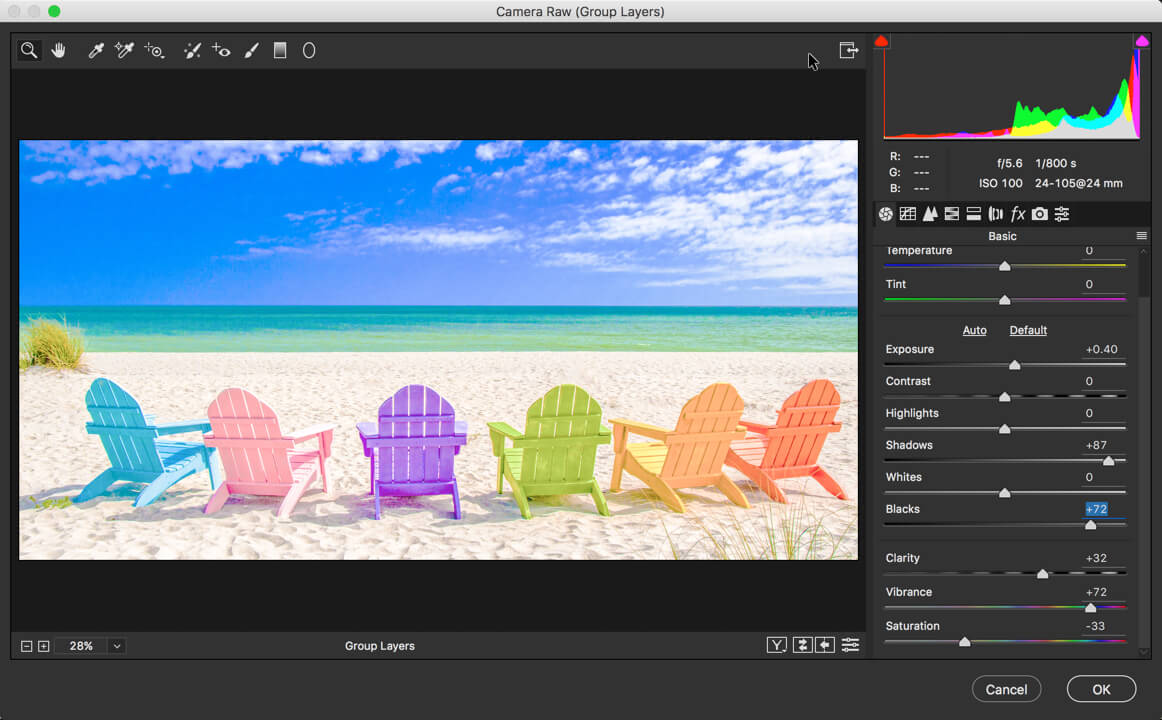
Step 1: Reduce Contrast
The first we need to do is the reduction of contrast. Go to Image>Adjustments>Brightness/Contrast. Reduce the contrast to -50.
We still have too much contrast. Let’s duplicate the layer so that our contrast minimizes more with least effort. Press Cmd+J/Ctrl+J to duplicate a layer.
Step 2: Let’s Play with Adobe Camera RAW
Time to stack all the layers onto a new layer. Press Cmd+Opt+Shift+E/Ctrl+Alt+Shift+E for that. This will create a new layer at the top.
Go to Filter>Camera RAW filter. Give your image a nice and soothing effect. This can only be done if you don’t have too much contrast.
Don’t close the Camera RAW now.
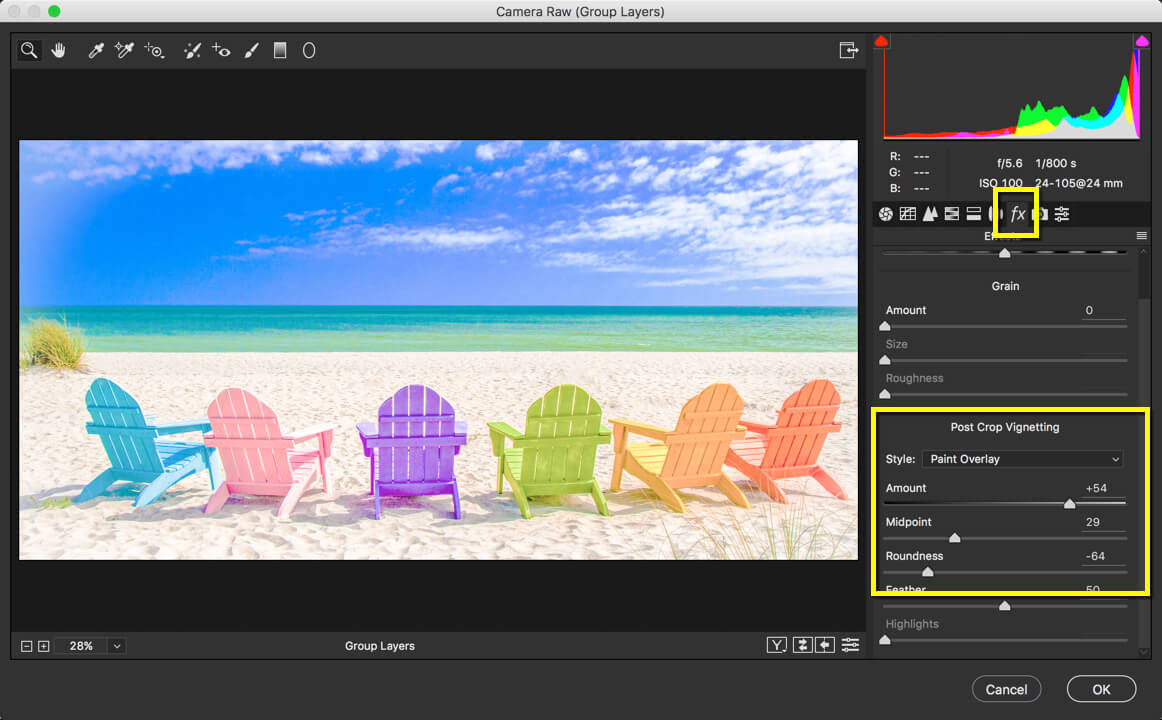
Step 3: Add White Vignette
Let’s add a white vignette to the image. Keeping the Camera RAW opened, head over to “fx” tab. Add a nice looking white vignette.
Change the Style to “Paint Overlay”. Sliding the Amount slider to the right adds white vignette and sliding it to left adds a black vignette.
Step 4: Add Warm Effect
Time to give warm effect to the image.
Go to Image>Adjustments>Photo Filter. Change the filter to Warming Filter 85 and increase the density to 37%.
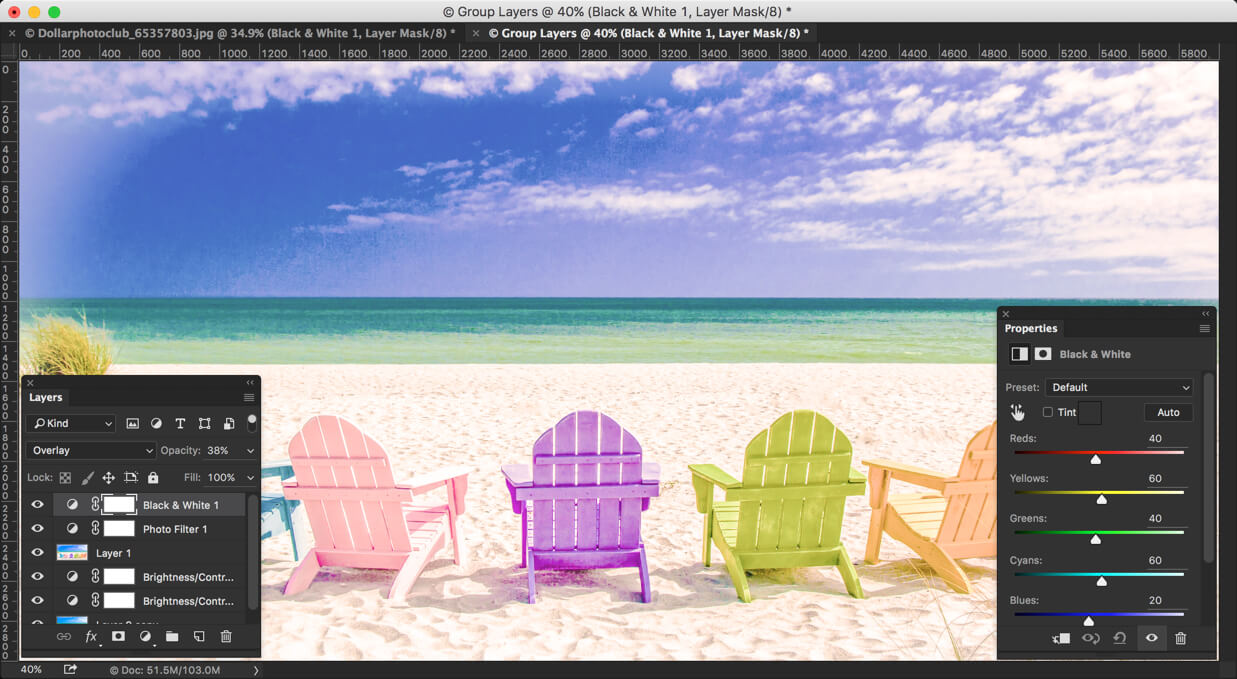
Step 5: Let’s give Black and Whitish Effect
Go to Image>Adjustments>Black and White. Now you need not do anything but change the blend mode to Overlay and Reduce opacity to 38%.
Step 6: Final Step of How to Create Instagram Slumber Filter in Photoshop
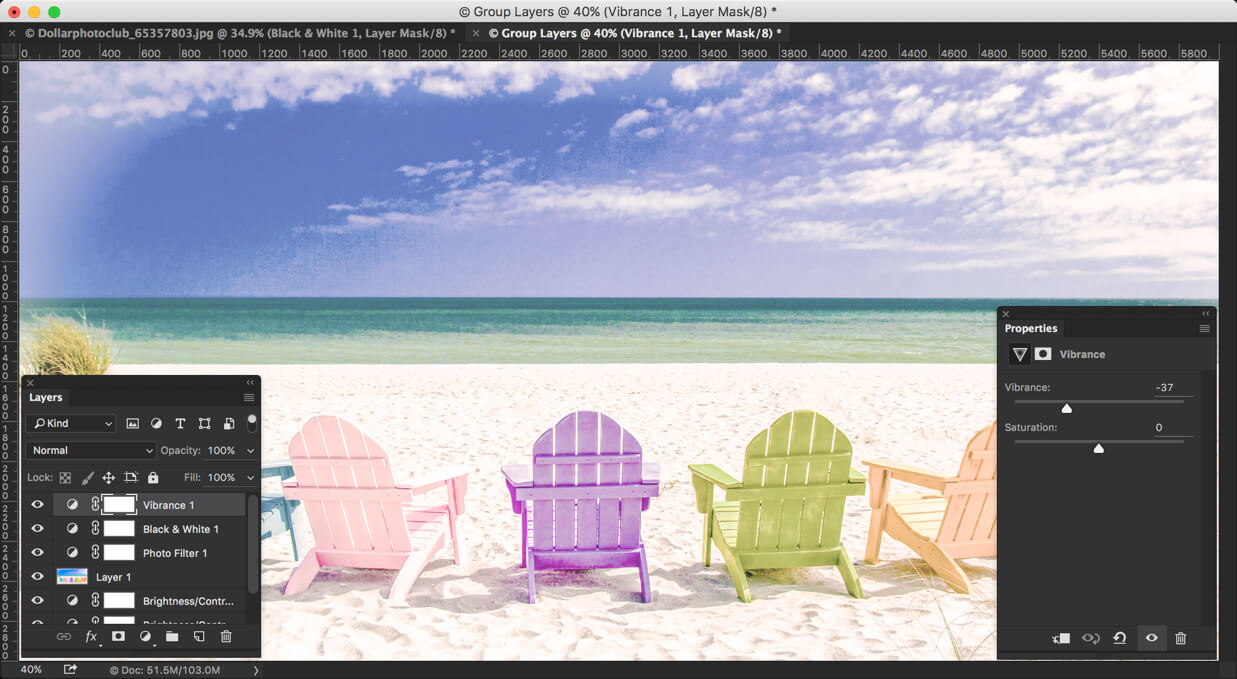
Time to decrease the Vibrance again. Go to Image>Adjustments>Vibrance.
Decrease it to -37.
And now we’re done.
Now that you have enjoyed this tutorial, the next thing you can do is to share it on Facebook and Twitter.