Lightroom Enhance Details is a hidden feature that was released with Lightroom 2.2 (back in 2008). Today, we’re going to see what is Enhance Detail in Lightroom and how can you use it?
What is Enhance Detail in Lightroom?
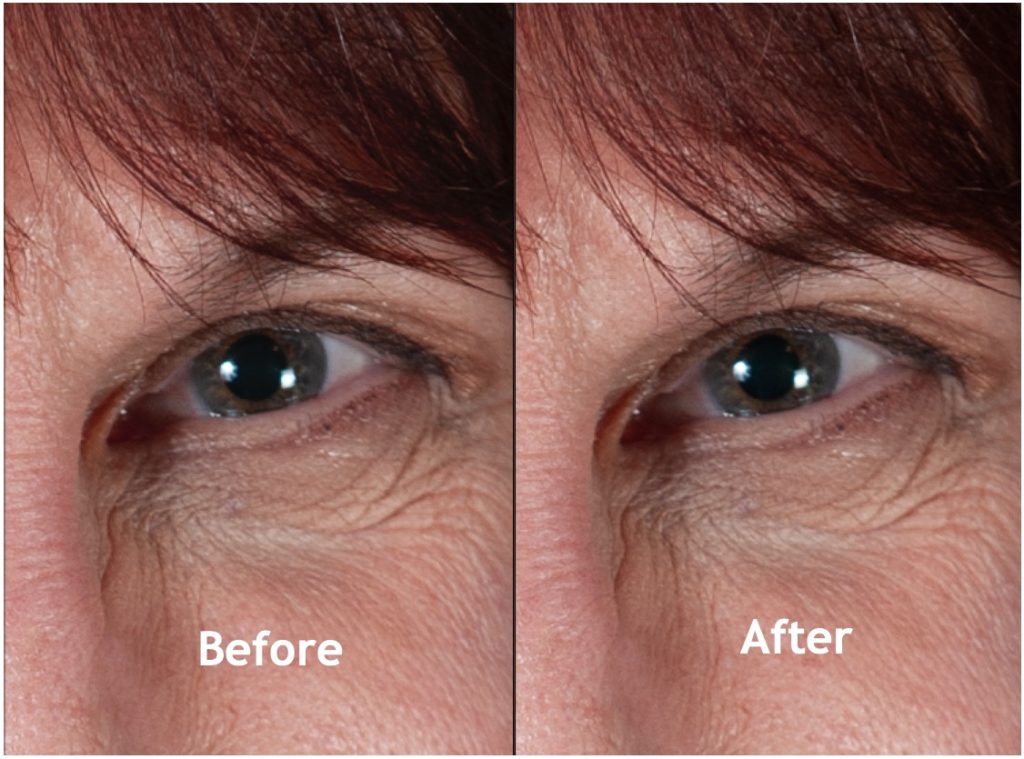
Adobe says that Enhance details uses Adobe Sensei technology and produces crisp detail, improved color rendering, more accurate renditions of edges, and fewer artifacts. Enhance Details is particularly useful for making large prints, where fine details are more visible.
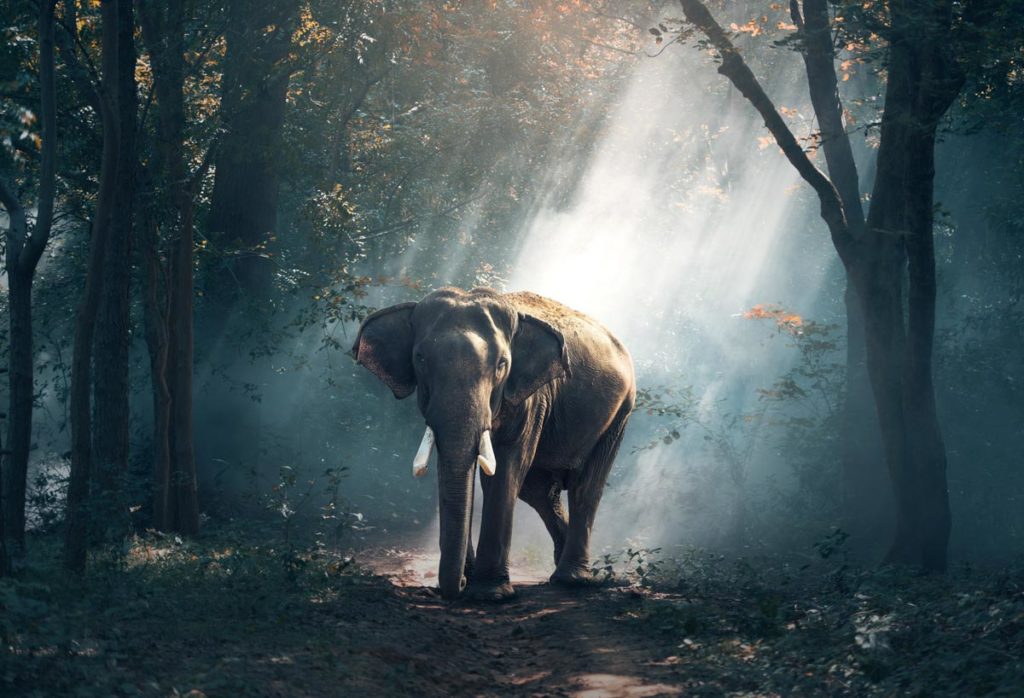
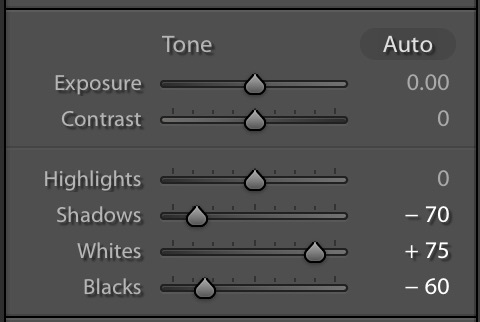
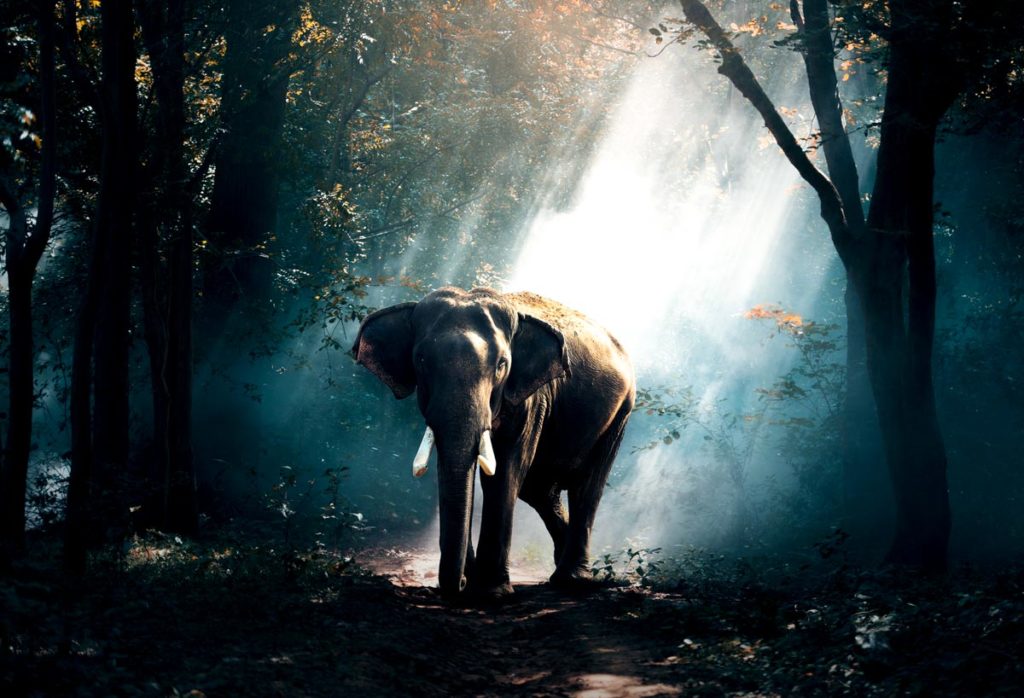
Does Enhance Details actually make a photo crispier?
I really didn’t see any visible difference. See the below screenshot. Both photos look the same.
You can use Enhance Details using two ways. It’s not like a slider that we see on the right hand side. Rather, it’s an option that we get in the menu.
How to use Enhance Details for multiple photos?
Select the photos by pressing Shift.
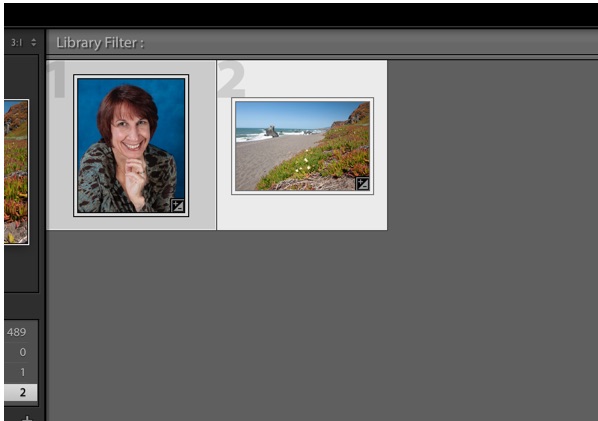
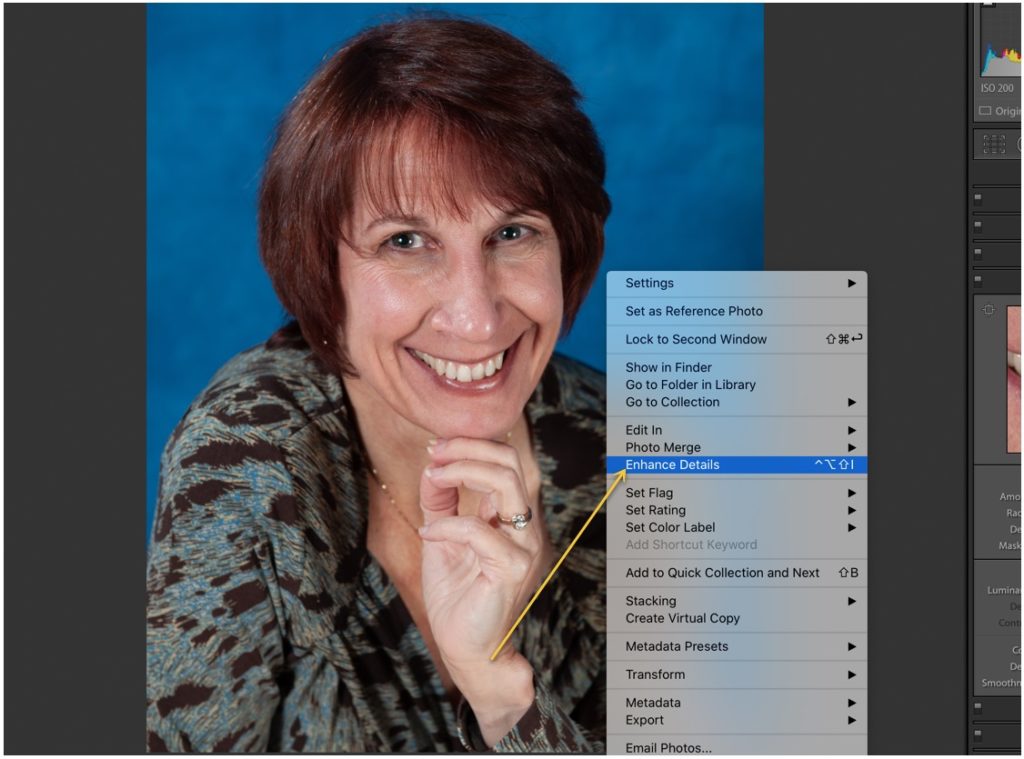
Now, go to Photo > Enhance Details. This will create a copy of your existing photo and the “enhanced” details. You can see the newly created copy in the Library section.
How to use Enhance Details for a single photo?
After opening the photo, right-click on the photo and click on Enhance Details. This will create a copy of your existing photo and the “enhanced” details. You can see the newly created copy in the Library section.
Lately, I have started posting more on Instagram Filters because I see a rise in people who want to create Instagram filters in Photoshop. More and more users are reading Instagram filters on my website every month. Today, we’re going to see how to create an Instagram X-Pro II filter in Lightroom.
Step 1 – Add Vignette and Grains to create Instagram X-Pro II filter in Lightroom
Let’s add a black vignette to the photo. If you see Instagram filters, almost all of them add a black vignette. And, the Instagram X-Pro II filter is one of them.
Go to Effects > Post-Crop Vignette > Amount and reduce the amount to -51. This will add a black vignette.
Let’s add some noise. Unlike Photoshop which calls the noise as a noise, Lightroom calls the noise as grains.
Go to Effects > Grain > Amount and reduce the amount to 30. This will add some grains.
Step 2 – Add a yellowish gree hue
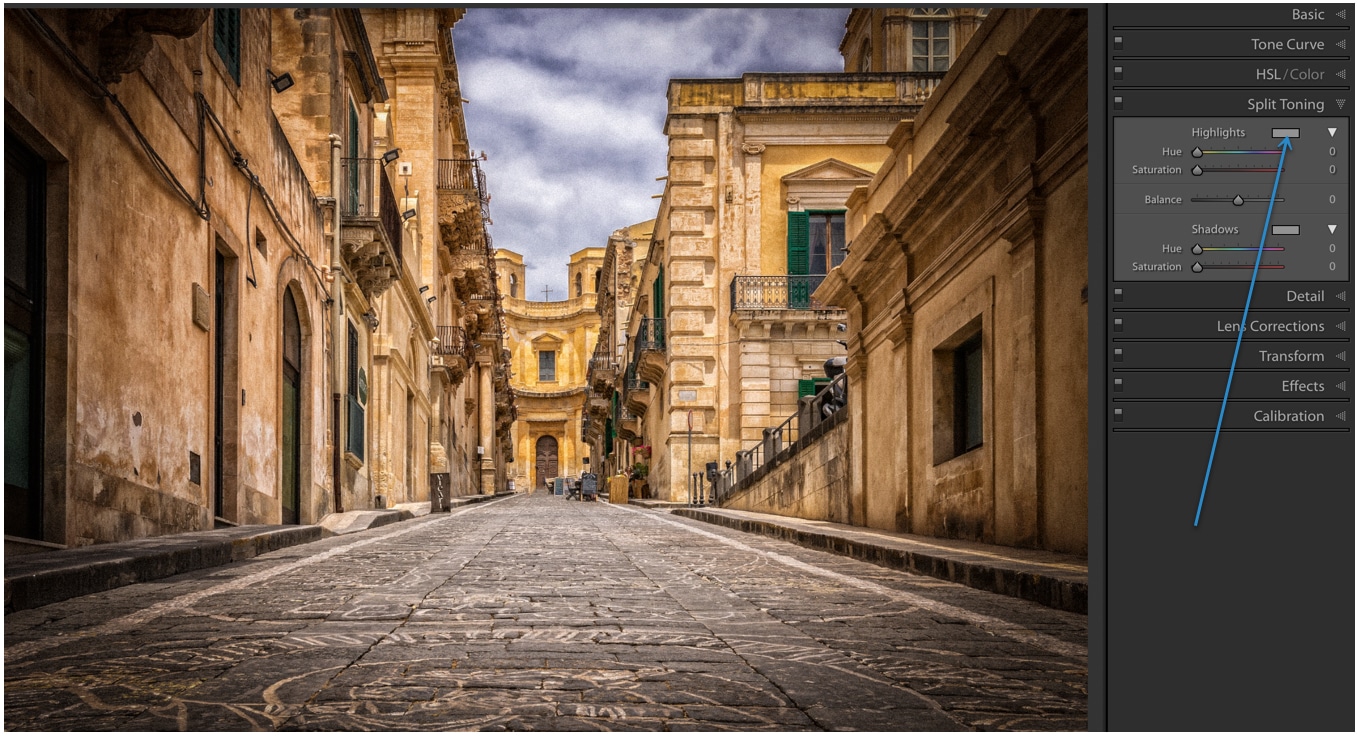
Let’s add a yellowish-green tone to the photo. We’ll do it using the Split Tone.
Go to the Split Toning section.
Click on the gray rectangle next to the highlight.
Choose any yellowish-green color. You can either use the numerical that I have shown in the below screenshot or you can choose the one that you like.
Click outside of the box after you choose the color.
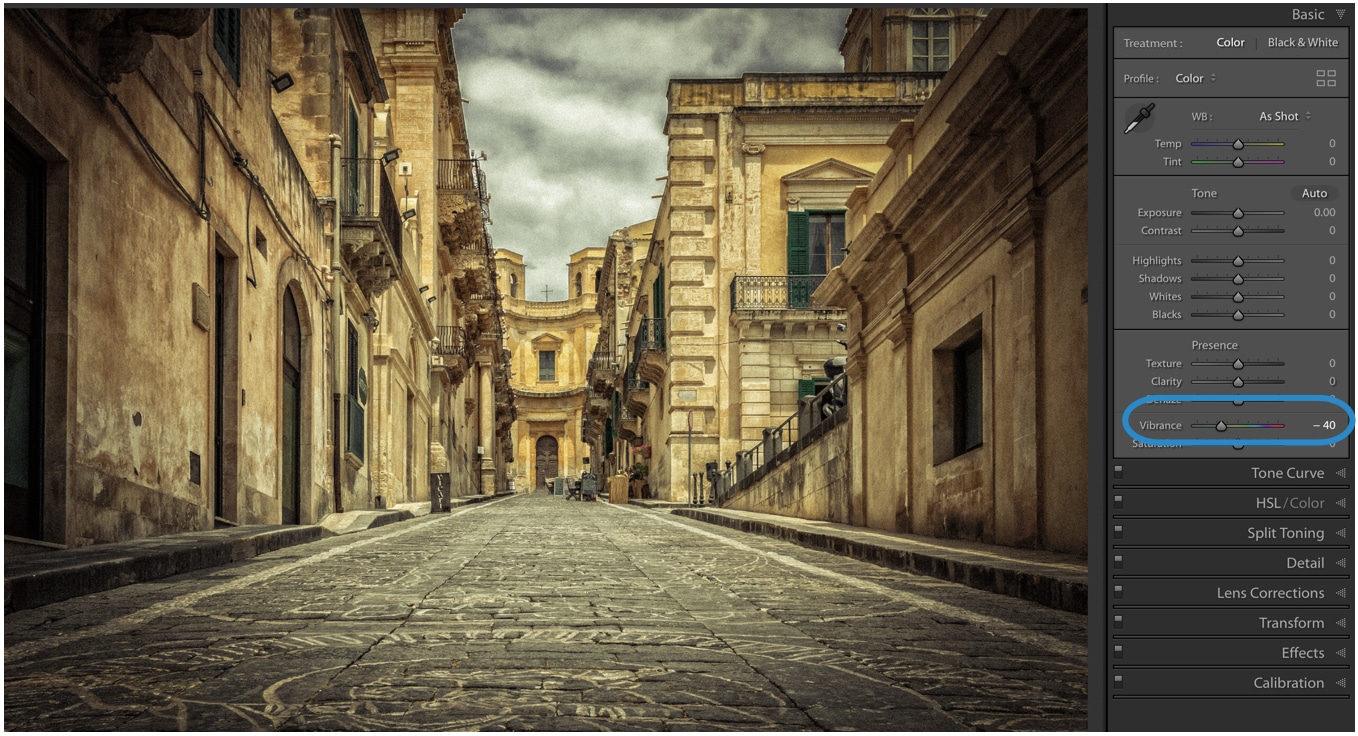
Step 3 – Decrease the vibrance to create Instagram X-Pro II filter in Lightroom
Almost all Instagram filters decrease the colors in a photo. Instagram X-Pro II is again one of them. To achieve Instagram X-Pro II in Lightroom, we’re going to decrease the color. But, we’ll do it using the Vibrance slider.
Photo editing is a critical function one needs, especially today with social media. Whether it is social media platforms like Facebook, Instagram, Snapchat, all of them have a photo editing tool included. But, for photographers or hobbyists, those tools do not work to their expectations. Lightroom Mobile fulfills that purpose with the added mobility and ease of use.
The same applies to the desktop version of Lightroom, which we all love- Lightroom Classic CC. Lightroom mobile CC tries to be as functional as Lightroom Classic CC, with some added advantages. Moreover, you can have all the premium features such as selective editing, brushes, and much more with the subscription in the mobile version. You do not need the subscription for using the same functions in the Lightroom Classic CC version.
Lightroom Desktop vs. Lightroom mobile
1. Synchronization:
Because of the integration of Adobe Creative Cloud in the mobile version, there is a lot of liberty to work across different platforms and devices. You can use your cloud storage of 100 GB with the Adobe Creative Cloud to keep your changes everywhere. Whereas, in Adobe Lightroom Classic CC, you have most of your work offline.
2. Limited Features in App:
The Lightroom Mobile app is a freemium service that unlocks important features only after buying the monthly subscription. Features such as selective editing, healing brush, geometry /perspective editing, and some online synchronization are only activated after subscribing. This is not the case with the desktop version – Lightroom Classic CC. Even features such as batch editing, are available only to premium users in the Mobile app.
3. Performance:
Lightroom Mobile only works on recent smartphones and not outdated phones such as the iPhone 5S, or several-year-old smartphones in general. You need a good processor for it to work the same as the desktop. Whether it is batch editing, brush usage, selective editing, you need a powerful processor for them to work. Apart from this basic requirement, Lightroom mobile is the perfect on-the-go app for all your editing requirements.
4. Feature Set:
The Lightroom mobile is not a watered-down version of the Lightroom Classic CC by any means. Instead, it has everything you need and has been using in the Lightroom Classic version. Whether it is the histogram information or the batch editing, you can do it all on the Lightroom mobile on your tablet or smartphone!
Conclusion:
Lightroom Classic CC is no different than the Lightroom mobile. It has the same features, same functionality and even better ease of use. Overall, you get the added advantage of mobility and ease of use in the Lightroom mobile, which might be an issue to carry your laptop everywhere for the same. You can use Lightroom mobile with more intuitive touch-based controls on tablets and smartphones.
This way you even make use of the generally better display of smartphones to really get a sense of how the colors look on the screen. But, for heavy or large collections, you may still prefer your desktop-based Lightroom Classic CC to make use of your laptop’s performance and huge storage space is taken up by RAW photos.
Adobe is a household name to professionals and hobbyists of all kinds. Adobe software can handle many things, whether it is image editing, management, graphic design or countless other utilities. Let’s discuss Lightroom vs Photoshop today.
Now, when it comes to their most widely used software – Photoshop and Lightroom, there is bound to be a comparison. Both are equally capable pieces of software but excel at different functions.
Adobe Lightroom:
Lightroom is more of a starter’s tool to use for image editing, fixing, and management. It is capable enough to fix and change the smallest details in RAW and other formats in images. And at the same time, it is an easy to use software, which one can learn fast. You can use Adobe Lightroom easily and make your edits quickly. Lightroom is an all in one package to batch edit your photos down to the last detail.
Adobe Photoshop:
Photoshop is a general creation and designing tool that can also do the same things that Lightroom can do. But, its functionality to use as a substitute for Lightroom is incredibly limited in terms of ease of use. Its unique functionality makes it possible to do millions of things like background swap, painting, web design, something that Lightroom cannot do. You have to master all the basics to be able to apply presets, modify images, create from scratch as well as tune images.
Photo by creativelive.com
Lightroom vs Photoshop
Since each of them has its benefits and unique features, it is not a competition. Both are part of the Adobe Suite and in a photographer’s workflow, both are quality essential.
You start with applying color and other fixes on Lightroom. Then, you move to Adobe Photoshop to further edit and add any more changes. After all, photoshop is the Swiss Army knife for graphic design! Whether it is removing, adding or modifying elements, you can do it all with Photoshop.
You can play wit layers, lighting, artificial effects, elements, and a lot of artificial edits in Photoshop. Whereas, in Adobe Lightroom, you cannot add elements and artificial external elements or modify the image’s elements.
Surely, you can remove blemishes, spots, change colors, that too at an advanced level. Whereas you can easily edit and add images to Lightroom, Photoshop is as its name suggests. Photoshop lets you play around with photos and add layers of edits and edit each layer differently. You can even stitch images, and make panoramas, something that Lightroom cannot do. It is kind of like a garage for photos; Lightroom’s name also gives it purpose away clearly.
Much like a photographer’s darkroom, its main purpose is to process images into a fair level of the usable final product. You can show the output of a digital camera’s raw file into a natural-looking image with the tuning tools of Lightroom.
Conclusion:
Both are capable at their own functions and tend to different users. When it comes to ease of use, Lightroom takes the leading position. On the other hand, if it is graphic design or advanced image editing you are looking for, you should learn Adobe Photoshop.
You can edit photos down to the pixel level in Photoshop, and in Lightroom, you can edit everything which looks appealing to a layman looking at a photograph with perfect colors and removing all imperfections in lighting. You can even add multiple images into one image with Photoshop whereas Lightroom lets you apply your desired settings to a batch of your photos.
As a photographer, whether professional or hobbyist, you need to be able to take stunning pictures. Often times it is the skill and experience which can teach about what settings work best according to the scenery. But, camera and colors play an equally major role in this too! This is where Adobe Lightroom comes in. You can understand what is Lightroom below:
Simply put, a phone or digital camera is only good enough to decide what looks best as per its coding and sensor settings. Nowadays, machine learning can do a lot, but in the end, one needs to use their own judgment to take stunning shots. When you take a massive number of photos, it is hard to concentrate on capturing the perfect picture every single time.
What is Lightroom?
Adobe Lightroom is your companion if you find yourself too often in the above scenario. Lightroom, as the name indicates, is the photographer’s best friend. It can manipulate, process and edit photos as required into an amazing end product. Adobe has enabled everything one would ideally need in a traditional sense of a dark room.
Whether it is pushing out amazing looking photographs or tuning intrinsic details about your capture digitally, Lightroom can do it all. You can change all the basic settings such as contrast, exposure, shadows, white balance among so many other available elements. There is a large number of data that a DSLR or even a smartphone captures in one photo.
As a multi platform tool, Lightroom is ideal to use anywhere, be it your smartphone or your desktop computer. Both professionals and hobbyists are using this amazing software to get amazing looking photos. Moreover, it can process RAW files such as .NEF perfectly.
RAW file formats show you how much this amazing software can actually tune and edit in your image. Additionally, whether is is JPG files or RAW, the performance and capabilities of Lightroom give you full and easy to use control over photo editing.
Additional Features:
Lightroom is not only good at editing the basic and finer details of your photos, but also can add a bit of flair to your photos. You can use built in Lightroom presets to completely change the setting and background of an image. Additionally, you can also rely on it to give you an accurate sense of how images would look on any screen in general.
If you need to understand what is Lightroom more, you need to start practicing on it right away and play with the controls a bit. As an easy to use software, it is quite intuitive in how it operates and can be your best buddy in churning out a picture perfect photo session in no time. It can process a bulk of images and you can process them into any desirable format as well.
In addition to bulk processing, Lightroom is perfect in sorting through your library and applying any number of edits to your portfolio. As an all in one package this is the ultimate tool to edit your photos irrespective of size, format, or even quality!
Today I am going to show you how to create an Instagram Lo-Fi filter in Lightroom. This is going to be an epic tutorial. If you like the Lo-Fi filter on your photos but don’t like using Instagram for all your photos then this tutorial is for you.
Plus, I am going to give you the preset for free also. No signup and email are required, just one click to download the preset. This button will scroll you to the bottom of the page.
We all want beautiful photos. Who doesn’t strive towards the perfect Instagram profile? Who doesn’t want to improve those vacation photos that are supposed to get printed?
But most of us are too busy. We have our jobs, our homes, and an exercise routine to take care of. Hey, students even buy assignment help because they can’t handle all the pressure. Time for complex photo editing on Photoshop? Not so much. So we opt for the usual Instagram filters that make our photos look tacky.
What if I told you there was a better solution? Lightroom has some pretty cool presets that are just as quick as Instagram filters. The tool is simpler than most people assume. So let’s get out of our tiny little boxes and do something cool to our photographs for a change.
1. Start by Choosing the Best Photos
Do you remember the good old days when we had to use photographic film for our cameras? We could take a limited number of photos on it. It was expensive, so we were saving it. We’d stage the scene, get our model to strike the perfect pose, and snap. That was it. No second attempts, since the film was too precious to use for similar photos.
The digital world is so much better! We can take as many photos of a scene as we want. We have tons of memory, so we don’t mind snapping several similar photographs. But when the time for choosing the one comes, it’s a problem. Lightroom has a simple feature to help us solve it.
Highlight all similar photos in a folder.
Press N – a shortcut key that takes you to Survey view mode.
You’ll see all similar photos in a single window, so you can eliminate them one by one until you end up with the perfect shot to edit.
2. Try Different Presets
Did you choose the right photo? Cool! Are you ready to start editing it?
When you choose the photo to edit on the Lightroom smartphone app, you’ll see the option Presets in the bottom menu. Tap it. It will lead you to cool effects that work exactly like Instagram filters. The difference? They are better and they don’t look like the majority of Instagram photos.
Play around with these presets. You know how to do that. Experiment with different ones (you’ll just press the X if you don’t want to save the last one you tried). The cool thing about Lightroom is that you can layer on different presets, so you get a unique effect for your photo.
3. Adjust the Features
The preset will do a lot for you. When chosen properly, it will brighten up the photo. Light is Lightroom’s forte!
But why don’t you try to make it even better? Most of the work is done; you just need to adjust a few elements to see if you can improve the result.
When you choose Light, you can play with the highlights, contrasts, shadows, and exposure of your photograph.
4. You Want to Maintain a Theme? Save Your Settings!
Why would you stick to the same style of photographs when there are so many opportunities to experiment? No one is forcing you to do so. If you like versatility, you can play with lightness and darkness and make a unique story out of each image you post. But if you want your Instagram profile to be impressive and recognizable, that’s not the right way to go.
Instagram stars engage in the branding process. The photographers and editors to help them with the photos, and they hire writers from a college paper writing service to create the perfect captions. You don’t have to go that far. But you can maintain a theme, which will make your visuals recognizable for your followers.
Before you set a theme, you should play around with Lightroom. Try different settings on your favorite photos, so you’ll see how they look. Is there a particular style of editing that you love? Save those settings! Once you’re sure you got a photo to perfection, click on the + button (located in the Presets panel when you’re using Lightroom on a computer). Name your preset and click OK.
When you have a new photo to edit, apply your very own preset. It’s your style. It’s your character expressed through image features. You can’t do that on Instagram!
5. Make Subtle Adjustments
There’s a thin line between professional-style editing and absolute tackiness.
For example, if you try to brighten the model’s skin on a portrait photo, the Adjustment Brush will do a good job. But if you go too far, the photo will lose its vibe.
The difference between an amateur and a pro photographer is in the dose of edits. The amateur is so excited with the new features they discover that they want to use them all… on a single photo! There’s a word to describe this result: kitsch. Look it up.
The pro, on the other hand, will invest in high-quality gear and do minimal editing once the photo is taken. Their photography looks more natural, even if there’s a fantasy vibe to it. It looks real. Even average cameras and smartphones take good photos today, so there’s no need to brush the realism layer away. Do the needed editing, but keep them real!
Lightroom Gets Better As You Practice More
Like any other editing tool, Lightroom also has a learning curve. But it’s not Photoshop. It’s way simpler and less overwhelming. If you don’t understand how it works when you first use it, don’t despair! Just practice. It’s fun to play with your photos and see where you can get them with a couple of edits.
Presets are the coolest thing for beginners. If you know how to apply filters on Instagram, you’ve got this! From there on, you’ll build upon your photo editing skills and the results will keep getting better!
Lauren Adley is a writer and editor at Australia writings and best paper writing service. She is dedicated to her family, work and friends. She is keen on reading, playing the guitar and traveling. She is interested in educational, marketing and blogging issues. Feel free to connect with her on Twitter if you need bestessays review.
The first basic rule before giving a yellow tone to a photo in Lightroom is to increase the temperature and decrease the tint. Tint should slightly shift towards the green side.
Make the below adjustments in the Basic panel
Temp: +10
Tint: -10
Step 2: Adjust the whites and blacks
Now we’re going to adjust the whites and blacks in the Basic panel.
Hold down Opt/Alt key and drag the Whites slider towards the right till you see white hgihlights. Check the below GIF. Here I am ignoring the white because of the window because that area is already super-duper overexposed.
Here’s my value.
Whites: +32
Time to do it for the Black. This time move the Black slider towards the left.
Hold down Opt/Alt key and drag the Blacks slider towards the left till you see black shadows. Check the below GIF.
Here’s my value.
Blacks: -42
Here’s the photo.
Step 3: Increase the saturation
This is the last step. Time to increase the saturation.
Go the the HSL/Color panel.
Increase the below sliders
Orange: +35
Yellow: +35
That’s all, guys.
Here’s the final photo.
If you want to download free Lightroom presets, you can download them on my download free Lightroom presets page.
If you want more tutorials on Lightroom, here’s the to the free Lightroom tutorials.