Hey, welcome to my another tutorial. Today I am back with my another tutorial from the 1-minute series. I am going to show you how to change the sky in Photoshop in 1 minute.
I will keep this tutorial short because you are going to achieve the result in just 1 minute. Everything will be crisp and short.
You’re reading this tutorial means that you already have an image of which you want the sky to be changed. That’s good. You will also need an image from where you can copy the sky. If you like free things then Unsplash is a great place. If you don’t then there are some good sites like Shutterstock, Adobe stock, etc. where you can buy the images.
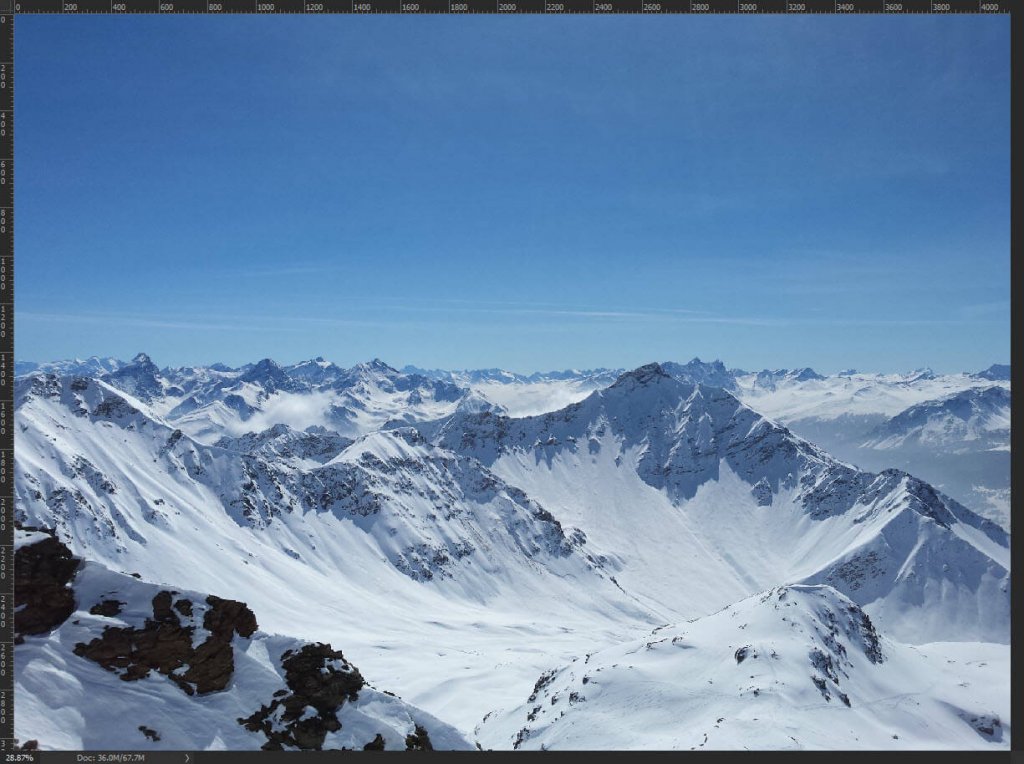
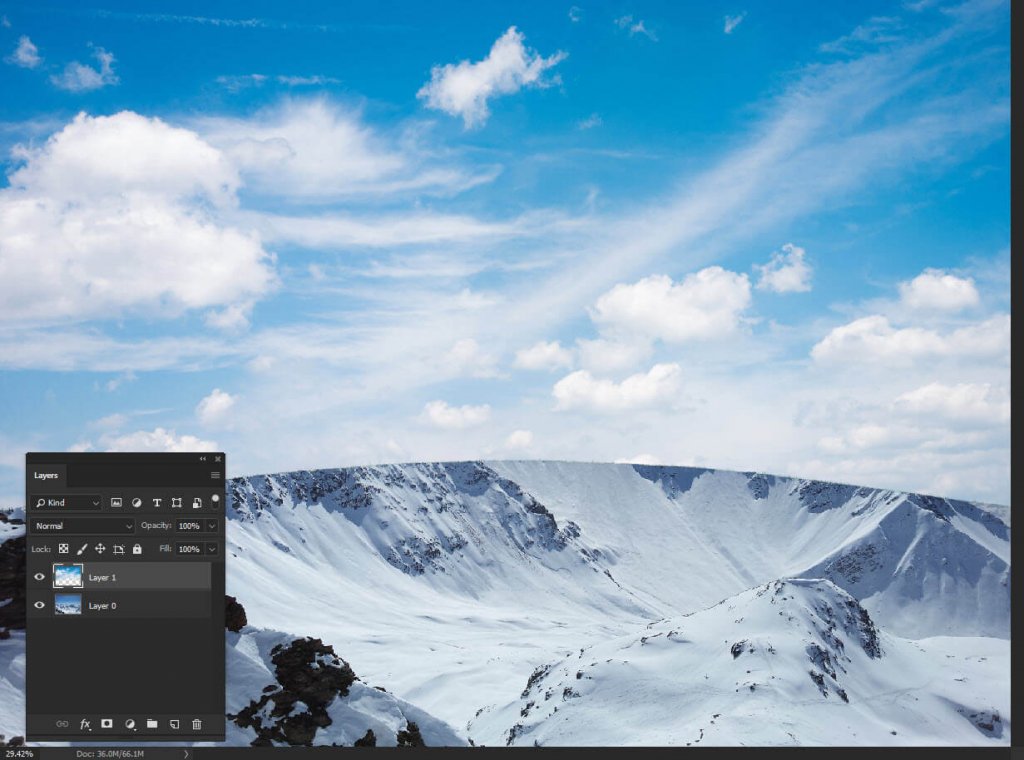
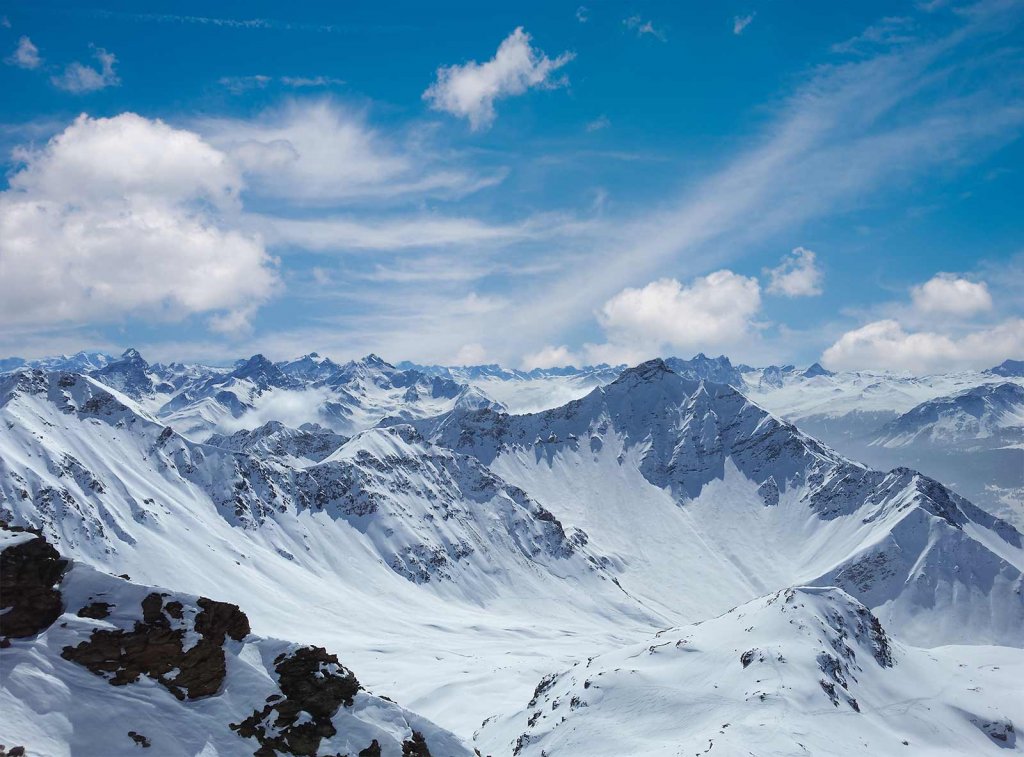
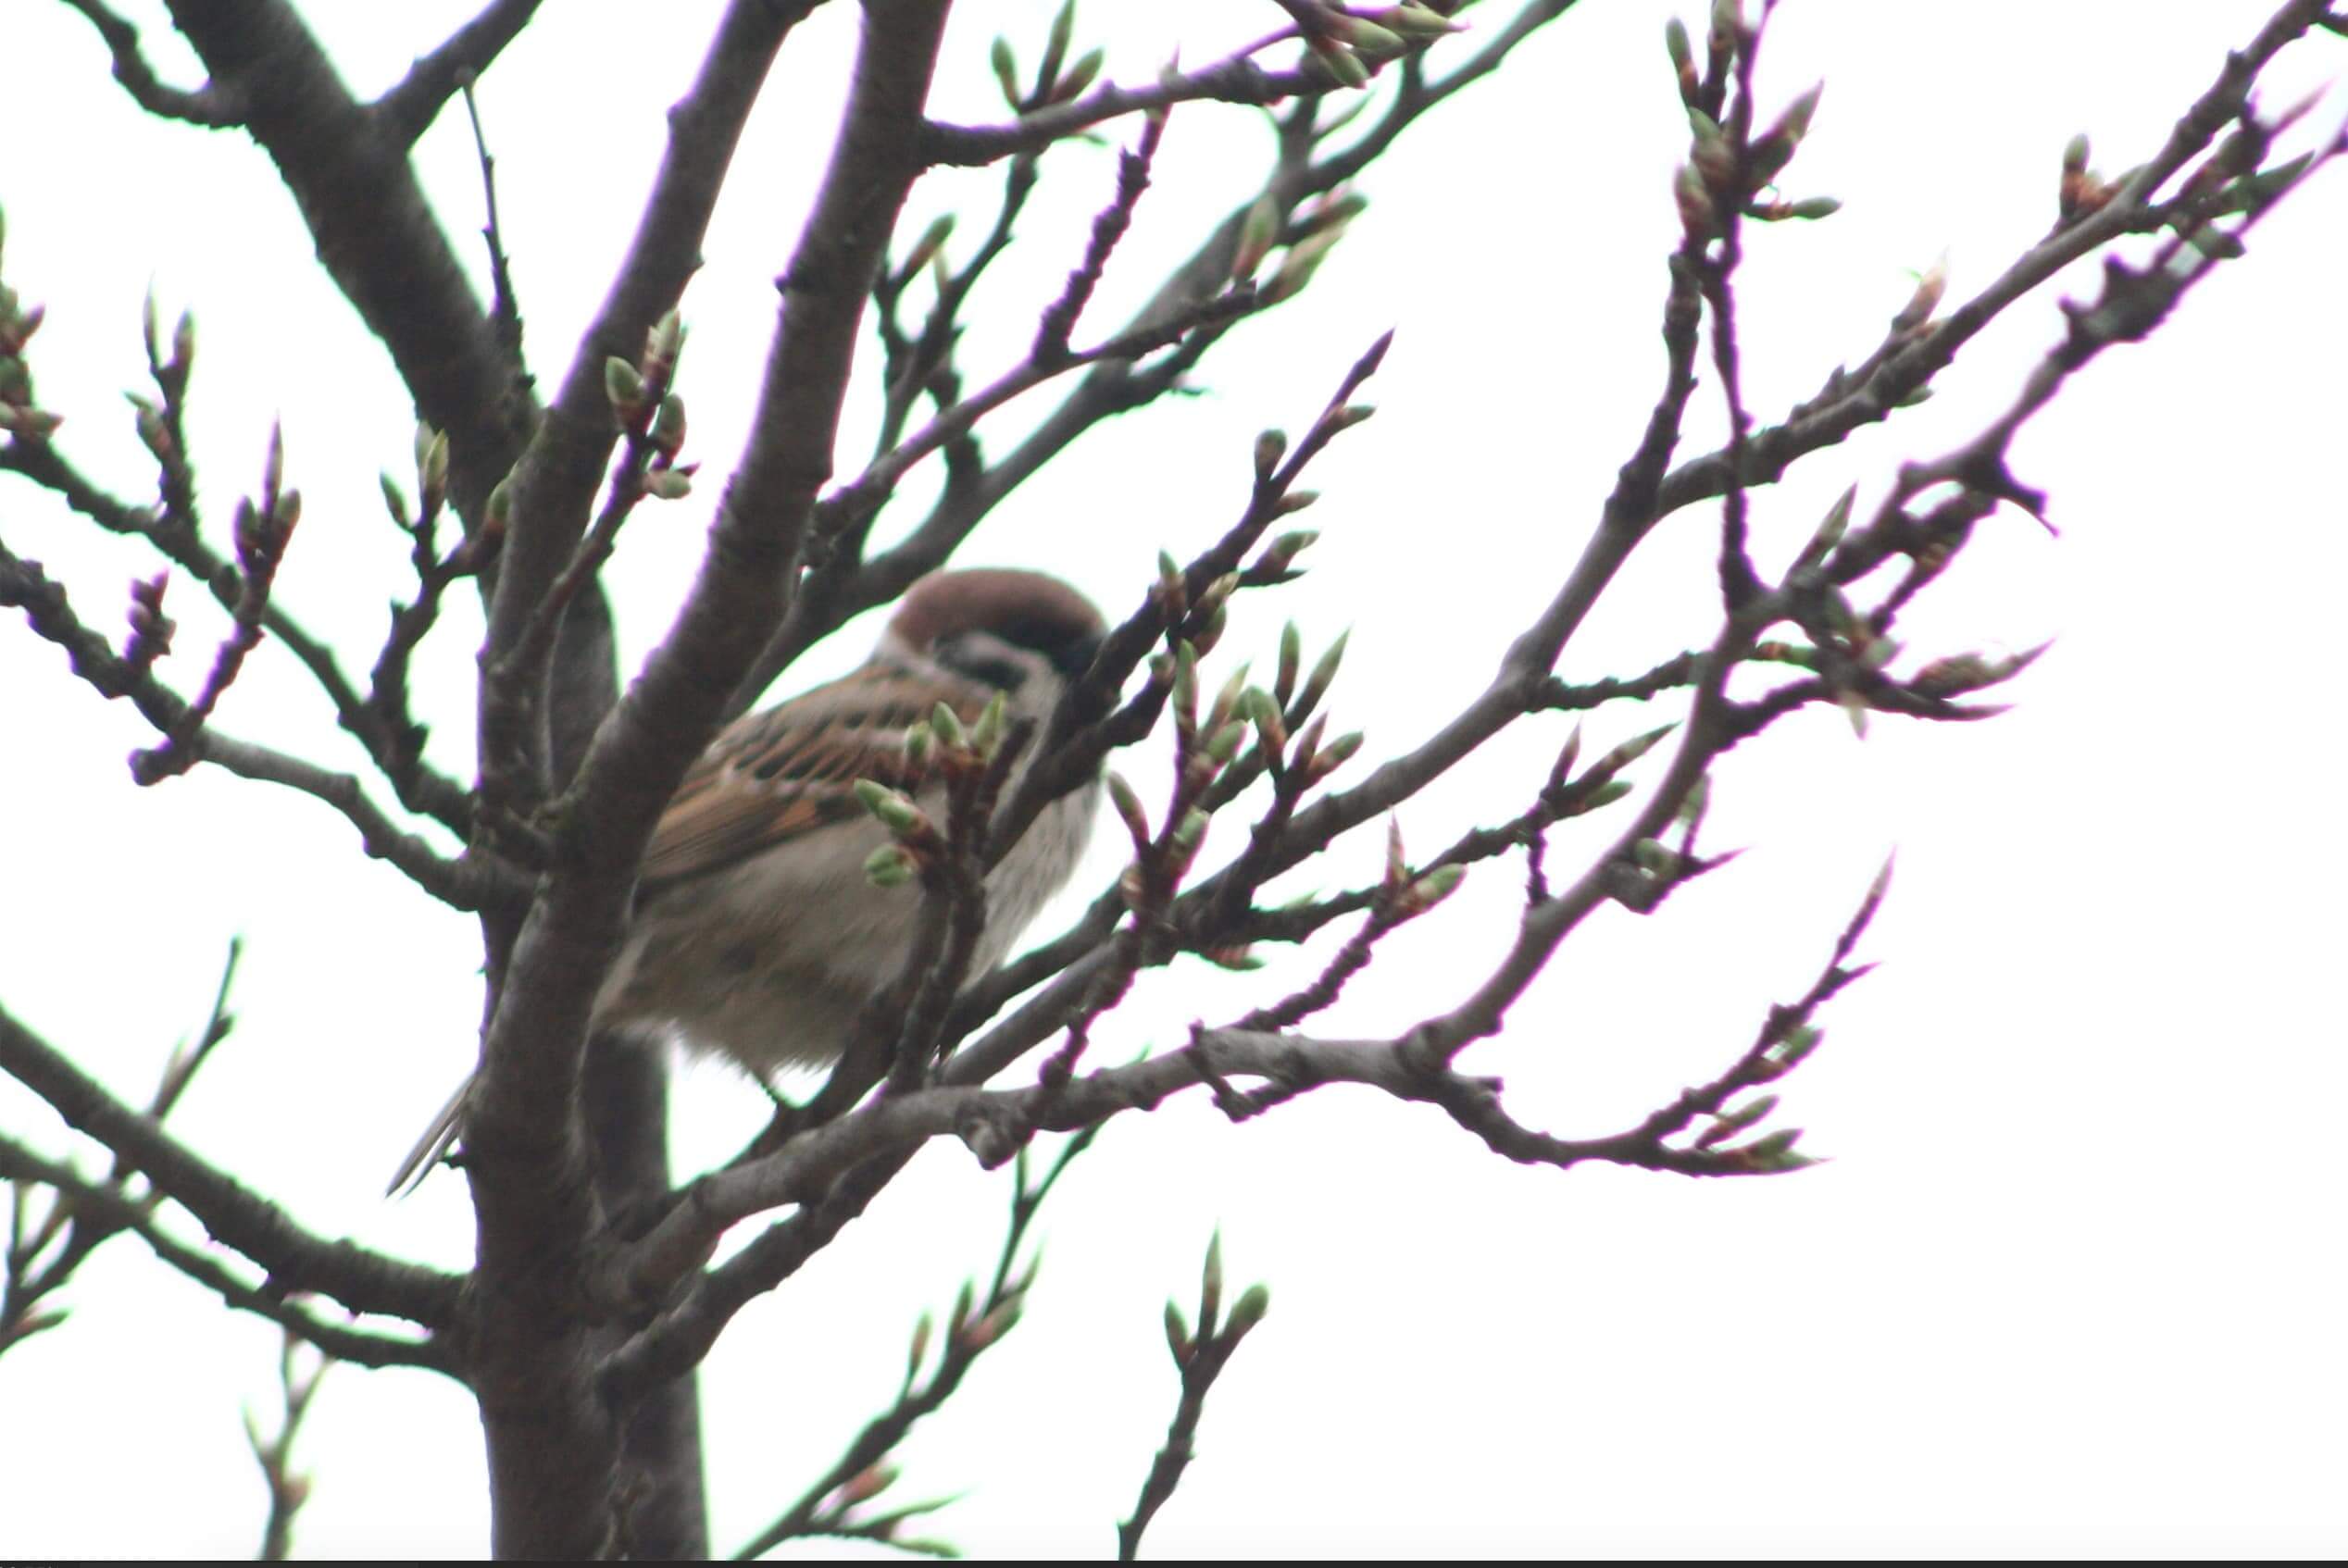
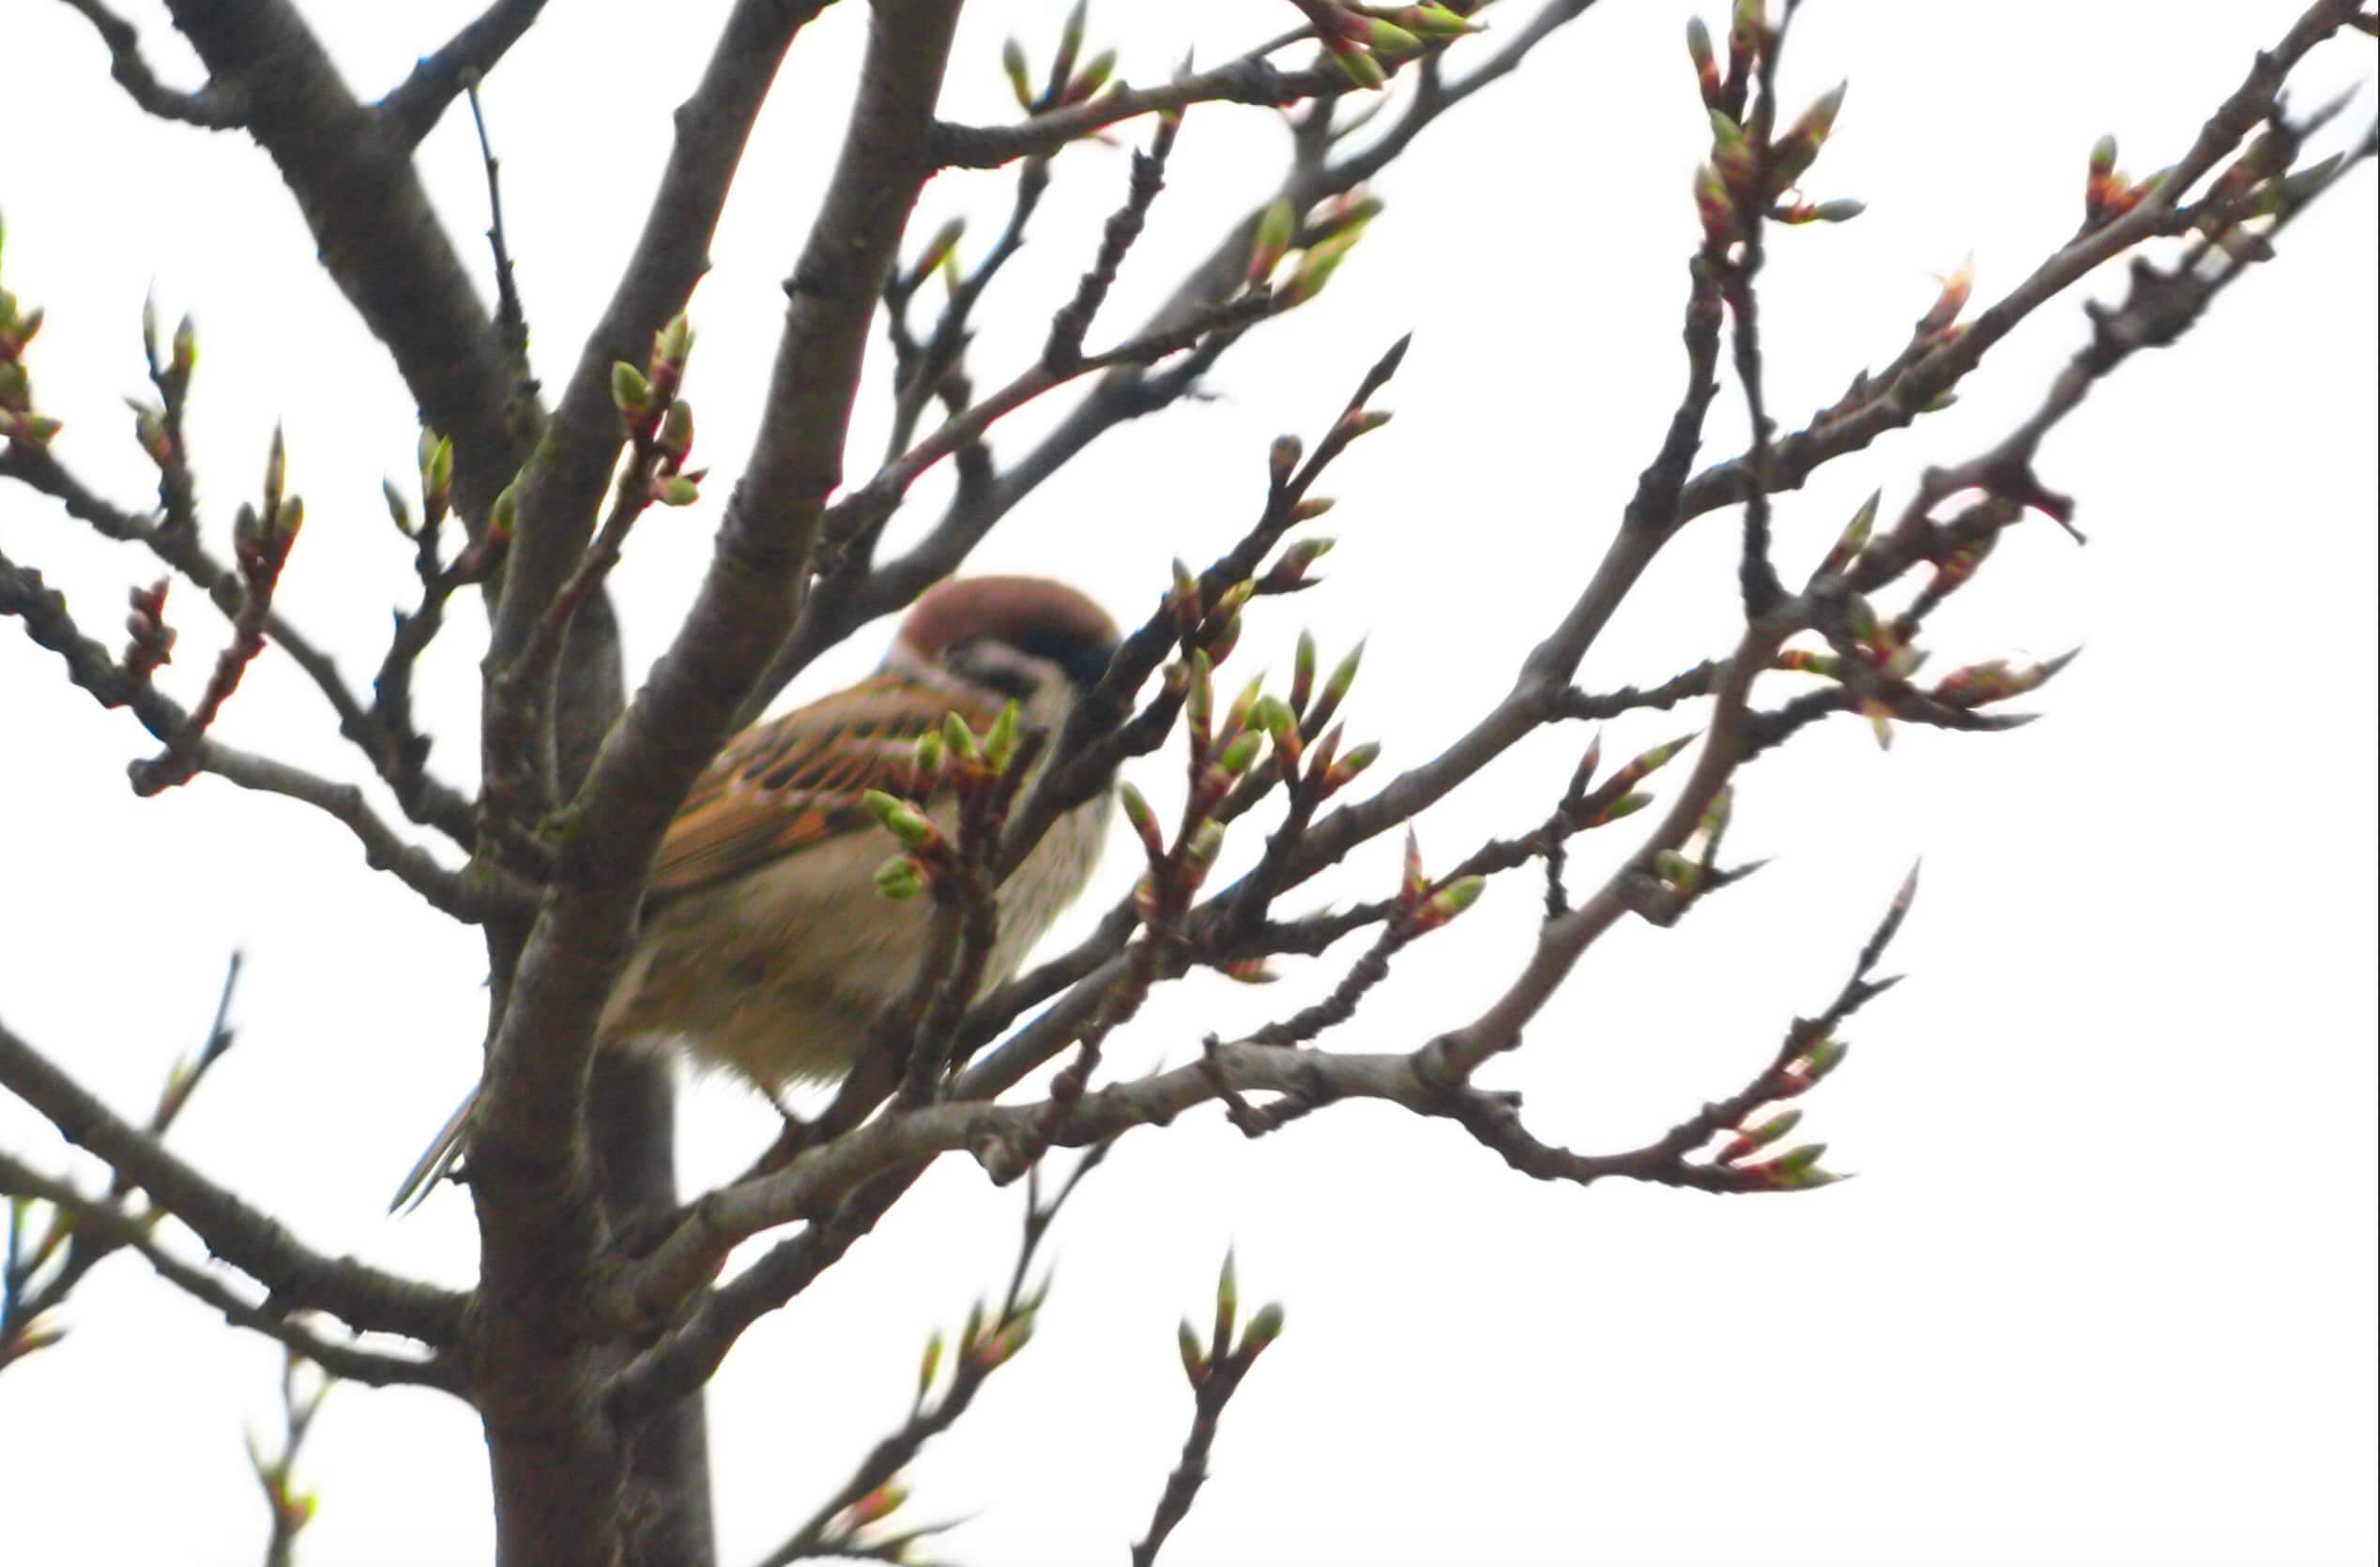
Let’s start the tutorial. But I would like to show you the before and after image before we start the tutorial.
After
Before
Did you see the sky in the after image? I didn’t like the sky in the before image so I changed it with the one which has clouds.
Step 1: Copy the Sky from the Source Image
You need to copy the sky from the source image. Let’s select the sky from the source image. You can use Quick Selection Tool for that. I am not explaining how can you select with Quick Selection tool for the time being but you can learn it by clicking on the link. Here you go – Quick Selection Tool.
Press Cmd+C/Ctrl+C once you have made the selection. This will copy the are which is selected.
Step 2 – Change the Sky in Photoshop
Go to the original image and press Cmd+V/Ctrl+V to paste it to change the sky.
You need to align the image so that it replaces only the background, nothing else. I’ll show you how you can do it.
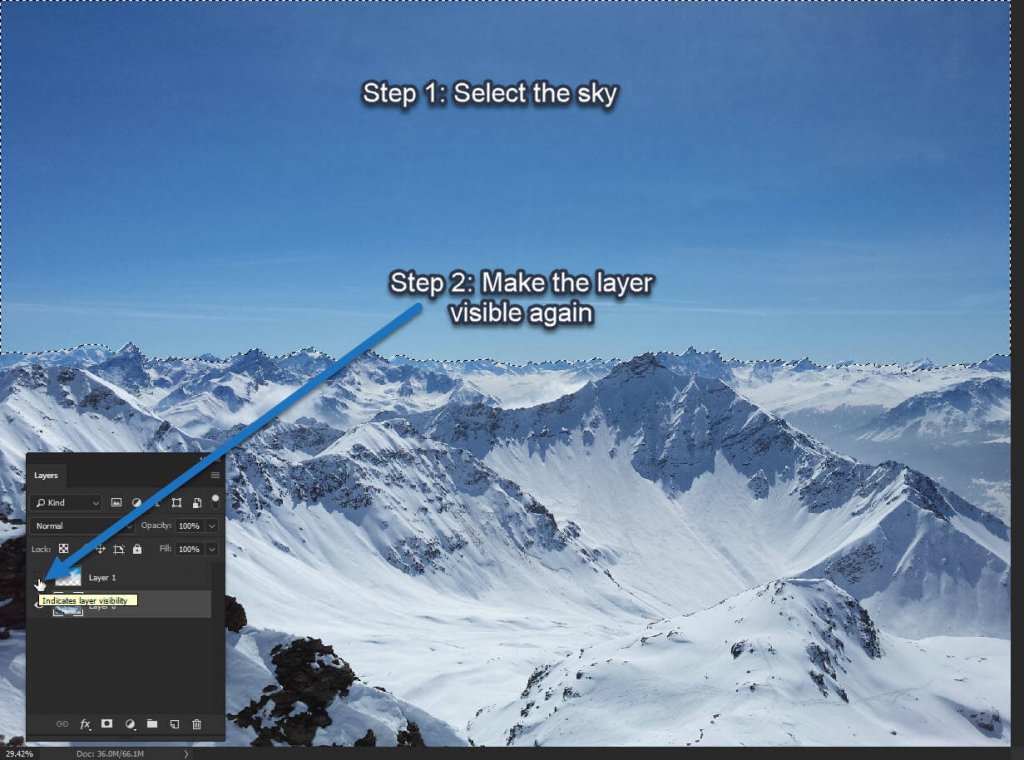
Step 3 – Select the Sky in the Source Image
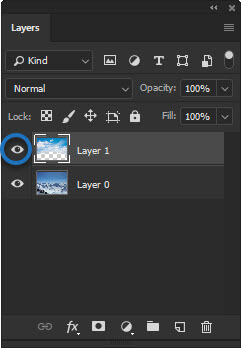
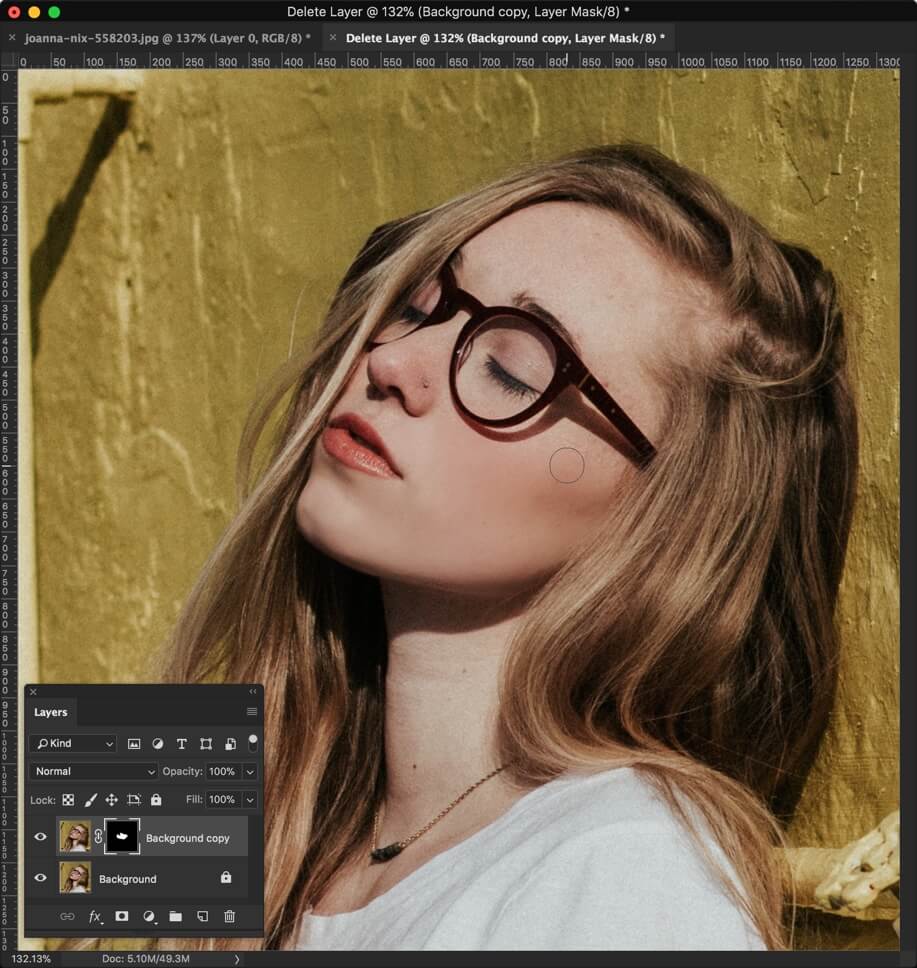
Hide the layer of the new sky so that you can see the original sky. Click on the “eye” icon of the layer of the new sky. This will hide it.
Select the original sky. You can use Quick Selection tool again. Once selected, unhide the layer you just hide.
Step 4 – Add Layer Mask
Make sure that the layer with the new sky is activated. Go to Layer>Layer Mask>Reveal Selection. This will reveal only the selected area.
Step 5 – Tweak the Sky
I think that the new sky is brighter as compared to the original sky. So, I am going to reduce the brightness.
Go to Layer>New Adjustment Layer>Brightness/Contrast. I am going to reduce the brightness. But I need to make sure that it will affect only the new sky, not the entire image. So, I’ll turn on “Clipping Mask” which is encircled with the blue color in the below image. This will ensure that the brightness will only affect the layer that is present just below it.
You use Photoshop to edit photos. Sometimes you edit landscapes, sometimes party photos, and sometimes your selfies. Whenever you edit selfies, the first thing you do is softening of the skin. Nobody likes rough skin (even on men). You spend around 5-10 mins to use the brush tool, gaussian blur, surface blur etc. to soften the skin, right? What if I tell you that I can give you a hidden feature in Photoshop that will cut down the time to only 1 minute? Yes, you can soften the skin in Photoshop within 1 minute.
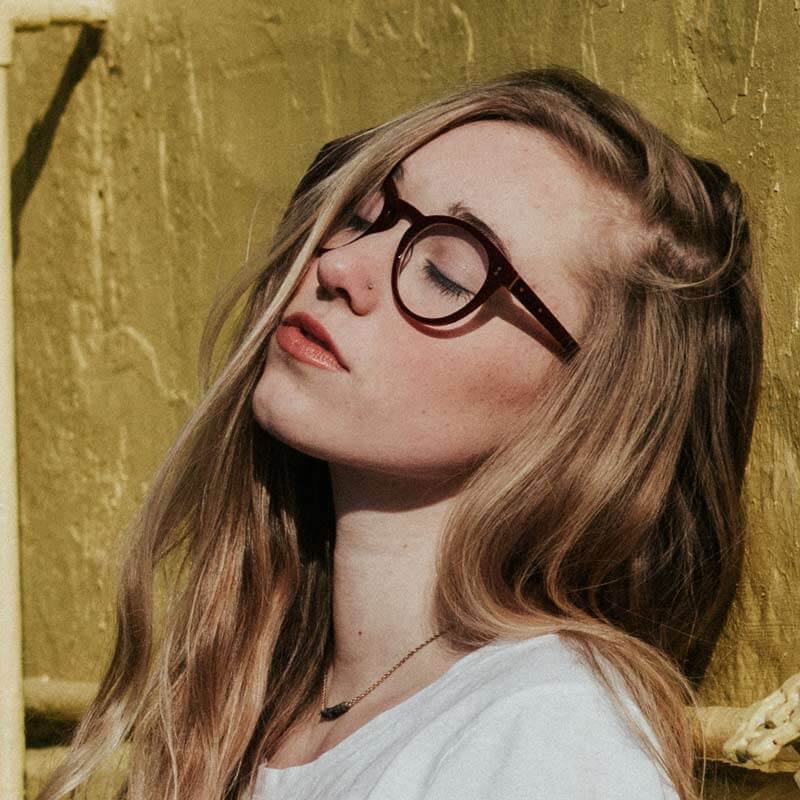
Before we begin, I want to show you the before and after photo. Did you see the difference?
Before
Fig. 1
After
Fig. 2
Let’s begin the tutorial.
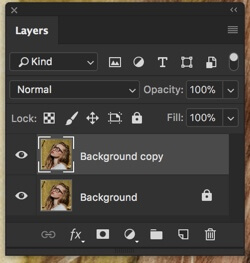
Step 1 – Duplicate the Layer
You and I need to use the layer mask in later steps so we need to duplicate the layer. Press Cmd+J/Ctrl+J to duplicate the layer. You can also go to Layer>Duplicate Layer to duplicate a layer. Your layer panel should look like Fig. 3.
Fig. 3
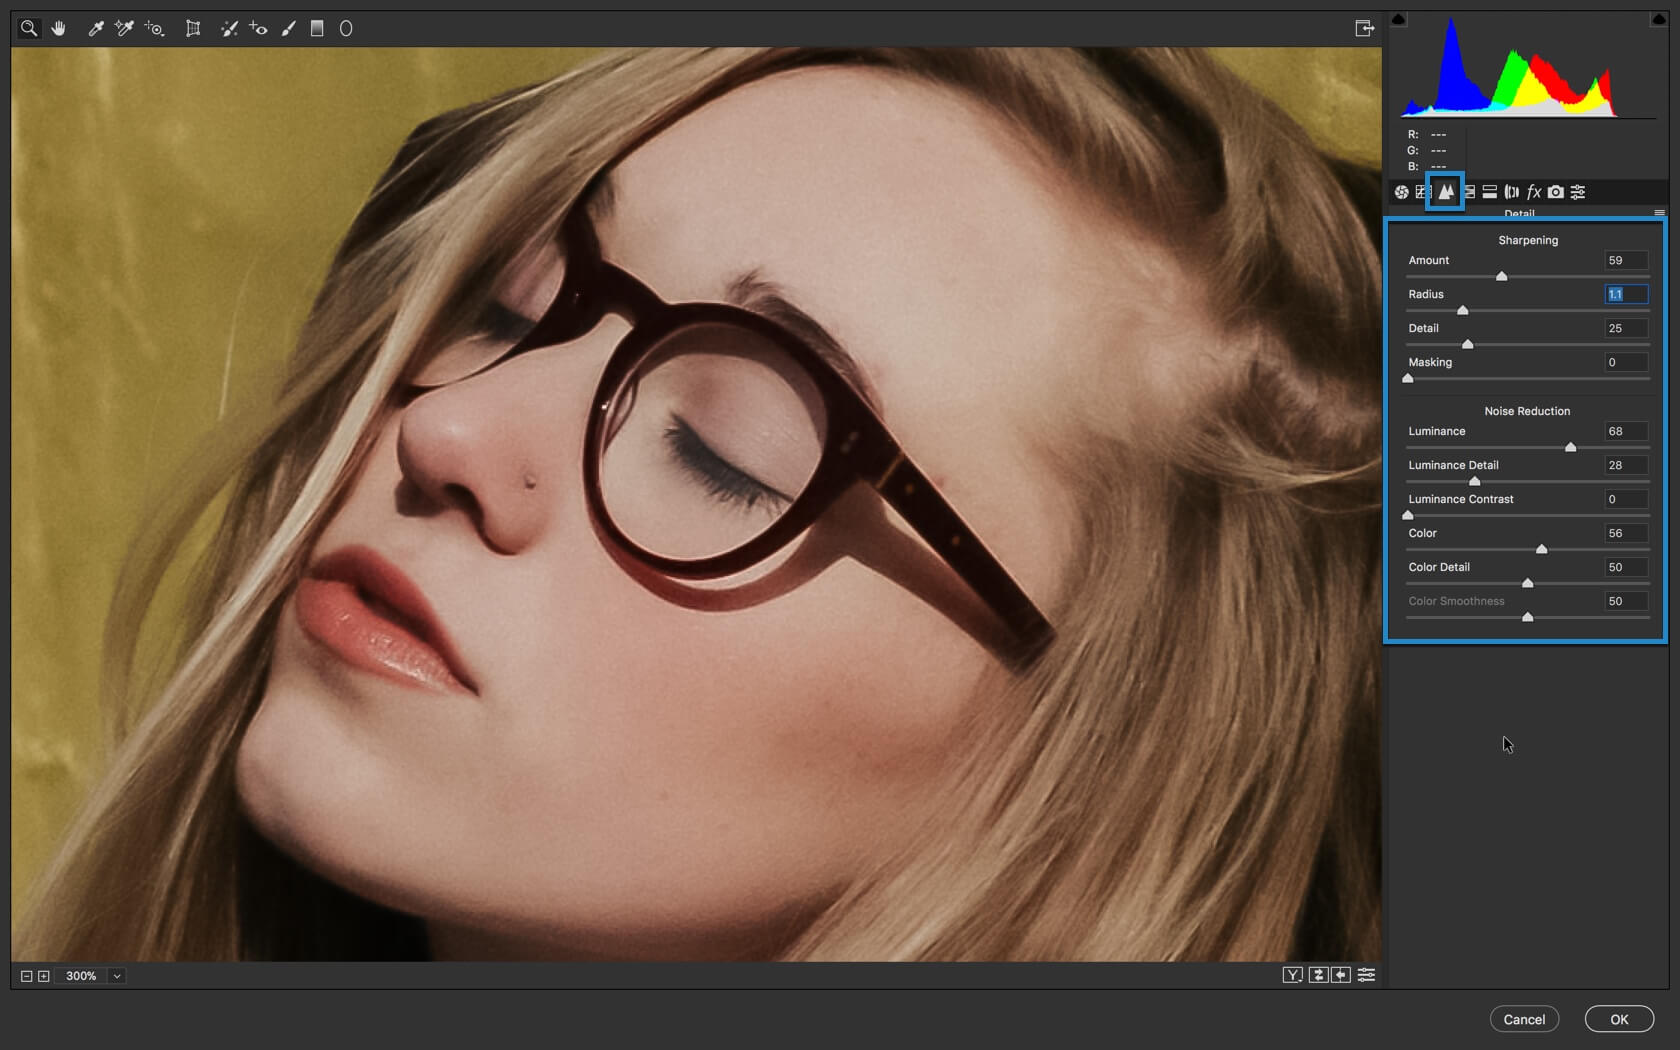
Step 2 – Soften Skin in Photoshop using Camera Raw
This is the step that will soften skin in Photoshop. Photoshop has an inbuilt feature that softens the skin but the name isn’t present with the same name. This is why you didn’t know that you could’ve saved an insane amount of time by using Camera Raw filter.
Go to Filter>Camera Raw filter or press Cmd+Shift+A/Ctrl+Shift+A.
Go to the “Details” tab which is marked with blue color in Fig. 4. Increase the Luminance to a high value. This will soften the skin. The problem is that it softens entire photo. You don’t want eyes and nose to soften, right? This is where Sharpening comes to rescue us. Increase the amount in Sharpening field and this will sharpen the edges.
Press OK
Step 3 – Use Layer Mask for Finetuning
Go to Layer>Layer Mask>Hide All. This will bring back the original photo again.
Sidebar – If you’re not familiar with the layer mask, you better check out my Layer Mask in Photoshop tutorial. The link will open in new tab.
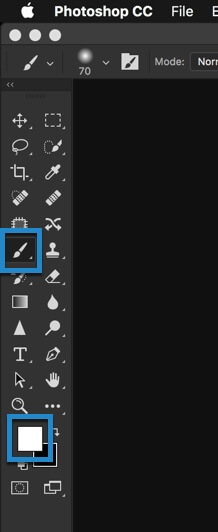
Choose the Brush Tool and change the foreground color to White.
Fig. 5
Adjust the size of the brush as per your needs and reduce the hardness to 1-5%. Now start brushing only on the skin. Avoid edges like jawline, nose, eyes, lips, etc. Your photo will start to look like Fig. 6. I have started to brush from the bottom of her face.
Fig. 6
You and I are human and we are bound to make mistakes. This is a certain chance that you might have brushed over the edges also. We’re going to fix that now. Change the foreground color to black and start brushing on the edges like lips, nose etc. Fig. 7 shows how the area where I was brushing just before taking the screenshot. The black arrow represents that area.
Fig. 7
This is all for today. This is how you soften skin in Photoshop. Check out the final image one more time.
Hey guys, welcome the brand new Select Subject in Photoshop. I received a notification on my Creative Cloud that a new version of Photoshop is available. I quickly checked what Adobe has added to Photoshop and I saw the Select Subject.
I quickly updated my Photoshop to use this tool. I had already guessed what this feature does by its name. Yes, you are correct. This feature tries to find the subject in the photo. I cannot say that Select Subject in Photoshop is flawless and I am expecting few improvements in this feature in the upcoming months.
Time to try it. Fig 1 shows the lion that I selected with the help of Select Subject.
Let’s begin with the tutorial, guys.
What is Select Subject in Photoshop?
Select Subject feature in Photoshop tries to find the subject in the photo. It uses artificial intelligence to draw a selection around the subjection.
Where is Select Subject in Photoshop Located?
The feature is hidden in Photoshop. You need to grab either Quick Selection or Magic Wand tool by pressing W to see it. Fig 2 shows the exact location.
You can also use it by going to Select>Select Subject.
How to Use Select Subject in Photoshop?
Umm. Just click on it and that’s it. 😀
Did you notice that Photoshop automatically selects the subject in Fig 3? I did not need to make the selection using any tool. It was a one-click selection. Just one and then bam.
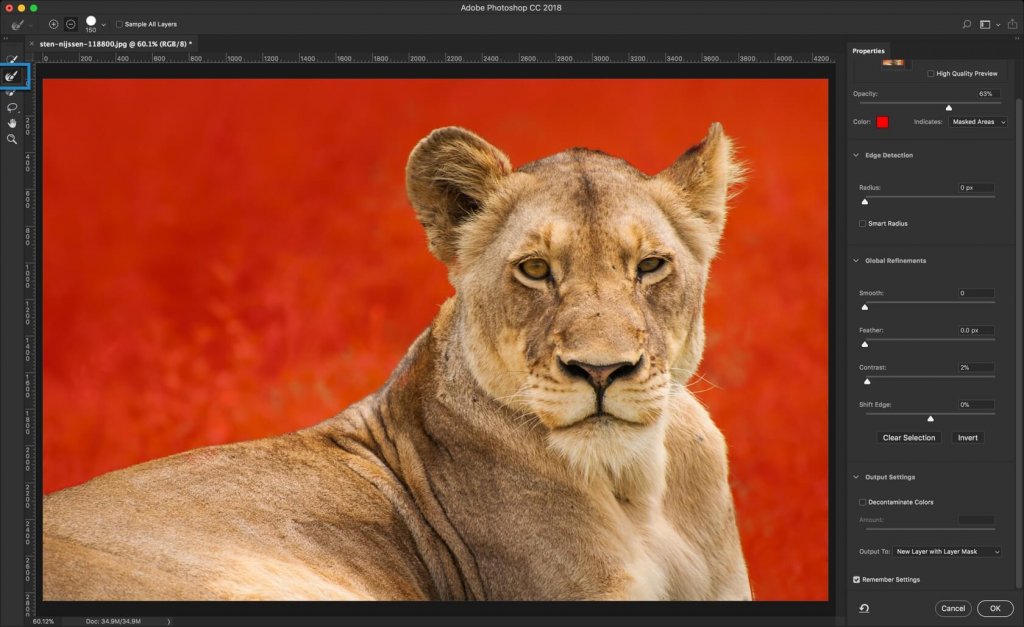
The selection made by Select Subject in Photoshop is not flawless. You need to refine the selection. I am going to use Select and Mask feature to refine the selection. Go to Select>Select and Mask.
I have highlighted the imperfection in Fig 3 that I am going to fix with Select and Mask.
The first thing that I am going to do is grab the Refine Edge Brush Tool (press E in Select and Mask). Now I am going to use it on the edges.
Pro Tip: Whenever you use Refine Edge Brush Tool, make sure that the center of the brush is outside the subject. If you can’t keep it outside, increase the size of the brush.
Look at Fig 5 to see how beautiful the selection is made.
In case you haven’t noticed, I did not even touch the controls on the right side. The selection is made just with the help of Select Subject and Select and Mask. Press OK to make the selection.
Hey, guys! Today, I am going to show you how to adjust the image size in Photoshop. It has been one of the most requested tutorials and I am surprised that I have never written one. And yes, you can enlarge the image with this tool.
The agenda is for today’s tutorial is very simple. The procedure is very simple and I’ll tell you more few things.
How to adjust the size of an image.
How image sizing is different than cropping.
How image sizing is different than canvas sizing.
Let’s begin with resizing an image.
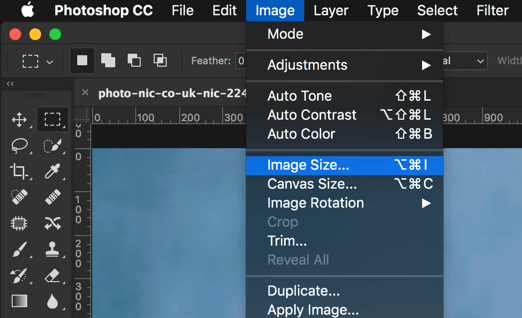
Step 1 – Adjust the Image Size in Photoshop
Go to Image>Image Size. You can also press Cmd+Opt+I/Ctrl+Alt+I as a keyboard shortcut.
Fig. 1
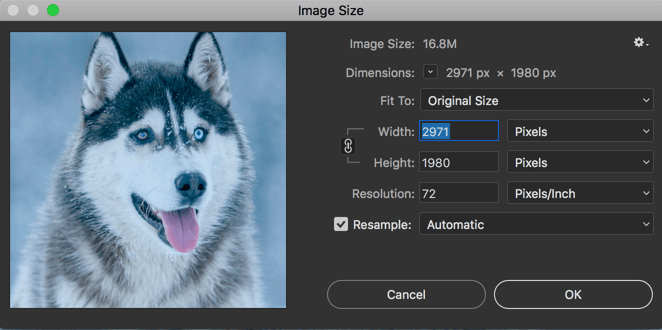
Step 2 – Tweak the Settings
You’ll see a dialog box like Fig. 2. I’ll explain you all the things in this dialog box.
Fig. 2
Image Size: This tells you the image size on disk as per the current dimension. If you change your dimension, the image size will also change. In short, it tells you the real-time data.
Dimensions: This tells you the width and height of the original image. You can change the scale to pixels, cms, inches, or whichever scale you’re convenient with. I use my images for web purpose so I keep the scale in pixels
Fit To: Here you can find some predefined sets or templates with some industry standards. You may find it useful if you need to alter your images as per the industry standards.
Width: This defines the wideness of the image. You can change the scale here also. I usually keep it to either Pixels or Percent.
Height: This defines the height of the image. If you change your width, Photoshop automatically changes the height to maintain the aspect ratio. I’ll show how can you stop Photoshop from automatically adjusting the height later in this tutorial.
Resolution: This defines the number of pixels in an inch. The photography standard is 300 and the web standard is 72. The positive side of having a high resolution is that if you zoom in the image, it will not pixelate. The drawback is that more the pixels per inch, higher the image size. You can also change the scale here.
Resample: There are eight resampling methods in Photoshop. Whenever you change the size of an image, Photoshop needs to resample (basically process) all the pixels in your image. I have already written a tutorial on Resample in Photoshop. If you ask me which method should you choose to enlarge the image, I’d suggest “Preserve Details 2.0”. If you ask for scaling down the image, I’d say “Automatic”.
Additional Tips
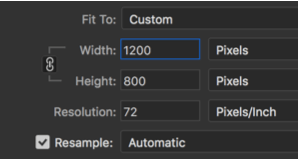
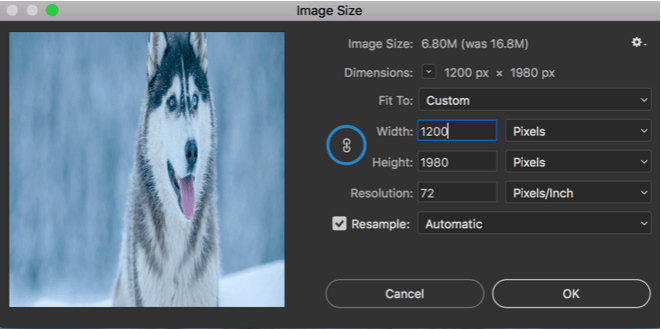
In point 5, I mentioned that Photoshop automatically changes height is you change the width or vice versa. My image width was 2971 pixels and when I changed it to 1200 pixels, my height got changed automatically. Photoshop does it to maintain the aspect ratio otherwise your photo will look stretched.
Fig. 3
A quick way to disable this feature is to click on the chain icon that is shown in Fig. 4. This will unlink the height with the width. I know it distorts the image that can be seen in the preview pane.
Fig. 4
Some Common Differences
You may confuse this with few other things in Photoshop like Canvas size and Crop Tool. I’ll compare each of them so that you can use this feature like a pro.
Crop Tool vs. Image Size: Crop tool is used to crop an image. It reduces the dimension but a part of the image will be cropped out. Image resizing doesn’t crop out anything. All part of the image will be same. You can either scale down the image or scale up the image.
Canvas Size vs. Image Size: Canvas size can be used to increase your image work area. It doesn’t increase your image size. If you can increase the canvas size, it’ll fill the newly added area with white color (or any color you like). Image size doesn’t add or remove any white color to the added area. Instead, it enlarges or shortens the actual image.
Hey Guys – It’s time for the next tutorial from 30 Days to Learn Photoshop Series. Last time we discussed on Adjustment layers of Solid Color, Gradient, Pattern, Brightness, Levels, Curves, and Exposure. This is the next and the last part of the series where I’ll be discussing Adjustment layers of Vibrance, Hue, Color Balance, Black and White, Photo Filter, Color Lookup, and Invert. There are few more but you are never going to use them.
Before we begin, I want to explain two things again (in case you missed any of the last two parts).
WHAT’S ADJUSTMENT LAYER IN PHOTOSHOP?
The Adjustment Layers in Photoshop are a group of some useful, non-destructive image editing tools that add color and tonal adjustments to your image. Did you read the word “non-destructive”? Yeah, all of the changes will be done without harming the original image. Means that you can go back to any point in time without any loss. It’s like a Time Machine in macOS and Win7 backup in Windows.
WHERE ARE ADJUSTMENT LAYERS LOCATED IN PHOTOSHOP?
Adjustment layers are located at the bottom of layer panel (press F7 to open).
All the things that you’d use daily are present here. Be it Brightness, Color Balance, Photo Filter, Gradient, or even Invert are present here.
Now that you what and where of the Adjustment layer, let’s explore it. I am going to explain each layer in a two separate tutorial. In the tutorial, I’ll cover Solid Color, Gradient, Pattern, Brightness, Levels, Curves, and Exposure. The rest of the things will be covered in the next tutorial.
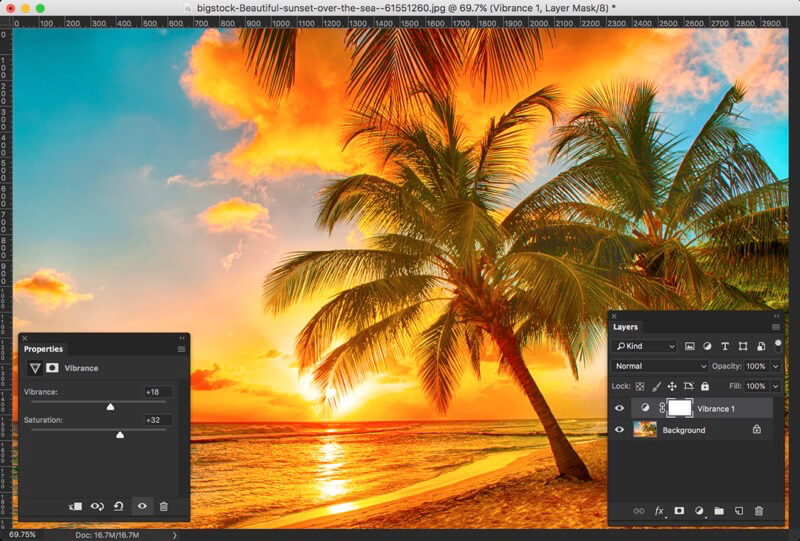
What is Vibrance and Saturation in Photoshop?
No photo looks worse than a washed out photo. To give life to a washed out photo, these two adjustment layers come into action.
You may feel that both of them works in the same way if you’re new to Photoshop. If you’re not new, you may feel that they work differently but you don’t know how. So, let me quickly differentiate between these two.
Vibrance – This slider only deals with the colors that are saturated. So if you drag this slider to the right, only less saturated colors will pop up. If you drag it to the left, only saturated colors will fade away.
Saturation – This slider does not work smartly. It doesn’t differentiate between less saturated color and more saturated color. If you drag this slider to the right, the entire image will become saturated.
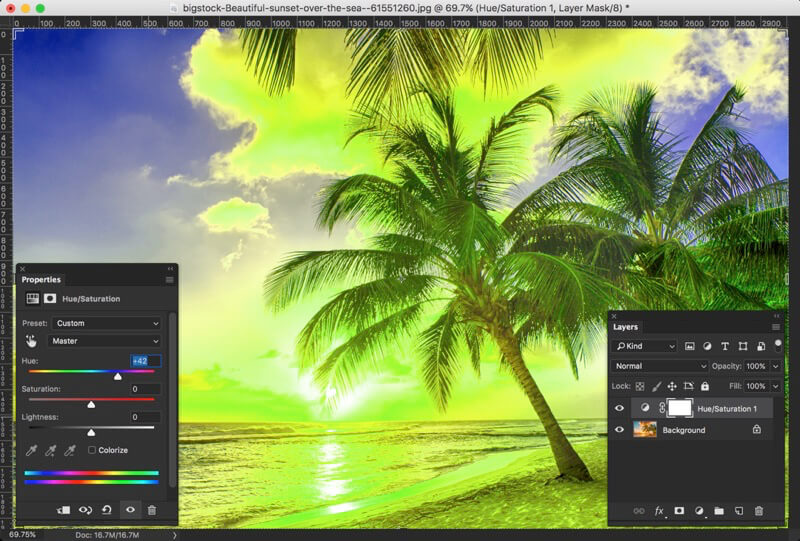
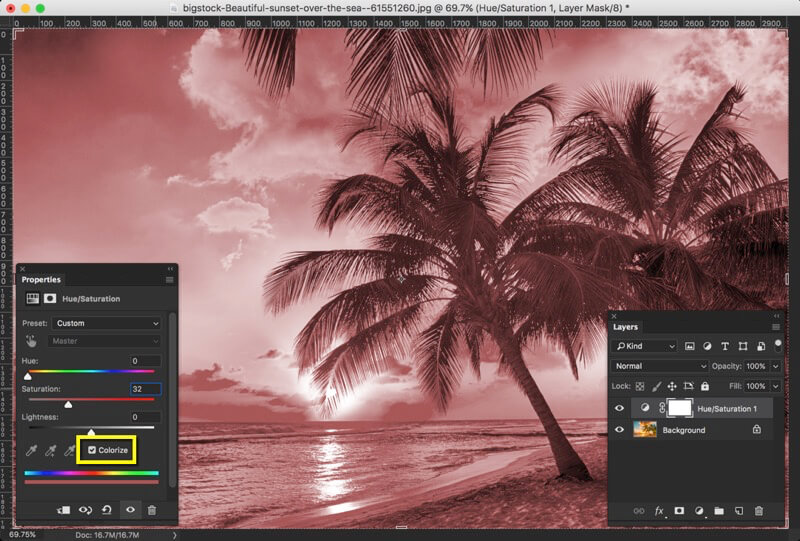
What is Hue/Saturation in Photoshop?
This adjustment layer lets you change the hue of the image. The Hue is basically the wavelength of the image and each color has a different wavelength.
Saturation slider does the same job here.
Lightness increases the white of the color. If you drag the slider to the right, the photo will become lighter.
You can also click on the “Colorize” box to add a tint to your image.
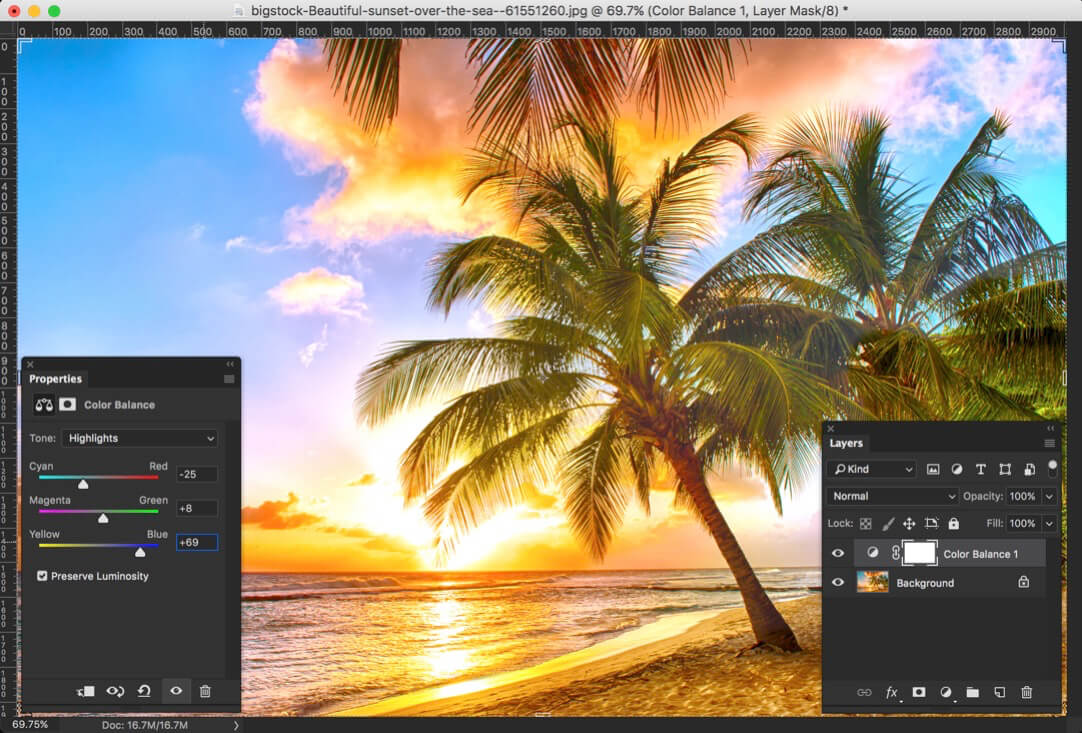
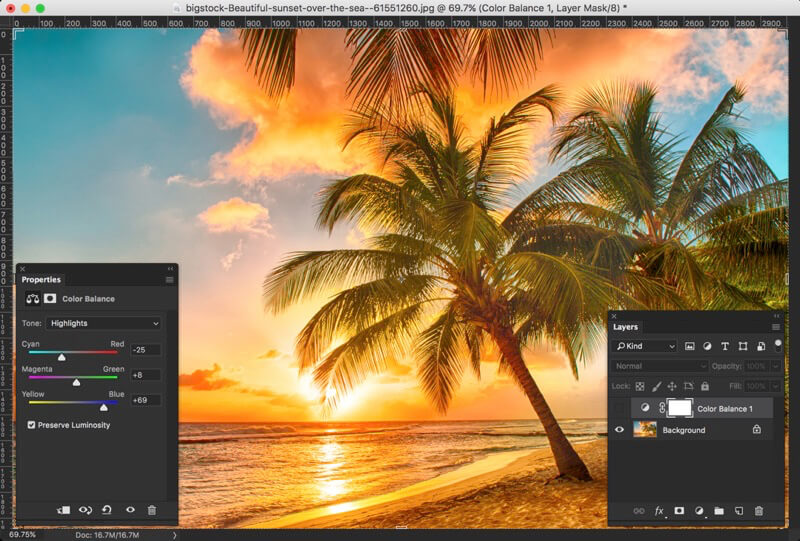
What is Color Balance in Photoshop?
Color balance is the most advanced adjustment layer to remove the tint from an image. Here you can increase or decrease the intensity of Red, Green, or Blue in an image.
For example, I have corrected the slightly yellow tint in the demo image.
Below is the original image.
Color Balance layer has three tones. One is Highlights, one is Midtones, and the last is Shadows.
Highlights – If this tone is set, whatever modification you do in the image will be changed only in the highlights part. Highlights part of an image is the part which is overexposed as per the histogram. Sun and sky are the highlight parts of the image. Midtones – If this tone is set, whatever modification you do in the image will be changed only in the midtones part. Midtones parts are neither bright nor dark. Sea is the midtone here. Shadows – If this tone is set, whatever modification you do in the image will be changed only in the dark part. Leaves and branches are the shadow parts here.
What is Black and White Adjustment Layer in Photoshop?
This adjustment layer converts an image to Black and White. Although this method is not the one which I prefer to convert my images (I prefer Gradient Map because that gives crispier black and white) but this layer gives a good amount of flexibility.
You can also select the amount of luminosity of each primary color.
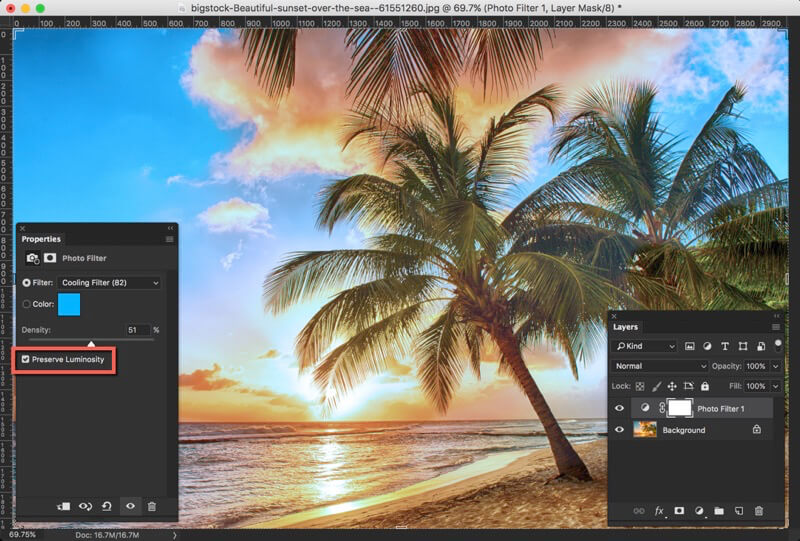
What is Photo Filter in Photoshop?
Photo Filter adds tint to the image.
You can choose the Filter (basically color) and start tinting your image. If your color is not listed, you can also choose some custom color by clicking on the “color” and then choose the color.
You can also smartly use this layer to remove the tint. For example – the original image has a yellow tint. Now we all know that the opposite of yellow is blue. So, if we choose the filter as Blue and increase the intensity then we can remove the yellow tint.
One thing I always recommend is to keep “Preserve Luminosity” turned on. This tool keeps the whites of the image white so that your highlights don’t get tinted.
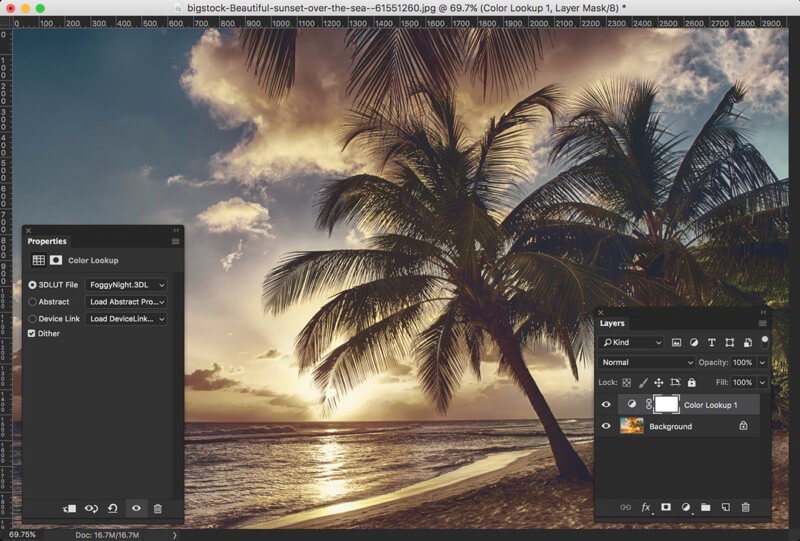
What is Color Lookup in Photoshop?
I have never used this layer much but this gives some cool filters to your image. Below is an example. There’s not much to share about this layer.
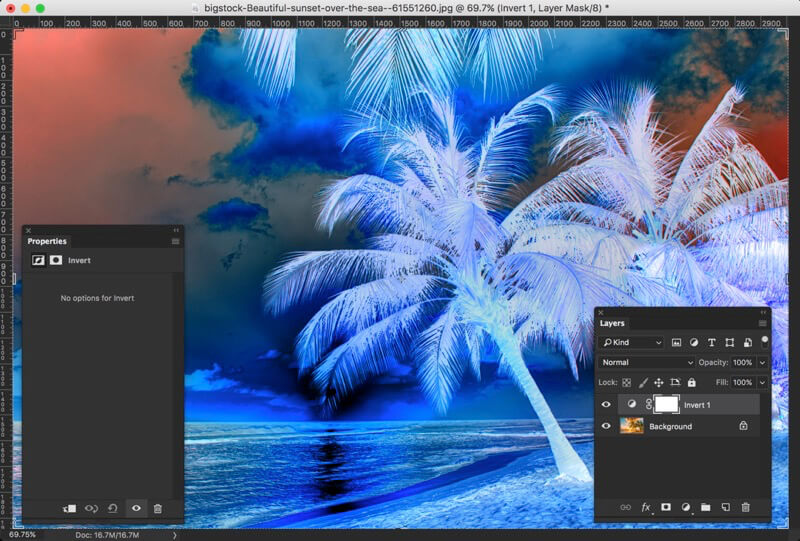
What is Invert in Photoshop?
Invert adjustment layer inverts the image. The Invert command inverts all the pixel colors and brightness values in the current layer as if the image were converted into a negative. Dark areas become bright and bright areas become dark. Hues are replaced by their complementary colors.
I have been receiving a lot of requests on how to remove chromatic aberration in Photoshop. People are saying that they’re trying to remove it but cannot remove it completely. I totally understand them. Removing it completely is really tough. You need to understand the colors of your image, but it’s not that tough. I’ll show one hack that you can use to easily remove the chromatic aberration. I have been using this hack for quite some time and it works like a charm.
I am going to use Camera RAW for this tutorial. If you’re using newer versions of Photoshop then Camera RAW is integrated into your Photoshop. If you’re using older versions of Photoshop then you need to download Camera RAW as a standalone software from adobe.com.
Before we begin, I want to show you the before and after. The photo credit goes to Reinhold Brezovszky.
Final
Initial
So, let’s begin the tutorial.
Step 1: Open the Image in Camera RAW
The first thing is to open the image in Camera RAW. Go to Filter > Camera RAW Filter. Go to Lens Correction Tab. Drag the Purple amount and green amount to all the way to the right.
You will see that almost all of the Chromatic Aberration has faded away just by doing this. But don’t trust your eyes. 😉
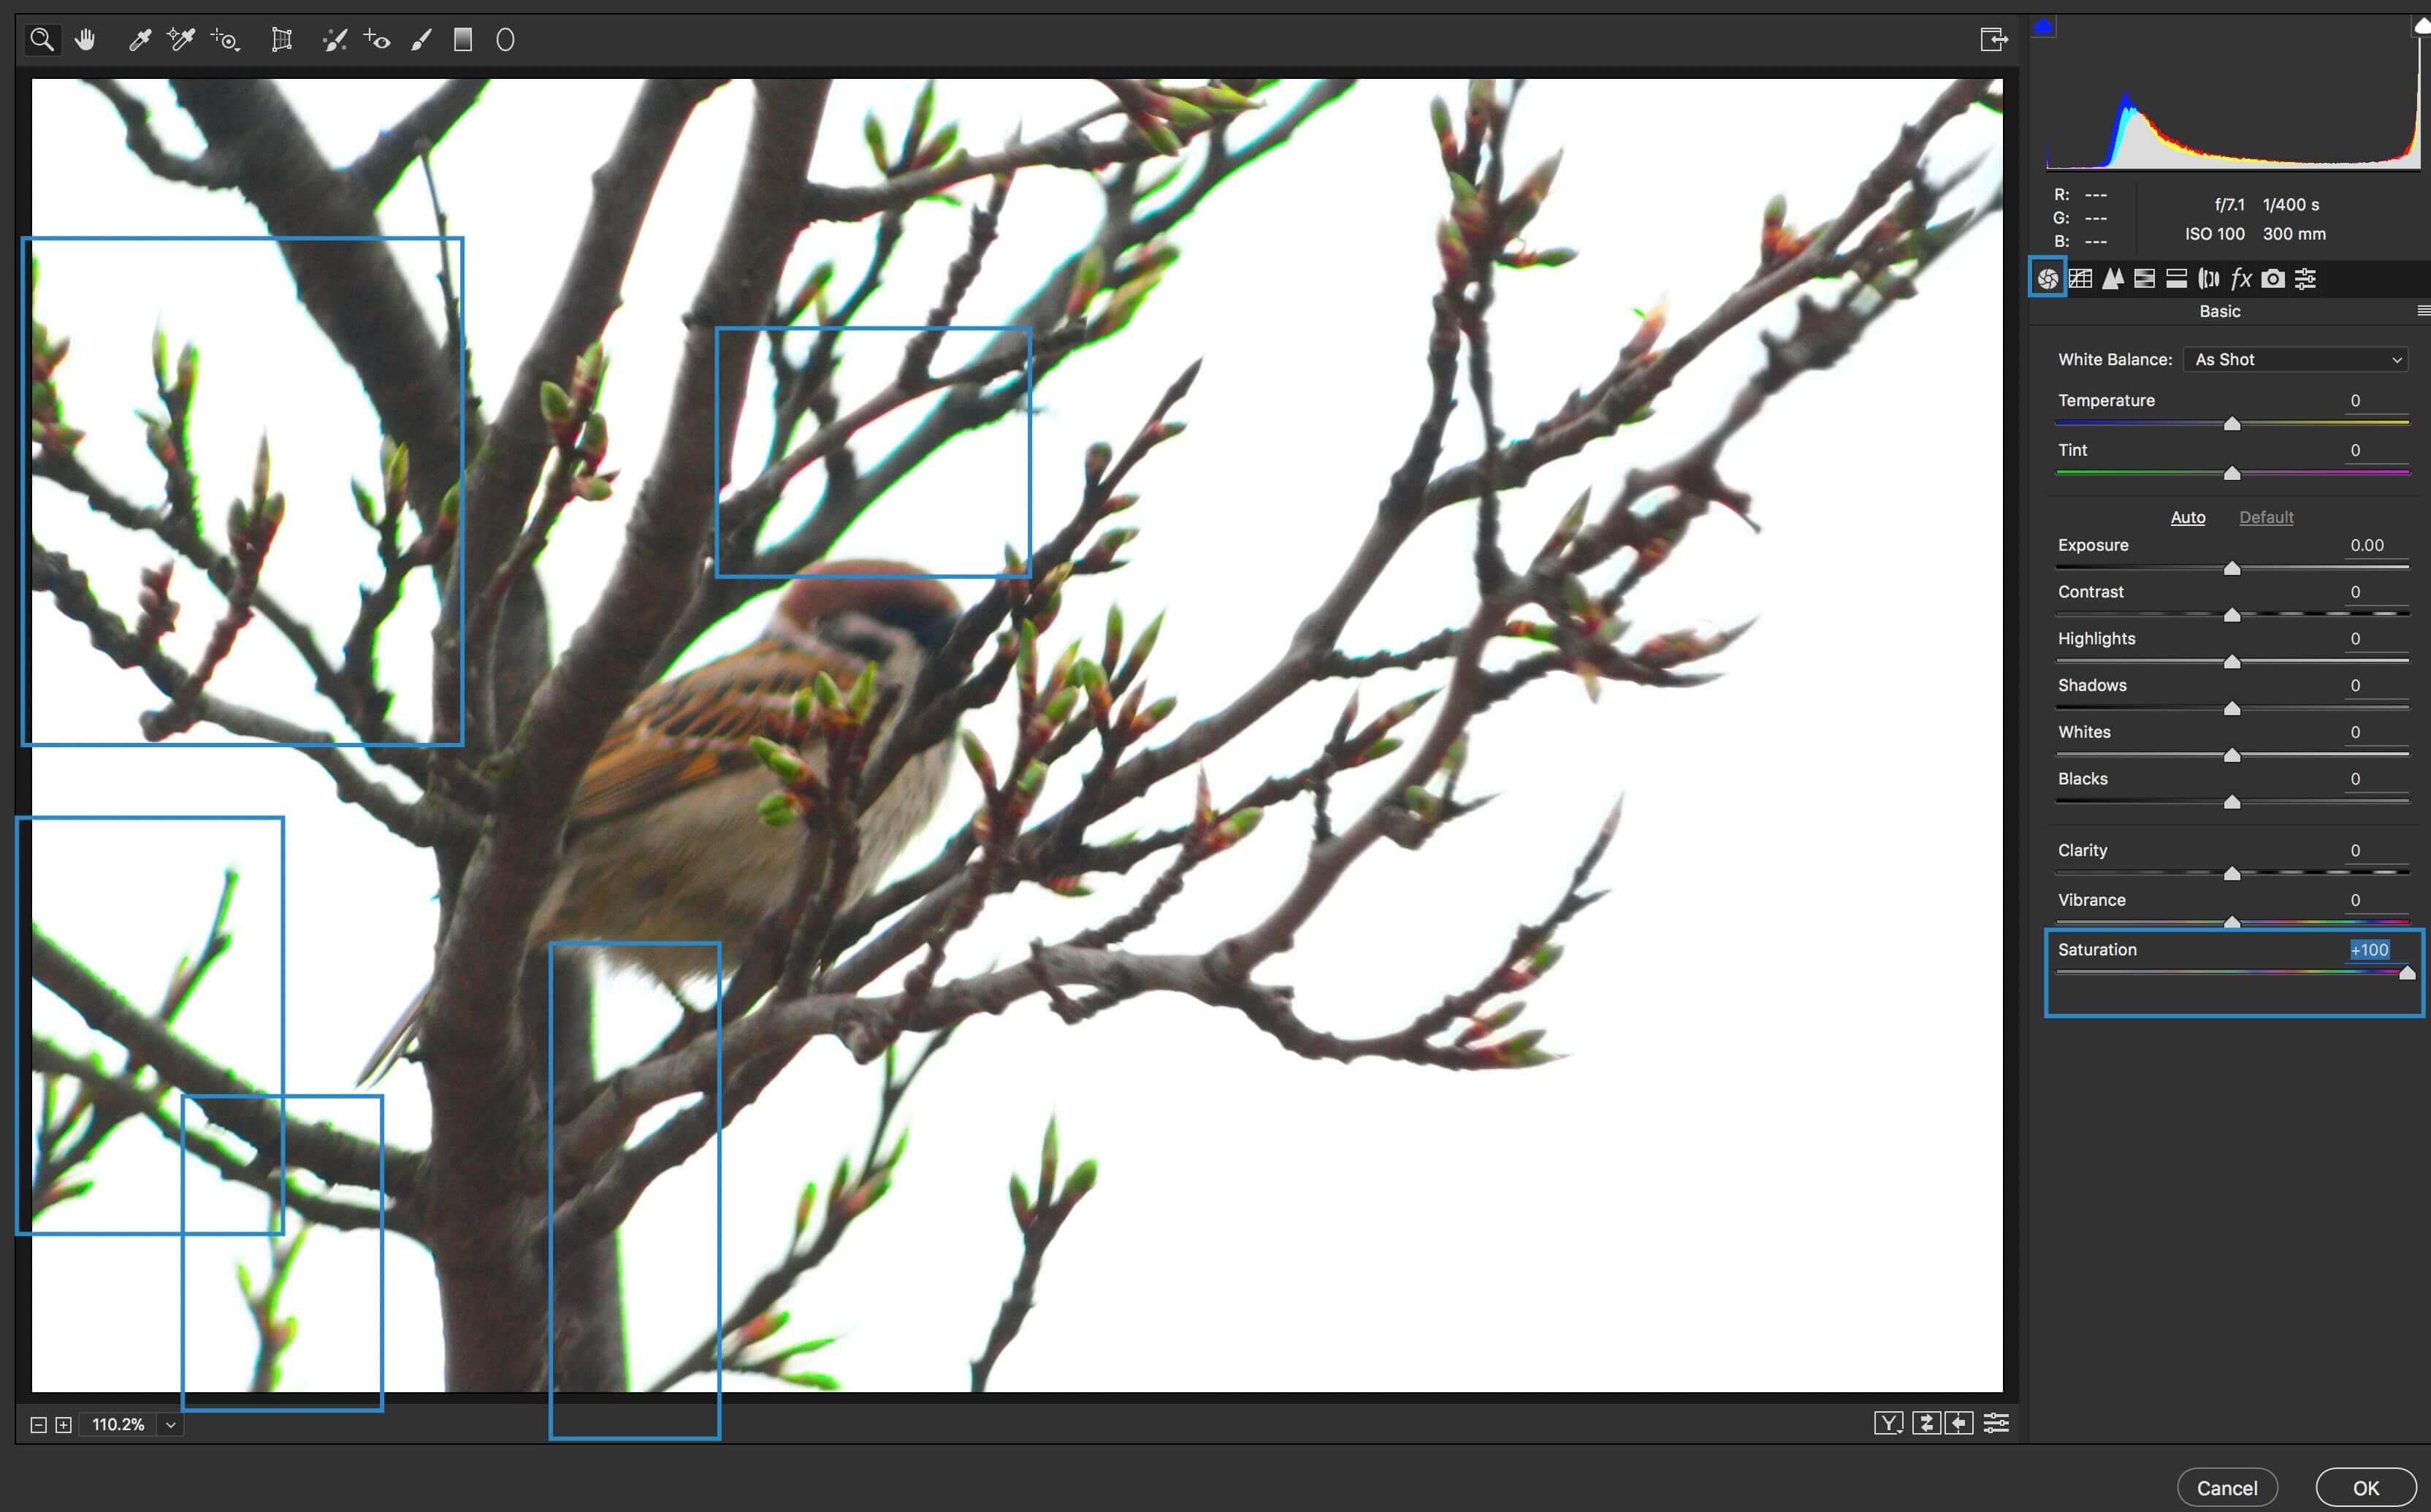
Step 2: Increase the Saturation
Go to Basic tab and increase the saturation all the way to 100. You’ll see that there are lots of chromatic aberration is still left.
Don’t worry. We can remove it too.
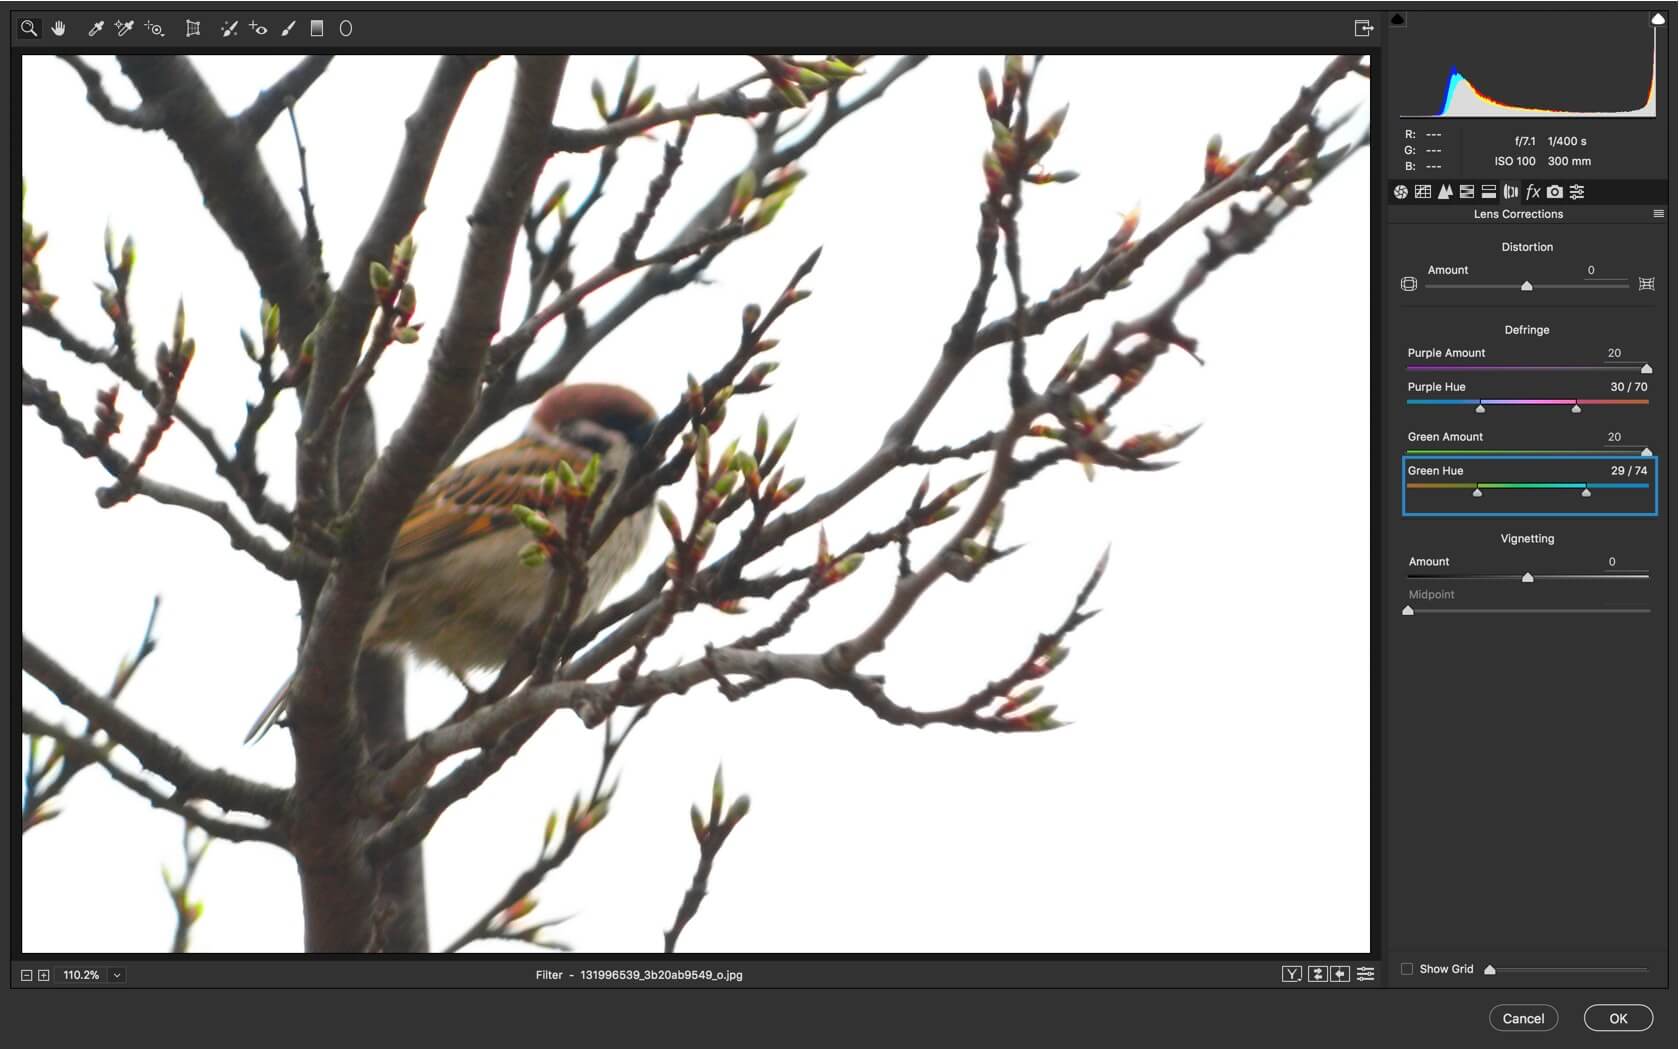
Step 3: Remove Chromatic Aberration in Photoshop
Now, again go back to Lens Correction Tab. Increase the range of Green Hue till the time you see that the chromatic aberration is gone.
Change the range of Purple if you’re facing this issue with Purple color.
Step 4: Reset the Saturation
Now, go back again to Basic Tab and reset the saturation.
That’s all!
Here’s the final photo again.
Share this tutorial with your friends and family on Facebook and Twitter and show them that it’s not tough to remove Chromatic Aberration.
I have even better tutorials on TickyPhotoshop. Check them out.
Hey, guys! It’s been few months since I wrote about Instagram effects. Since then, Instagram has introduced tons of new filters. One of them is Clarendon. So, let me present you my new tutorial on how to create Instagram Clarendon effect in Photoshop.
I must say that all these Instagram effects are easy to replicate in Photoshop. You just need to know which adjustment layer to use and when to use. For this tutorial, I am going to use three unique adjustment layers which are photo filter, levels, and brightness/contrast.
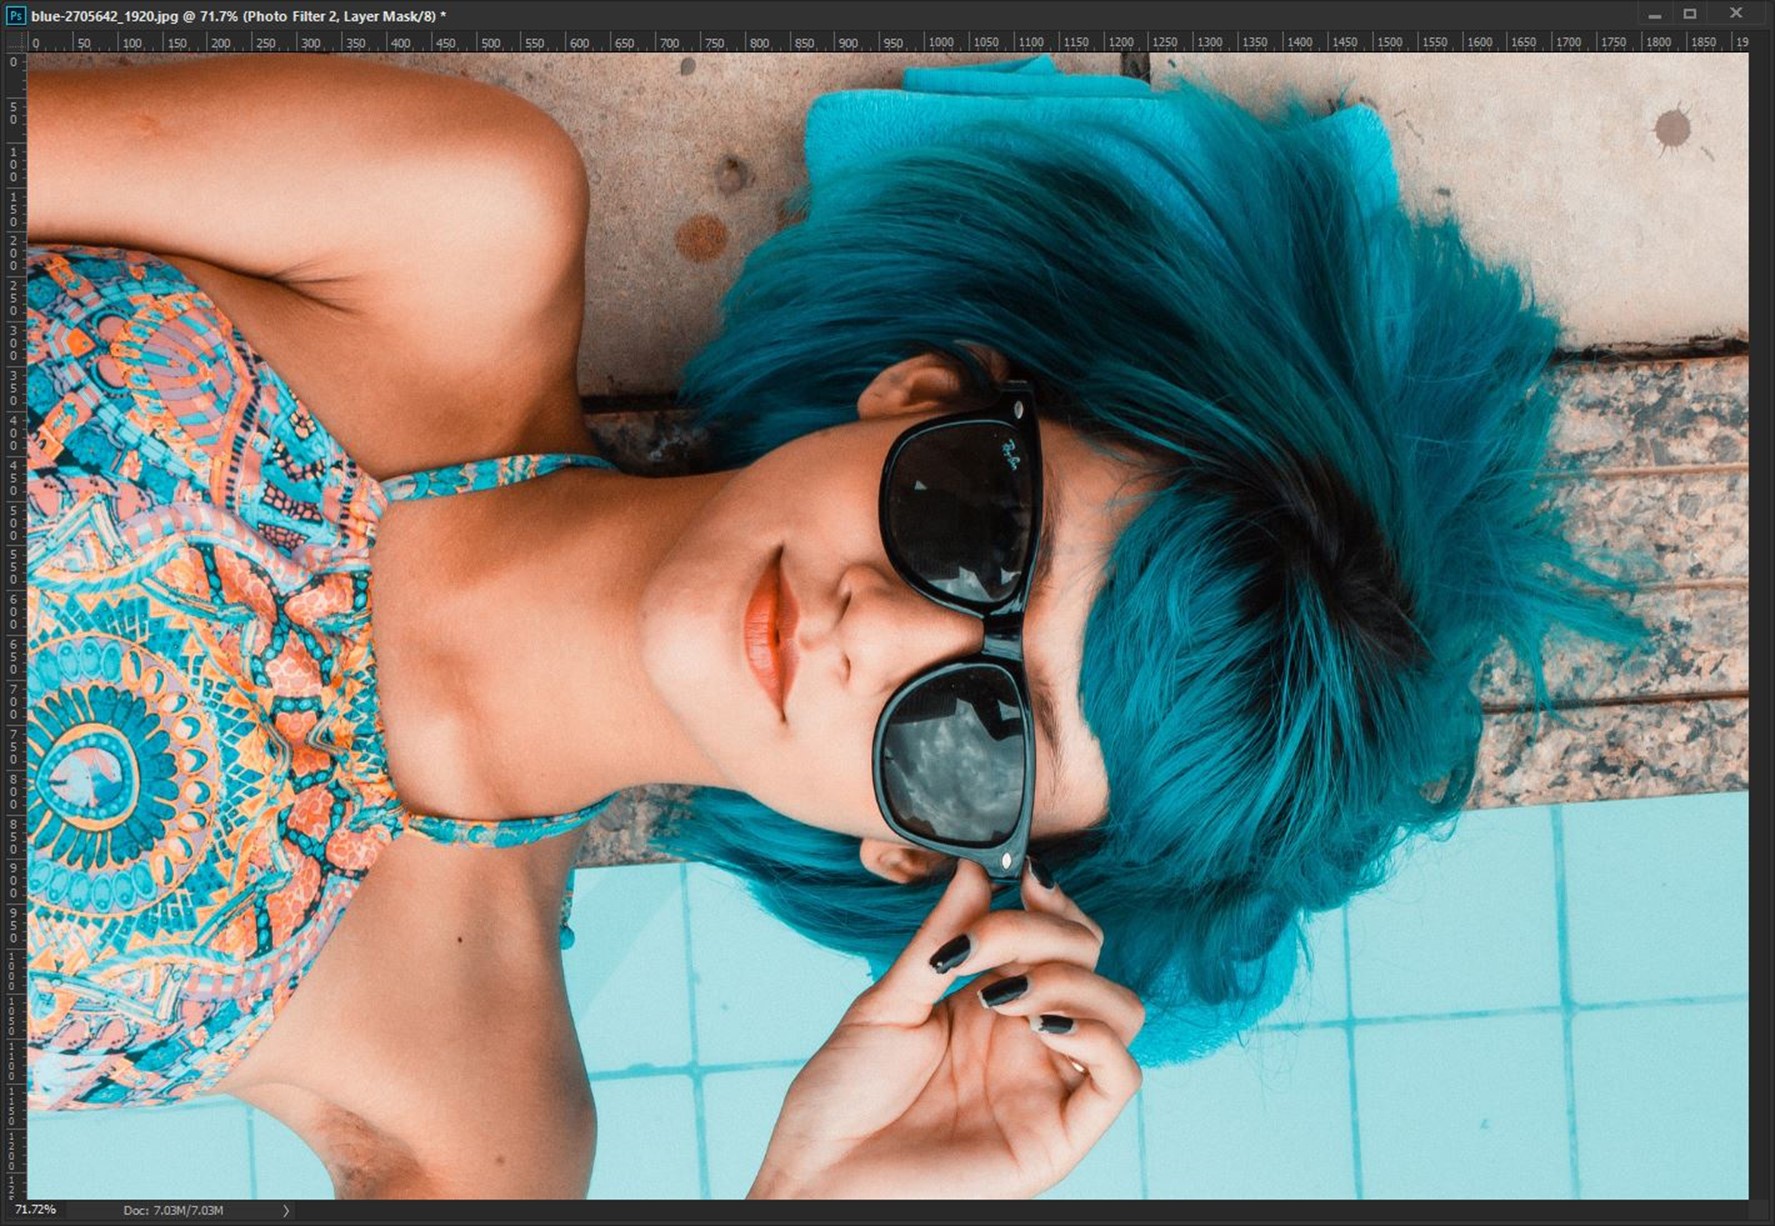
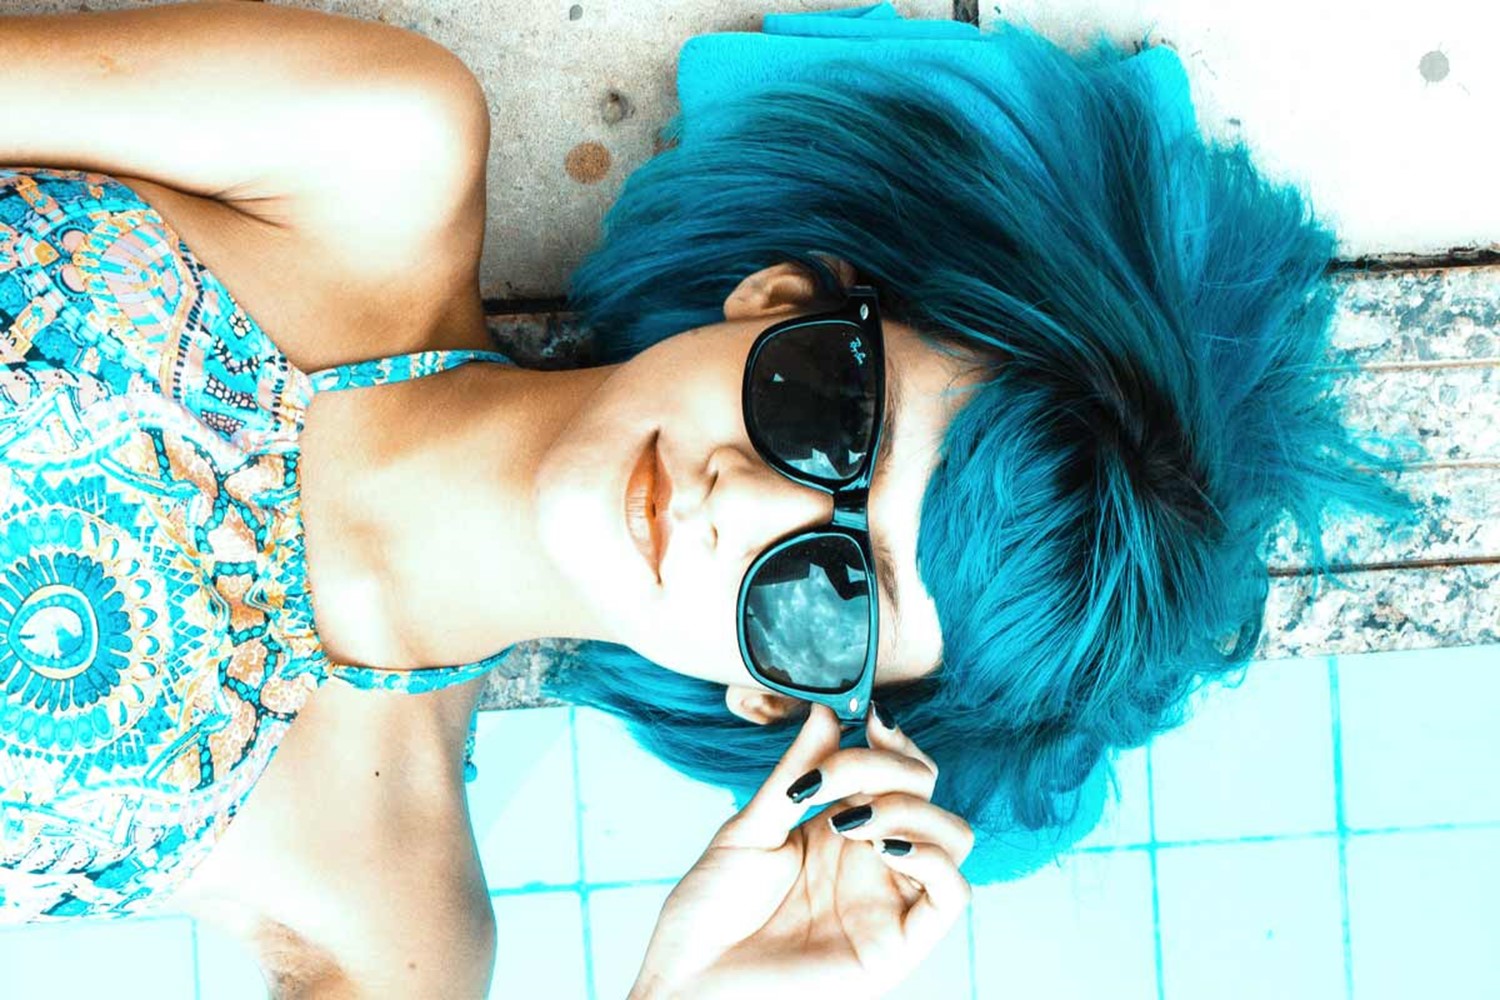
Without further ado, let me bring to you the tutorial. But before that, let me show you the before and after photo.
Final
Initial
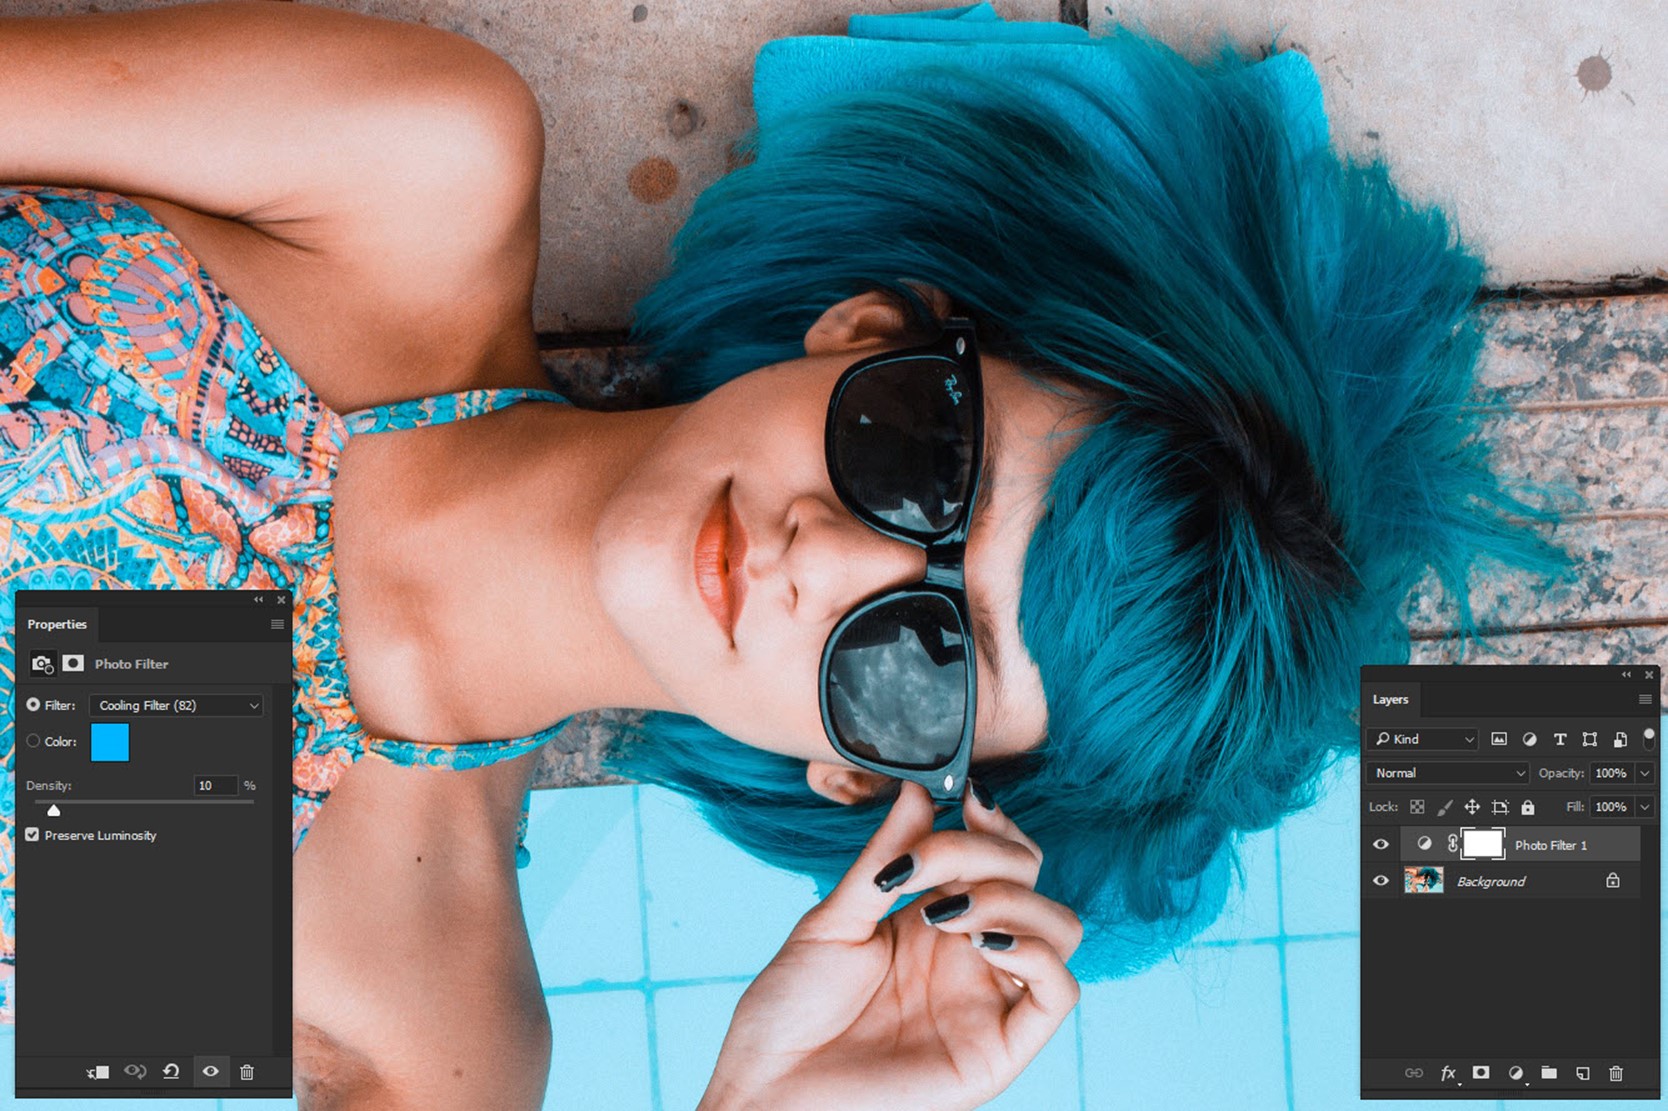
Step 1: Bring the Blue Effect with Photo Filter.
Go to Layer>New Adjustment Layer>Photo Filter.
Change the filter to Cooling Filter (82) and increase the Density to 10%. Please keep the Luminosity turned on.
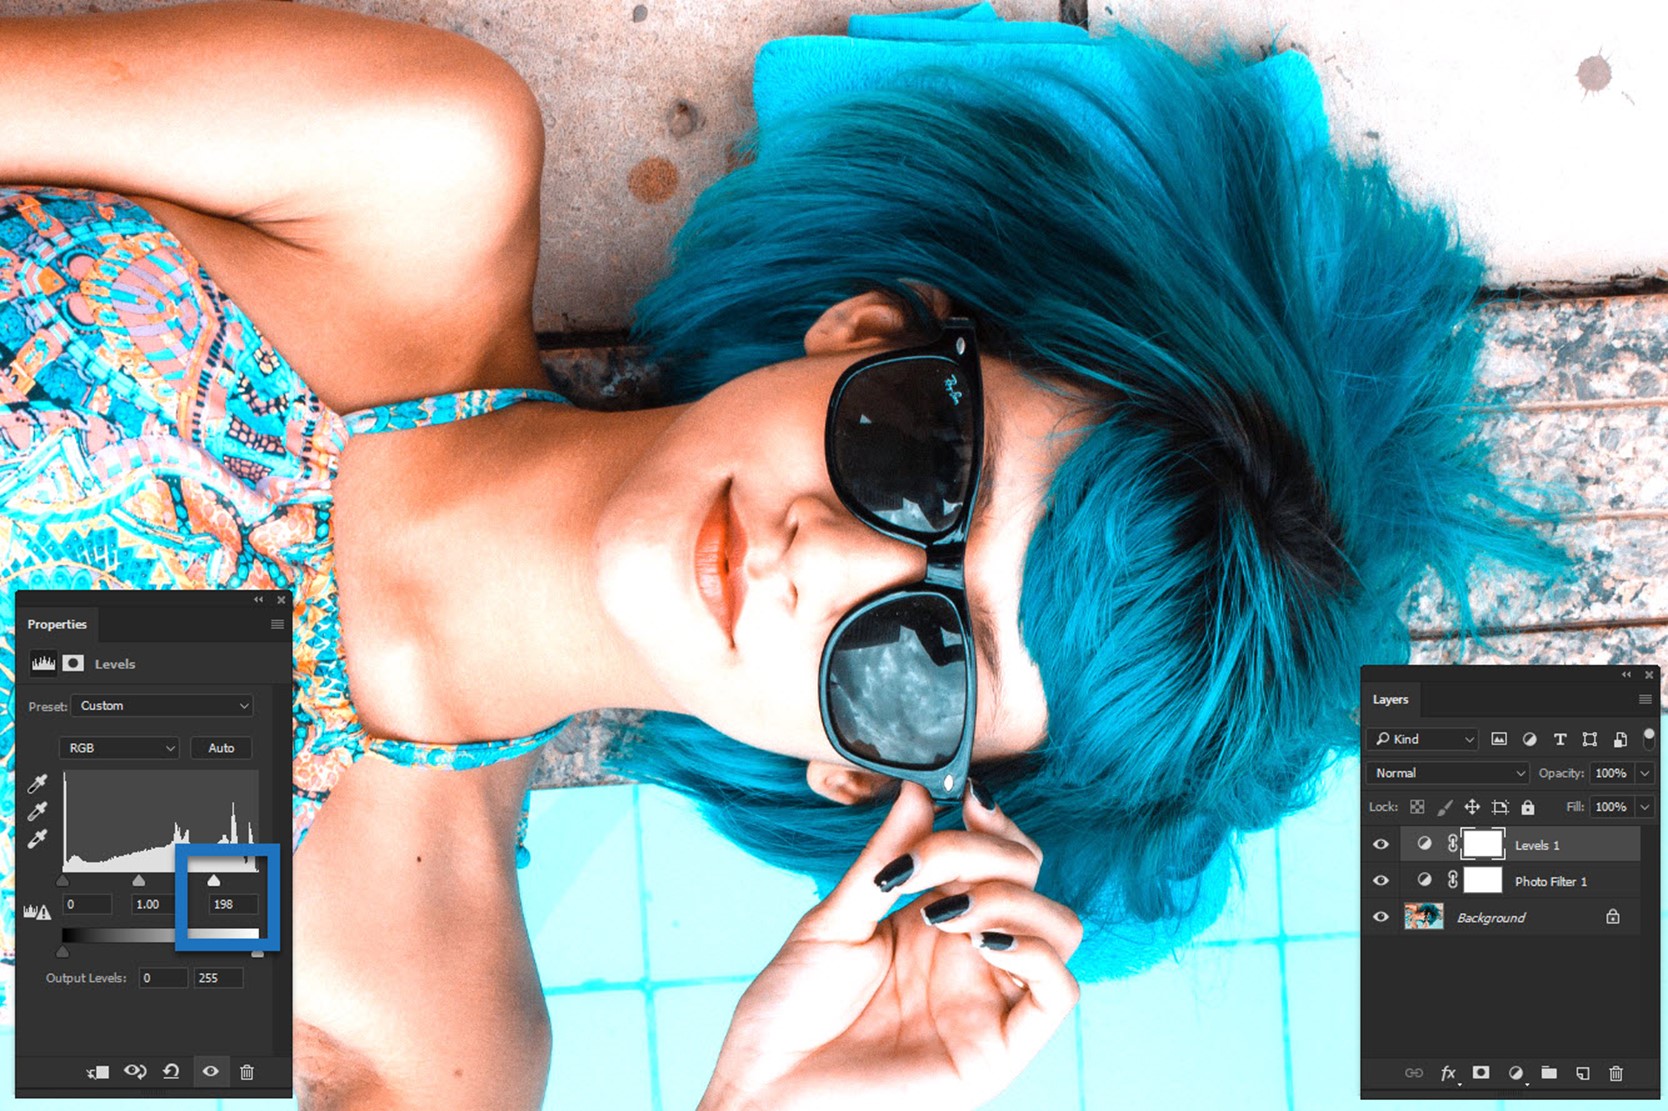
Step 2: Increase the Whites with Levels
Clarendon effect overexposes a photo. Your highlight turns into something extraordinarily white. We’re going to do the same thing here. We can either use Levels or use Curves. But I think that Levels is better for this job because you get better control of your settings.
Slide the white bar to the left such that its value is 198. Please refer the screenshot below for better understanding.
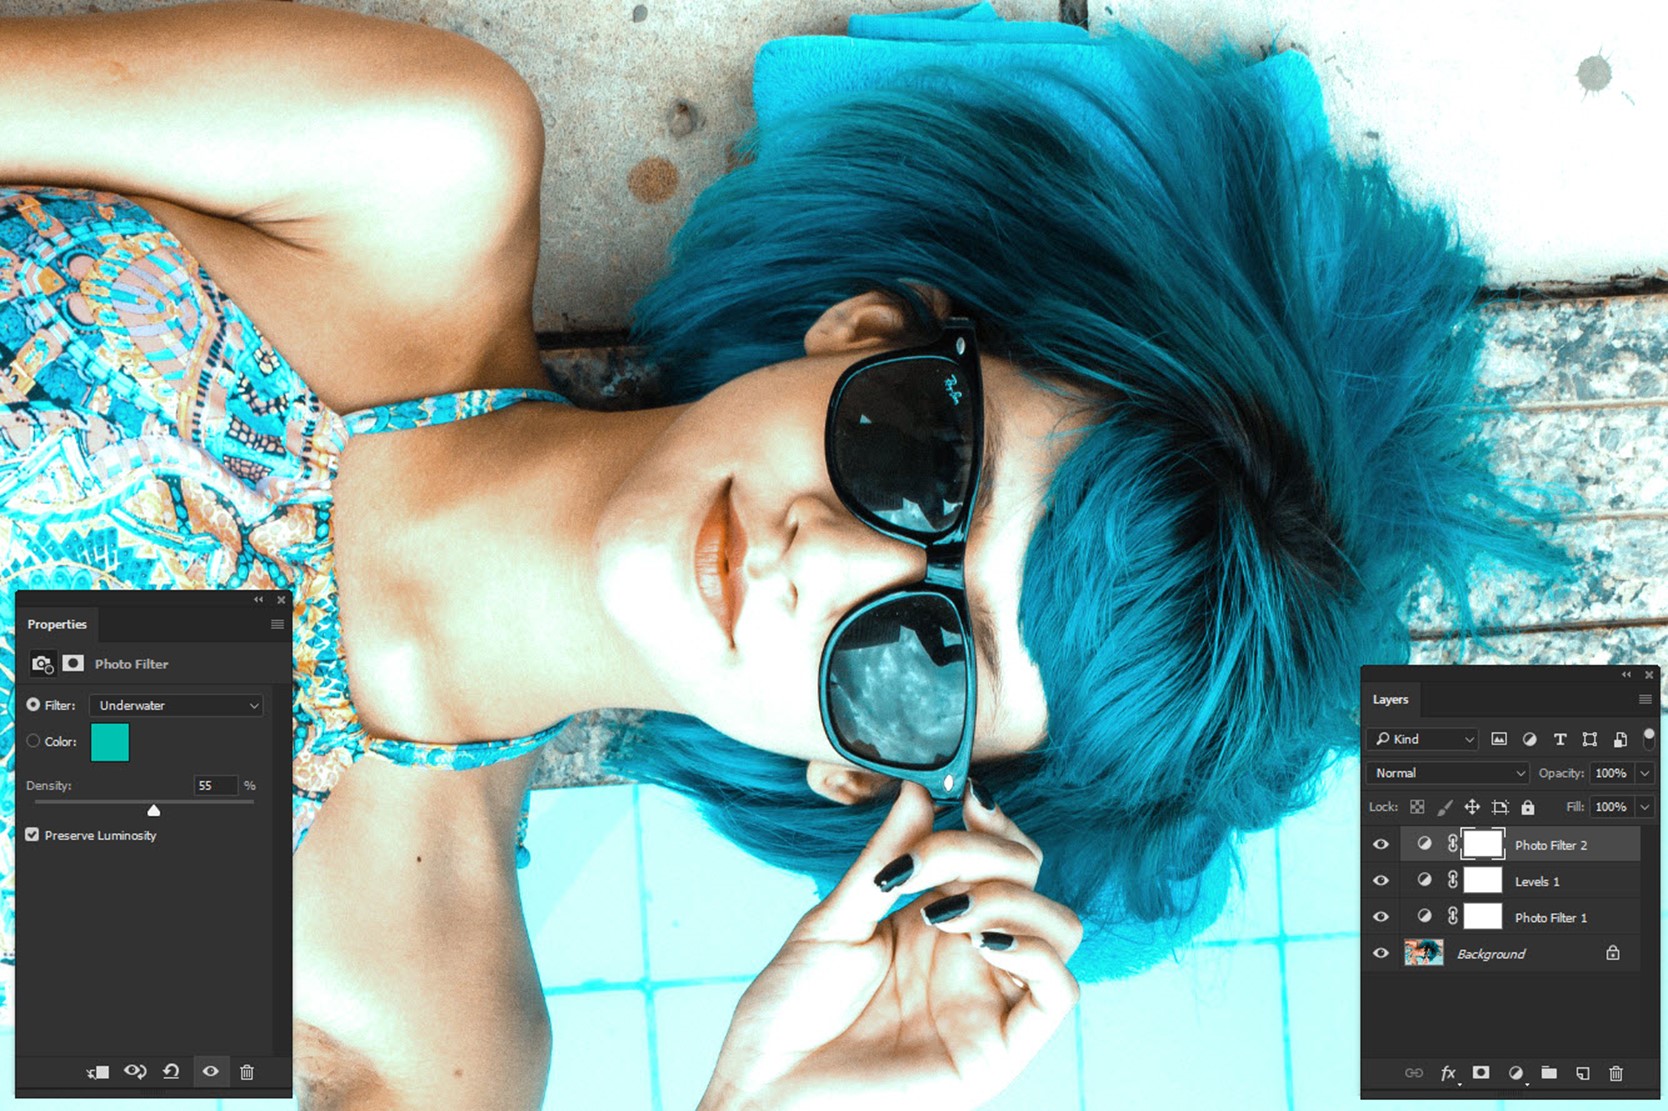
Step 3: Again, Use Filter for Aqua Color
Now, we’re going to use Filter again. But this time we’re going to give some aqua color effect to the photo.
Go to Layer>New Adjustment Layer>Photo Filter.
Change the Filter to Underwater and increase the density to 55%. Make sure that the luminosity is turned on.
Unfortunately, we don’t have any aqua filter so we should be satisfied with the Underwater. Yes, we can choose a custom color but underwater serves our purpose.
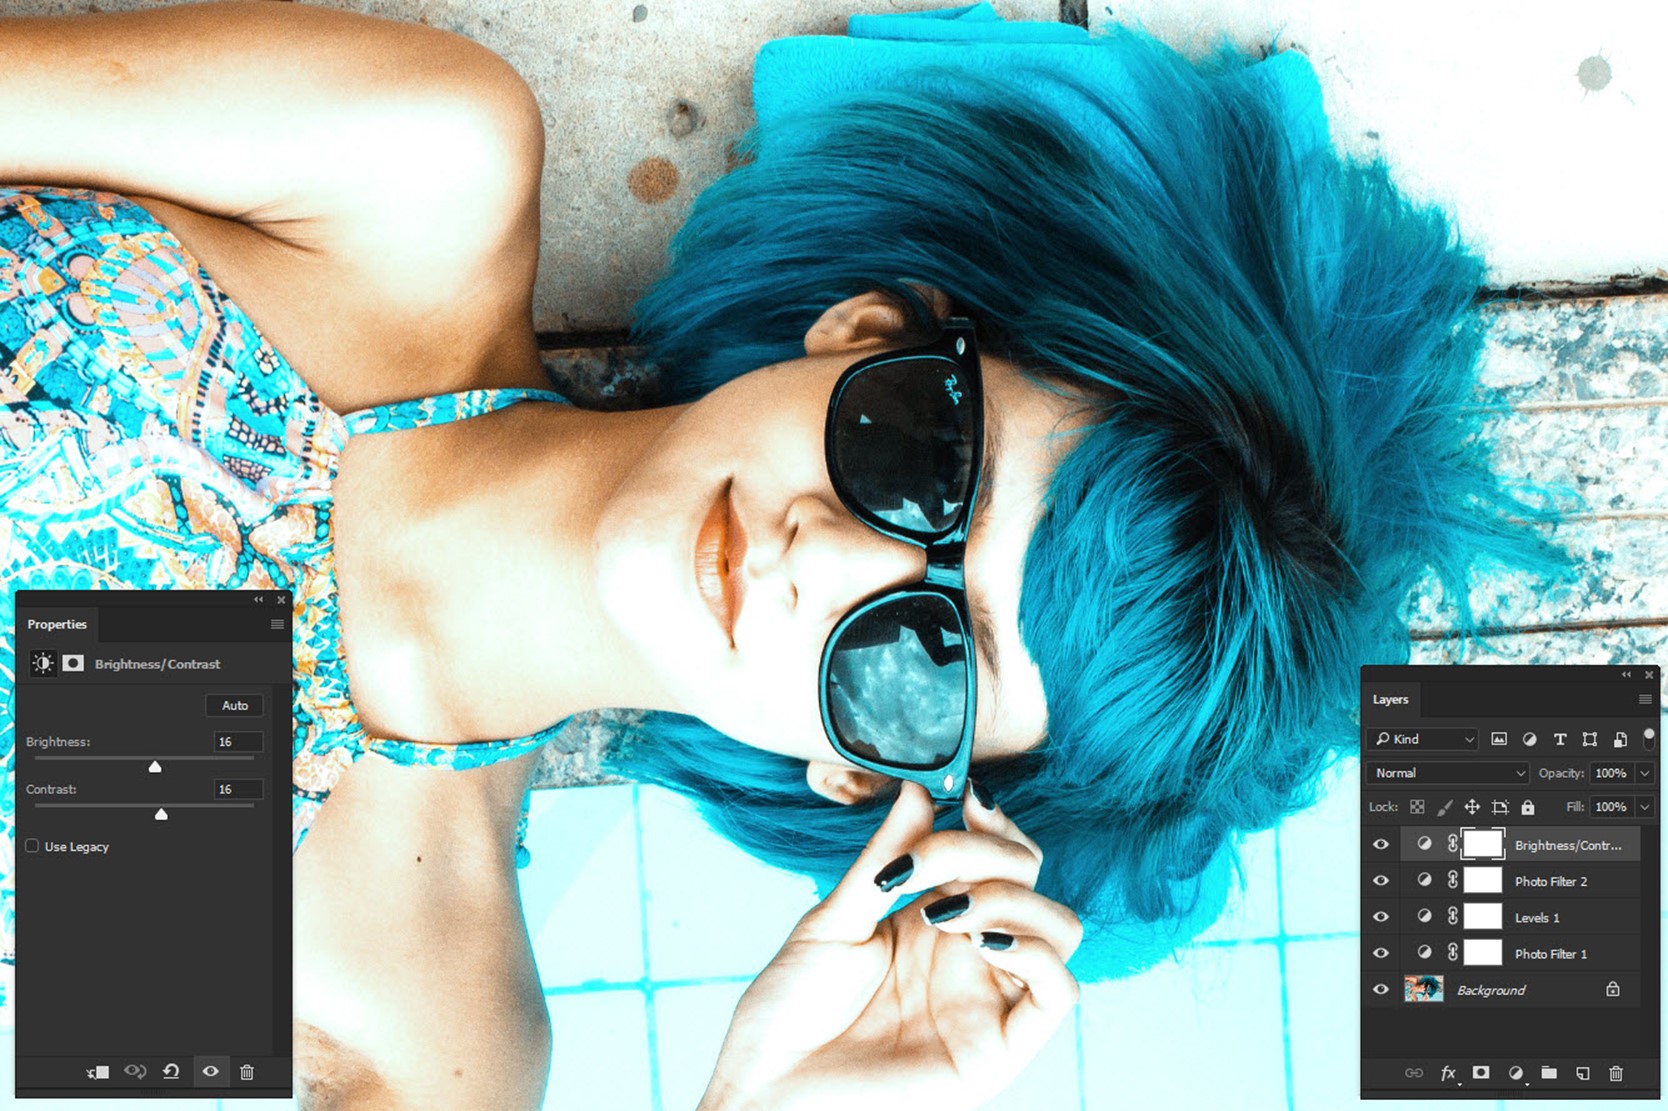
Step 4: Increase the Brightness to Finally Create the Instagram Clarendon Effect in Photoshop
Now, we’re going to brighten the photo to give it the final touch.
Go to Layer>New Adjustment Layer>Brightness/Contrast.
Increase both brightness and contrast to 16.
Now, this all you need to do to create the Instagram Clarendon Effect in Photoshop.
I hope that you enjoyed the tutorial. Please share this tutorial with your friends on Facebook and show them that they can create Instagram Effects in Photoshop also.
Hey, guys! I posted a tutorial two weeks ago which involves a car and I showed how to create headlights. Since then I am getting a lot of requests to show how to create motion blur in Photoshop. So, I present you a tutorial on creating motion blur in Photoshop. The best part of my tutorials is that they all are short and simple. Whenever I see something which is complex to create in Photoshop, I use my mind to think how to create it in the simplest way. I know that this is what you also want to see.
Today’s tutorial won’t take much of your time and should complete in 10 minutes if you’re not a beginner. If you are, add 5-10 more minutes. I am going to use Clone Stamp Tool and a filter.
Let me show you the initial and final photo before I proceed. You can easily see that adding motion blue adds life to the photo.
Final
Initial
Step 1: Select the Moving Subject
There will always be a moving subject against which motion blur needs to be added. In my case, it’s the running man.
I am grabbing Quick Selection Tool to select the subject.
Step 2: Use Clone Stamp Tool to Remove the Subject
Hide the newly created layer and activate the “Background” layer.
Grab Clone Stamp tool from the tool panel or press Shift + S again and again until it comes. We need to remove the subject. So, I am going to use the trees as my source and I am going to brush the man.
The angle depends on the motion on the subject. It is horizontal in my case so I am putting the angle as 0. I am keeping the distance as 110 pixels because it suits me the best. You can change as per your preference. Press OK.
Step 4: Unhide the Subject
Now, unhide the subject and here you go.
Here is the final photo one more time.
I hope that you like the tutorial. Check out our homepage where you’ll get even more exciting tutorials.
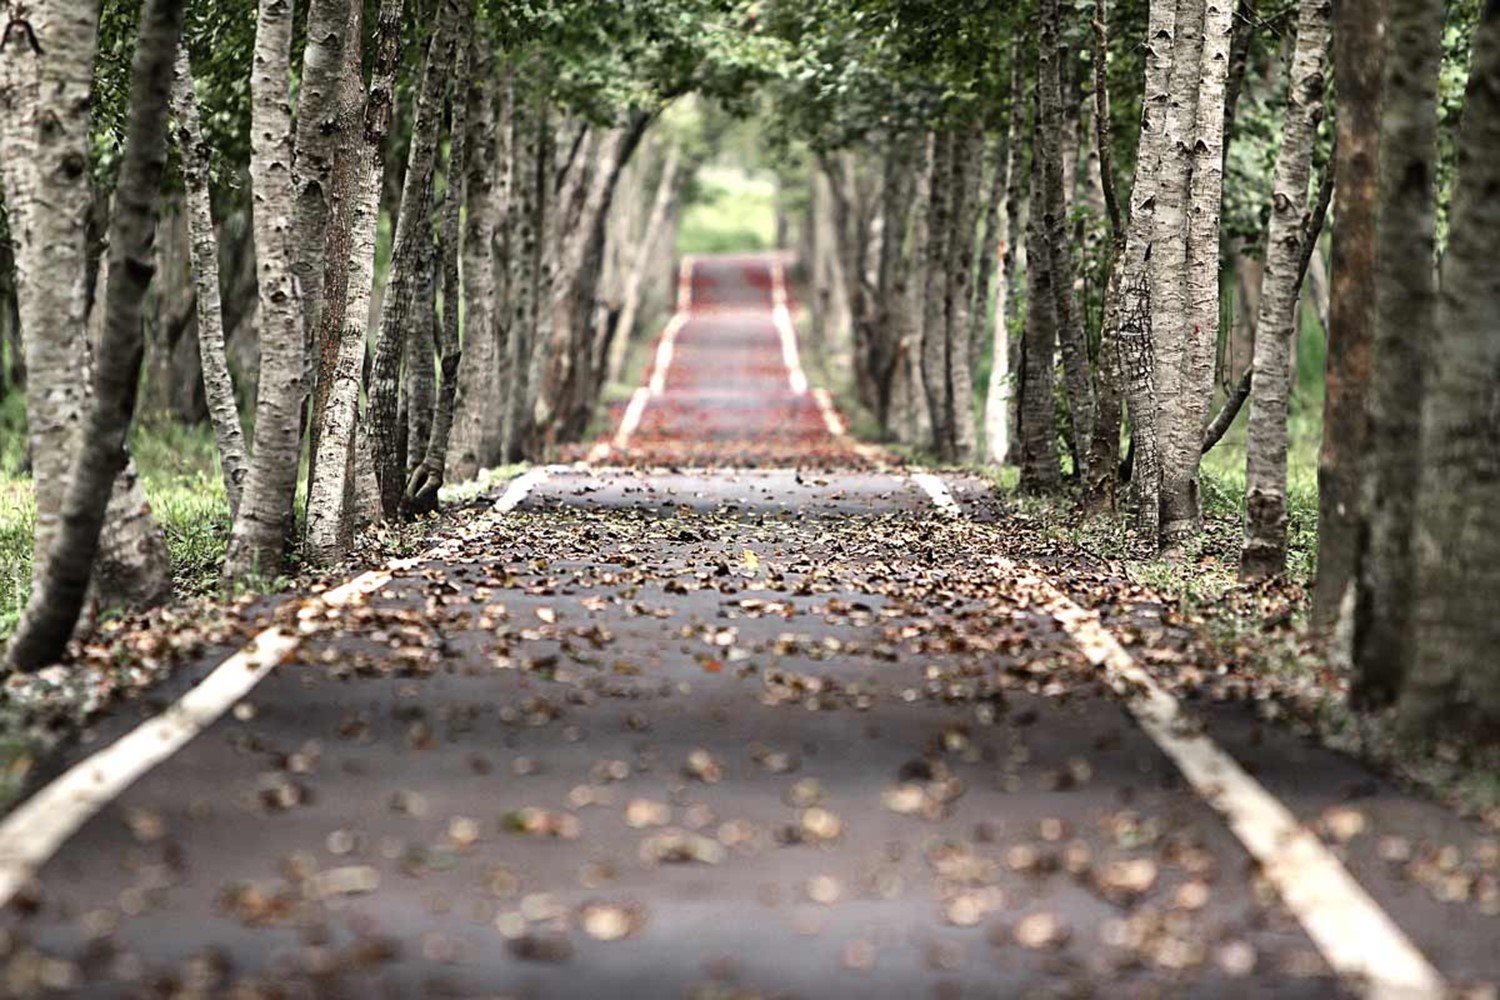
Hey guys – What’s up? I received a request from Mariya and she wants to create something like the one shown below. She saw something like this on Instagram and shoot me an email to ask if I can write a tutorial to create this effect. I said “Yes”. I don’t know what’s the name of this effect but this kind of manipulation is usually called as Dragan effect in Photoshop. This is basically used for portraits but I’d like to try it for landscape.
I am going to use few adjustment layers in this tutorial and one filter. This tutorial is easy to follow and suitable for beginners.
Final
Initial
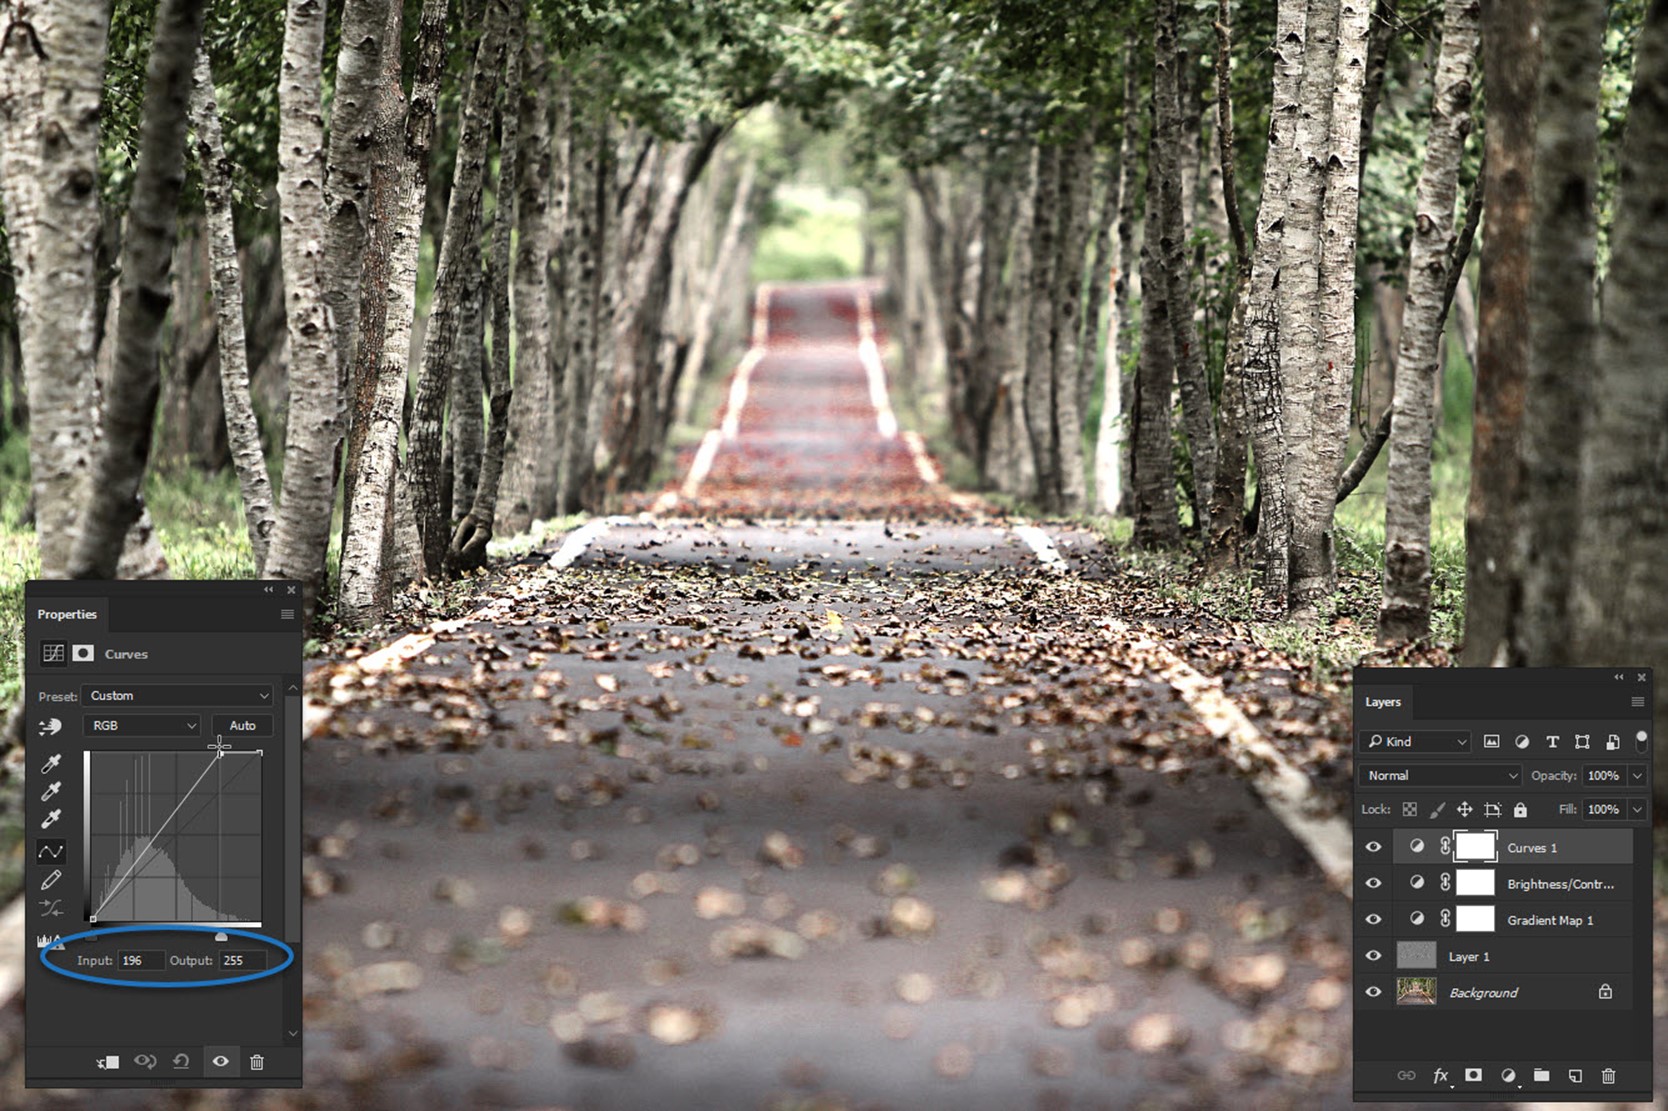
Step 1: Create Grunge Effect
The first thing that I am going to do is to create a grunge effect. The best way to add grunginess is by using High Pass filter. Duplicate the layer by pressing Ctrl+J/Cmd+J to duplicate the layer.
Now we’re going to High Pass filter. Go to Filter > Other > High Pass. Set the radius to somewhere where you can see the edges like the one you’re seeing below. Click OK.
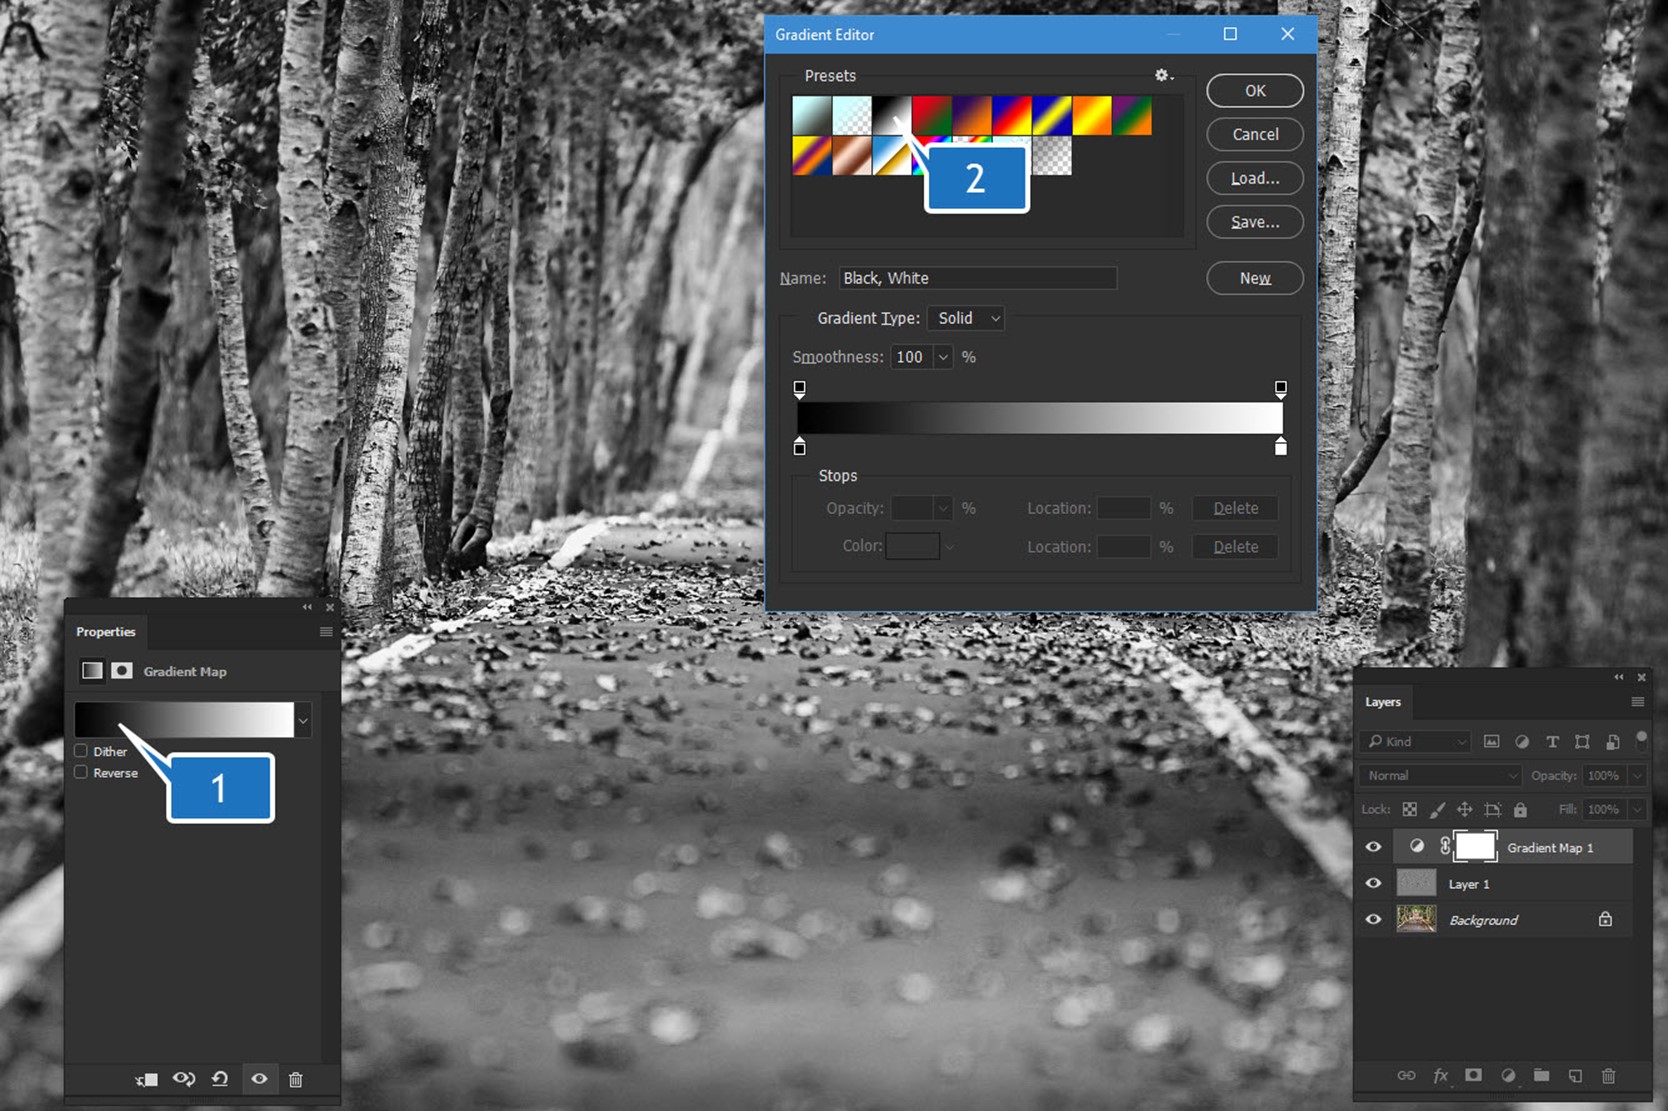
You can use Vibrance adjustment layer to reduce the color but that wouldn’t make the effect that we’d like to achieve. Instead, we’re going to use Gradient Map. Go to Layer > New Adjustment Layer > Gradient Map. Click on the place which is named as 1. This will help you change the color. Click on the Black and White gradient is named as 2. Press OK.
Reduce the opacity to 50%.
Step 3: Change Brightness and Contrast
Go to Layer > New Adjustment Layer > Brightness/Contrast. Reduce the brightness to -24 and increase the contrast to 28.
Step 4: Give Final Grunge Effect in Photoshop
We’re going to use Curves to give the final grunge effect. Go to Layer > New Adjustment Layer > Curves. Set the line to a point where the input is 196 and output is 255.
This is all we need to create a grunge effect in Photoshop. Here’s the final photo again.
Hope you like the image. Let me know what you think of it.
Head over to the homepage to find out even more exciting tutorials.
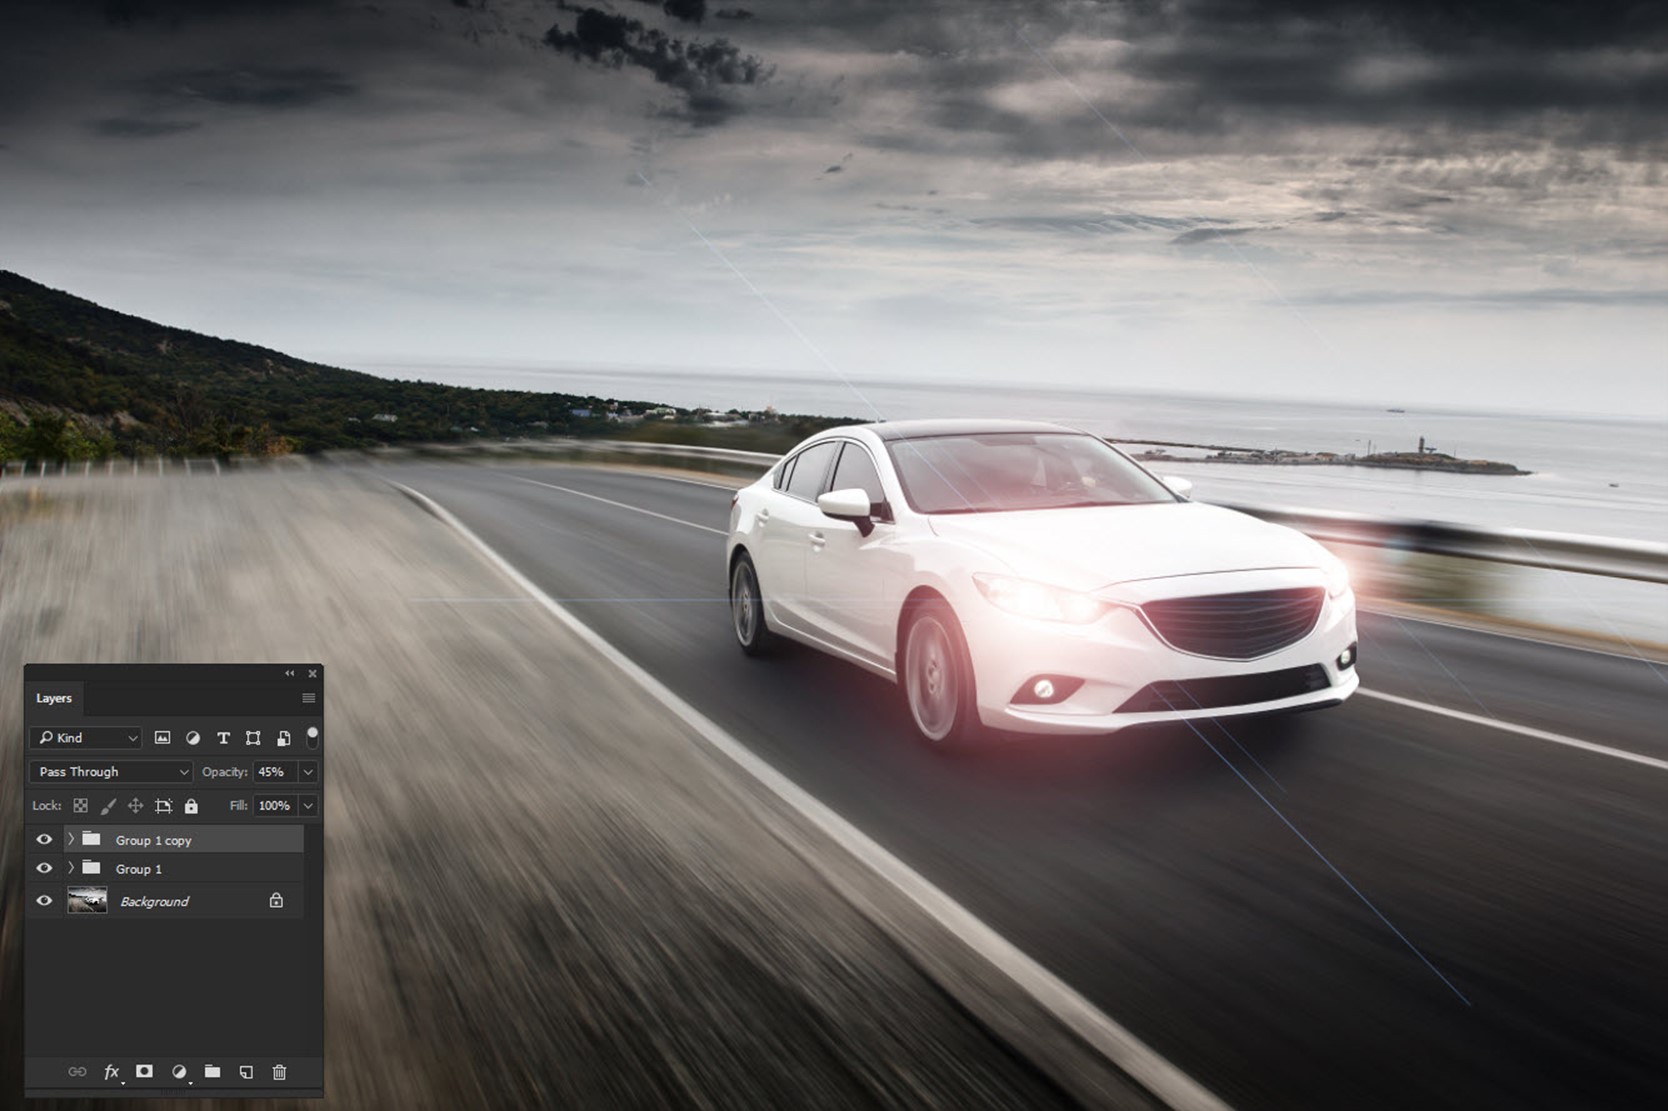
Hey, guys! It’s been two weeks since I wrote the last tutorial, and I am sorry for that. To make up your sad faces, I bring to you an awesome tutorial. I am going to add realistic headlights in a car using Photoshop. Guess what’s the bonus point is? Guess it! It just takes 5 minutes to add them No, I am not kidding.
Forget about all those long procedures of choosing a brush, using countless blend modes, and applying various filters to get what you want. With this tutorial, you’re just going to use one filter and one blend mode. That’s it. Of course, you need to use Free Transform tool, new layer etc. to place the headlight at the desired position but how much time do they take? Yes, almost zero.
I would like to show you the before and after image before I proceed. Here you go.
Before
After
Now that you have seen the pictures, let’s proceed with the tutorial.
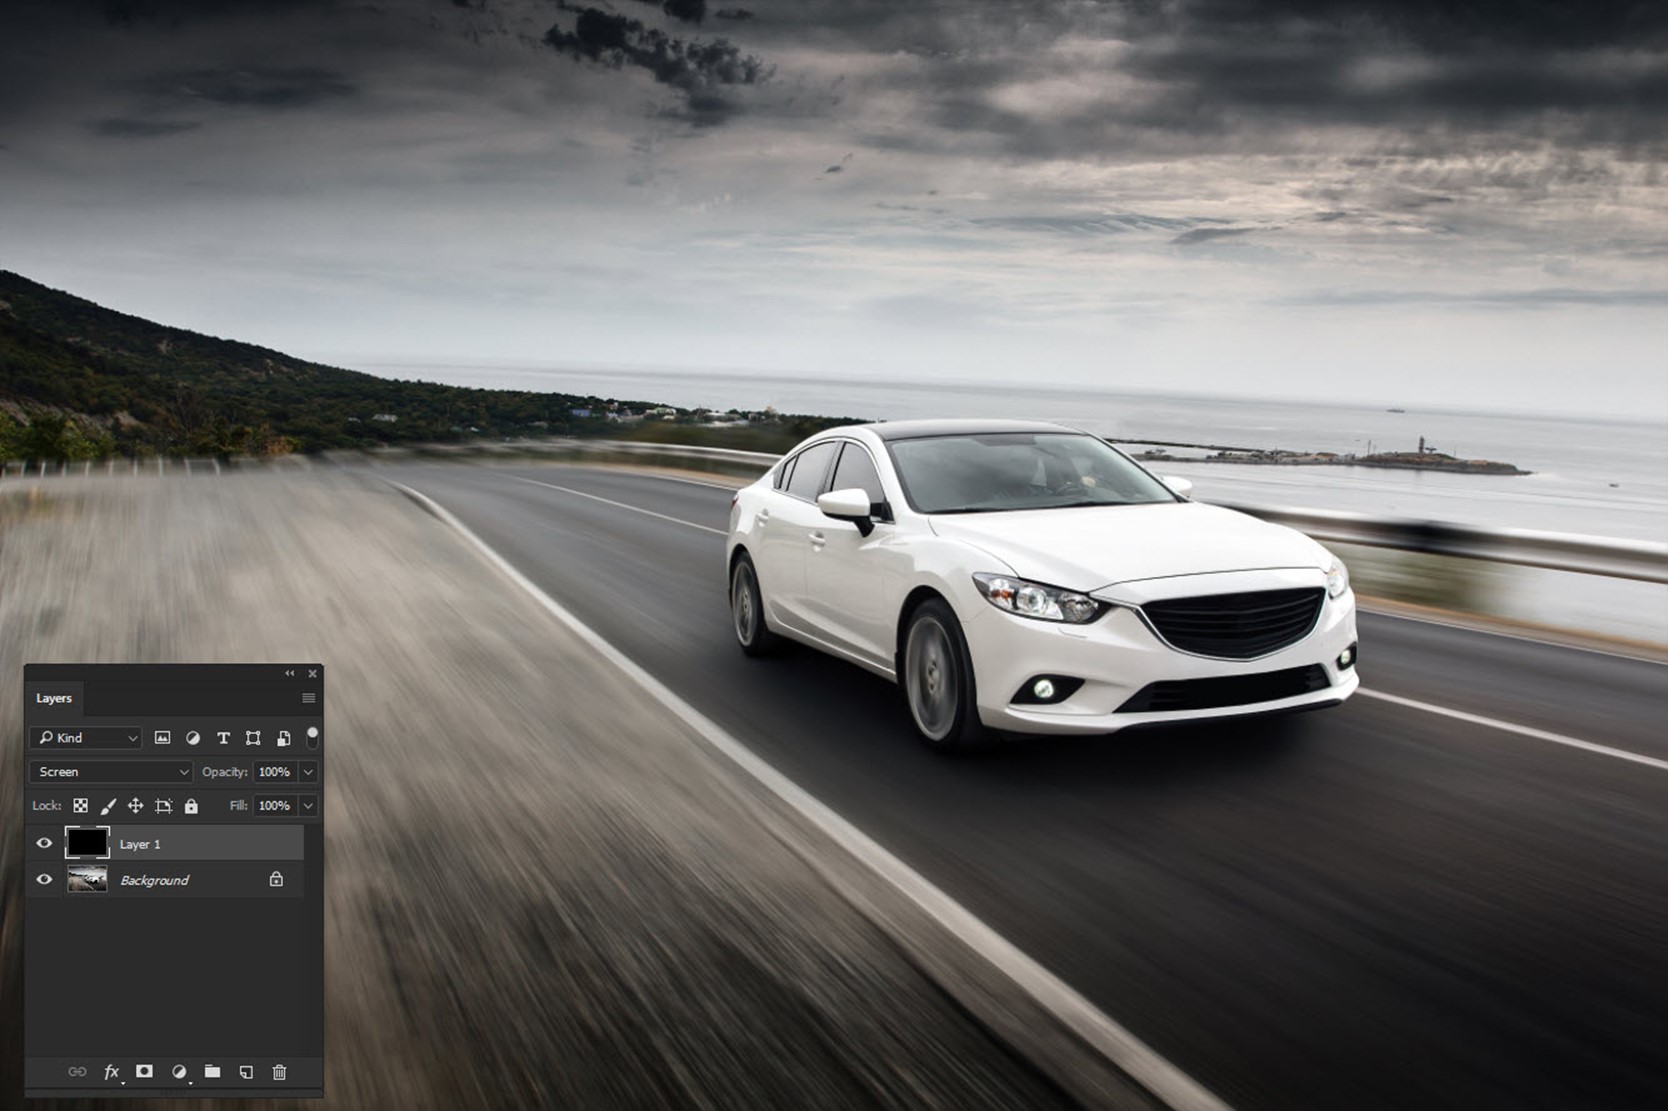
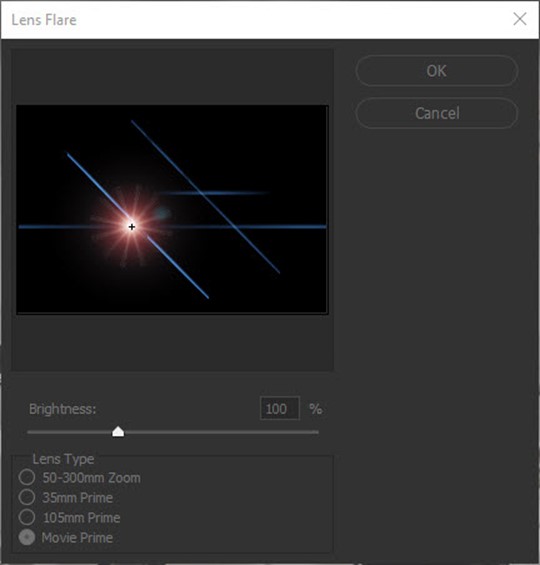
Step 1: Create a New Layer with Black Color
We are going to Lens Flare filter but the filter needs to be placed on a layer which is not blank. So, we’re going to create a layer and fill that with Black color.
Press Ctrl+Shift+N/Cmd+Shift+N to create a new layer. Press D to make black as your foreground color and press Alt+Backspace/Opt+Delete to fill the layer with black color (foreground color).
After that, change the blend mode to screen. You’ll see that the black layer will become transparent. This is because “screen” blend mode shows the lighter pixel between the current layer and the layer just below it. As everything is lighter than black, so everything below the black pixels will be visible.
Go to Filter>Render>Lens Flare. Keep the brightness to 100% and change the Lens Type to Movie Prime. This bright ball will be our headlights. Press OK.
It will add a nice-looking lens flare to your image.
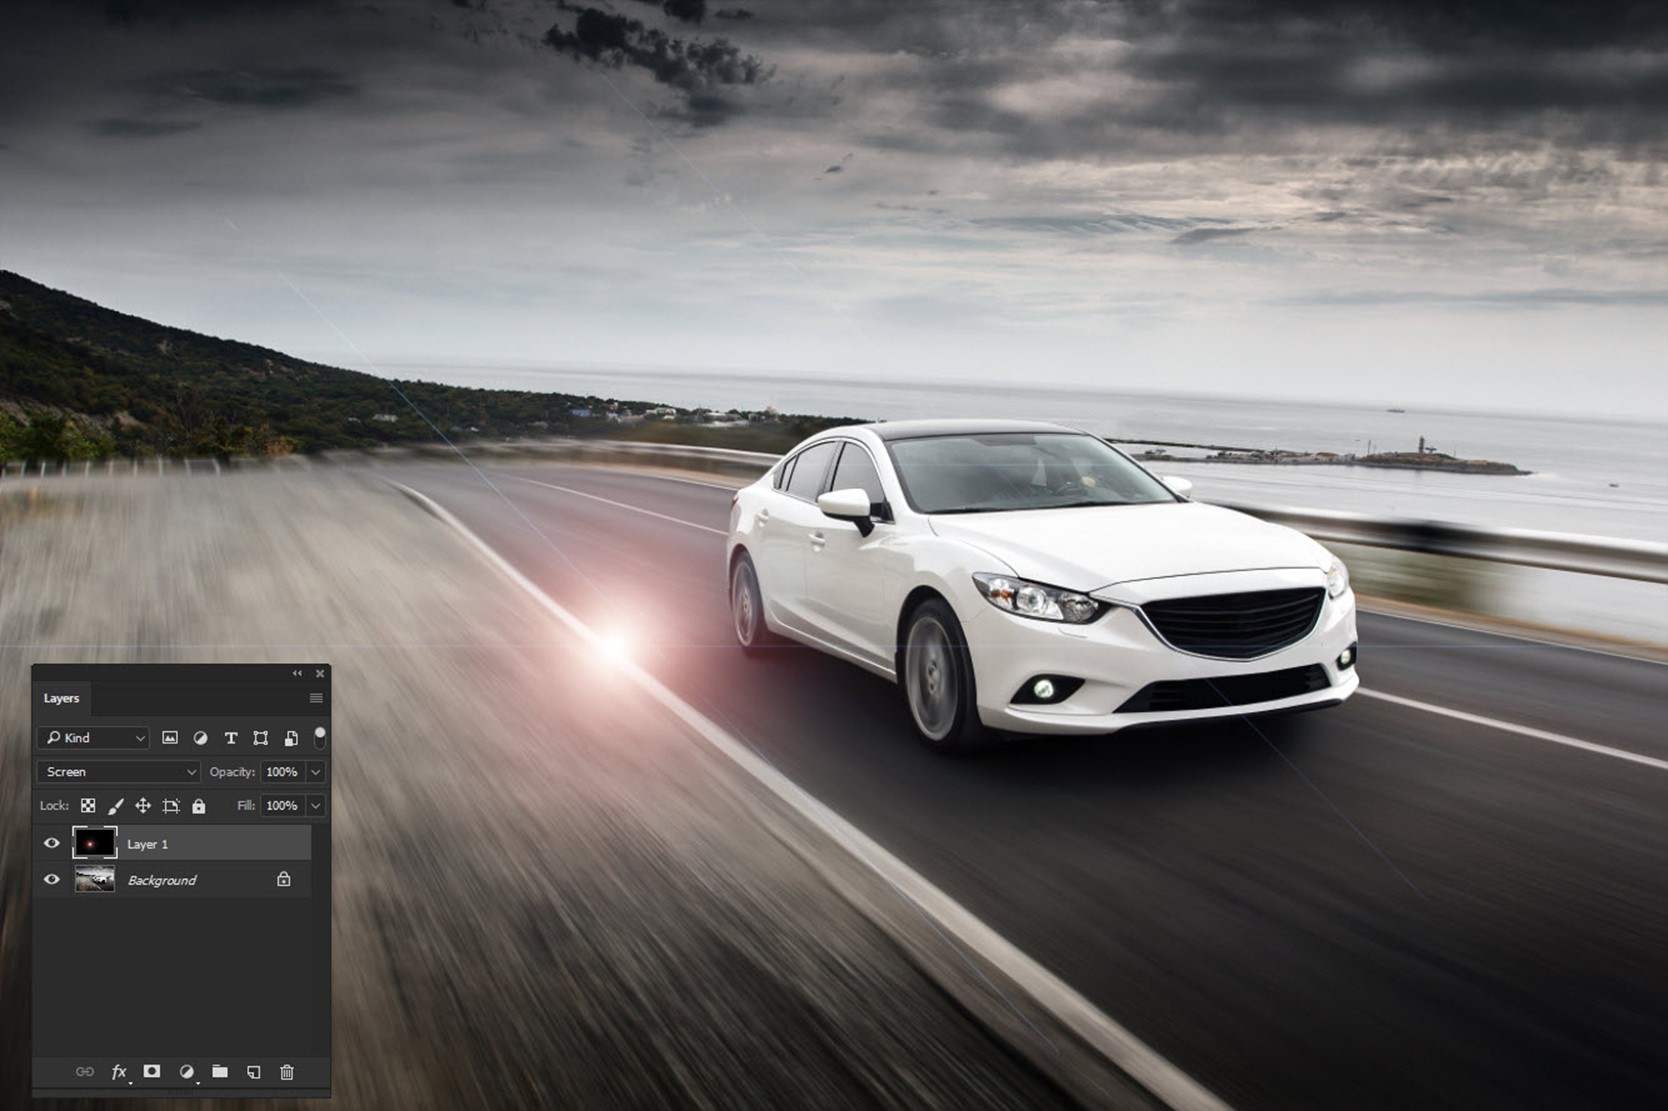
Let’s use Free Transform tool to move the flare to the desired position. I am going to fill the right headlight (your left) first.
Press Ctrl+T/Cmd+T to activate the Free Transform tool. Zoom out the image by pressing Ctrl+(-) and place the flare at the correct spot.
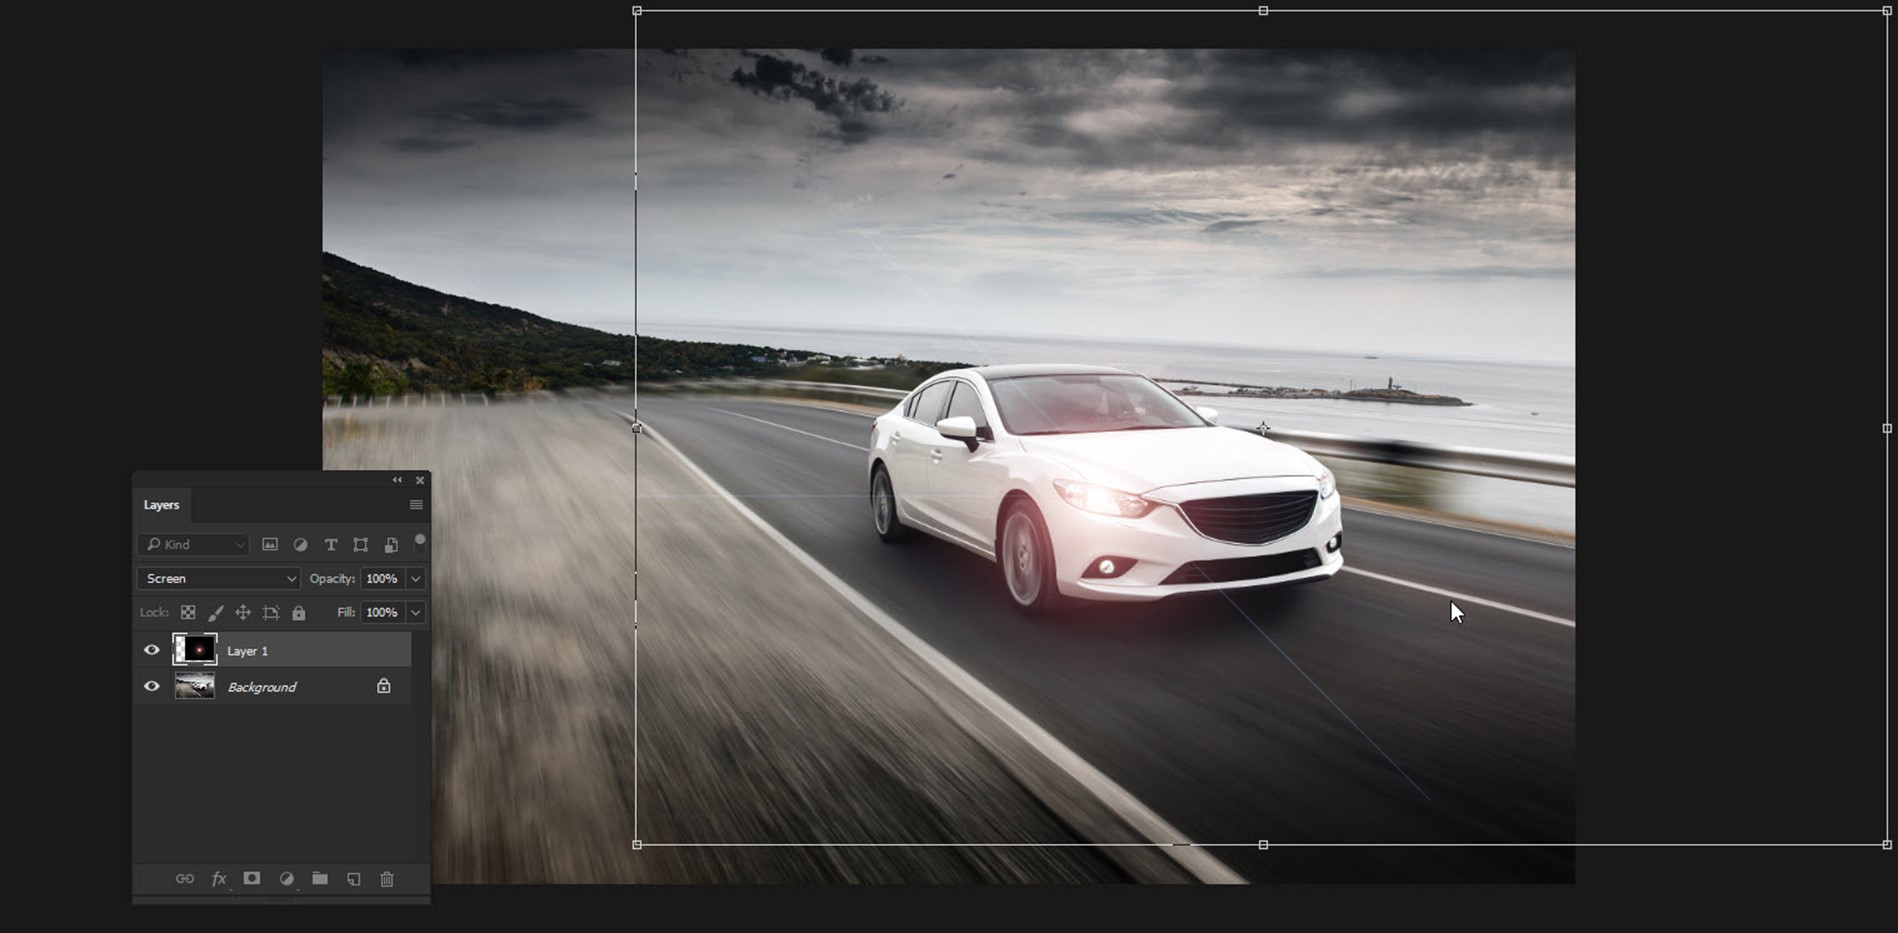
Step 3: Duplicate the Layer for Another Side
Duplicate the layer for another side. Press Ctrl+J/Cmd+J to duplicate.
Again, use Free Transform tool to place the flare to the correct spot.
Go to the next page for the bonus step. 🙂
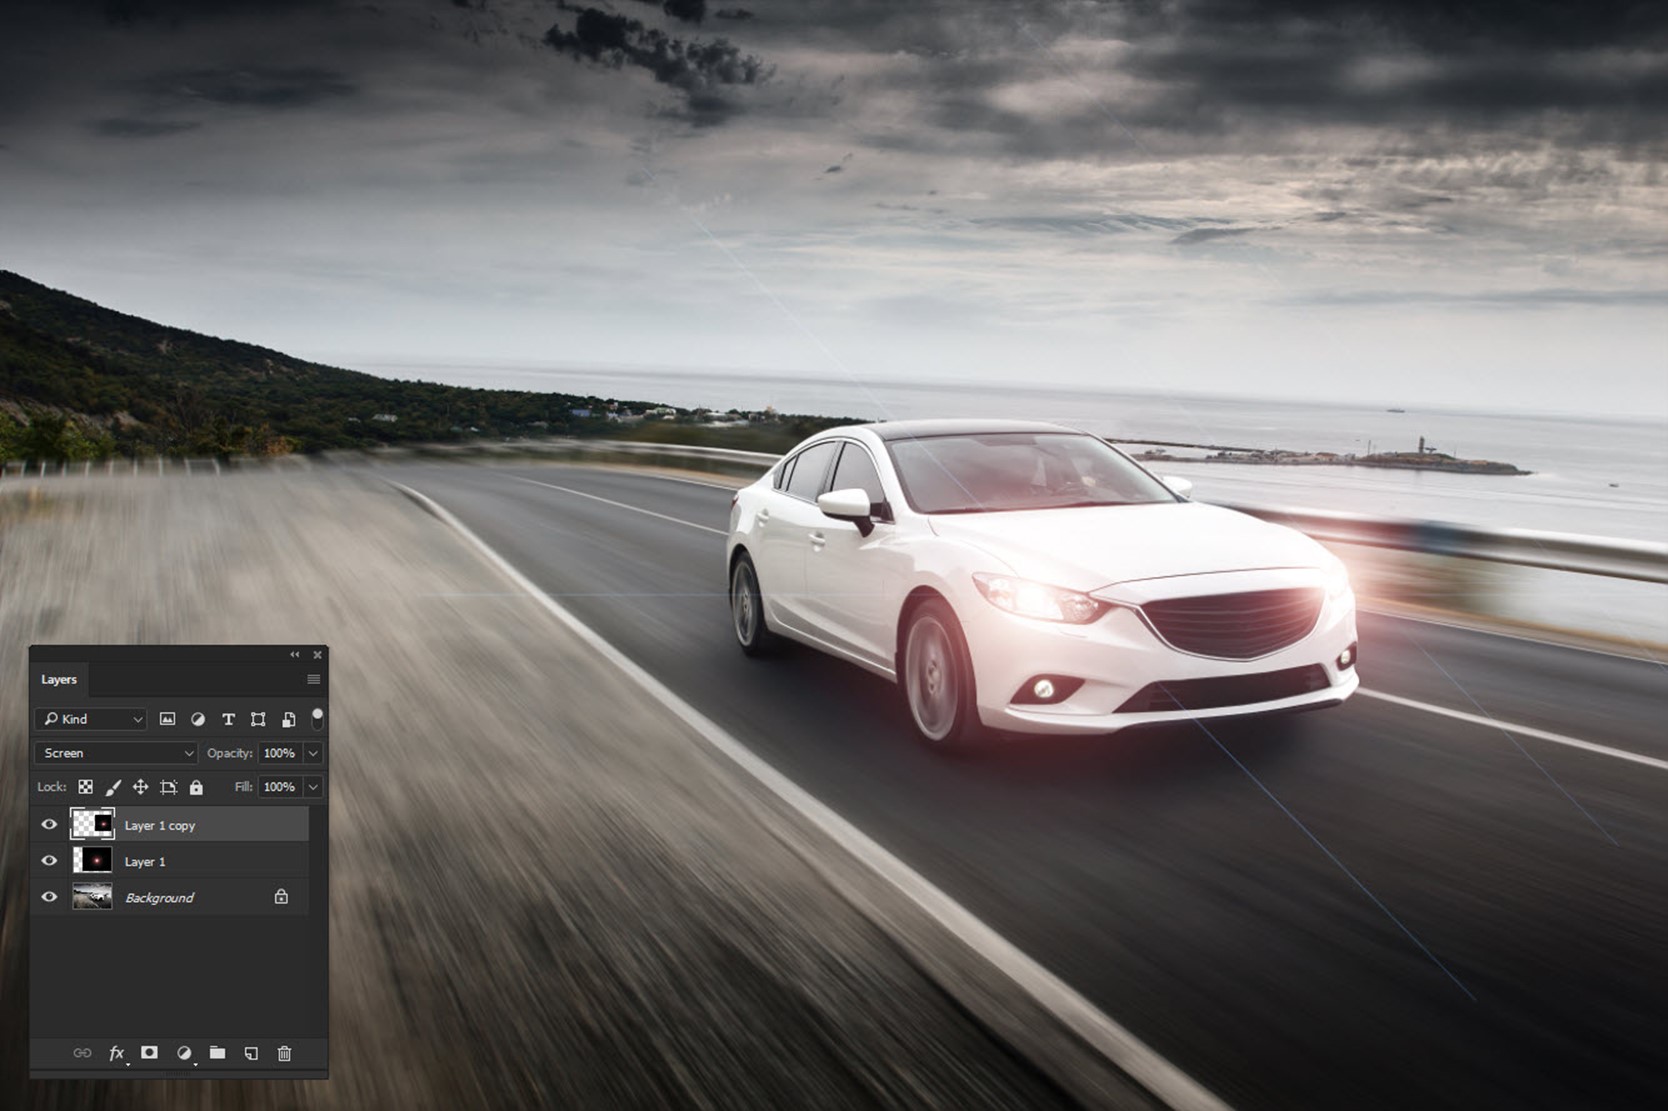
Bonus Step
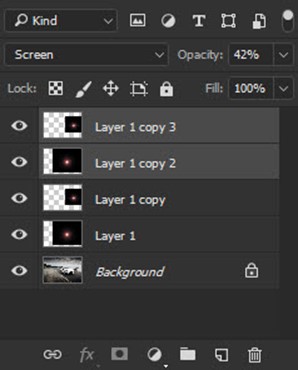
If you think that light is very bright, you can reduce the opacity. If you think that light needs to be brighter, you can duplicate the two layers.
To duplicate both layers, hold down Ctrl/Cmd and click on both layers. Press Ctrl+J/Cmd+J to duplicate both layers. Now, you can reduce the opacity also if you want to reduce the brightness. I reduced it to 42%.
Here’s the image.
Enjoyed this tutorial, right? Share it with your friends and family and show them that adding a headlight in 2 minutes is possible in Photoshop.
Head over to my home page for more awesome tutorials.