How to Adjust the Image Size in Photoshop?

Hey, guys! Today, I am going to show you how to adjust the image size in Photoshop. It has been one of the most requested tutorials and I am surprised that I have never written one. And yes, you can enlarge the image with this tool.

The agenda is for today’s tutorial is very simple. The procedure is very simple and I’ll tell you more few things.

  1. How to adjust the size of an image.
  2. How image sizing is different than cropping.
  3. How image sizing is different than canvas sizing.

Let’s begin with resizing an image.

Step 1 – Adjust the Image Size in Photoshop

Go to Image>Image Size. You can also press Cmd+Opt+I/Ctrl+Alt+I as a keyboard shortcut.
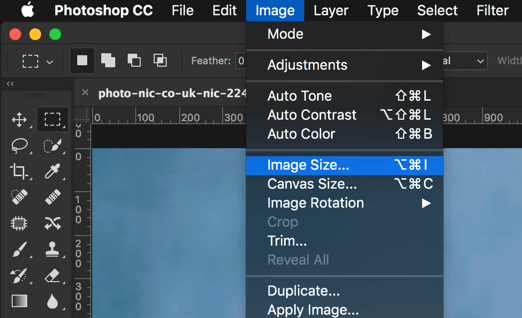
Fig. 1

Step 2 – Tweak the Settings

You’ll see a dialog box like Fig. 2. I’ll explain you all the things in this dialog box.
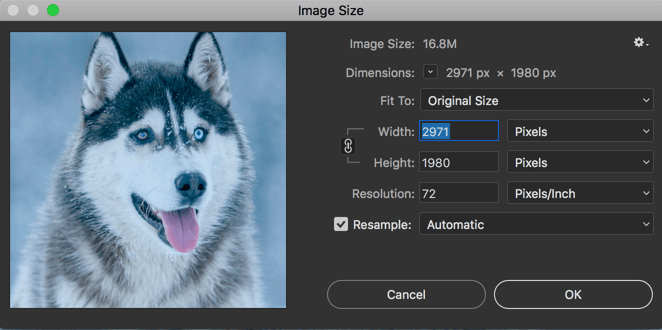
Fig. 2
  1. Image Size: This tells you the image size on disk as per the current dimension. If you change your dimension, the image size will also change. In short, it tells you the real-time data.
  2. Dimensions: This tells you the width and height of the original image. You can change the scale to pixels, cms, inches, or whichever scale you’re convenient with. I use my images for web purpose so I keep the scale in pixels
  3. Fit To: Here you can find some predefined sets or templates with some industry standards. You may find it useful if you need to alter your images as per the industry standards.
  4. Width: This defines the wideness of the image. You can change the scale here also. I usually keep it to either Pixels or Percent.
  5. Height: This defines the height of the image. If you change your width, Photoshop automatically changes the height to maintain the aspect ratio. I’ll show how can you stop Photoshop from automatically adjusting the height later in this tutorial.
  6. Resolution: This defines the number of pixels in an inch. The photography standard is 300 and the web standard is 72. The positive side of having a high resolution is that if you zoom in the image, it will not pixelate. The drawback is that more the pixels per inch, higher the image size.  You can also change the scale here.
  7. Resample: There are eight resampling methods in Photoshop. Whenever you change the size of an image, Photoshop needs to resample (basically process) all the pixels in your image. I have already written a tutorial on Resample in Photoshop. If you ask me which method should you choose to enlarge the image, I’d suggest “Preserve Details 2.0”. If you ask for scaling down the image, I’d say “Automatic”.

Additional Tips

In point 5, I mentioned that Photoshop automatically changes height is you change the width or vice versa. My image width was 2971 pixels and when I changed it to 1200 pixels, my height got changed automatically. Photoshop does it to maintain the aspect ratio otherwise your photo will look stretched.
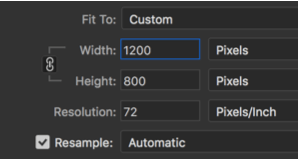
Fig. 3

A quick way to disable this feature is to click on the chain icon that is shown in Fig. 4. This will unlink the height with the width. I know it distorts the image that can be seen in the preview pane.
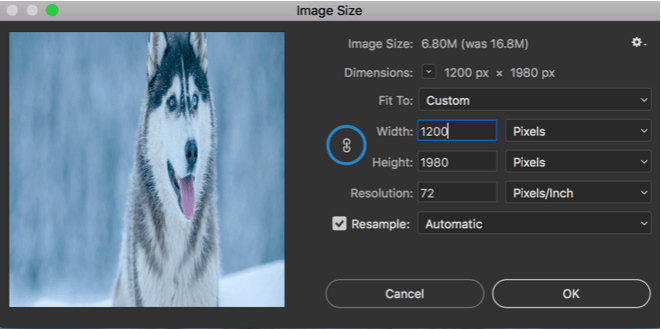
Fig. 4

Some Common Differences

You may confuse this with few other things in Photoshop like Canvas size and Crop Tool. I’ll compare each of them so that you can use this feature like a pro.

  1. Crop Tool vs. Image Size: Crop tool is used to crop an image. It reduces the dimension but a part of the image will be cropped out. Image resizing doesn’t crop out anything. All part of the image will be same. You can either scale down the image or scale up the image.
  2. Canvas Size vs. Image Size: Canvas size can be used to increase your image work area. It doesn’t increase your image size. If you can increase the canvas size, it’ll fill the newly added area with white color (or any color you like). Image size doesn’t add or remove any white color to the added area. Instead, it enlarges or shortens the actual image.

This sums up today’s tutorial. See you next week.

As always, more good stuff coming soon.

Day 12: Crop Tool in Photoshop

When it comes to making your viewers focus on a definite part of a photo then apart from making other parts blur or darken it, the most common method is to crop the image. Definitely cropping is one of the most used methods to define your center of attraction in your photo. A bad crop or no crop can ruin your photo while a good crop gives more perfection to your photo. Thank god, we have a tool called as Crop Tool in Photoshop to crop images.

Crop Tool in Photoshop

To select crop tool all you need is to press Shift+C again and again until it comes. You can also select it from the tool panel (left one).

2015-12-27_23-00-34

After selecting crop tool you can able to see 8 handles at the edges of the image. 4 at the corners and other 4 at the sides. These handles are new in Photoshop CC and saves us lot of time to crop images. Just drag the handle and press enter/return and your cropping will be done.

2

To crop a photo just drag the handle as per your requirement and your photo will be cropped. If you think that you have made a mistake then press Ctrl+Z/Cmd+Z to undo the last action. The black portion that you are seeing is called shield. It denotes the area that are going to be cropped.

You can do much more with crop tool in Photoshop CC. First let me introduce you the option bar of “crop tool”

3.jpg

CONSTRAINED VS. UNCONSTRAINED CROPPING

Constrained cropping lets you to crop your photo only in a definite aspect ratio. Means the ratio of your image height and your image width will always be constant. Let me show you an example.

4.jpg

Suppose I put a constrained of 1 x 1 (square) means that the ratio between my image height and my image width will always be equal to one. This means that my width will always be equal to my height. Then Photoshop will adjust the crop handle in such a way that my image height will always be equal to my image height.

5.jpg

In the above example you can see that the width is equal to the height. I showed you an example of 1 x 1 constrained crop. Just like this we have many other cropping presets available in Photoshop like 4 x 5, 8.5 x 11 etc. If you cannot see the preset you want then you can click on “size and resolution” for custom constrained cropping. Just fill the width, height, and resolution you want and then click on OK. You can also save that as your preset after checking “save as crop preset”.

The main use of constrained crop comes while printing an image. Suppose you want to print one of your photo for 5 x 7 frame. Then you can use 5 x 7 constrained crop to crop your photo such that the aspect ratio of the cropped photo will be of 5 x 7.

Just opposite of constrained crop is unconstrained crop. By choosing this option, you have full flexibility over your crop tool. Unlike constrained crop, you can crop your photo with any dimension you want.

STRAIGHTEN

This is used to straighten your photo. If you have an image and you want to tilt the image then you can use this tool. You just need to drag the mouse as per your requirement and Photoshop will tilt your image.

VIEW

This helps us to crop our image. Generally I use “rules of third” which displays 2 horizontal lines with 2 vertical lines while cropping.

ADDITIONAL CROP ACTION

Use Classic Mode: If you have used Photoshop CS5 or older version in past and you think that cropping in Photoshop CS6 is somewhat difficult then you can revert back to old cropping method by turning this option on.

Auto Center Preview: By turning this option on, Photoshop will automatically put the unshielded are at the center of the window.

Show Cropped Area: By turning this feature off, Photoshop will not show the area that is going to be cropped.

Enable Crop Shield: By turning this feature on, Photoshop will darken the area (shield) that is going to be cropped.

Color: It determines the color of the shield.

Opacity: It determines the opacity of the shield.

DELETE CROPPED PIXELS

In Photoshop CS5 and older versions when you crop a photo, the area you have cropped out will be gone permanently. But in Photoshop CS6 and newer versions, you can restore the area that you have cropped out in past. I totally recommend to turn off “delete cropped pixels” while cropping an image because no one knows what will happen in future and in case you need your cropped pixels then you can have that easily. All you need to do is to expand the crop handle.

And we are done here.

Thank you for reading this article. Hopefully, we’ll meet again.

Please support TrickyPhotoshop by sharing this article with your friends and family on Facebook, Twitter, and Google+.