I know that you see Smart Radius checkbox in Photoshop every day. I also know that you also never bothered to check what is smart radius for months or maybe for years.
Allow me to explain to you what’s smart radius in Photoshop.
What is Radius in Photoshop?
Before we understand further, let’s understand what’s Radius in Photoshop.
Radius in Photoshop determines the size of the selection border in which edge refinement occurs. Use a small radius for sharp edges, and a large one for softer edges.
What is Smart Radius in Photoshop?
Smart Radius in Photoshop helps in edge detection.
Smart Radius allows for a variable width refinement around the edge of your selection. There are many cases where you can use the Smart Radius. Among those cases, this option is helpful if your selection is a portrait that includes both hair and shoulders. In such portraits, the hair might require a larger refinement area than the shoulders. -Source: Adobe Official Website
Should I always use Smart Radius in Photoshop?
Personally, I see that the Smart Radius is doing any good when I need to select hair.
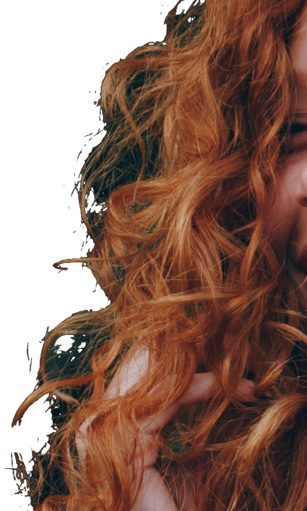
Let me show you why. Here’s an image of the hair. I am going to roughly select the hair. One time I’ll turn on Smart Radius and another time I won’t.
Scenario 1: Smart Radius is turned on
Scenario 2: Smart Radius is turned off
Note: In both images, I have not done any kind of refinement with the Refine Edge brush.
You can clearly see that the Smart Radius keeps more hair. I can further refine the selection with the Refine Edge brush.
Places where you see Smart Radius
The only place where you can find (as far as I remember) Smart Radius is Select and Mask. You can find Smart Radius in the Refine Edge in older versions of Photoshop.
You have a headshot or a product photo and you badly want to remove the background of that photo. But the problem is that you don’t know how to remove the background. This is why I am writing this tutorial on how to remove background in Photoshop.
I am going to show you three ways to remove a photo. The ways ordered based on their difficulty level. I am going to write the easiest one first.
The easiest one is to use Microsoft Word and the next two involves Photoshop. Out of the two Photoshop methods, one is very easy and takes a couple of seconds.
Video
Here’s the video for you if you prefer videos.
1. Remove the background of a photo using Microsoft Word
Before we go ahead, let me tell you that Microsoft Word does not remove the background as good as Photoshop. If your photo has a simple background then you can use Microsoft Word.
Pros:
Super duper easy to use
No need to have any knowledge of image editing
Easily accessible to everyone
Cons:
Does not remove the background completely. Leaves some traces
The output file is scaled down. Suppose you want to remove the background of a photo that you shot with a 12MP camera, the output would be like a photo that is shot with 1.2 – 2 MP camera.
If you don’t want the output to be of smaller in size, you can hire me to remove the background for you.I’ll do it in Photoshop which does not scale down the image. The min cost is $4 per image and the max cost is $10 per image. Send me the image at hello@tricky-photoshop.com.
Before
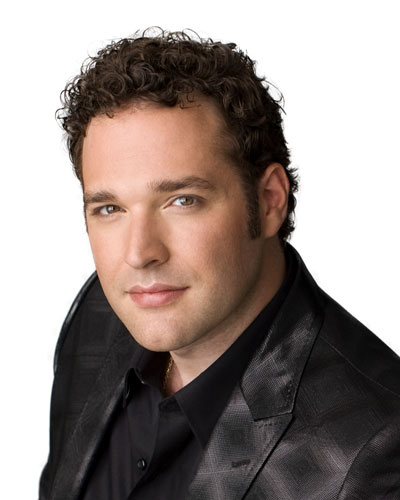
After
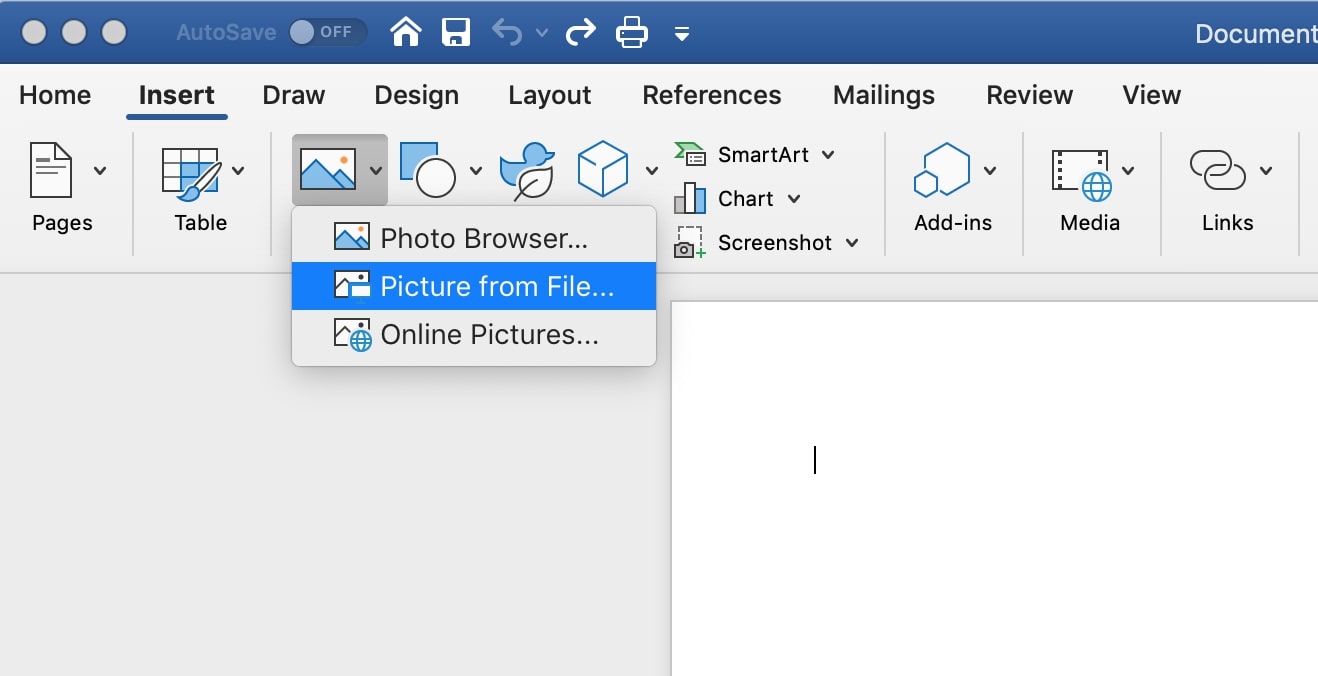
Step 1: Open the image in Microsoft Word
Open the image in Microsoft Word to remove the background.
Open Microsoft Word. Go to Insert > Image > Picture from file. The user interface for Windows would be a little different.
Step 2: Remove background of the photo in Microsoft Word
Go to the Picture tab. Click on the Remove Background button. It is there at the top left.
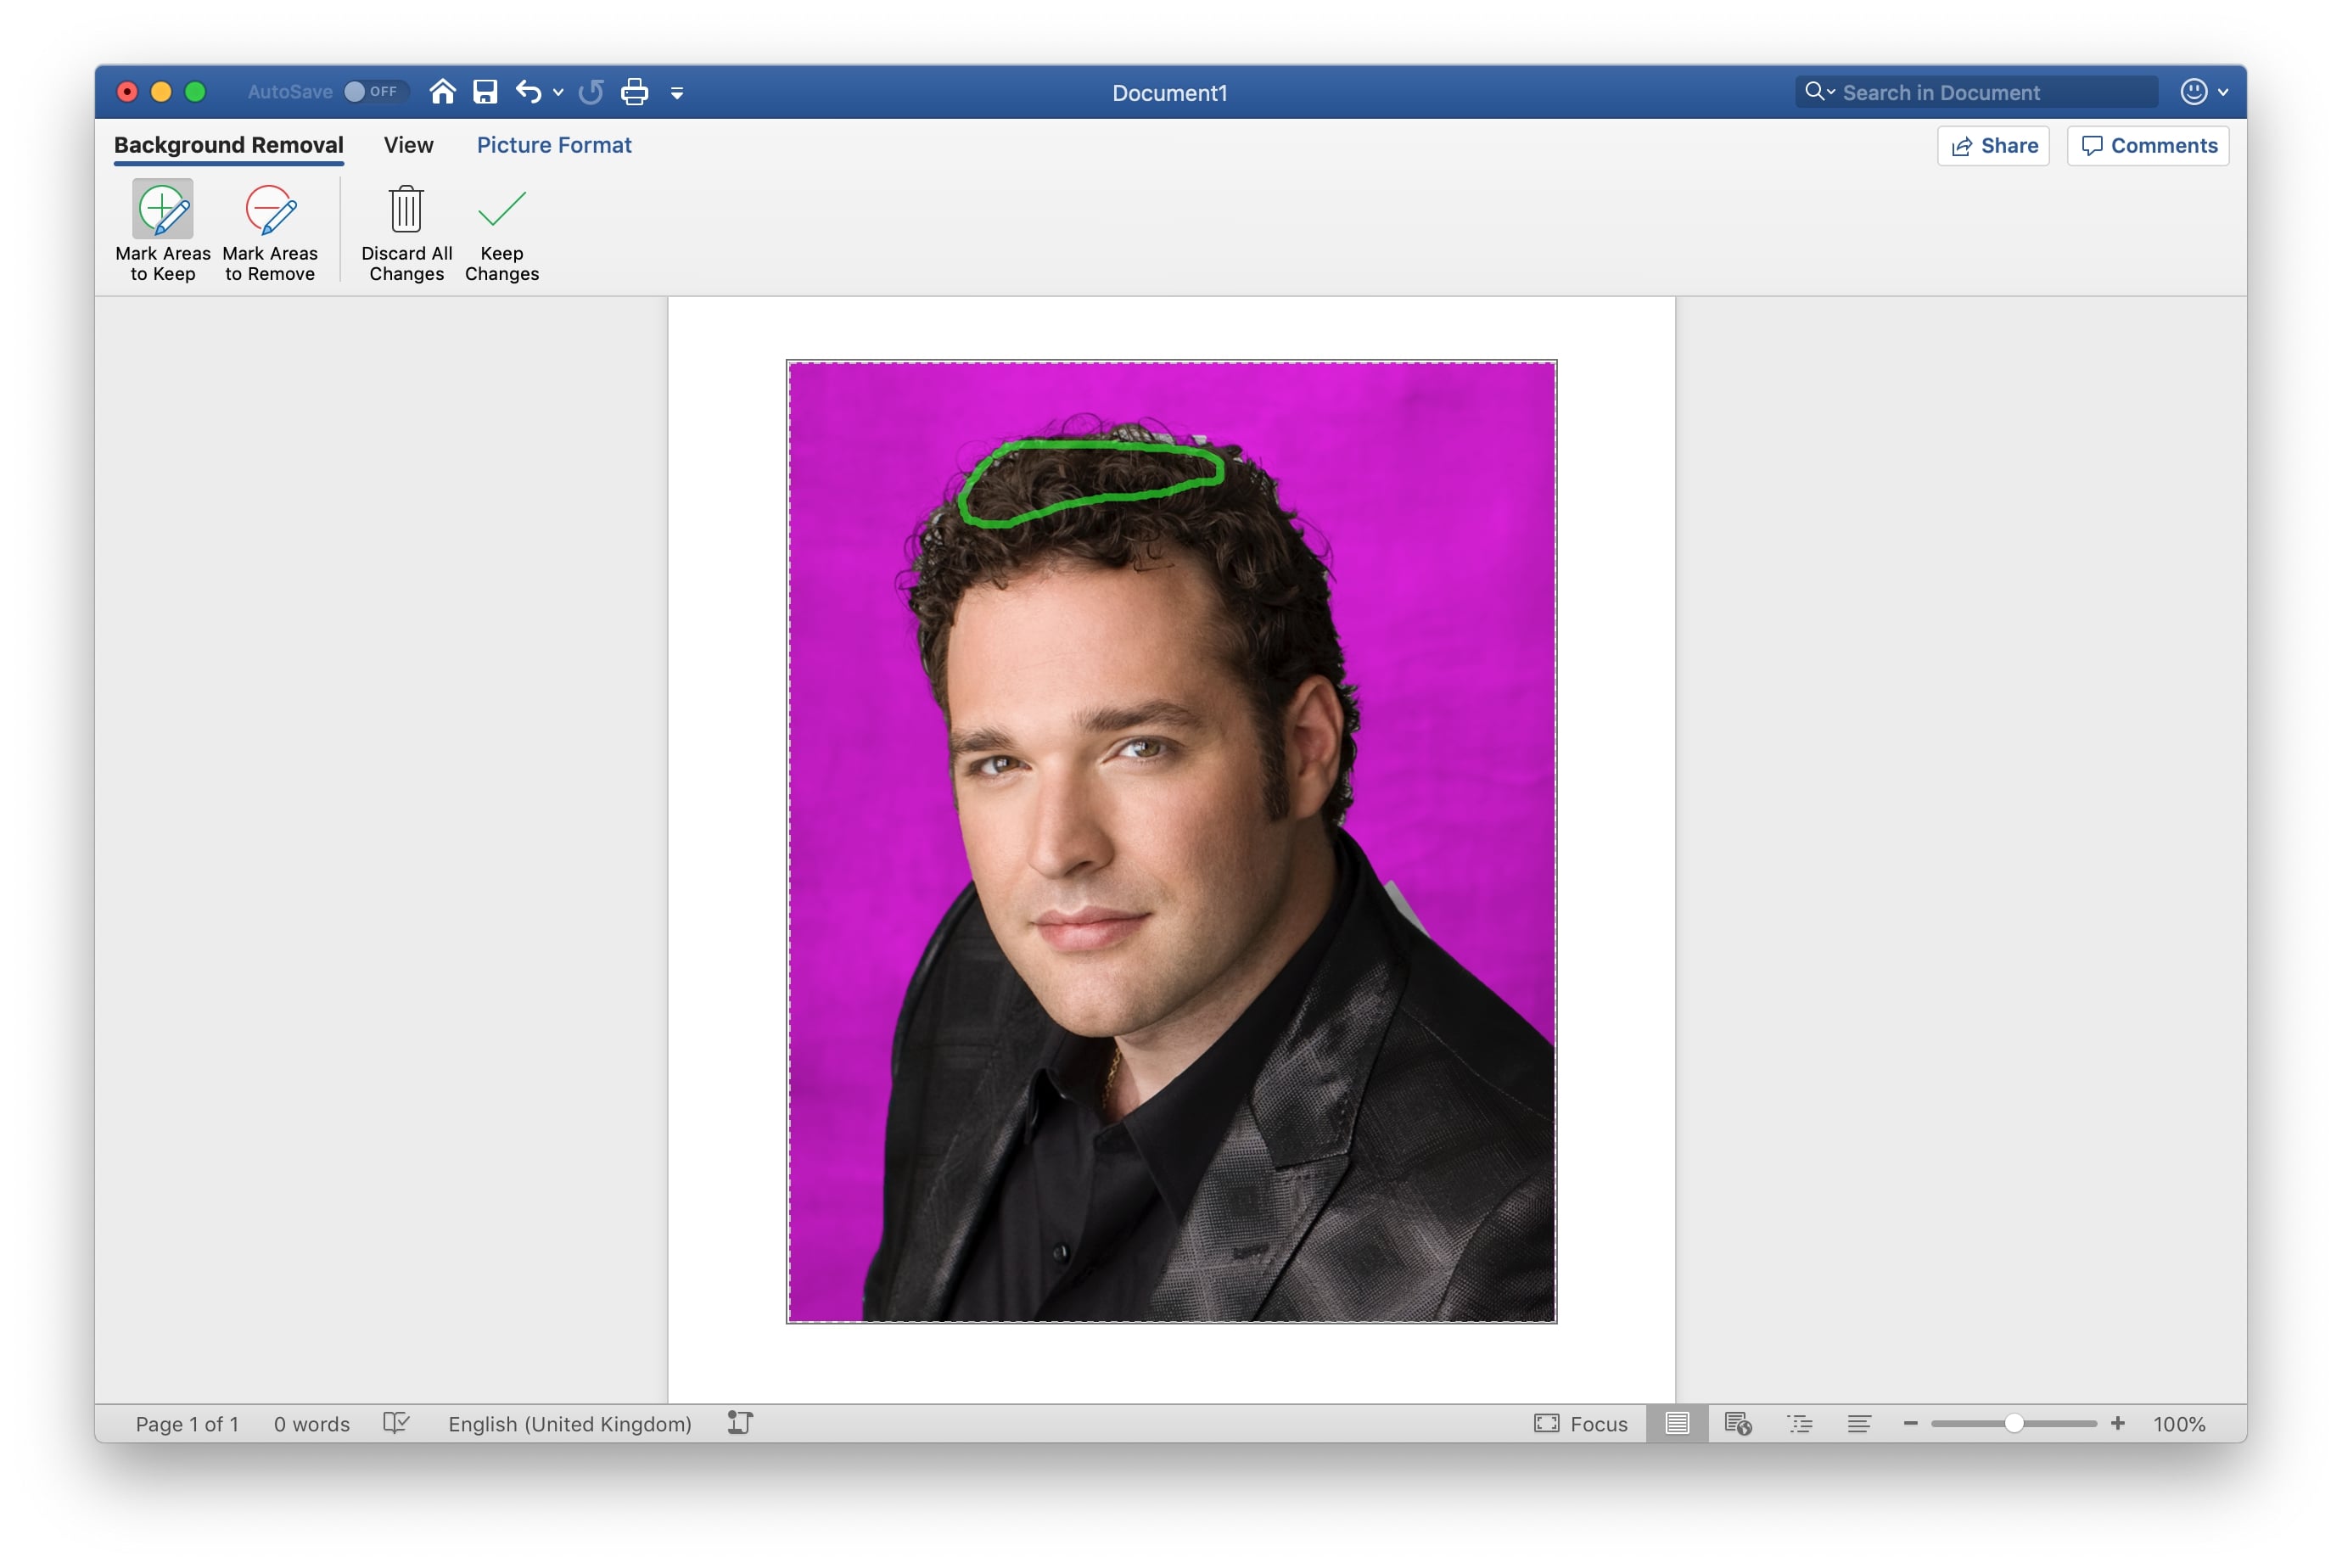
Step 3: Finetune the removal
In case Word has removed some of the wanted areas then you can fix that. In the next window, click on the “Mark Area to Keep”. Draw a rough line and Word will keep that.
If you think that Word has included some of the unwanted areas then you can remove that using “Mark Area to Remove”.
Once done, right click on the photo and click on “Save as picture”.
That’s all.
Tried yourself and didn’t like the output? You can hire me to remove the background for you. The min cost is $4 per image and the max cost is $10 per image. Send me the image at hello@tricky-photoshop.com.
2. Remove background in Photoshop using Select Subject
Time to use Photoshop.
Pros:
Super duper easy to use
Does not reduce the size and quality of the photo
Leaves no traces of Photoshop
Edits the image professionally
Cons:
Not free
Not the majority of people are familiar with Photoshop
Before
After
Open the image in Photoshop.
Step 1: Select the Subject
Select Subject feature is available only in the versions that launched in 2018 and after. Go to Select > Subject.
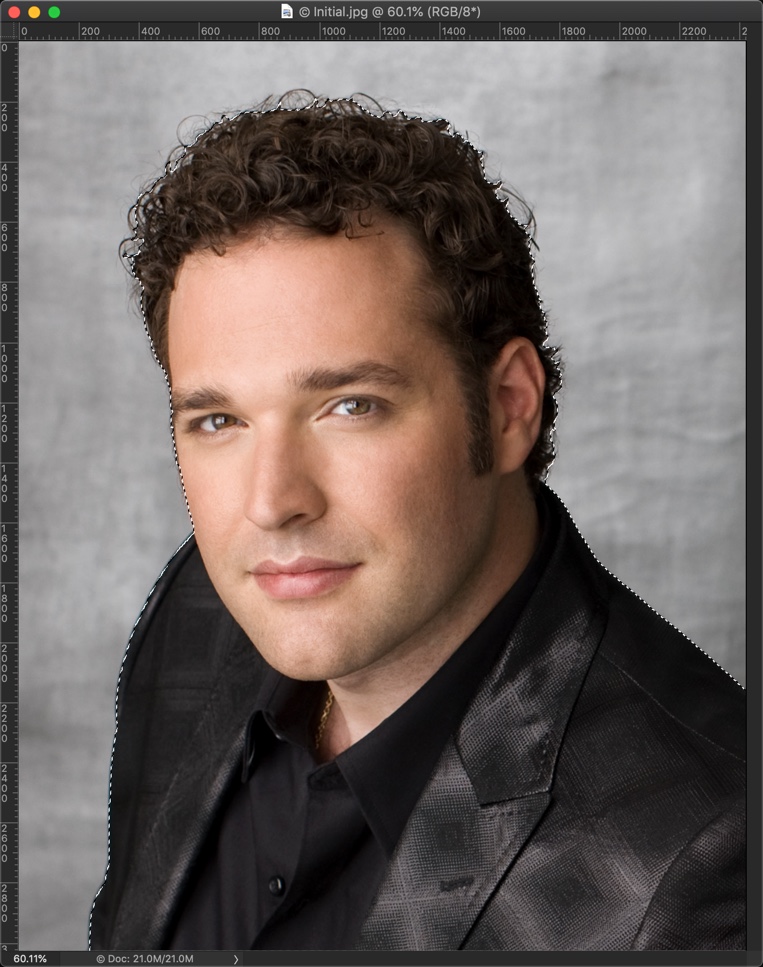
Photoshop will use artificial intelligence to automatically select the subject. The subject is the main focus of the image. Here the man is the subject.
Step 2: Use Select and Mask to Refine the Selection
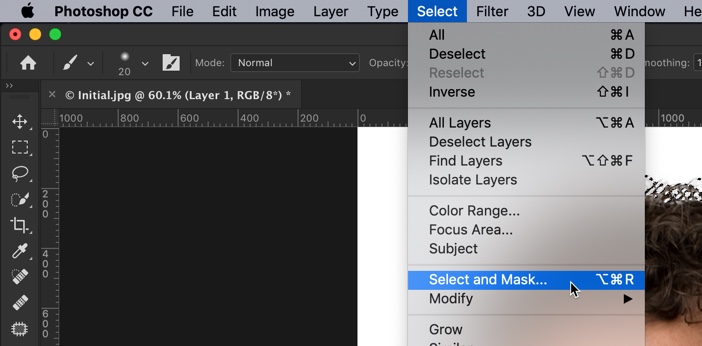
Time to refine the selection. We’re going to use Select and Mask for this. This option was added in 2017. If you have older versions then you can use Refine Edge. Go to Select > Select and Mask.
Increase the radius to 250px and turn on Smart Radius. This will do your job.
Here’s the final photo.
Feeling frustrated? If you’re having some problem and feeling frustrated, you can hand over this task to me. The max-to-max cost is $10 per image. Contact me at hello@tricky-photoshop.com.
2. Remove background in Photoshop using the Quick Selection Tool
Time to use another method Photoshop.
Pros:
Easy to use but not as easy as Select Subject
Does not reduce the size and quality of the photo
Leaves no traces of Photoshop
Edits the image professionally
Cons:
Not free
Not the majority of people are familiar with Photoshop
Before
After
Open the image in Photoshop
Step 1: Select the person with the Quick Selection Tool
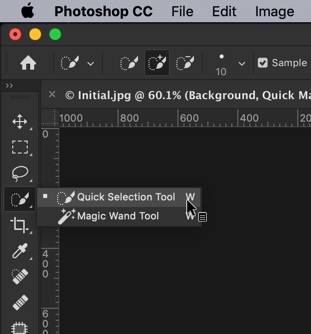
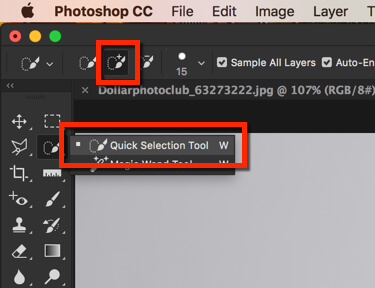
Grab the Quick Selection Tool from the tool panel or press Shift + W again and again until it comes.
Now drag the mouse over the image of the subject. Quick Selection Tool will automatically select the subject. See the GIF below.
This will select the subject.
Step 2: Use Select and Mask to Refine the Selection
We’re going to do the same that we did in the previous method.
Time to refine the selection. We’re going to use Select and Mask for this. This option was added in 2017. If you have older versions then you can use Refine Edge. Go to Select > Select and Mask.
Increase the radius to 250px and turn on Smart Radius. This will do your job.
Here’s the final photo.
Feeling frustrated? If you’re having some problem and feeling frustrated, you can hand over this task to me. The max-to-max cost is $10 per image. Contact me at hello@tricky-photoshop.com.
Hey guys, welcome the brand new Select Subject in Photoshop. I received a notification on my Creative Cloud that a new version of Photoshop is available. I quickly checked what Adobe has added to Photoshop and I saw the Select Subject.
I quickly updated my Photoshop to use this tool. I had already guessed what this feature does by its name. Yes, you are correct. This feature tries to find the subject in the photo. I cannot say that Select Subject in Photoshop is flawless and I am expecting few improvements in this feature in the upcoming months.
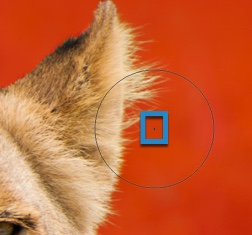
Time to try it. Fig 1 shows the lion that I selected with the help of Select Subject.
Let’s begin with the tutorial, guys.
What is Select Subject in Photoshop?
Select Subject feature in Photoshop tries to find the subject in the photo. It uses artificial intelligence to draw a selection around the subjection.
Where is Select Subject in Photoshop Located?
The feature is hidden in Photoshop. You need to grab either Quick Selection or Magic Wand tool by pressing W to see it. Fig 2 shows the exact location.
You can also use it by going to Select>Select Subject.
How to Use Select Subject in Photoshop?
Umm. Just click on it and that’s it. 😀
Did you notice that Photoshop automatically selects the subject in Fig 3? I did not need to make the selection using any tool. It was a one-click selection. Just one and then bam.
The selection made by Select Subject in Photoshop is not flawless. You need to refine the selection. I am going to use Select and Mask feature to refine the selection. Go to Select>Select and Mask.
I have highlighted the imperfection in Fig 3 that I am going to fix with Select and Mask.
The first thing that I am going to do is grab the Refine Edge Brush Tool (press E in Select and Mask). Now I am going to use it on the edges.
Pro Tip: Whenever you use Refine Edge Brush Tool, make sure that the center of the brush is outside the subject. If you can’t keep it outside, increase the size of the brush.
Look at Fig 5 to see how beautiful the selection is made.
In case you haven’t noticed, I did not even touch the controls on the right side. The selection is made just with the help of Select Subject and Select and Mask. Press OK to make the selection.
Hey, folks! it’s been a few weeks since I have uploaded a new article on TrickyPhotoshop. I must say that I am quite busy with my another venture, I Innovate Magazine – the magazine for Entrepreneurs, these days. But this should not be an excuse. I know that you get upset about not seeing any new tutorial for weeks and I also know that I need to upload more frequently. I will also try my best to upload at least a new article every week. Last time I discussed Brush Tool in Photoshop. Today, as the title already gave you a hint, we’re going to see the brand new Select and Mask feature in Photoshop 2017. Yes, you saw it right. Photoshop 2017 is here.
Since the past few years, or at least I am noticing, Adobe has been trying hard to make the selection as easy as possible. This can be seen by removal of extraction and introduction of Refine Edge back in Photoshop CS3. Now with the addition of Select and Mask tool, the selection is now easier than ever.
Let me show you how to use this feature. All you need to have is the Quick Selection Tool activated.
Select Using Quick Selection Tool
Let’s grab Quick Selection Tool from the tool panel or press Shift+W again and again until it comes. Make sure that “Add to Selection” is turned on.
Once you’re done with the selection, you need to make sure every single part is selected. In hurry, usually what happens is that we forget to select every bit of the thing that we want to select. Later, when we use Refine Edge (it’s gone in Photoshop 2017, at least in version 20161012.r.53 x64), we struggle to get the desired outcome.
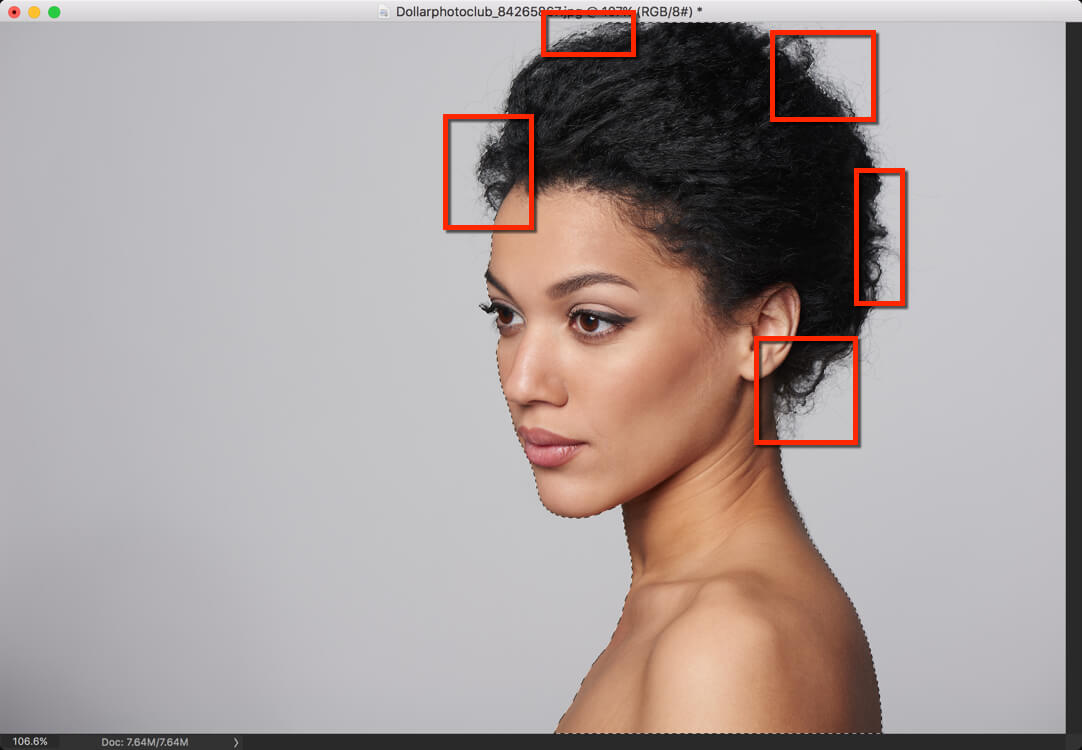
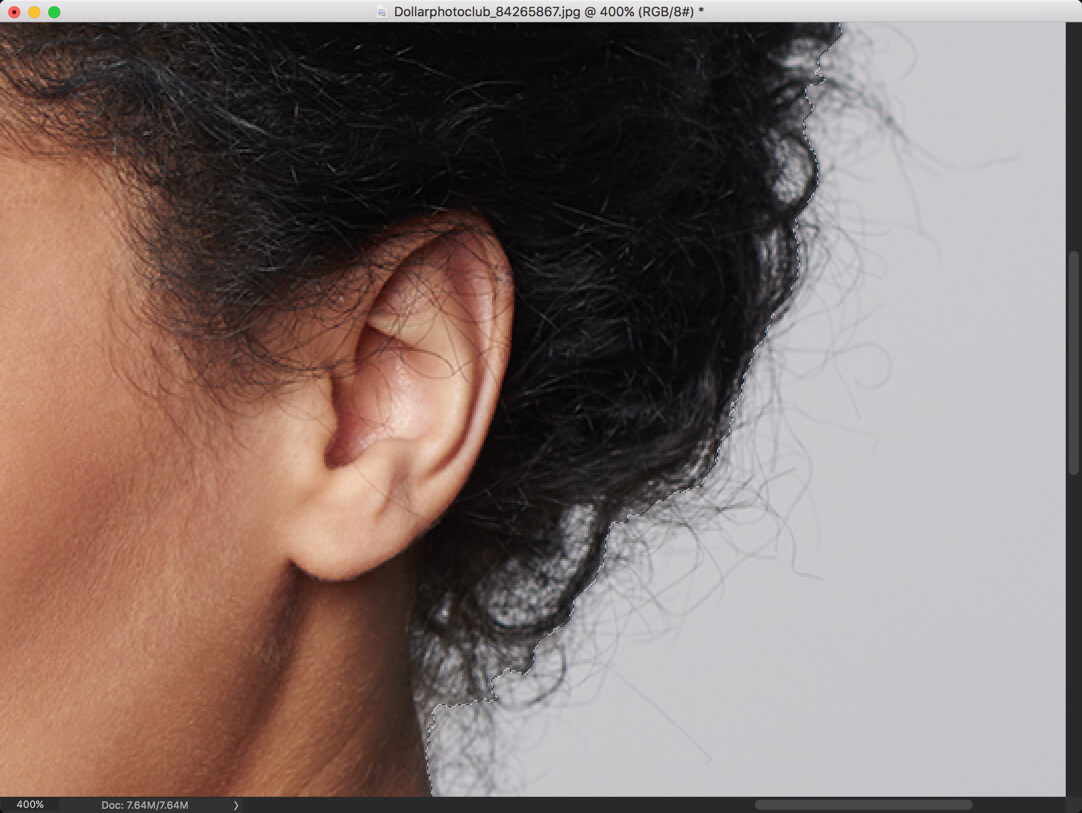
In below image, I have made few rectangles that show where we usually miss the selection.
Let’s zoom in to see it better. Are you seeing the marching ants? See how precisely are the walking around the hair.
Refine the Selection Using Select and Mask Tool
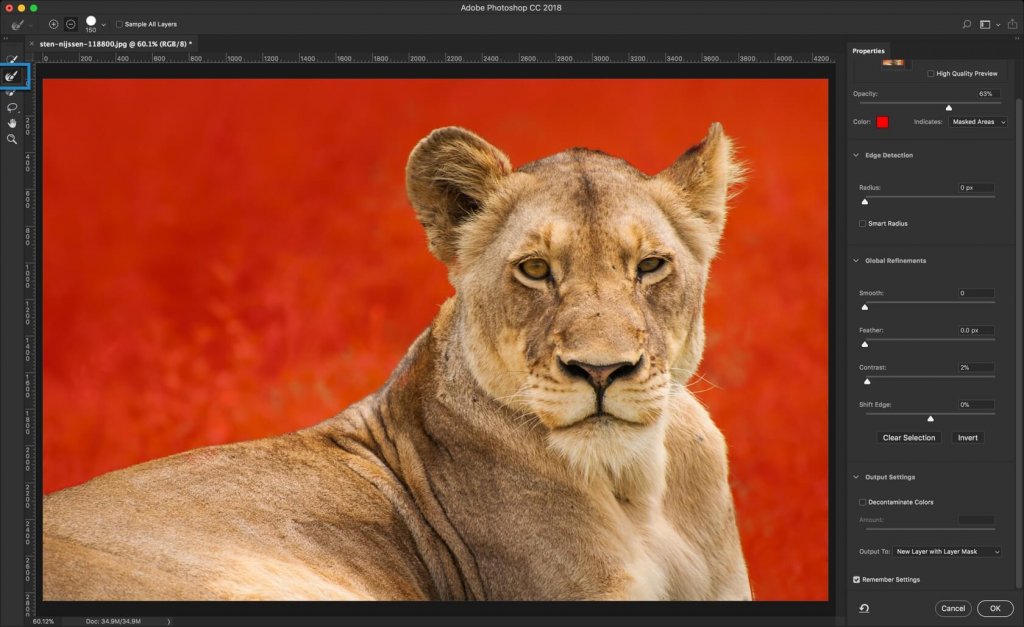
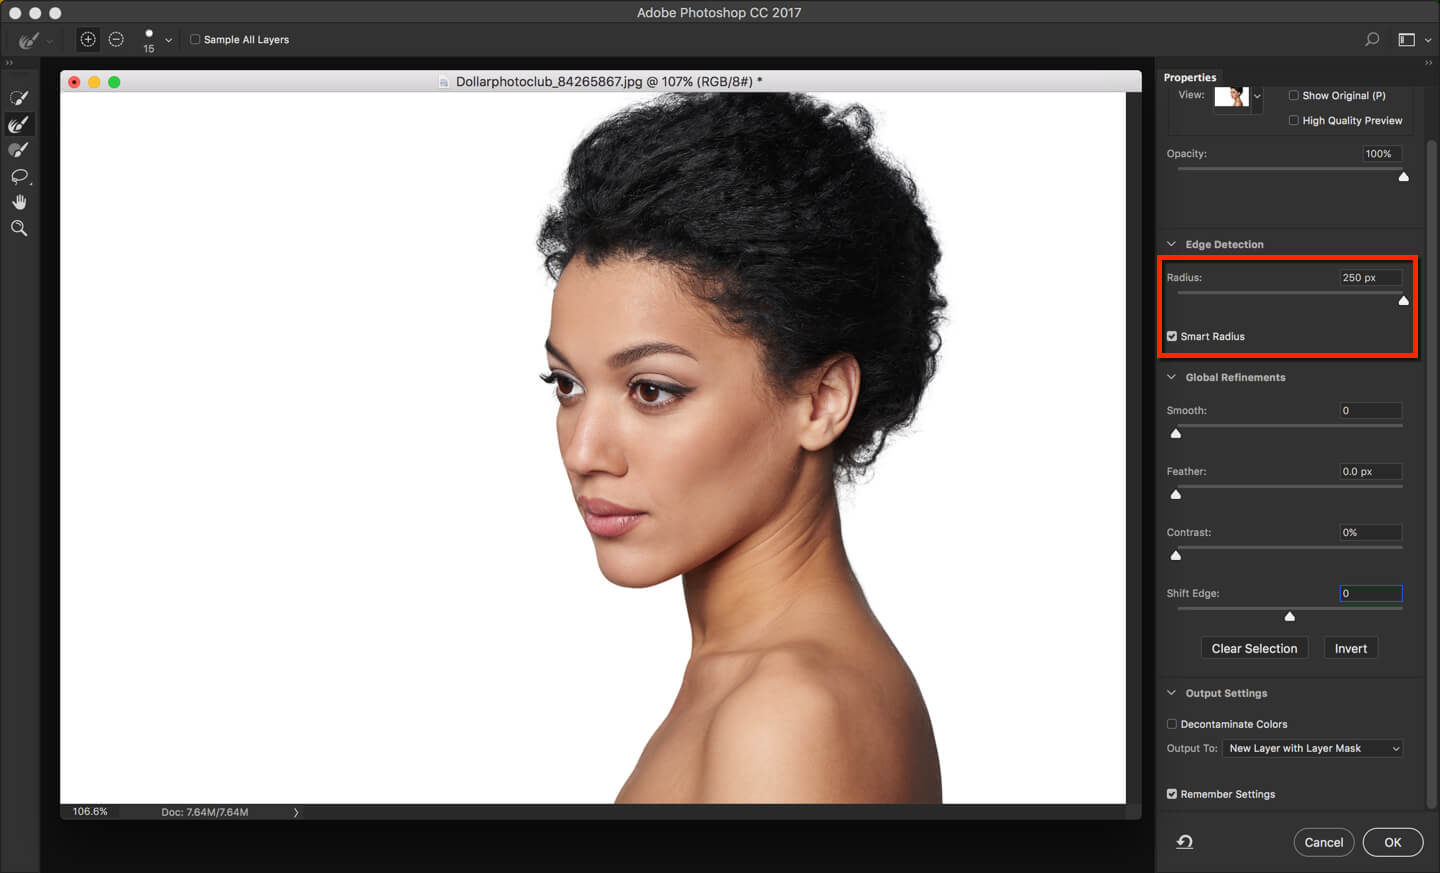
Now, let’s go to Select and Mask. Activate it by pressing Cmd+Opt+R/Ctrl+Alt+R.
As my image is quite big, one thing that I usually always go is turning on “Smart Radius” and increase the radius all the way to 250 pixels.
This does all of the work.
Did you see how efficiently it worked around the hair? It selects the hair flawlessly.
Did you notice one more thing? All of the other settings are the default. This means alone Radius did all of the work.
Isn’t it amazing?
Now, let your friends know about this tool by sharing this with them on Facebook and Twitter.
Also, make sure that you make most of the offer below.