Hey Guys, welcome to my another tutorial on creating Instagram Effects in Photoshop. This time, I will be showing you How to Create Instagram Moon Effect in Photoshop. Couple of weeks ago, I wrote a post on Creating Instagram Gingham effect and I must say that I received a big cheer on that post, and that motivated me to write my another on Instagram.
Moon effect is pretty much subtle like almost all other Instagram effects are. But what makes it different is that it is unsaturated which means it is Black and White.
Before we go further, I would like to show you the final image of the effect when applied on an image.
Final
So let’s begin the tutorial.
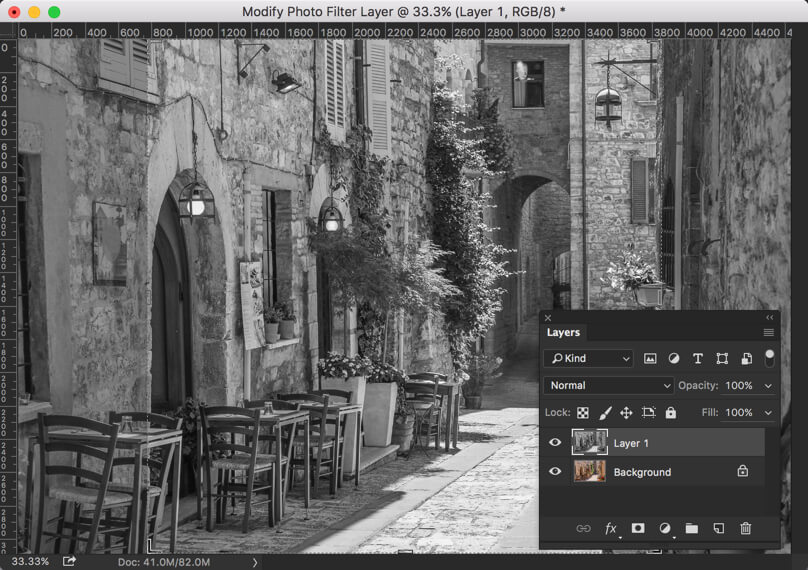
Step 1: Desaturate the Image
The first thing we need to do is to desaturate the image. Duplicate the layer by pressing Cmd+J/Ctrl+J. Press Cmd+Shift+U/Ctrl+Shift+U.
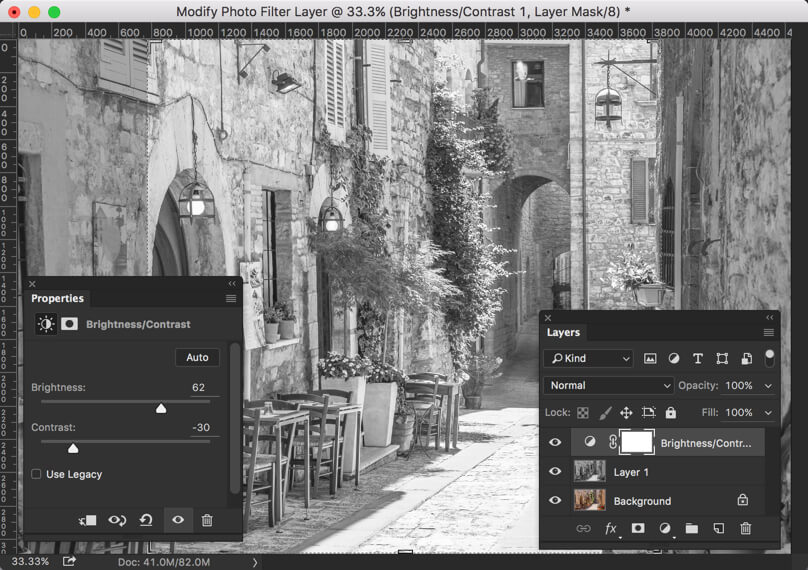
Step 2: Play with Brightness and Contrast
Moon Effect generally brightens the image and decreases the gap between highlights and shadows. We are going to do the same. Go to Image>Adjustment>Brightness/Contrast.
Increase the brightness to 62% and decrease the contrast to -30%.
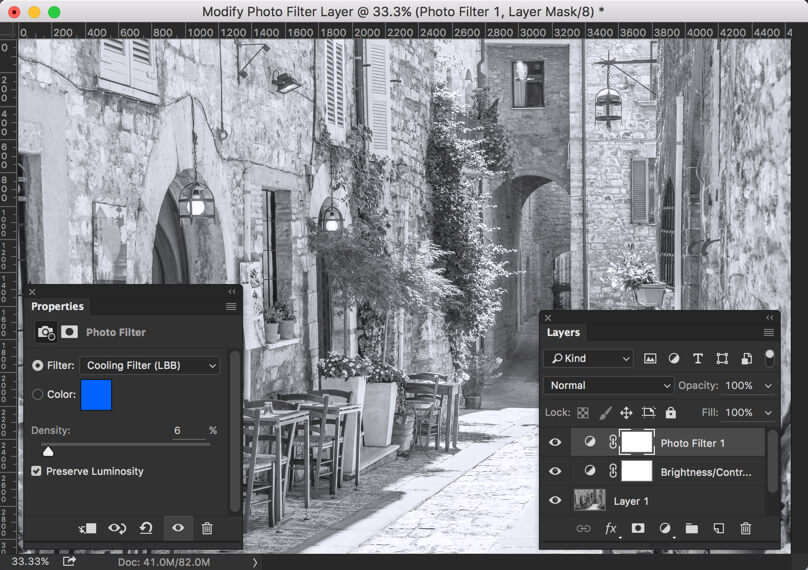
Step 3: Add Blue Tint
Time to add a very subtle, even unnoticeable blue tint. Go to Layer>New Adjustment Layer>Photo Filter.
Choose the filter as Cooling Filter (LBB). Keep the density at 6%.
Step 4: Add Vignette
Time to add nice looking black vignette.
Press Cmd+Opt+Shift+E/Ctrl+Alt+Shift+E to stack all the layer into a new layer in Photoshop. Go to Filter>Camera Raw Filter.
Switch to Effects tab. Decrease the amount o -45. It will add a nice looking black vignette.
And we are done.
I hope that you have enjoyed this tutorial. Don’t forget to check my other tutorials on Instagram effect in Photoshop.
Please support TrickyPhotoshop by sharing this tutorial with your friends and family on Facebook, Twitter, and Google+.
Hi Guy, I hope that you had enjoyed my last tutorial on Creating Instagram Gingham effect on Photoshop. This time I am shifting a little bit to write on How to Create HDR Image in Photoshop. Lately I have been receiving a lot of requests to write a tutorial on Creating HRD Effect, and here’s one.
HDR stands for High Dynamic Range. To achieve HDR effect, we need special kind of photos called as bracketed photos. You shoot same scene 3 or 5 times with exposure difference of 1 or 2. For example, you shoot 3 images of same scene with its exposure value as -1, 0, and +1, or -2, 0, and +2. You can also shoot 5 images with its exposure value as -2, -1, 0, +1, and +2. This feature comes by default in most of the DSLR cameras. But we are humans and we forget to take bracketed images and go to create a HDR and realize how foolish we are. To keep those people is mind, I am going to start with 1 image and make some adjustments such that they’ll look like bracketed images.
Before we go further, I’d like to show you how the final image will look.
Step 1: Change Exposure to Create Bracketed Photos
Open your image.
Go to Image>Adjustments>Exposure. Increase the Exposure by 1 value.
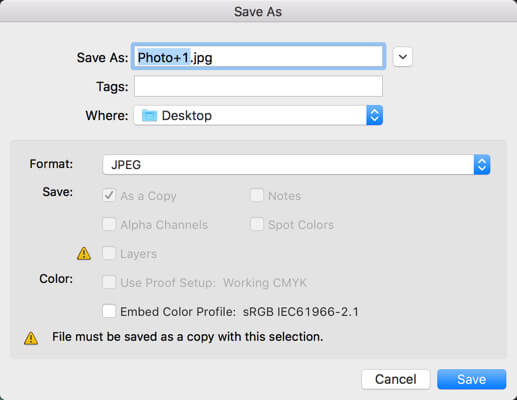
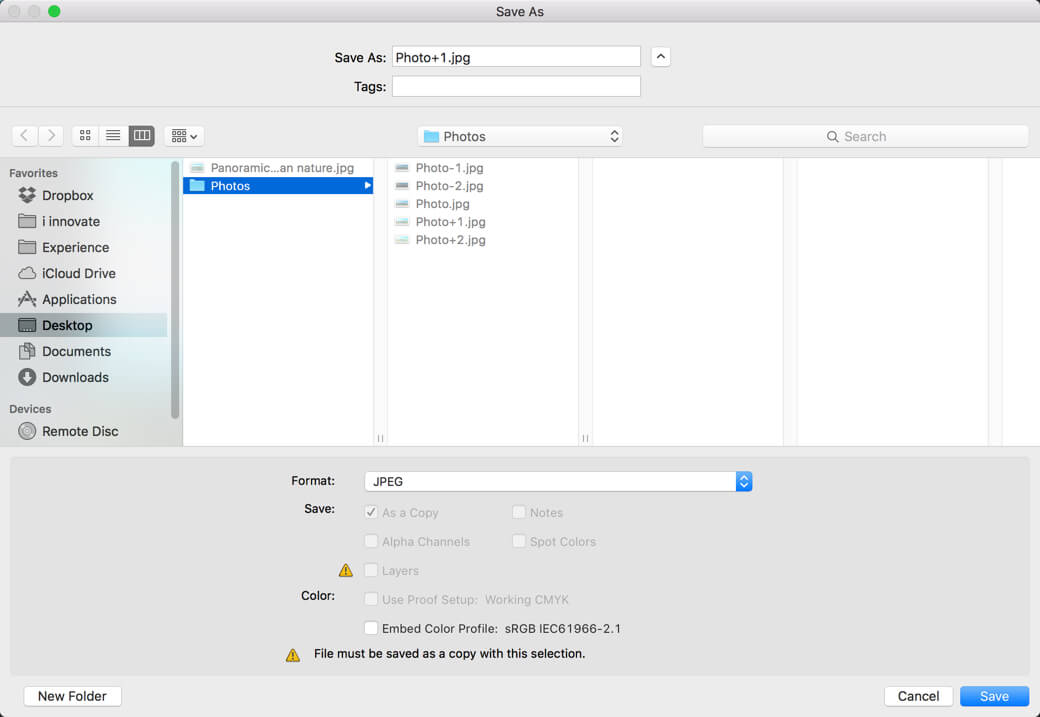
Now save the image with an easily recognizable name. Photo stands as prefix and +1 stands for +1 value of exposure.
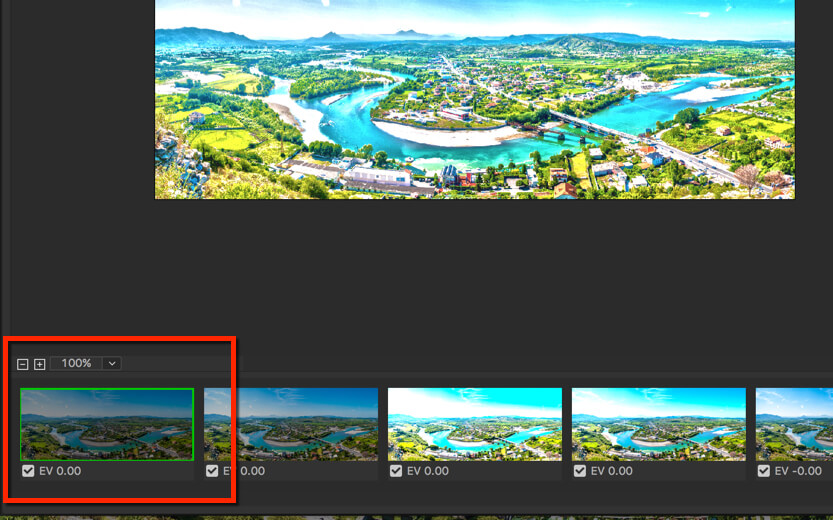
In same way, create 4 photos with their exposure value as -2, -1, +1 and +2. In the end, you will have total 5 images including the original and 4 images that we just created.
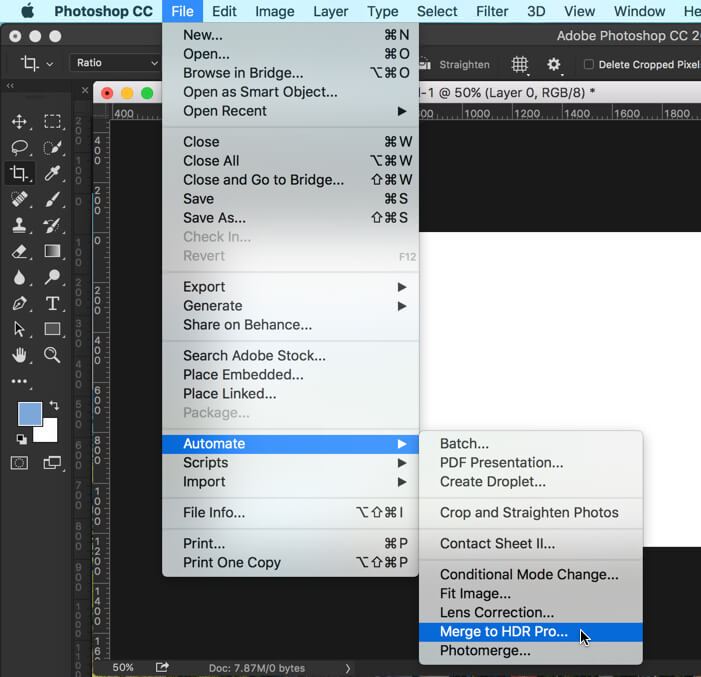
Step 2: Open HDR in Photoshop
Go to File>Automate>Merge TO HDR Pro.
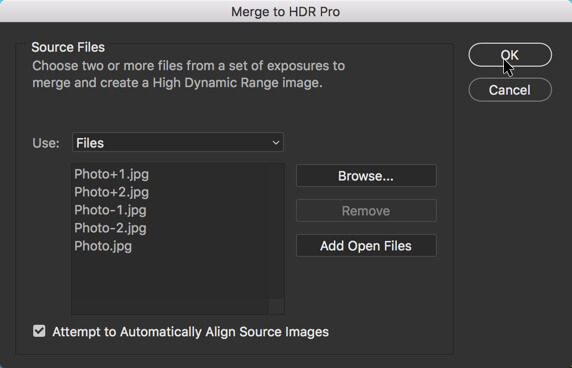
Click on Browse and select all photos. Press OK.
Now wait for few seconds till Photoshop finishes its magic.
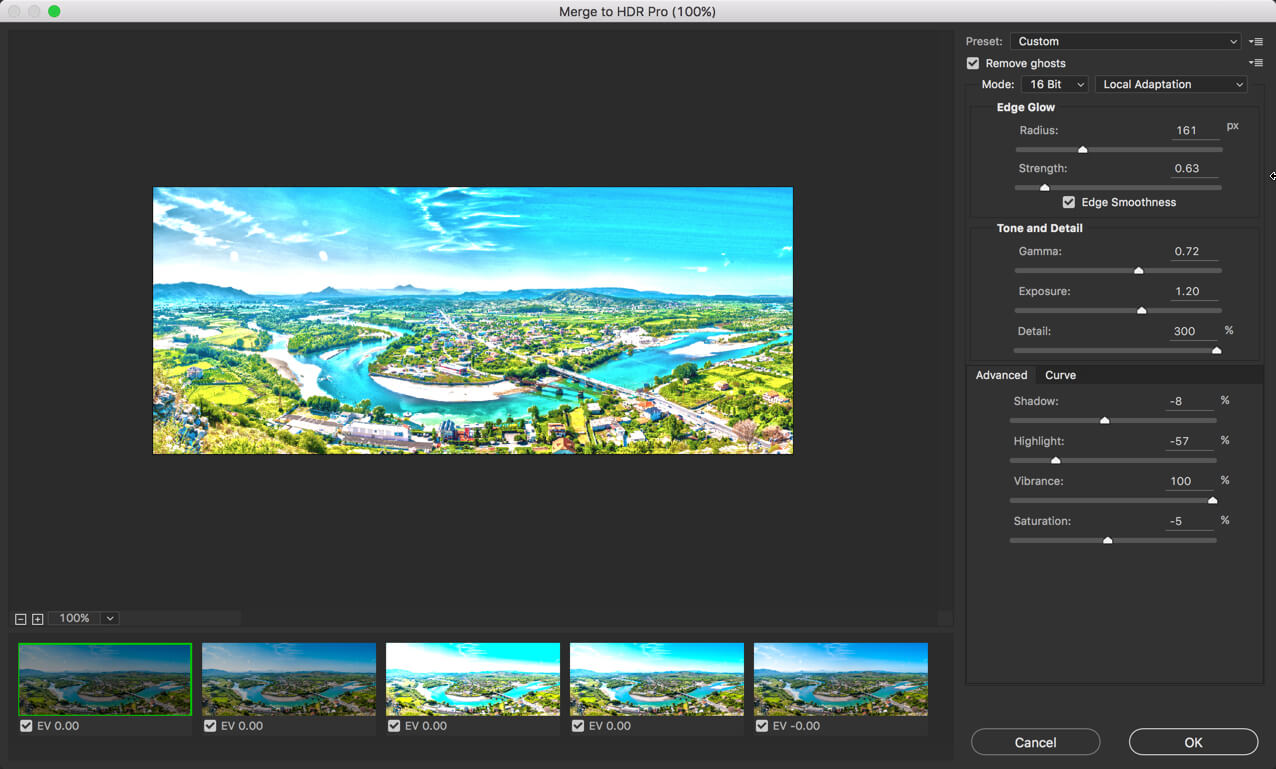
Step 3: Create HDR Image in Photoshop
Photoshop will show below screen when it complete processing.
It’s looking beautiful, isn’t it?
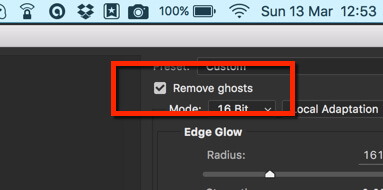
The first thing you wanna do to turn on Remove Ghosts.
This will clean up all the unnecessary extra highlights present in the image.
Step 4: Choose the Image
You can choose which image to use as reference image to create HDR image at the bottom of your screen.
I am choosing the image that has exposure value of -2. Don’t worry about the exposure value that Photoshop is showing now. it’s because changed the exposure value in Photoshop. Had we done it with our camera, Photoshop would’ve shown us the correct value.
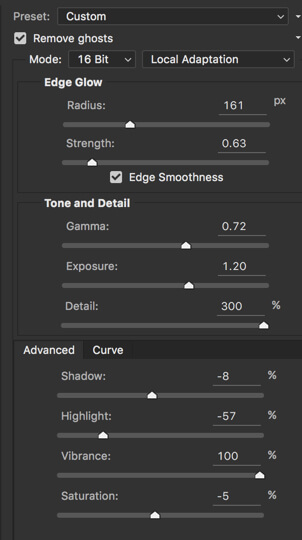
Step 5: Play with Sliders
There’s no such magical settings in HDR. Each image looks perfect with a different adjustments of sliders. Below is the setting that I used. I am not saying this is the perfect adjustment.
And we are done with the image. I hope that you enjoyed the tutorial.
Please support TrickyPhotoshop by sharing this tutorial with your friends on Facebook, Twitter, and Google+.
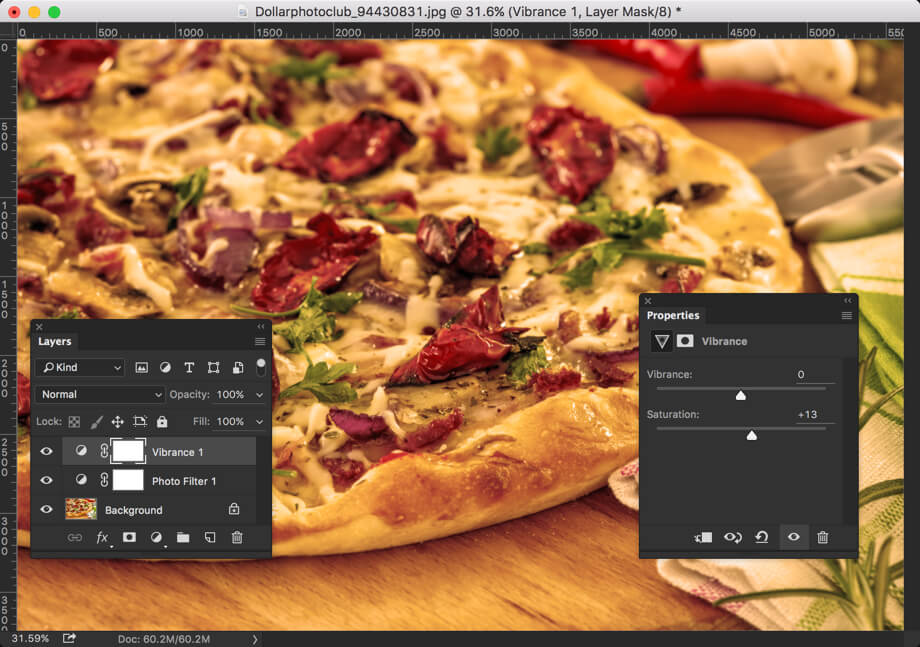
Hey guys, welcome to my another tutorial on Instagram Effects. A few weeks ago I shared a tutorial on Creating Instagram Claredon Effect and today I’ll be sharing How to Create Instagram Gingham Effect on Photoshop. Instagram is getting popular day by day, and it has crossed 400 million users worldwide. Yes, I know that’s huge. Given that the total world’s population is around 7 billion, around 5% of all people in this world uses Instagram. Considering that, it’s quite obvious that enthusiasts like you would search for Creating Instagram effects on Photoshop, and here’s the end of your search.
Before we go any further, I’d like to show you the final image.
FINAL
So let’s begin the tutorial.
Step 1: Reducing Highlights
The key feature of this filter is that it suppresses every single highlight present in an image, and we are going to do the same.
Open your image on Photoshop and go to Image>Adjustments>Shadows/Highlights.
Reduce the highlights as shown below. I’ve reduced it by 48%. Please note that what settings suit your image best, might be different than mine. Make sure that you decrease the tone as reduction of highlight will also affect the face which we don’t want.
Step 2: Reduce Colors
The next thing we need to do is to reduce saturation.
Go to Image>Adjustments>Vibrance. Reduce the Saturation to -31.
Step 3: Apply Vignette
Press Cmd+Opt+Shift+E/Ctrl+Alt+Shift+E to stack all layers onto top of the layer panel.
Go to Filters>Camera Raw Filter.
Head over to the FX section. Increase the Amount and Midpoint in the Post Crop Vignette section.
This will add a nice white vignette to the image.
I hope that you enjoyed this tutorial. Please share TrickyPhotoshop by sharing this tutorial with your friends and family on Facebook, Twitter, and Google+.
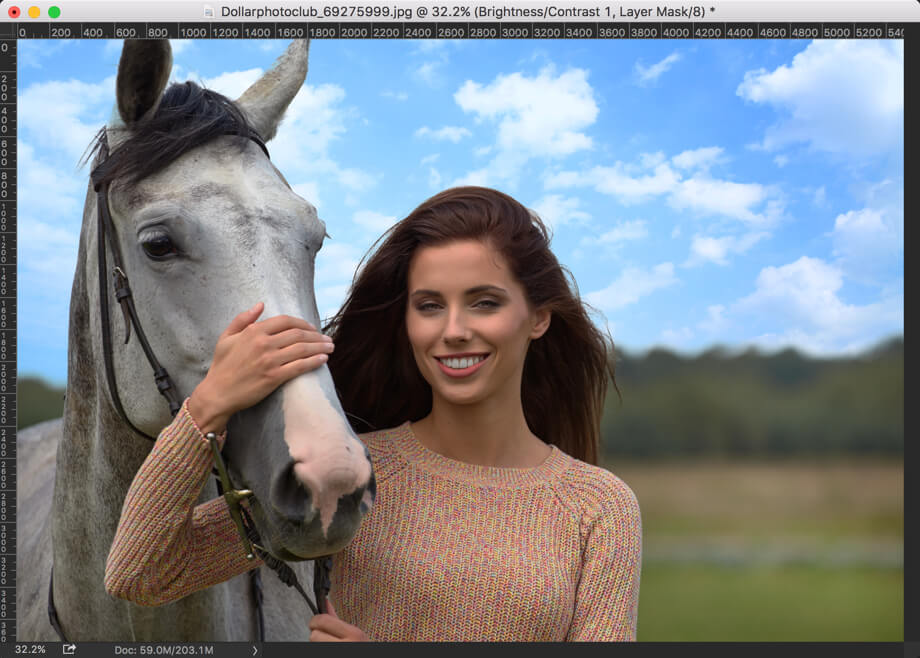
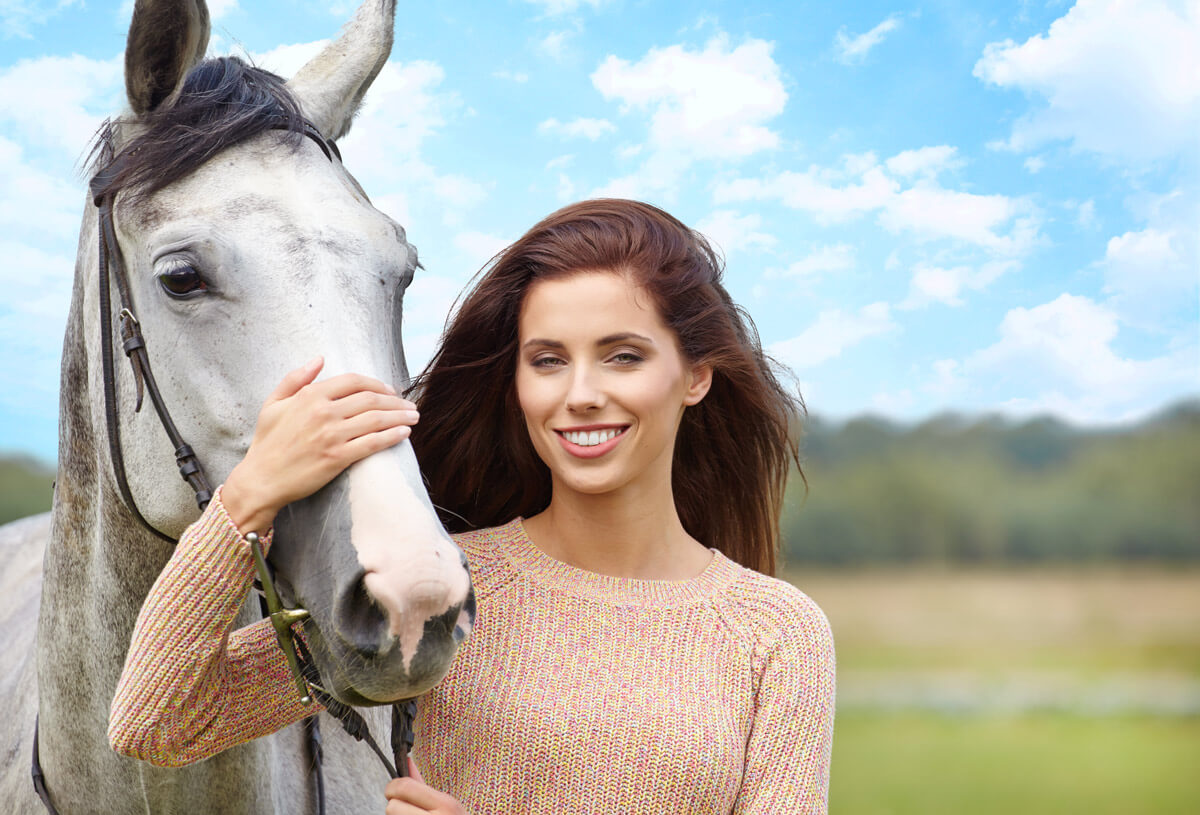
Hey guys! Today we’re going to learn a bit different than what we usually learn at TrickyPhotoshop. It is very common in daytime when you take photos, either the background gets overexposed or the foreground gets underexposed. Suppose you want take photo of a tuscany field and beautiful clouds are there to add beauty to your photos. Time is 1 PM and light is harsh. You adjust the Shutter speed so that field is properly exposed but you realize that sky is overexposed. Now you adjust shutter speed so that sky is properly exposed but later you realize that field is underexposed. There’s no ideal adjustment present in the camera that makes both background foreground perfectly exposed, and this is bothering you because you like your photos to be perfect. Fortunately we have an option to merge multiple exposures photos in Photoshop.
In this tutorial, I am going to show you how to merge different exposures photos in Photoshop. This tutorials require you to have at least two different exposures of same photo where in one foreground is perfectly lit and in another background is perfectly lit.
Before we go any further, I would like to show you two initials and one final photos.
Perfectly Exposed Foreground
Perfectly Exposed Background
Perfectly Exposed Foreground and Background
As I used a stock image, I needed to alter same image to create two different photos where one has perfectly exposed foreground and other has perfectly exposed background.
Let’s begin the tutorial
Step 1: Select the Sky in Perfectly Exposed Foreground Photo
We need to replace the overexposed sky with perfectly exposed sky. For that we need to first take it out.
I am going to use Magic Wand Toolto select the sky. You could activate it either from the Tool Panel or press Shift+W again and again until it comes.
Now drag your mouse to select the sky.
Step 2: Refine the Selection
Invert the selection to select the foreground. You could do it by pressing Cmd+Shift+I/Ctrl+Shift+I.
We are going to use Refine Edge tool to make our selection near to perfect. Go to Select>Refine Edge.
As the photo is pretty much large, I am dragging the radius all the way to 250 pixels. Make sure your Output To is set to New Layer with Layer Mask.
This will create a new layer in the layer panel.
Step 3: Place the Perfectly Exposed Background Photo below the top layer.
Press Cmd+O/Ctrl+O to open a new photo in Photoshop. Browse the photo and open it. Press Cmd+A/Ctrl+A to select the whole image and Cmd+C/Ctrl+C to copy it.
Step 4: Merge Multiple Exposures Photos in Photoshop
Time to paste the recently copied image.
Press Cmd+V/Ctrl+V to paste it onto the image that has perfectly exposed foreground.
Move the layer to below the layer that has perfectly exposed foreground.
And now we’re done with this tutorial.
Here’s the final image again.
I hope that you enjoyed this tutorial.
Please support TrickyPhotoshop by sharing this tutorial with your friends and family on Facebook, Twitter, and Google+.
Hey guys, again I am back with my series on achieving Instagram effects using Photoshop. This time I am going to create Instagram Clarendon Effect in Photoshop. Instagram has become quite popular after Facebook bought it for a massive amount of 1 billion dollars. Turned out that the investment was quite strategic as the present value of Instagram is 30 billion dollars.
The best or worst part of Instagram is its exclusivity to its app. You cannot use its filter if you’re not using its app. The only way left to you is to create it. So let’s create one.
Before we proceed, I’d like to show how our image will look at the end.
FINAL
I hope that you like it. Let’s begin.
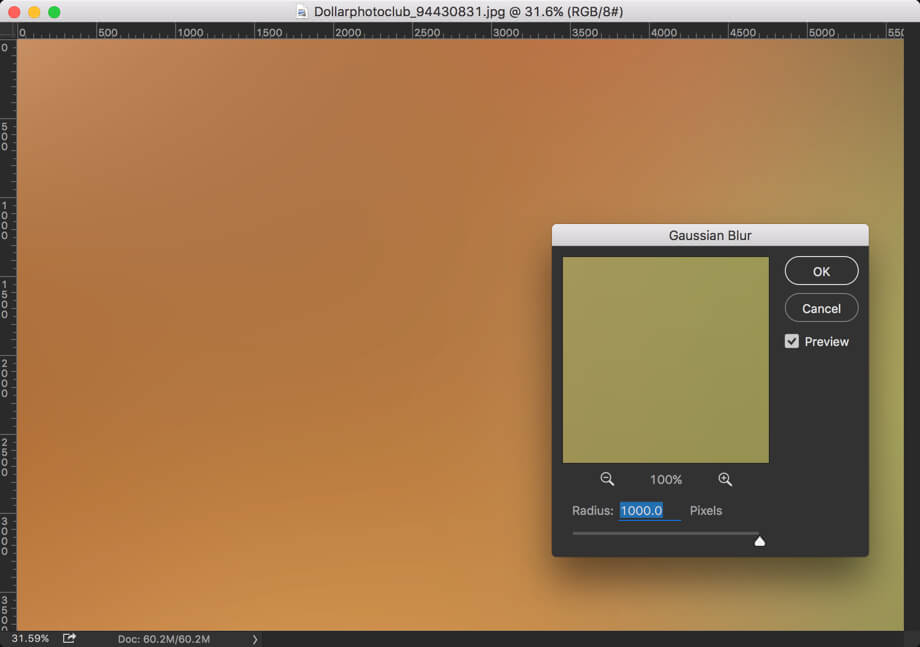
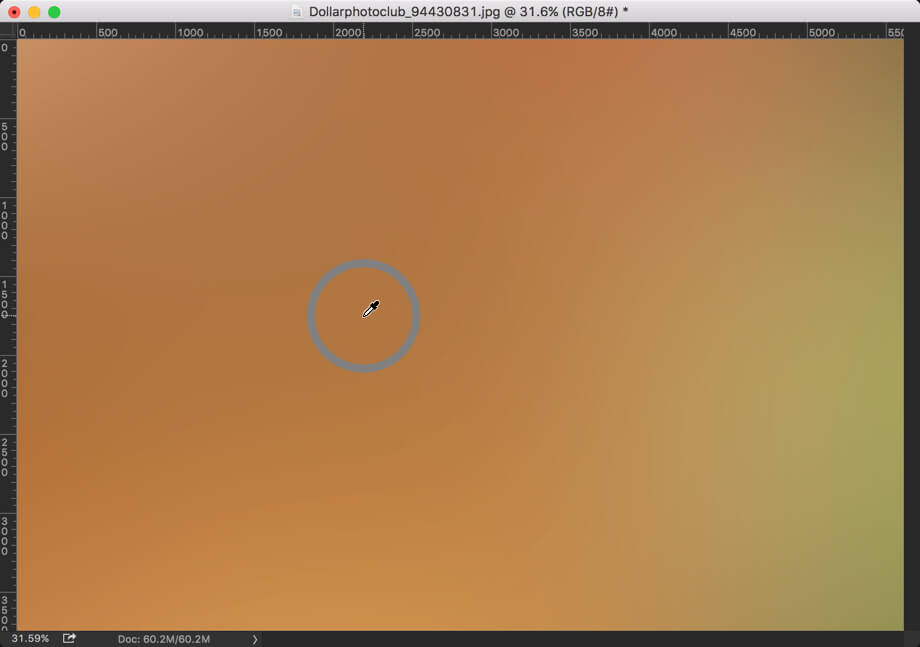
Step 1: Find the Accent Color
You might have noticed that Clarendon filter adds a tint of the color that has maximum presence in the image. Our job is to find out that color. The best way to do that is by blurring the image all the way to its extreme.
Open the image. Go to Filter>Blur>Gaussian Blur. Turn the slider all the way right to 1000 pixels.
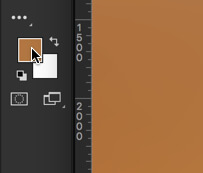
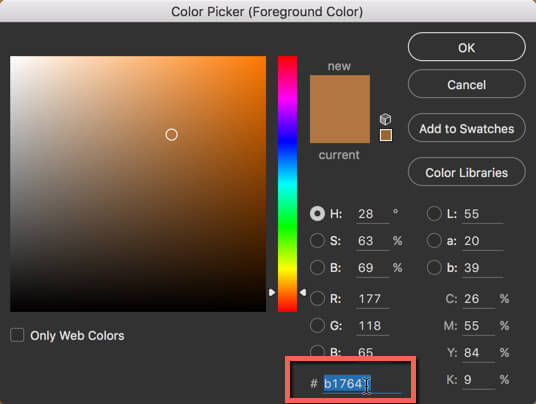
Now activate Eyedropper tool by pressing I. Sample the color by clicking on the color.
Click on the foreground color.
Copy the HEX color code by pressing Cmd+C/Ctrl+C.
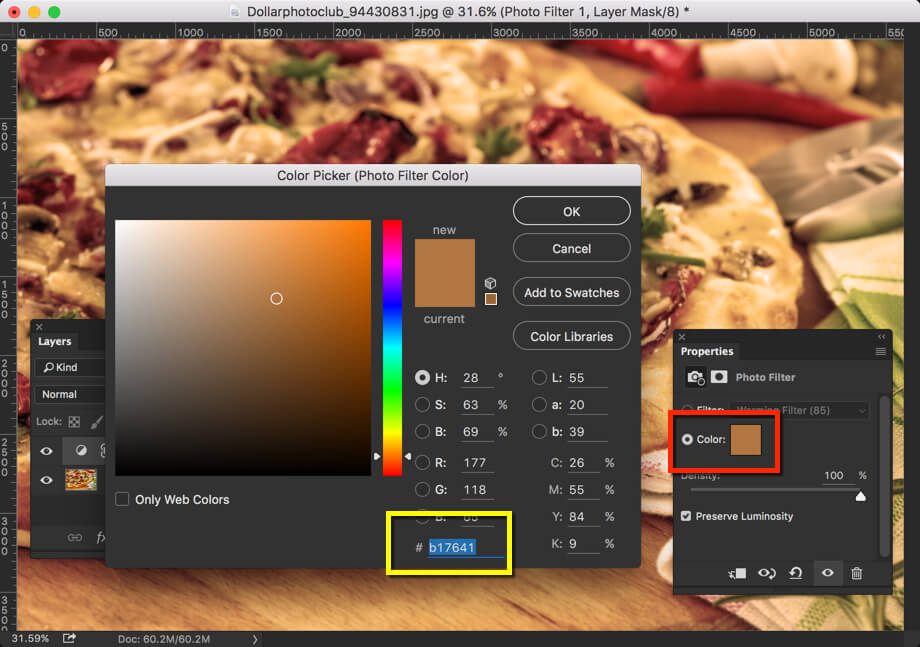
STEP 2: Add Tint of Accent Color
Go to Layer>New Adjustment Layer>Photo Filter.
Turn on the color (highlighted by red box) and then paste the HEX color code you just copied in the area inside Yellow box.
Drag the Photo Filter slider all the way to 100%. Make sure that “Preserve Luminosity” is turned on.
STEP 3: Add Saturation
Go to Layer>New Adjustment Layer>Vibrance.
Increase the saturation by 10-15%.
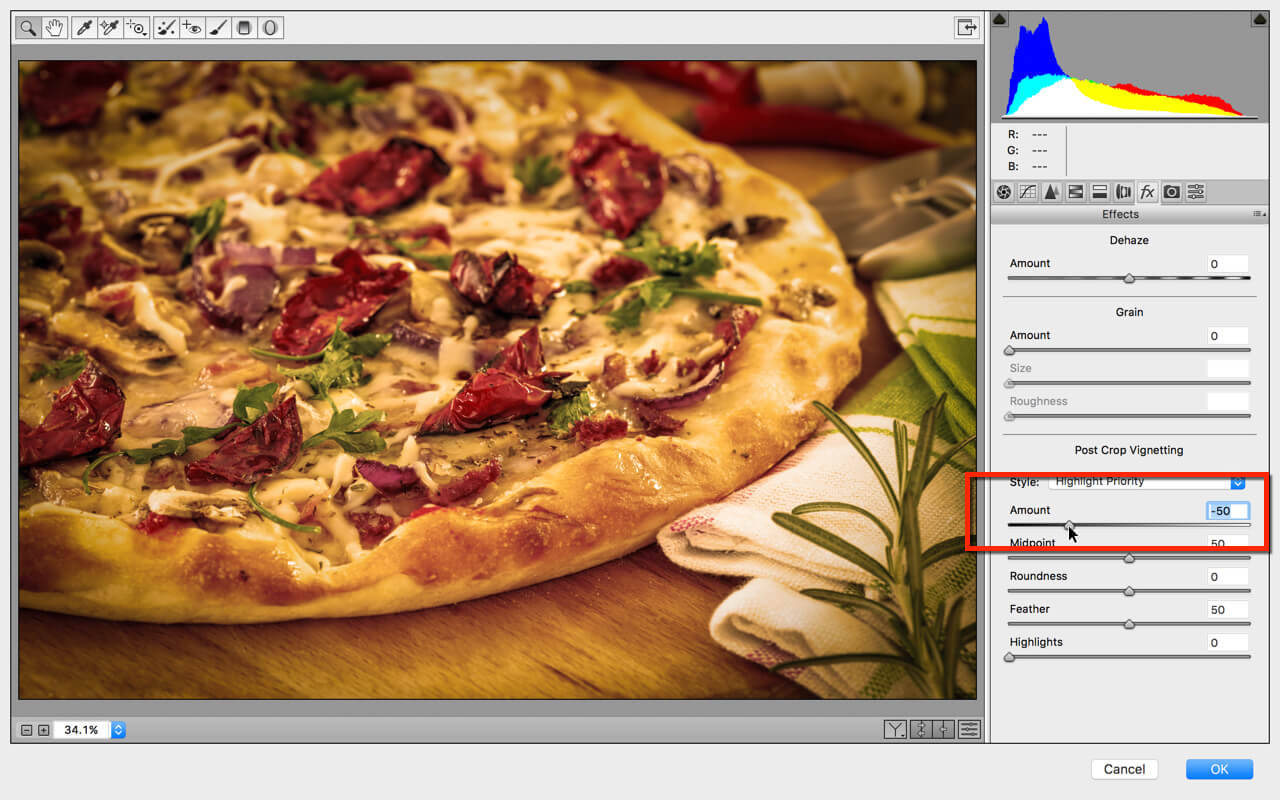
STEP 4: Create Instagram Clarendon Effect in Photoshop
Press Cmd+Opt+Shift+E/Ctrl+Alt+Shift+E to stack all the layers into a new layer. This will not alter the image. It will just create a new layer at the top of the layer panel.
Go to Filter>Camera RAW filter. Navigate to the fx tab and decrease the Amount in Post Crop Vignette to -50%. Press OK
This will add a nice looking vignette to the image.
And now we’re done. Here’s the final photo.
FINAL
I hope that you like this tutorial.
Please support TrickyPhotoshop by sharing this tutorial with your family and friends on Facebook, Twitter, and Google+.
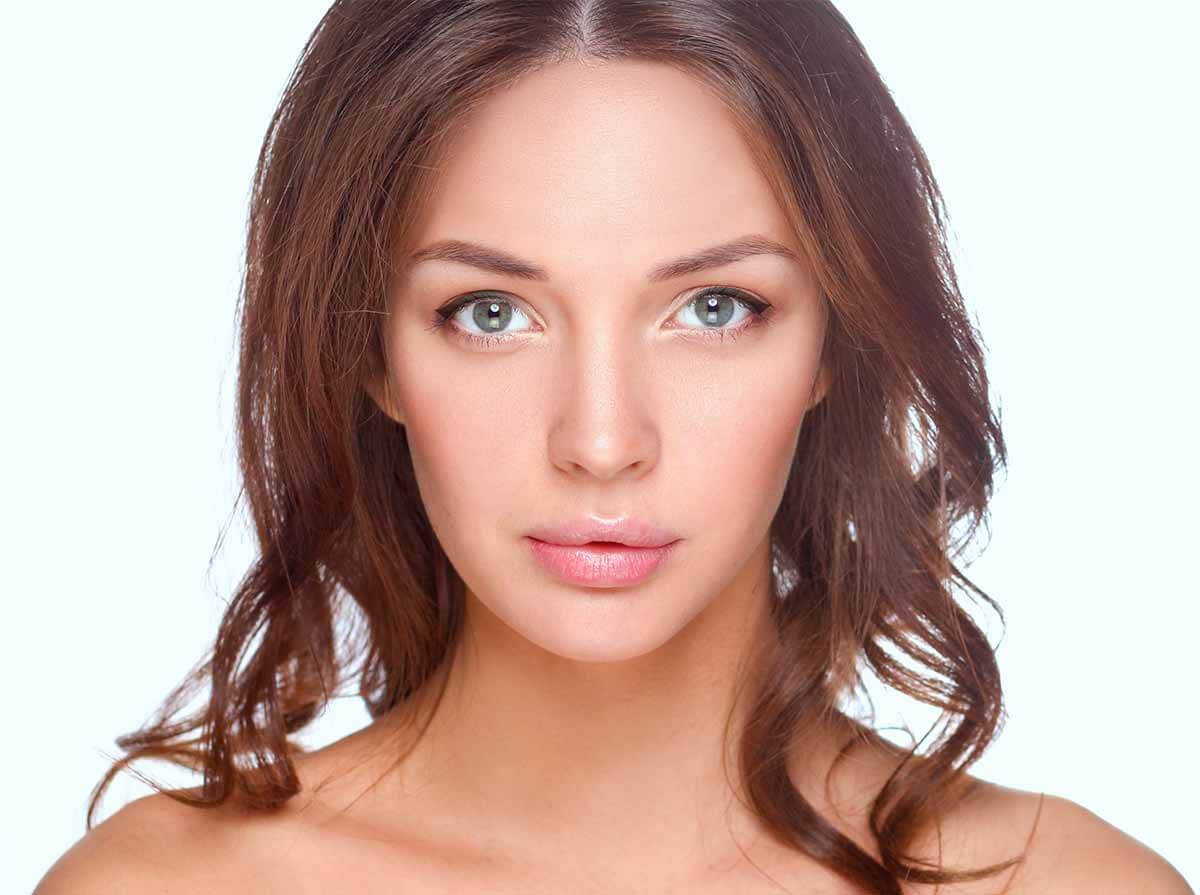
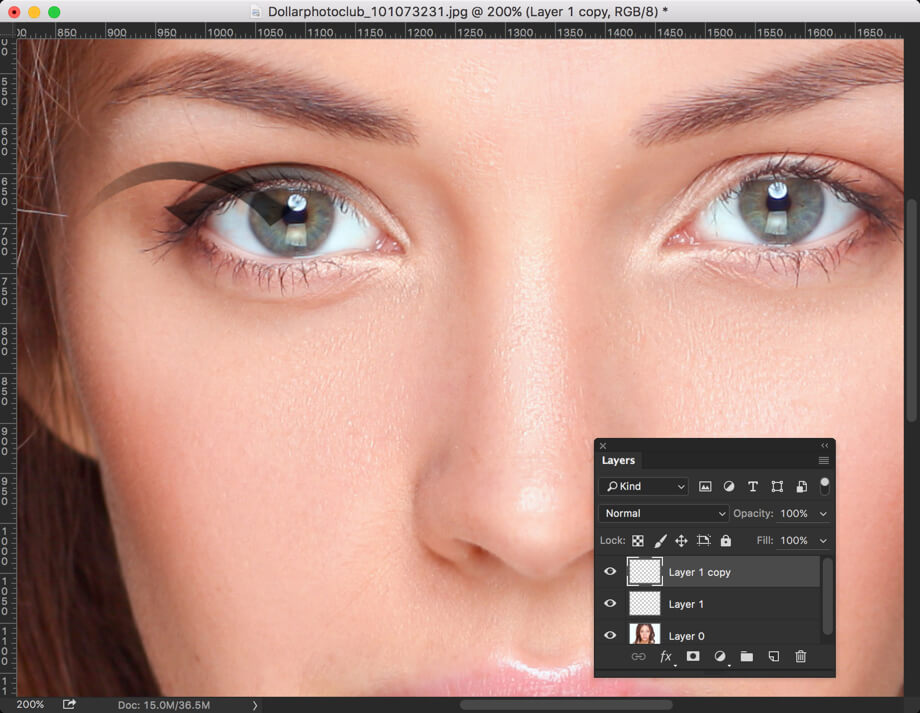
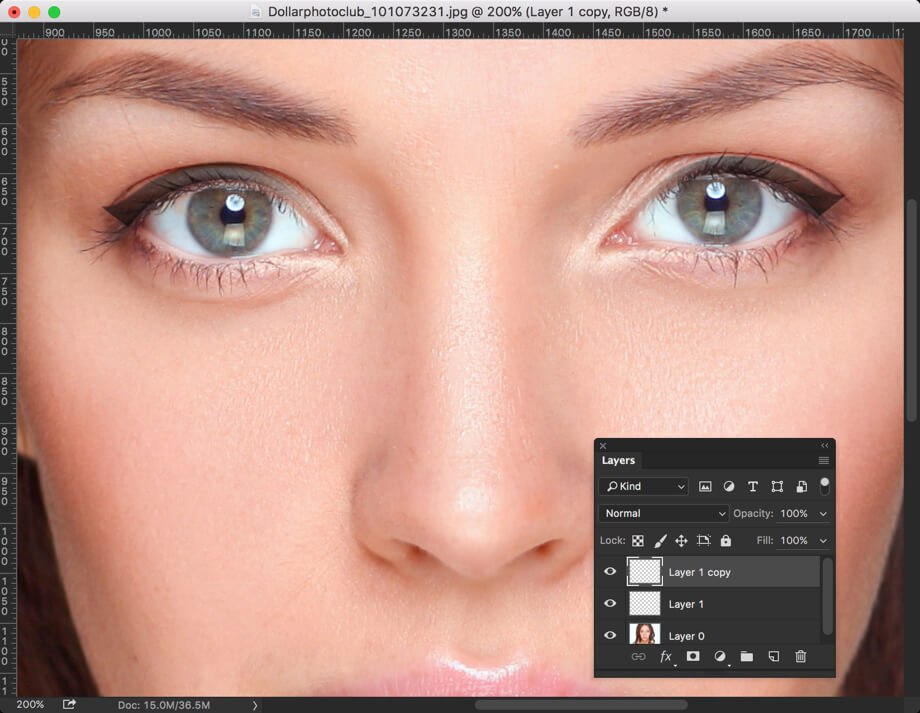
Hey guys, welcome to my another tutorial on Photoshop. You went to a party and your wife forgot to put on eyeliner. After looking at the images, she realized that she had made a terrible mistake. Her eyes are looking completely plain in the photos. Now she can’t upload those adorable photos on Instagram because of one small mistake. Fortunately, we have something in Photoshop that can save her soul. So let’s begin our today’s tutorial on How to Add Eyeliner in Photoshop.
Before we begin, I’d like to show you how our final image will look like.
Now that you’ve seen the final image, let’s begin with the tutorial.
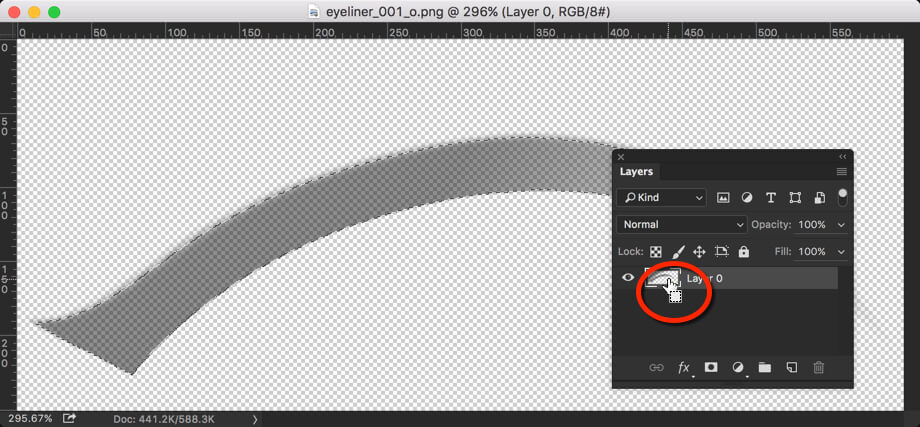
Step 1: Download Eyeliner
Download a PNG image of eyeliner.
Download it
You need to save the above image in order to proceed. Right click on the image and save it.
Step 2: Copy Eyeliner
Open the image in Photoshop. Open the Layer Panel by pressing F7. Hold down Cmd/Ctrl key and click on the icon shown on the layer panel.
Now press Cmd+C/Ctrl+C to copy the image.
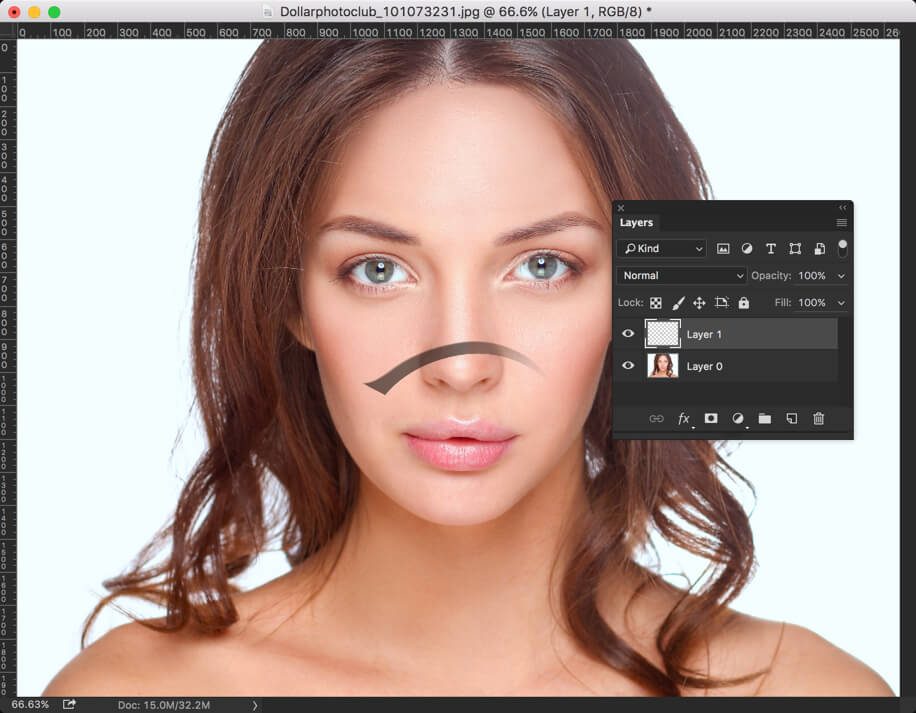
Step 3: Add Eyeliner in Photoshop
Open the image where eyeliner needs to be added.
We need to move the eyeliner to the desired place. We could use any type of move tool but I am using my favrouite, Free Transform Tool. Press Cmd+T/Ctrl+T to activate it. Resize and place the image on her eye. You don’t have to be accurate here. Placing it perfectly will be done in the next step.
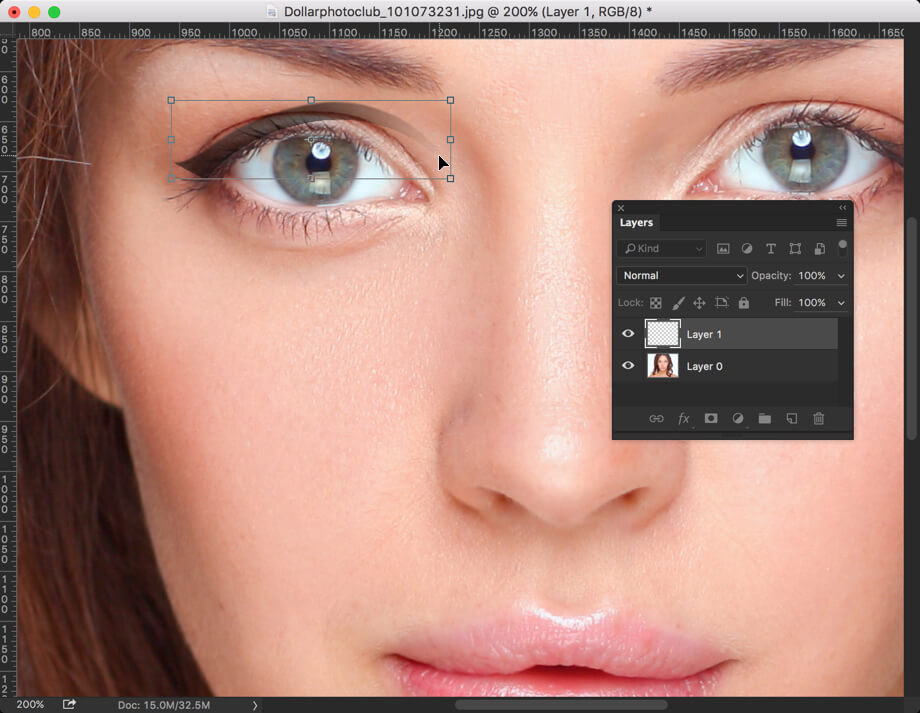
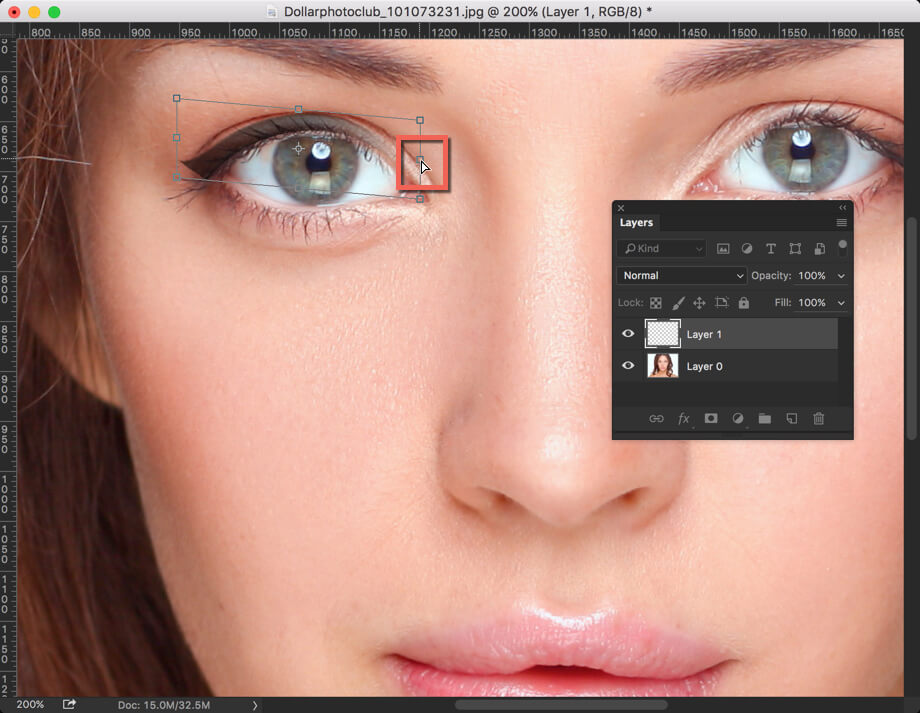
Step 4: Transform Eyeliner
To make the eyeliner skewer, hold down Cmd/Ctrl key. Make sure that Free Transform Tool in still activated. You’ll notice that cursor will change to white. Now drag middle right point to make the eyeliner skewer.
You need to do it couple of times to get a perfect picture.
Step 5: Duplicate Eyeliner
Duplicate the layer by pressing Cmd+J/Ctrl+J.
Go to Edit>Transform>Flip Horizontal.
Step 6: Complete the Image
Once again use Free Transform Tool and place the flipped eyeliner on the other eye.
And now you’re done with the image.
FINAL
I hope that you like the image.
Please support TrickyPhotoshop by sharing this image with your family and friends on Facebook, Twitter, and Google+.
Last night I was playing with Photoshop, and trying to add eyelashes on Photoshop to a model. Stupidly what I was doing was copying eyelashes from one image and pasting into another. No wonder that took more than an hour as achieving perfect result was near to impossible. Then I googled out a little bit, and I found a one-stop solution that made me feel how much stupid I was. If I had known that thing, what I had done in 80 minutes could’ve been done in 5 minutes.
FINAL
The trick I am talking about is “Brush”. Yes, a brush. What we can do is to either create a Photoshop brush out of it or downloda it from internet. I chose the later. Here’s the link to download eyelashes brush. You will find insane amount of eyelashes brushes on internet but for ordinary needs, this one may suits you.
Once downloaded, we need to install the brush. Fortunately I’ve already written an article on installing brush on Photoshop years ago. The article was written August 2013 but will still fulfill your needs.
So let’s start with the tutorial.
Step 1: Download the Brush
The first thing that you need to do is to choose the eyelashes brush. Grab Brush Tool from the tool panel or press Shift+B again and again until it comes. Right click anywhere on the photo and choose Eyelashes Brush (Yours name may be ss-eyelashes).
A popup message will ask you to choose among three options that are Append, Cancel, and OK. Choose OK.
Choose the type of eyelashes you’d like to have.
Step 2: Add Eyelashes on Photoshop
You don’t want your editing to be destructive. Create a new layer by either going to Layer>New>Layer or by pressing Ctrl+Shift+N. Now click on the area where you want to put on eyelashes.
As you can see, the eyelash is very much misaligned. We are going to use Warp Tool to make it aligned.
Step 3: Warp it!
Go to Edit>Transform>Warp. Now align the image accordingly.
This may take few minutes. Please dedicate your time to make eyelash looks as much real as possible.
Reduce the opacity to around 70% to make it looks better.
Step 4: Do it for Another Eye
Do the same with other eye.
And there you’ll get your final result. 🙂
And we’re done here.
I hope that you like this tutorial.
Please help TrickyPhotoshop by sharing this tutorial on Facebook, Twitter, and Google+.
When it comes to making your viewers focus on a definite part of a photo then apart from making other parts blur or darken it, the most common method is to crop the image. Definitely cropping is one of the most used methods to define your center of attraction in your photo. A bad crop or no crop can ruin your photo while a good crop gives more perfection to your photo. Thank god, we have a tool called as Crop Tool in Photoshop to crop images.
Crop Tool in Photoshop
To select crop tool all you need is to press Shift+C again and again until it comes. You can also select it from the tool panel (left one).
After selecting crop tool you can able to see 8 handles at the edges of the image. 4 at the corners and other 4 at the sides. These handles are new in Photoshop CC and saves us lot of time to crop images. Just drag the handle and press enter/return and your cropping will be done.
To crop a photo just drag the handle as per your requirement and your photo will be cropped. If you think that you have made a mistake then press Ctrl+Z/Cmd+Z to undo the last action. The black portion that you are seeing is called shield. It denotes the area that are going to be cropped.
You can do much more with crop tool in Photoshop CC. First let me introduce you the option bar of “crop tool”
CONSTRAINED VS. UNCONSTRAINED CROPPING
Constrained cropping lets you to crop your photo only in a definite aspect ratio. Means the ratio of your image height and your image width will always be constant. Let me show you an example.
Suppose I put a constrained of 1 x 1 (square) means that the ratio between my image height and my image width will always be equal to one. This means that my width will always be equal to my height. Then Photoshop will adjust the crop handle in such a way that my image height will always be equal to my image height.
In the above example you can see that the width is equal to the height. I showed you an example of 1 x 1 constrained crop. Just like this we have many other cropping presets available in Photoshop like 4 x 5, 8.5 x 11 etc. If you cannot see the preset you want then you can click on “size and resolution” for custom constrained cropping. Just fill the width, height, and resolution you want and then click on OK. You can also save that as your preset after checking “save as crop preset”.
The main use of constrained crop comes while printing an image. Suppose you want to print one of your photo for 5 x 7 frame. Then you can use 5 x 7 constrained crop to crop your photo such that the aspect ratio of the cropped photo will be of 5 x 7.
Just opposite of constrained crop is unconstrained crop. By choosing this option, you have full flexibility over your crop tool. Unlike constrained crop, you can crop your photo with any dimension you want.
STRAIGHTEN
This is used to straighten your photo. If you have an image and you want to tilt the image then you can use this tool. You just need to drag the mouse as per your requirement and Photoshop will tilt your image.
VIEW
This helps us to crop our image. Generally I use “rules of third” which displays 2 horizontal lines with 2 vertical lines while cropping.
ADDITIONAL CROP ACTION
Use Classic Mode: If you have used Photoshop CS5 or older version in past and you think that cropping in Photoshop CS6 is somewhat difficult then you can revert back to old cropping method by turning this option on.
Auto Center Preview: By turning this option on, Photoshop will automatically put the unshielded are at the center of the window.
Show Cropped Area: By turning this feature off, Photoshop will not show the area that is going to be cropped.
Enable Crop Shield: By turning this feature on, Photoshop will darken the area (shield) that is going to be cropped.
Color: It determines the color of the shield.
Opacity: It determines the opacity of the shield.
DELETE CROPPED PIXELS
In Photoshop CS5 and older versions when you crop a photo, the area you have cropped out will be gone permanently. But in Photoshop CS6 and newer versions, you can restore the area that you have cropped out in past. I totally recommend to turn off “delete cropped pixels” while cropping an image because no one knows what will happen in future and in case you need your cropped pixels then you can have that easily. All you need to do is to expand the crop handle.
And we are done here.
Thank you for reading this article. Hopefully, we’ll meet again.
Please support TrickyPhotoshop by sharing this article with your friends and family on Facebook, Twitter, and Google+.
When it comes to selection in Photoshop, we’ve lots of tools available. Each tool is unique in its own way. The same goes for Magic Wand Tool in Photoshop. Although it is bit similar to Quick Selection Tool, but its ability to draw a selection with one single click gives it a slight edge over Quick Selection Tool.
In this tutorial, we’re going to learn what is Magic Wand Tool in Photoshop, when to use it, and how to use it.
What is Magic Wand Tool in Photoshop
If you’re following this article from the beginning, you must know by now that Magic Wand Tool is a selection tool in Photoshop. Being extremely agile in nature, if you want a quick turnaround, you could use this. But speed comes at a cost, and that is quality. You may not get superior quality of selection that you make with Magic Wand Tool. But for day to day use, this tool is all you need.
You could activate this tool by pressing Shift+W again and again until it comes or by grabbing it from the toolbar.
Fig. 1
When to Use Magic Wand Tool in Photoshop
Adobe made Magic Wand Tool for specific tasks. Generally Magic Wand Tools works best when your selection needs same type of color.
Fig. 2
Fig. 2 is ideal for Magic Wand Tool if you want to select the yellow umbrella. The reason is that Magic Wand Tool selects a particular color out of the whole image. It uses Photoshop’s advanced edge detection technique to find edges. Bit confused, everything will get clear in next section.
How to Use Magic Wand Tool in Photoshop
Selection with the help of Magic Wand Tool is probably the easiest thing anyone can do in Photoshop. It is as simple as one single click. All you need to do is to activate the Magic Wand Tool and click on the area you want to select.
Fig. 3
Now suppose you want to select the yellow umbrella in Fig. 3, you just need to click on the umbrella, and that’s it. If the selection doesn’t cover the whole subject as shown in Fig. 3, just click one more time on the area which is not selected. This will give you complete selection like Fig. 4.
Fig. 4
Now you might be wondering “How does it work?”. Well the answer is simple. As I mentioned in the beginning, Magic Wand Tool uses advanced edge detection of Photoshop. It just looks for change in color. Whenever Photoshop finds one, it knows that there’s an edge present out there. With reference to Fig. 4, there’s a huge contrast between the yellow color and the black color. Such huge contrast can only be present because of presence of an edge.
Now let’s get into a bit deeper.
Fig. 5
The Tool Panel of Magic Wand Tool is pretty much similar to the Quick Selection Tool’s but there’s a slight difference. That’s “Tolerance’.
This option lets you do three things with your selection. You have already seen it in action in Marquee Tool and Lasso Tool. It is subdivided into three sections.
New Selection: This option lets you create a new selection every time your releases your mouse button. It’s like one shot. Whenever you’ve selected an area and you release the mouse button, and then you again hold down the mouse button, it’ll automatically deselect the older selections and lets you create a new one.
Add to Selection: This option lets you store sessions. If you lift your mouse up and again holds down, your previous selection doesn’t vanish. Your new selection will be added to your old selection.
Delete from Selection: It works same as above except that it deletes rather than adds.
Sample Size: This lets you select the size of the sample. 5 by 5 average means that Photoshop will consider a square of 5 by 5 pixels and then takes average of 25 pixels to determine the color that it should consider for matching.
Tolerance: The more it is, the more lenient Photoshop edge detection will be. In other words, if the value is 1, Photoshop will very tightly select the adjacent pixels. It keeps on becoming lenient as value goes higher.
Anti-alias: If this feature is turned on, Photoshop smoothen out the color transition between the pixels around the edges of your selection and the pixels in the background.
Contiguous: When you drag the “Magic Wand” to an area of color in a Photoshop image and click, it magically selects a shape with contiguous pixels of the same color. However, if you uncheck “Contiguous,” the “Magic Wand” will select every pixel of that color, whether touching or not.
Sample All Layer: If your file has more than one layer, it’ll consider all layers (while turned on) while making selection.
Refine Edge:Here you can find the complete answer.
And that’s all for today. See you in the next week.
Please support TrickyPhotoshop by sharing this article with your family and friends on Facebook, Twitter, and Google Plus.