Welcome the Brand New Select and Mask in Photoshop 2017

Hey, folks! it’s been a few weeks since I have uploaded a new article on TrickyPhotoshop. I must say that I am quite busy with my another venture, I Innovate Magazine – the magazine for Entrepreneurs, these days. But this should not be an excuse. I know that you get upset about not seeing any new tutorial for weeks and I also know that I need to upload more frequently. I will also try my best to upload at least a new article every week. Last time I discussed Brush Tool in Photoshop. Today, as the title already gave you a hint, we’re going to see the brand new Select and Mask feature in Photoshop 2017. Yes, you saw it right. Photoshop 2017 is here.

Since the past few years, or at least I am noticing, Adobe has been trying hard to make the selection as easy as possible. This can be seen by removal of extraction and introduction of Refine Edge back in Photoshop CS3. Now with the addition of Select and Mask tool, the selection is now easier than ever.

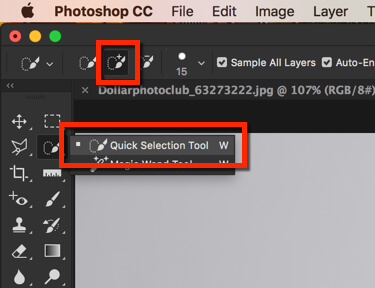
Let me show you how to use this feature. All you need to have is the Quick Selection Tool activated.

Select Using Quick Selection Tool

Let’s grab Quick Selection Tool from the tool panel or press Shift+W again and again until it comes. Make sure that “Add to Selection” is turned on.

2016-11-20_18-11-33.jpg

Now hold your mouse button and drag it to select.

You can also go through my tutorial on How Beginners can use Quick Selection Tool. I have explained everything in detail in that tutorial.

Once you’re done with the selection, you need to make sure every single part is selected. In hurry, usually what happens is that we forget to select every bit of the thing that we want to select. Later, when we use Refine Edge (it’s gone in Photoshop 2017, at least in version 20161012.r.53 x64), we struggle to get the desired outcome.

In below image, I have made few rectangles that show where we usually miss the selection.

2.jpg

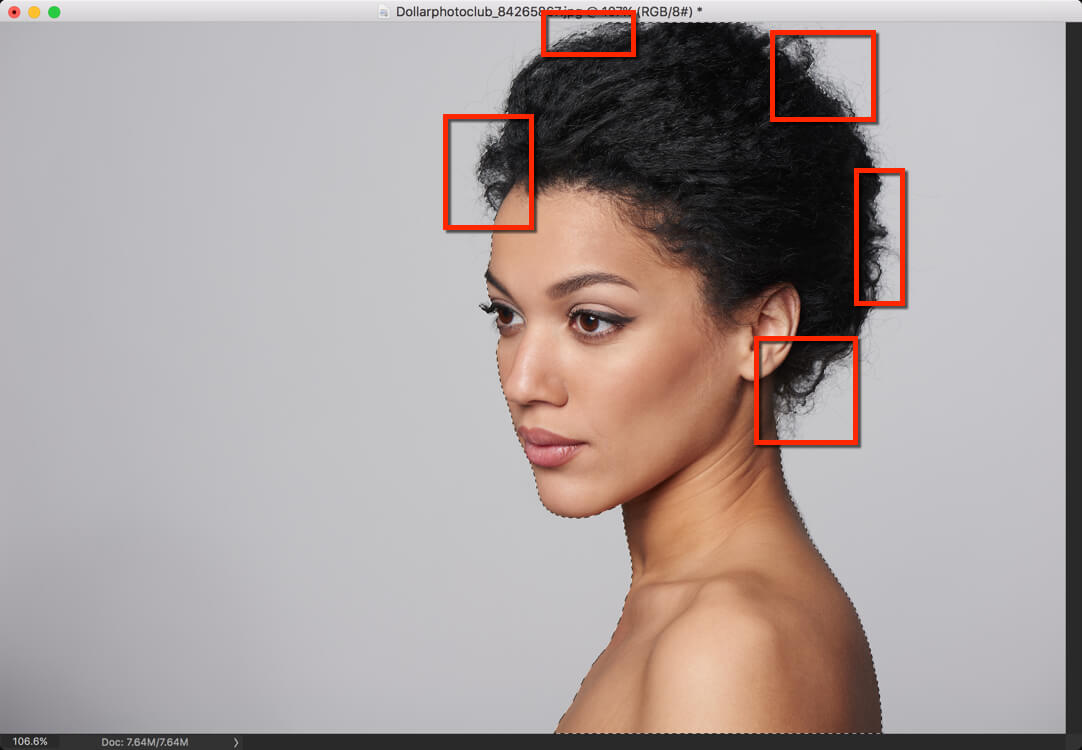
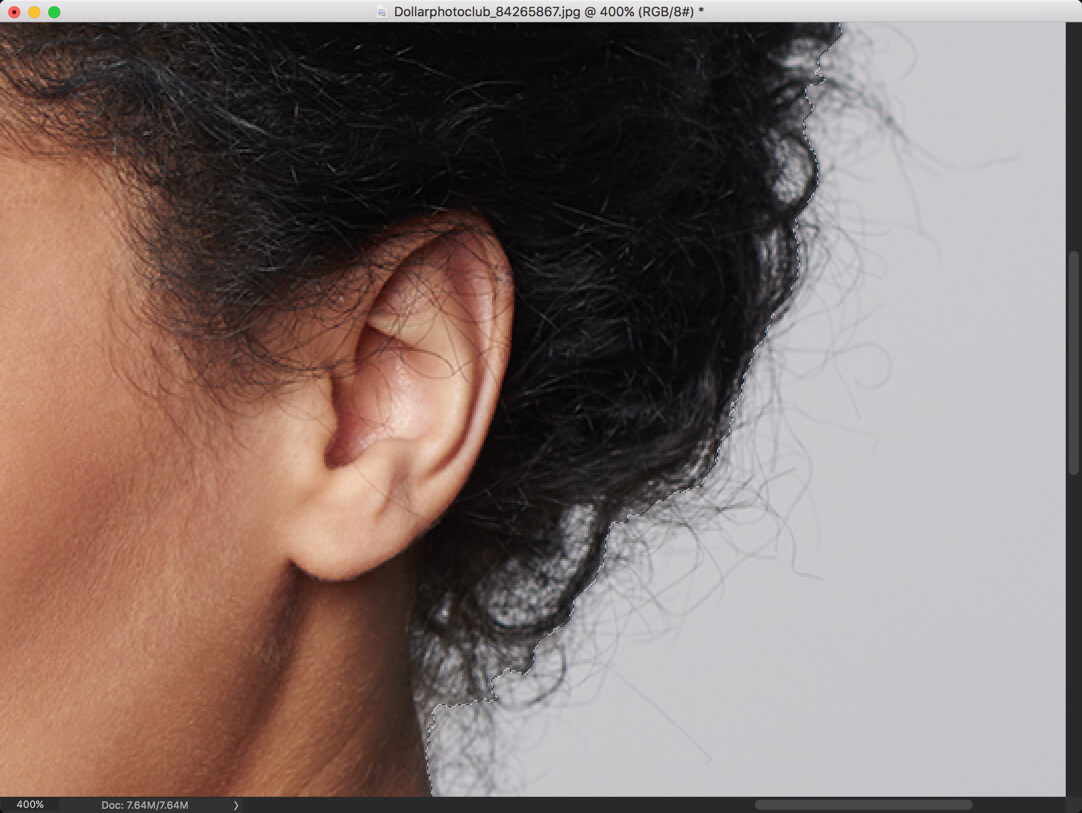
Let’s zoom in to see it better. Are you seeing the marching ants? See how precisely are the walking around the hair.

3.jpg

Refine the Selection Using Select and Mask Tool

Now, let’s go to Select and Mask. Activate it by pressing Cmd+Opt+R/Ctrl+Alt+R.

As my image is quite big, one thing that I usually always go is turning on “Smart Radius” and increase the radius all the way to 250 pixels.

This does all of the work.

4.jpg


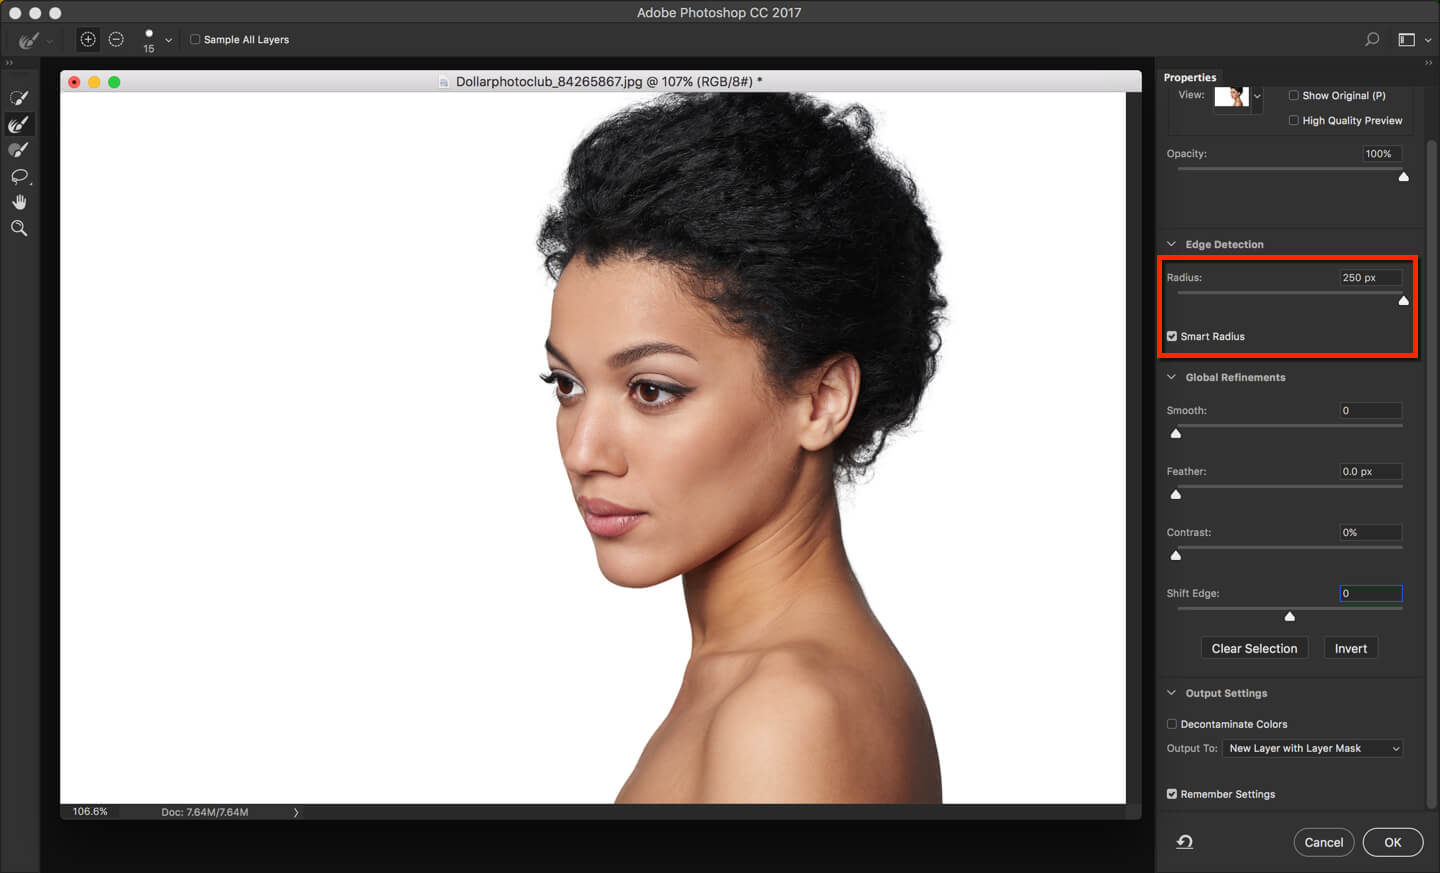
Did you see how efficiently it worked around the hair? It selects the hair flawlessly.

Did you notice one more thing? All of the other settings are the default. This means alone Radius did all of the work.

Isn’t it amazing?

Now, let your friends know about this tool by sharing this with them on Facebook and Twitter.

Also, make sure that you make most of the offer below.

Day 11: What is Magic Wand Tool in Photoshop

When it comes to selection in Photoshop, we’ve lots of tools available. Each tool is unique in its own way. The same goes for Magic Wand Tool in Photoshop. Although it is bit similar to Quick Selection Tool, but its ability to draw a selection with one single click gives it a slight edge over Quick Selection Tool.

In this tutorial, we’re going to learn what is Magic Wand Tool in Photoshop, when to use it, and how to use it.

What is Magic Wand Tool in Photoshop

If you’re following this article from the beginning, you must know by now that Magic Wand Tool is a selection tool in Photoshop. Being extremely agile in nature, if you want a quick turnaround, you could use this. But speed comes at a cost, and that is quality. You may not get superior quality of selection that you make with Magic Wand Tool. But for day to day use, this tool is all you need.

You could activate this tool by pressing Shift+W again and again until it comes or by grabbing it from the toolbar.


2015-12-13_17-40-24.jpg

Fig. 1

When to Use Magic Wand Tool in Photoshop

Adobe made Magic Wand Tool for specific tasks. Generally Magic Wand Tools works best when your selection needs same type of color.

2.jpg

Fig. 2

Fig. 2 is ideal for Magic Wand Tool if you want to select the yellow umbrella. The reason is that Magic Wand Tool selects a particular color out of the whole image. It uses Photoshop’s advanced edge detection technique to find edges. Bit confused, everything will get clear in next section.

How to Use Magic Wand Tool in Photoshop

Selection with the help of Magic Wand Tool is probably the easiest thing anyone can do in Photoshop. It is as simple as one single click. All you need to do is to activate the Magic Wand Tool and click on the area you want to select.

3.jpg

Fig. 3

Now suppose you want to select the yellow umbrella in Fig. 3, you just need to click on the umbrella, and that’s it. If the selection doesn’t cover the whole subject as shown in Fig. 3, just click one more time on the area which is not selected. This will give you complete selection like Fig. 4.

4.jpg

Fig. 4

Now you might be wondering “How does it work?”. Well the answer is simple. As I mentioned in the beginning, Magic Wand Tool uses advanced edge detection of Photoshop. It just looks for change in color. Whenever Photoshop finds one, it knows that there’s an edge present out there. With reference to Fig. 4, there’s a huge contrast between the yellow color and the black color. Such huge contrast can only be present because of presence of an edge.

Now let’s get into a bit deeper.

5.jpg

Fig. 5

The Tool Panel of Magic Wand Tool is pretty much similar to the Quick Selection Tool’s but there’s a slight difference. That’s “Tolerance’.

  1. This option lets you do three things with your selection. You have already seen it in action in Marquee Tool and Lasso Tool. It is subdivided into three sections.
    1. New Selection: This option lets you create a new selection every time your releases your mouse button. It’s like one shot. Whenever you’ve selected an area and you release the mouse button, and then you again hold down the mouse button, it’ll automatically deselect the older selections and lets you create a new one.
    2. Add to Selection: This option lets you store sessions. If you lift your mouse up and again holds down, your previous selection doesn’t vanish. Your new selection will be added to your old selection.
    3. Delete from Selection: It works same as above except that it deletes rather than adds.
  2. Sample Size: This lets you select the size of the sample. 5 by 5 average means that Photoshop will consider a square of 5 by 5 pixels and then takes average of 25 pixels to determine the color that it should consider for matching.
  3. Tolerance: The more it is, the more lenient Photoshop edge detection will be. In other words, if the value is 1, Photoshop will very tightly select the adjacent pixels. It keeps on becoming lenient as value goes higher.
  4. Anti-alias: If this feature is turned on, Photoshop smoothen out the color transition between the pixels around the edges of your selection and the pixels in the background.
  5. Contiguous: When you drag the “Magic Wand” to an area of color in a Photoshop image and click, it magically selects a shape with contiguous pixels of the same color. However, if you uncheck “Contiguous,” the “Magic Wand” will select every pixel of that color, whether touching or not.
  6. Sample All Layer: If your file has more than one layer, it’ll consider all layers (while turned on) while making selection.
  7. Refine Edge: Here you can find the complete answer.

And that’s all for today. See you in the next week.

Please support TrickyPhotoshop by sharing this article with your family and friends on Facebook, Twitter, and Google Plus.

Day 9: What is Lasso Tool in Photoshop

There are times when we need to select things out in an image so that we can only edit the selected part. For those purpose, we have several dedicated tools in Photoshop, and one of them is the Lasso Tool in Photoshop.

Before we begin with lasso Tool, let’s understand selection in Photoshop. Selection is like a lock. When we select any part in image, only that part gets edited. Let’s understand this with the help of Fig. 1. In that image, the dome is selected as you can see marching ants surrounds the dome. So whatever I do now, be it increasing brightness, decreasing contrast or anything, it’ll only affect the dome.

1

Fig. 1

Now there are numerous tools present in Photoshop for this kind of selection. One among them in Lasso Tool.

Photoshop provides three variants of Lasso Tool. Each one performs same function but being executed differently. These three are:

  1. Lasso Tool
  2. Polygonal Lasso Tool
  3. Magnetic Lasso Tool

Fig. 2 will show you where to find them. You can also press Shift+L again and again to activate selection.

2

Fig. 2

Now I am going to explain you each of them one by one. They all are very much similar. Let’s start with the first one i.e. Lasso Tool.

Lasso Tool

This tool is like a freehand selection. You just draw on the screen and Photoshop will automatically select the area as soon as you leave the mouse button.

3

Fig. 3

I am sorry for the not so accurate drawing or selection. I am not good at drawing.

Believe you, you’re never going to use this tool. The other two kinds of Lasso tool may be used by you in future. The reason is that we have other tools that perform same action but with better result in lesser time. There’s nothing there to explain in Lasso Tool.

Let’s move to the Polygonal Lasso Tool.

Polygonal Lasso Tool

This tool is basically present for straight edges. You activate this tool just by clicking anywhere on the image, and wherever you take your mouse cursor, the tool will go with you. To create an edge, you need to click on the point. Fig. 4 will explain things better.

4

Fig. 4

Are you seeing a gray color line near the edges of the building? They are made with the help of polygonal lasso tool.

I intentionally placed the selection slightly off the edges so that you could see properly.

Let’s understand how it works. I started the selection from the viewer’s left side. You could see the beginning of the selection in Fig. 4. Now I all needed to do is to click on the point where I want my selection to take different path or bend. You are seeing 5 corners in the above selection which means that I clicked on five points.

Let’s move to Magnetic Lasso Tool.

Magnetic Lasso Tool

This tool works like a magic. It automatically detects edges and tries to align itself according to the edges.

Let’s see it in action.

5

Fig. 5

I know that the result is not perfect, the I appreciate the try. Photoshop does a wonderful job there.

Basically Photoshop looks for drastic contrasts between adjacent pixels and whenever Photoshop finds it, it’ll know there’s an edge present.

So how to handle this tool? The answer is you don’t. It’ll handle itself. All you need to do is to keep the mouse as close as to the edge, and let the Magnetic Lasso Tool performs the rest of work for you.

Now let’s talk about the option panel that comes with the Lasso Tool.

6

Fig. 6

A. You have seen these four boxes in Marquee Tool’s chapter. I am going to write same for your reference.

  • New Selection: This function provides you a new selection. Let’s assume that you have selected a custom area in your image and then you don’t like the selection, and want to select a new selection that is going to override the existing selection. This mode is best to do these kind of things. In short you if you deselect a selection by pressing Ctrl+D/Cmd+D and then select a new area, the result would be same.
  • Add to Selection: I bet 99% of users use this mode. Let’s say you have selected an area and you also want to select another area but don’t want to deselect the existing area. Then, my friends, this selection is perfect for you. Lot of tricky selections can easily be done by this selection. When this mode is on, you’ll see a + sign near your mouse cursor.
  • Subtract from the Selection: As name says it subtracts the selection. Basically it is just opposite of “add to selection”. You’ll see a sign just below the cursor.
  • Intersect with Selection: Suppose you have selected an area A and also selected an area B. A small part of area B lies inside the area A. Then only that small part will be selected. Basically the overlapped are will be selected in this mode. By pressing this you can see a small multiplication (x) bar at the bottom of your cursor.

B. Feather: It softens the selection. It helps a lot when you are creating vignette effect to your photo. You can learn more about it here.

C. Anti-Alias: Photoshop smooths out the color transition between the pixels around the edges of your selection and the pixels in the background.

D. Refine Edge: You have a whole tutorial dedicated to this feature. It is probably one of the mightiest feature in Photoshop.

I hope that you found this tutorial helpful.

Please support TrickyPhotoshop by sharing this tutorial with your friends and family on Facebook, Twitter, and Google+.

Day 8: Elliptical Marquee Tool in Photoshop

Last time we learnt a new tool, Rectangular Marquee Tool, which is pretty much a basic tool. Today we’re going to learn a sister of that tool that performs very much similarly i.e. Elliptical Marquee Tool in Photoshop.

Today we’re going to learn the tool that is present at the top-left corner in Photoshop i.e. Elliptical Marquee Tool.

Fig 1
Fig 1

The main function of Marquee tool is selection. This is the most basic tool present in Photoshop for selection. It is divided into four parts i.e. Rectangular Marquee, Elliptical Marquee, Single Row Marquee, and Single Column Marquee. So let’s start with Elliptical Marquee Tool.

Rectangular Marquee Tool

This tool creates rectangular, and square also as square is a part of rectangle, selection.

To see it in action, grab it from the tool panel as shown in Fig. 2. You can also press Shift+M again and again until it comes.

Fig. 2
Fig. 2

Now all you need to do is to drag and drop your mouse to draw a selection. I am going to select the whole moon.

Fig. 3

There are two important notes that I want you to remember:

  1. If you want to draw a selection that’s circle using Elliptical Marquee Tool, you need to hold sown Shift, and then drag and drop your selection.
  2. If you want to move your selection or place your selection in a different part of the image, you need to hold down Spacebar and then move your selection.

Option Panel of Marquee Tool

Fig. 4
Fig. 4

You might be wondering of those panels that are present at the top all of the time. Let me explain each of them one by one.

  1. New Selection: This function provide you a new selection. Let’s assume that you have selected a custom area in your image and then you don’t like the selection and want to select a new selection that is going to override the existing selection. This mode is best to do these kinds of things. In short you if you deselect a selection by pressing Ctrl+D/Cmd+D and then select a new area, the result would be same.
  1. Add to Selection: I bet 99% of users use this mode. Let’s say you have selected an area and you also want to select another area but don’t want to deselect the existing area. Then, my friends, this selection is perfect for you. A lot of tricky selections can easily be done by this selection. When this mode is on, you’ll see a + sign near your mouse cursor.
  1. Subtract from the Selection: As name says it subtracts the selection. Basically it is just opposite of “add to selection”. You’ll see a sign just below the cursor.
  1. Intersect with Selection: Suppose you have selected an area A and also selected an area B. A small part of area B lies inside the area A. Then only that small part will be selected. Basically the overlapped are will be selected in this mode. By pressing this you can see a small multiplication (x) bar at the bottom of your cursor.
  1. Feather: It softens the edge of the selection. It is a part of the refine edge tool. We’re going to discuss it in a new chapter.
  1. Anti-alias: By turning on anti-alias your selections softens a little bit. But you cannot control the amount of softens like “feather”. The softening will be done in such a way that Photoshop provides a better selection for different color tones. Until and unless you want extremely sharp selection, keep this feature turned on for better result.
  1. Style: In this drop-down menu you can see 3 sub menu. First is “normal” which is nothing but a default mode. Second is “fixed ratio”. By selecting a fixed ratio you might have realized that the width and the height panel adjacent to it has activated. Now just enter the width vs. height ratio and here you go. The third submenu is “fixed size”. After entering the width and height, no matter how long you drag your image it will select only select the area with the entered dimensions.
  1. Refine Edge: One of the most versatile tool that makes Photoshop different from all the other software’s. Feather that we discussed in fifth point is a part of this tool.

And we’re done here.

Please support TrickyPhotoshop by sharing this tutorial with your family and friends on Facebook, Twitter, or Google+.