Nowadays Instagram is kinda like a portfolio of a person, a modern resume if you will. That is why we are so obsessed to take that amazing photo of yourself and to post it on your feed. However, taking a great shot is no longer enough, filters are what matters right now. Having cool filters means that you kinda have it all in the Instagram world: likes, comments, and popularity.
Of course, there may be negative comments, cause you know, there will always be haters. The worst thing that can happen is that such comments may affect the minor audience and there are few ways to prevent it such as turning off the comments on Instagram or blocking unfriendly users or using the KidSecured app.
This article is not about already known presets, this is about your own vision of a photo, your own filter to show the real you and that what makes you special despite the number of likes on your photos. There is only one thing you need to understand in this life is that you don’t have to be liked by everyone, the only person who should accept you is you.
Anyway, if you are interested in giving the photos a little gloss here are some tips on how to create your own Instagram filter in Photoshop. Get inspired and be that inspiration!
The first step is, of course, to download Adobe Photoshop if you haven’t done it yet. Next, you need to open a photo to start work, you can do this two ways: tap File and then Open or with the help of Photoshop hotkey Ctrl+O.

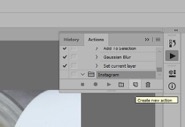
When the photo is into Photoshop go to Window and then tap Actions or use the hotkey Alt+F9 to make sure that your every step will be recorded and saved for your convenience. Later you can use the recorded filter on other photos to get them a makeover with a few seconds.

By hitting the Actions the Actions panel has brought out and now you can press the folder icon to create a new set. Give whatever name you want to this set and press ok. It would be easier if you name it with the word or phrase that refers to your actions, e.g. My own Instagram filter or Presets for Instagram, etc.

Next to the folder icon is the paper icon that you want to select and name it as well to create a new action. After that you hit record and you ready to begin, it will automatically record everything you do. Don’t be afraid to make a mistake, you can always tap the hotkey Ctrl+Z to undo.
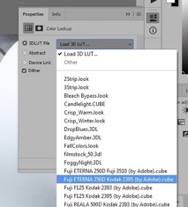
Now we need to create a layer, so your step is to find Layer on the control panel and press New Adjustment Layer and then Color lookup. Once the layer opens you pick the Soft light mode that will open the Properties panel to select Fuji ETERNA 250D Kodak 2395, it will give more definition to your photo. Obviously you can select any mode you like to change the color and shade of a photo.

Once again you open a New layer and to do this you can press the paper icon in the right corner and fill it with the green color or whatever color you like using the Paint Bucket Tool. We use green one to make the leaves more vibrant and then set this layer on Hue to soothe a greenish tint and with the 50% Opacity, we lower the saturation.


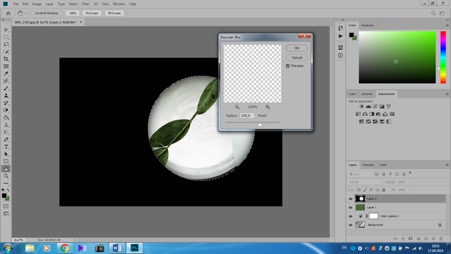
To give the emphasis to some objects in a photo is easy to create with the help of a slight vignette. Create a New layer, fill it with black color as we did with the green one. Use the Elliptical Marquee Tool to make a circle the size you want it to be and press Delete to remove its center. Try to decide where you want to have a center, then draw a circle on it and there you have a focus on a picked object in a darkened frame around.
Go to Filter to Blur to Gaussian Blur or use the hotkey Alt+Ctrl+F and select the Radius of 100 pixels to make the edges blur so that it won’t look so obvious. There are few things left and your own filter is done.

Get back to the Layers panel where you need to lower the Opacity to 15% and choose Overlay to make it more softer. As soon as you ready with it use the hotkey Ctrl+Shift+Alt+E to create a new layer with all the editing you made and press Stop recording on the Actions panel. Congratulations, you’ve created your own very first filter in Photoshop.
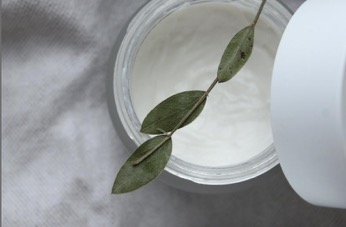
And now, let’s see the before and after a look at the photo we’ve been working with.
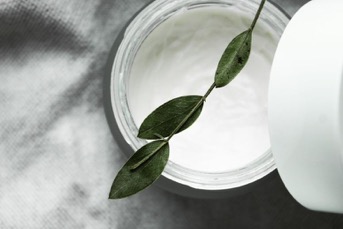
See the difference, right? So now you can apply this recorded filter to any photo you like without even editing it. All you need to do is use your imagination and be creative by selecting different settings to make your photos look unique and outstanding.
We think it’s great to have an opportunity to instantly transform your photo from ordinary and plain to almost a piece of art and not just somebody’s but your own piece of art. And what is even greater is that using Photoshop to create filters you can apply and customize the effects the way you like it without repeating ready-made presets on Instagram. Besides, you are not only can download your photos to Instagram but in any other social network as well.


