How to Crop an Image in a Circle in Photoshop

Nowadays, we are seeing that a lot of apps are asking for circular images for profile pictures. If they’re user-friendly, they crop an image in a circle by themselves. Otherwise, you need to crop an image in a circle in Photoshop and upload to the app. The good thing is that it takes less than a minute in Photoshop to crop an image. The bad thing is that you need to open Photoshop and do the work. 😞

Related: Not a while ago I wrote a tutorial on Crop tool in Photoshop where I explained the entire cropping process. The link will open in a new tab.

Before I proceed, I want to show you the final picture where an image of a guy is cropped in a circle.

So let’s start the tutorial.

Video

If you like watching videos, here’s the video tutorial for you.

Step 1: Draw a Circle with the Marquee Tool

Grab an Elliptical Marquee tool from the tool panel or press Shift+M again and again until it comes.

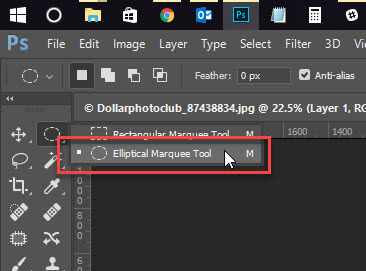
Sidebar: I have written a tutorial on Elliptical Marquee tool in Photoshop. If you need to learn more on Elliptical Marquee Tool in Photoshop, head over there. The link will open in a new tab.

Step 2: Draw a Circular Selection

Hold down the Shift key and draw a selection around the face. The Shift key will make sure that the selection always stays circular. If you’re using Rectangular Marquee tool, holding down the Shift key will keep the selection square.

Right now, you don’t need to worry about the center of the circle. We’ll adjust it in the next step.

Step 3: Adjust the Center of the Selection

Now move your mouse to the inside of the circle. You will notice that the cursor changes. This shows that you can move your selection.

Now place the circle in a place which suits you. The area inside the circle will be the area which remains once the cropping is done.

Step 4: Copy the Selection to a New Layer

Now we’re going to copy the selected area to a new layer.

Press Ctrl+J/Cmd+J to duplicate the selection to a new layer. Open the Layer Panel by pressing F7 and you will see a new layer.

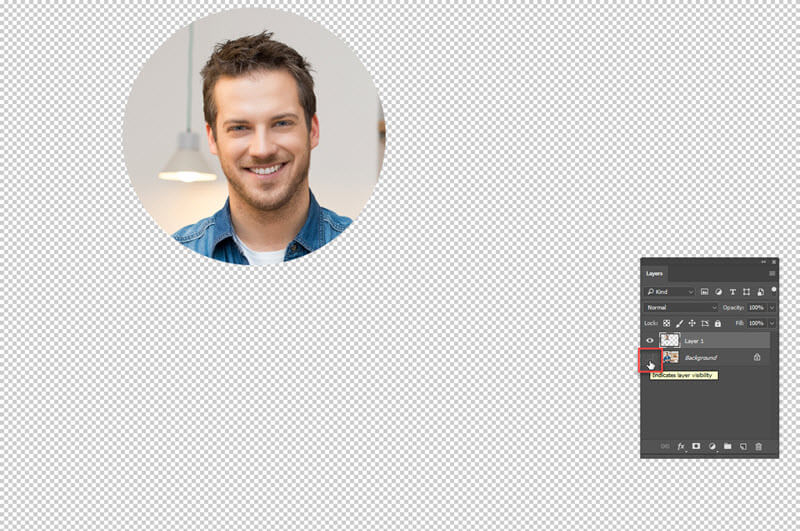
Hide the “Background Layer” by clicking on the button that is highlighted with the red rectangle. Once it is done, all the image is gone except the selected area and you will see the background which is shown above. This kind of Photoshop background tells that there’s actually no background present in the image. The area is transparent.

Step 5: Crop an Image in a Circle in Photoshop

After this, we are going to trim all the transparent pixels so that the selection stays. This is the most important step in this tutorial of crop an image in a circle in Photoshop.

Go to Image>Trim and choose Transparent Pixels. Press OK.


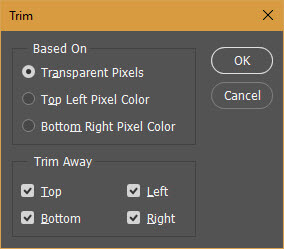
Once it is done, Photoshop will crop every single thing except the face.

Step 6: Don’t Save it in JPG

If you don’t want the background, don’t save it in JPG. JPG doesn’t support transparency and adds white background automatically. Save in PNG as PNG supports the transparent background.

Go to File>Save As or press Ctrl+Shift+S/Cmd+Shift+S and choose the format as PNG and save. That’s it. This is how you crop an image in a circle in Photoshop.

Day 8: Elliptical Marquee Tool in Photoshop

Last time we learnt a new tool, Rectangular Marquee Tool, which is pretty much a basic tool. Today we’re going to learn a sister of that tool that performs very much similarly i.e. Elliptical Marquee Tool in Photoshop.

Today we’re going to learn the tool that is present at the top-left corner in Photoshop i.e. Elliptical Marquee Tool.

Fig 1
Fig 1

The main function of Marquee tool is selection. This is the most basic tool present in Photoshop for selection. It is divided into four parts i.e. Rectangular Marquee, Elliptical Marquee, Single Row Marquee, and Single Column Marquee. So let’s start with Elliptical Marquee Tool.

Rectangular Marquee Tool

This tool creates rectangular, and square also as square is a part of rectangle, selection.

To see it in action, grab it from the tool panel as shown in Fig. 2. You can also press Shift+M again and again until it comes.

Fig. 2
Fig. 2

Now all you need to do is to drag and drop your mouse to draw a selection. I am going to select the whole moon.

Fig. 3

There are two important notes that I want you to remember:

  1. If you want to draw a selection that’s circle using Elliptical Marquee Tool, you need to hold sown Shift, and then drag and drop your selection.
  2. If you want to move your selection or place your selection in a different part of the image, you need to hold down Spacebar and then move your selection.

Option Panel of Marquee Tool

Fig. 4
Fig. 4

You might be wondering of those panels that are present at the top all of the time. Let me explain each of them one by one.

  1. New Selection: This function provide you a new selection. Let’s assume that you have selected a custom area in your image and then you don’t like the selection and want to select a new selection that is going to override the existing selection. This mode is best to do these kinds of things. In short you if you deselect a selection by pressing Ctrl+D/Cmd+D and then select a new area, the result would be same.
  1. Add to Selection: I bet 99% of users use this mode. Let’s say you have selected an area and you also want to select another area but don’t want to deselect the existing area. Then, my friends, this selection is perfect for you. A lot of tricky selections can easily be done by this selection. When this mode is on, you’ll see a + sign near your mouse cursor.
  1. Subtract from the Selection: As name says it subtracts the selection. Basically it is just opposite of “add to selection”. You’ll see a sign just below the cursor.
  1. Intersect with Selection: Suppose you have selected an area A and also selected an area B. A small part of area B lies inside the area A. Then only that small part will be selected. Basically the overlapped are will be selected in this mode. By pressing this you can see a small multiplication (x) bar at the bottom of your cursor.
  1. Feather: It softens the edge of the selection. It is a part of the refine edge tool. We’re going to discuss it in a new chapter.
  1. Anti-alias: By turning on anti-alias your selections softens a little bit. But you cannot control the amount of softens like “feather”. The softening will be done in such a way that Photoshop provides a better selection for different color tones. Until and unless you want extremely sharp selection, keep this feature turned on for better result.
  1. Style: In this drop-down menu you can see 3 sub menu. First is “normal” which is nothing but a default mode. Second is “fixed ratio”. By selecting a fixed ratio you might have realized that the width and the height panel adjacent to it has activated. Now just enter the width vs. height ratio and here you go. The third submenu is “fixed size”. After entering the width and height, no matter how long you drag your image it will select only select the area with the entered dimensions.
  1. Refine Edge: One of the most versatile tool that makes Photoshop different from all the other software’s. Feather that we discussed in fifth point is a part of this tool.

And we’re done here.

Please support TrickyPhotoshop by sharing this tutorial with your family and friends on Facebook, Twitter, or Google+.