I get asked a lot that which laptop do I use for Photoshop. The answer in MacBook Pro. Yes, I use Macbook pro and I love ❤️ it. But, it does not mean that you’ll also love Macbook pro. I personally know some people who like Windows-powered laptop more than Apple laptops. So, here I go with a list of the best laptops for Photoshop in 2019.
So, I am going to list down the 3 best laptops in 2019 for Photoshop. These are my personal favorites. I have listed the name, major specifications, and pros and cons. I have also provided an Amazon link at the end of the laptops.
The Amazon links in this article are sponsored links. So, if you click on the links and buy, I’ll get a small commission.
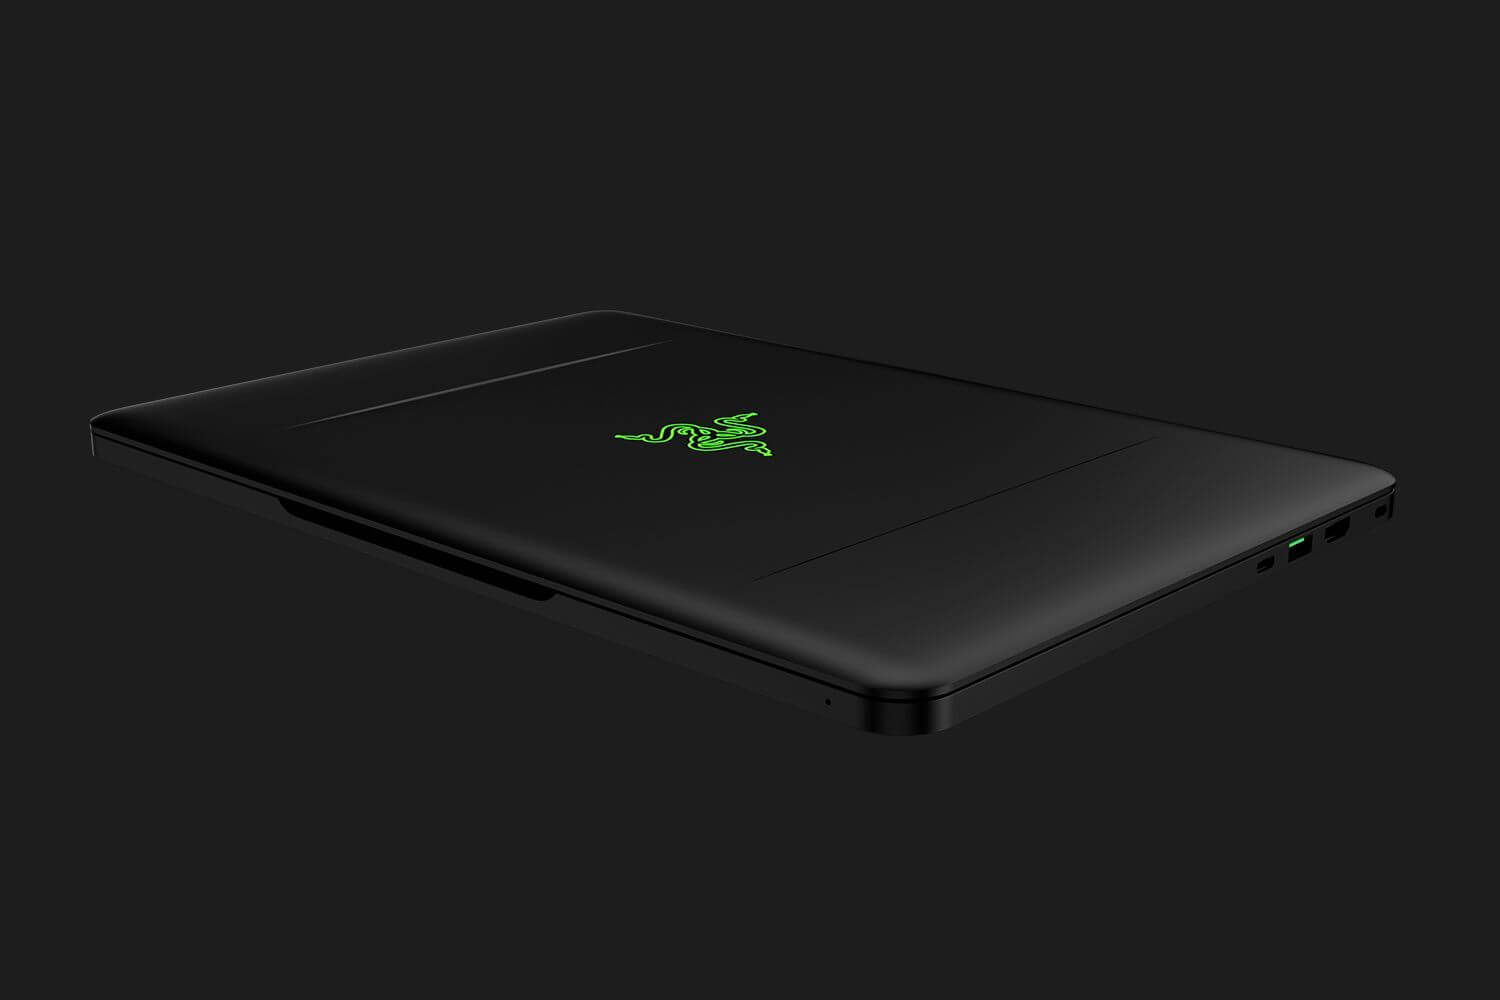
1: Apple MacBook Pro with Touch Bar
Title
Specification
Display
13.3-inch (diagonal) LED-backlit Retina display with IPS technology; 2560-by-1600 native resolution at 227 pixels per inch with support for millions of colors, 16:10 aspect ratio
Processor
2.3GHz quad-core Intel Core i5, Turbo Boost up to 3.8GHz, with 128MB of eDRAM
This article is submitted by Terence Murray. He is a journalist and an editor from London. He loves to meet new people and talks with them about literature, photography and jazz music. Join him on Facebook and Google+.
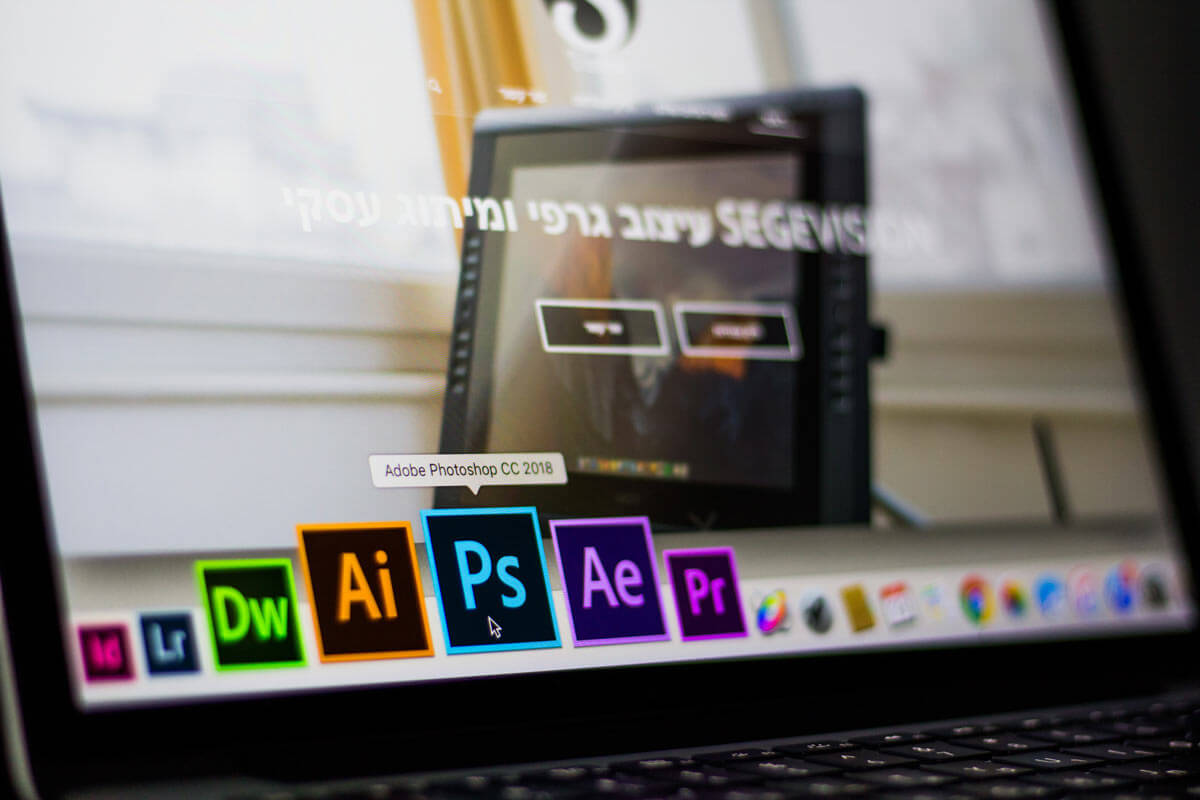
One question that comes from our readers what is the best photo editing software to choose between Photoshop and Lightroom. To the beginner, it’s hard to choose between these two Adobe products.
Noel Anderson, The Senior UI Designer of Essay on timesaid,
If you are a UI designer, you would love to pick Adobe Photoshop. It’s a powerful design tool to create the UI of a website, mobile app, and desktop app.
By using Photoshop, the UI designer can design any custom graphics for websites that include logos, patterns or custom background images.
The creators of Photoshop then created a new app for the photographer to edit photos called Lightroom. Though both of the applications are related to photo editing, there are some factors on which they can be different. It’s becoming a burning question what form you should learn and use? In this article, I am going to show you the main differences between Adobe Photoshop and Adobe Lightroom.
The Main Differences between Photoshop and Lightroom
Adobe always tries to improve user experiences. To provide excellent opportunities to edit photos, they created Photoshop and Lightroom one after another. Both of their photo editing apps offer the users to edit and manipulate photos. Still, there are some differences between these applications.
Price: You can use Adobe Creative Cloud to get both of the software buying the subscription. The cost is as low as $10 a month.
Keep Historical Changes: If there are no layers created in Photoshop, you can not go back to the previous settings as Photoshop cannot keep historical changes. On the other hand, using Lightroom, you can go back to your last settings and restore it.
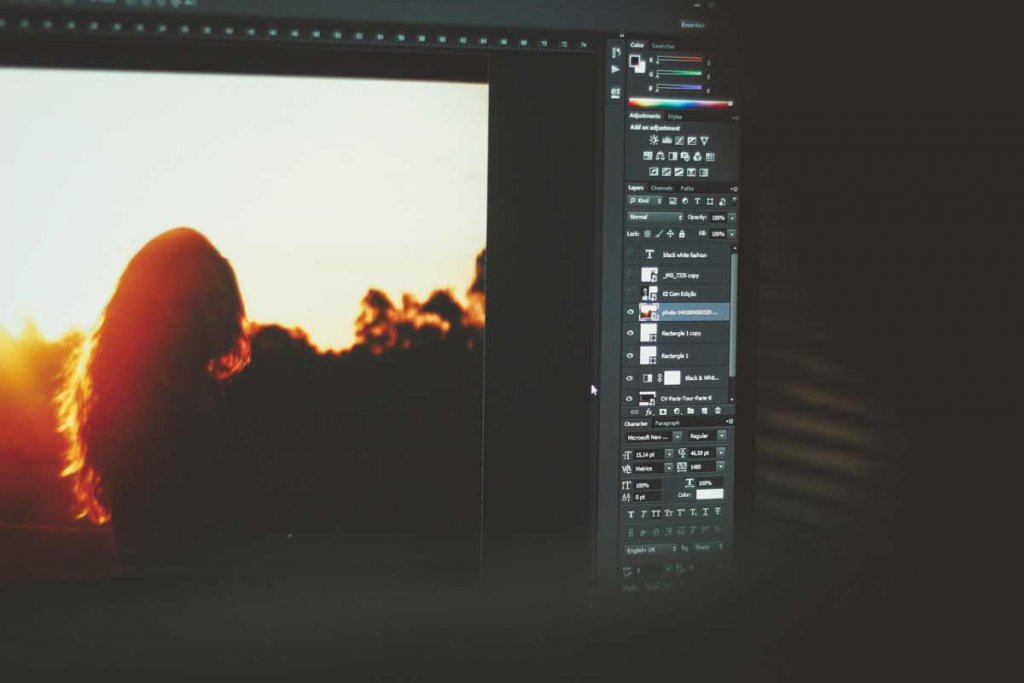
Advanced Retouching: Both Photoshop and Lightroom can do retouching using the retouching tools. But, for advanced retouching, you’ll love to pick Photoshop as there are some great options to patch and remove the blemish.
Compositing Multiple Images: If you want to combine multiple images and their elements into a single one, Photoshop is the best option. You can mix, manipulate and save the composition in Photoshop whereas using Lightroom it’s difficult.
Display Image Metadata: Lightroom can display the image metadata to make an overlay to the image where Photoshop cannot display image metadata. You cannot show image metadata when an image is opened.
Batch Process Multiple Images: Lightroom is way better than Photoshop when it comes to batch process multiple images. Though you can batch process with Photoshop using Actions, the presets and the smooth workflows of Lightroom is more straightforward than Photoshop.
Layer Management: In Photoshop, you can use layer managementto add effects and modifications. On the other hand, there is no layer management option in Lightroom. You can store multiple layers within a master file and modify or enhance the layers separately.
In The End, Both Programs Are Great Depending On Your Needs
Based on the differences and features of both Adobe programs, we can say that both apps are great photo editing tools. It’s a draw between both apps as you can use it for different purposes. If you want to use photo editing software to edit or tweak your images only, then Lightroom can be your best choice. But, if you’re going to do more with photo editing software, Photoshop is the best choice for having extra options that boost your task.
In a world where marketing is driven by the high-quality visual content, Photoshop can help you in so many ways to get more business and overcome competition in a crowded niche. The knowledge of essential features and functionalities of Photoshop is enough to turn a boring stock image into professional and share-worthy visual illustrations. From entrepreneurs and startups to SMEs and freelancers, it does not matter which type of business you are in, Photoshop will help you get more reach and leads. Starting from eye-catching social media images to professional product photography, the following are the top five ways Photoshop will help you get more business than usual.
Social Media Images – There is no doubt that social media is the best marketing platform for all local and global businesses. Most of the businesses post general photos that are taken from the internet which the targeted audiences have already seen before or they use the boring stock images that are way too professional to grab attention. Instead, you can use Photoshop to design stunning custom images that are absolutely new to everyone and promote your brand. They are the ones that get shared the most and grab the eyeball instantly. You can also make your social media profiles super attractive with mind-blowing cover photos, banners, and other visual illustrations wherever required. Naturally, your targeted audiences will be interested in checking out your products and land on your website.
Website Images – When online users land on your website, it is up to you to impress them immensely and convert them into customers and clients. The first thing any user checks out on a website is its visual content. Therefore, your visual illustrations have to be top-notch to hook the attention of the user and they should consider your brand premium. Your images should have originality, creativity, and the x-factor that will make you stand out easily. Photoshop is the only tool that has all the required features to create amazing sliders, exceptional product photography, and even high-quality website layouts. This will increase your conversion rate and get you more sales.
Ad Banners – Paid advertisement campaign is one of the best ways to get potential customers easily. But most of the people on the internet ignore ad banners that they come across as they fail to attract attention. This is where Photoshop can help to design that most creative and innovative ad banners that are extremely eye-catching and the online users will check them out in details to understand the creativity and hence, you are going to get more clicks. This is a super way to outshine your competitors and drive relevant traffics who are likely to be your repeat or permanent customers.
Flyers and Brochures – Not only online marketing, Photoshop is highly essential for offline marketing as well. Flyers and brochures are popular marketing items that companies give out to the targeted audiences to let them know about their brands and products. But people come across so many such flyers and brochures every day from different companies and those items eventually end up in the trash bin without people checking them out. This is where Photoshop can help you design flyers and brochures that can intrigue people and force them to check them out instantly. There are so many awesome flyer and brochure templates available that you can customize and get your business flyer and brochure ready like a pro. You can impress your targeted audiences immensely and generate more leads effortlessly.
Infographics – The reason why email marketing fails for most of the companies is not due to the popularity of social media but lack of innovative ideas for writing such promotional emails. Instead of just promoting your product and brand, you should include some cool infographics that not only promote your product indirectly but also educate your targeted audiences so that they start considering you a trustable brand. Embedding stunning informative graphics in the email body makes it exigent otherwise your emails will end up in the trash bin and spam box just like others. Photoshop has so many graphics templates available that you can customize and create outstanding infographics and innovative illustrations like never before.
There are so many tutorials available on the internet to learn Photoshop and make exceptional designs for marketing. You can also hire Photoshop experts to do it for you so that your business can grow exponentially.
One of the hottest queries that keep beginners awake is regarding the software that should be used to edit photos professionally. While the free options have Picasa and iPhoto among other commercial software like Pixelmator, the most popular ones are the Adobe Photoshop and Lightroom. They have a lot in common but they still possess a few unique features sufficient to boost “What’s the actual difference between Adobe Photoshop and Lightroom?” query.
Today, I am going to share few of the differences between Adobe Photoshop and Lightroom. So, let’s begin.
1: File Handling Varies
The first case where the Lightroom differs from the Adobe Photoshop is the way it handles the file fed to it. It neither edits your photos nor can be used to transfer them between multiple locations. The changes you make in a photo via Lightroom gets stored in a separate file named “Catalogue”. This means that while you are altering or modifying any pic, Lightroom will record this sequence of alterations into the Catalogue. It leaves the original file intact.
Photoshop on the other hand has no Catalogue and does edits on the same image. The original image is altered without any scope of re-modifying it from the initial state again. There is a way called as “non-destructive” editing where you get to preserve your image.
2: Workflow
Lightroom offers end-to-end workflow solutions to the photographers stepping newly into this profession. From importing pictures from your storage to organising, editing, sharing and finally printing them, Lightroom takes care of almost everything that you expect from it. It even has virtual folders to track the images being edited and organised.
Photoshop, however, fails to transfer files and doesn’t even organize them into slide shows or photo books. It’s editing is still better and powerful than the Lightroom. Photoshop Bridge is something which is can be engaged to import and organize photos in Photoshop (if urgently required). The workflow is not as streamlined as in Lightroom, but Photoshop is undoubtedly a great deal to compromise with a few points.
3: Variety in the Tools
Lightroom’s quickly editing feature helped it gain a major popularity over Photoshop. It was specifically designed for editing hundreds of pictures in one-go. Lightroom basically has all the tools from Photoshop bundled together in an easy to handle package.
From adding Adjustment Layer to the Blend Mode and Dodge Layer, Photoshop truly has made real editing possible. Lightroom however has a few features less than the Advanced Photoshop program. Photoshop also supports adding 3D support and text to your pictures. This is why it is ideal for every editing situation. Lightroom is a collection of only those editing tools which shutterbugs or professionals utilize the most.
Wrapping Up
So this was all about the difference between Adobe Photoshop and Adobe Lightroom. Thanks to the Adobe’s Creative Cloud Option under which you can own these two at $10 monthly subscription.
Both the programs have a lot to offer. The choice depends upon the type of modifications you want to implement to your snaps. If you too are familiar with these two programs, do share your feedback with us. There might be more differences which we need to spread. I hope you guys enjoyed this. Share this piece with as many as you can. We’ll be back with more such articles. Till then, good luck and stay tuned.
Nowadays, we are seeing that a lot of apps are asking for circular images for profile pictures. If they’re user-friendly, they crop an image in a circle by themselves. Otherwise, you need to crop an image in a circle in Photoshop and upload to the app. The good thing is that it takes less than a minute in Photoshop to crop an image. The bad thing is that you need to open Photoshop and do the work. 😞
Related: Not a while ago I wrote a tutorial on Crop tool in Photoshop where I explained the entire cropping process. The link will open in a new tab.
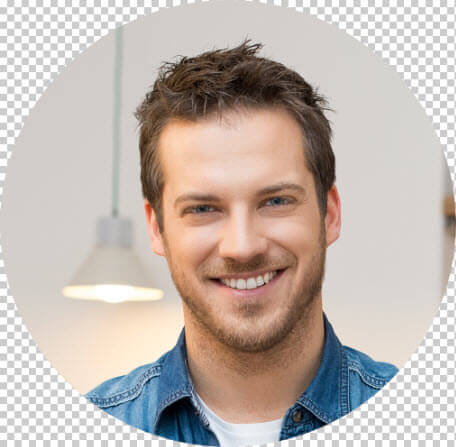
Before I proceed, I want to show you the final picture where an image of a guy is cropped in a circle.
So let’s start the tutorial.
Video
If you like watching videos, here’s the video tutorial for you.
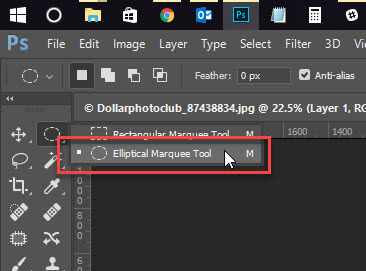
Step 1: Draw a Circle with the Marquee Tool
Grab an Elliptical Marquee tool from the tool panel or press Shift+M again and again until it comes.
Sidebar: I have written a tutorial on Elliptical Marquee tool in Photoshop. If you need to learn more on Elliptical Marquee Tool in Photoshop, head over there. The link will open in a new tab.
Step 2: Draw a Circular Selection
Hold down the Shift key and draw a selection around the face. The Shift key will make sure that the selection always stays circular. If you’re using Rectangular Marquee tool, holding down the Shift key will keep the selection square.
Right now, you don’t need to worry about the center of the circle. We’ll adjust it in the next step.
Step 3: Adjust the Center of the Selection
Now move your mouse to the inside of the circle. You will notice that the cursor changes. This shows that you can move your selection.
Now place the circle in a place which suits you. The area inside the circle will be the area which remains once the cropping is done.
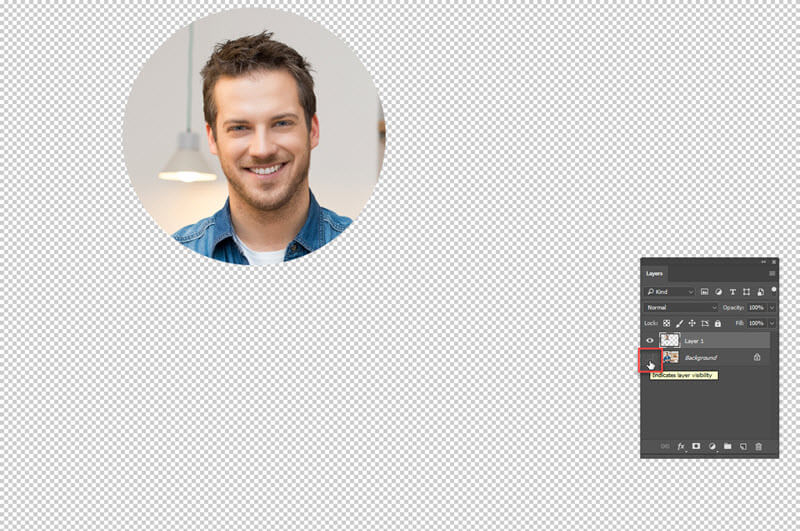
Step 4: Copy the Selection to a New Layer
Now we’re going to copy the selected area to a new layer.
Press Ctrl+J/Cmd+J to duplicate the selection to a new layer. Open the Layer Panel by pressing F7 and you will see a new layer.
Hide the “Background Layer” by clicking on the button that is highlighted with the red rectangle. Once it is done, all the image is gone except the selected area and you will see the background which is shown above. This kind of Photoshop background tells that there’s actually no background present in the image. The area is transparent.
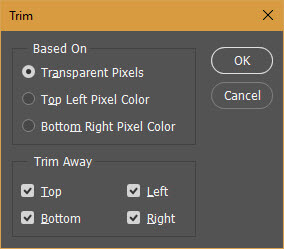
Step 5: Crop an Image in a Circle in Photoshop
After this, we are going to trim all the transparent pixels so that the selection stays. This is the most important step in this tutorial of crop an image in a circle in Photoshop.
Go to Image>Trim and choose Transparent Pixels. Press OK.
Once it is done, Photoshop will crop every single thing except the face.
Step 6: Don’t Save it in JPG
If you don’t want the background, don’t save it in JPG. JPG doesn’t support transparency and adds white background automatically. Save in PNG as PNG supports the transparent background.
Go to File>Save As or press Ctrl+Shift+S/Cmd+Shift+S and choose the format as PNG and save. That’s it. This is how you crop an image in a circle in Photoshop.
You’ve been using Photoshop for a while and you’ve been noticing mouse takes so much time to do small tasks that can be done in milliseconds by keyboards. You cannot accomplish Photoshop mastery if you don’t become acquainted with Adobe Photoshop Keyboard Shortcuts. You can view, edit, and sum up keyboard shortcuts in the Keyboard Shortcuts dialog box. Photoshop allows you observe a list of all shortcuts, and edit/generate shortcuts. The Keyboard Shortcuts dialog box stand as a shortcut editor and comprises all commands that back up shortcuts.
It is crucial for you to understand how to get set up, choose the right tools, use the brush tool, use the marquee tool, use different blending options, control layers & objects, and save your work for later. Here is the ultimate guide to Adobe Photoshop keyboard shortcuts:
How to Get Set Up
Control + Alt + i (Command + Option + i) = Amend the image size.
Control + Alt + c (Command + Option + c) = Adjust canvas size.
Control + + (Command + +) = Zoom in.
Control + – (Command + -) = Zoom out.
How to Choose the Right Tools
v = Pointer
w = Magic Wand
m = Rectangular Marquee
l = Lasso
i = Eyedropper
c = Crop
e = Eraser
u = Rectangle
t = Horizontal Type
b = Brush
y = History Brush
j = Spot Healing Brush
g = Gradient
a = Path Selection
h = Hand
r = Rotate View
p = Pen
s = Clone Stamp
o= Dodge
z = Zoom Tool
d = Default Foreground and Background Colors
x = Switch Foreground and Background Colors
q = Edit in Quick Mask Mode
How to Use the Brush Tool
, or . = Choose preceding or next brush style.
Shift + , or . = Choose first or last brush style used.
Caps Lock or Shift + Caps Lock (Caps Lock) = Show exact crosshair for brushes.
Shift + Alt + p (Shift + Option + p) = Toggle airbrush option.
How to Use the Marquee Tool
Control (Command) = Toggle between Slice tool and Slice Selection tool.
Shift + drag = Draw square slice.
Alt + drag (Option + drag) = Draw from center outward.
Shift + alt + drag (Shift + option + drag) = Draw square slice from center outward.
Spacebar + drag = Change the position of the slice when creating the slice.
How to Use Different Blending Options
Shift + + or – = Cycle through blending modes.
Shift + Alt + n (Shift + Option + n) = Normal mode
Shift + Alt + i (Shift + Option + i) = Dissolve
Shift + Alt + k (Shift + Option + k) = Darken
Shift + Alt + g (Shift + Option + g) = Lighten
Shift + Alt + m (Shift + Option + m) = Multiply
Shift + Alt + o (Shift + Option + o) = Overlay
Shift + Alt + u (Shift + Option + u) = Hue
Shift + Alt + t (Shift + Option + t) = Saturation
Shift + Alt + y (Shift + Option + y) = Luminosity
How to Manipulate Layers & Objects
Control + a (Command + a ) = Choose all objects
Control + d (Command + d ) = Deselect all objects
Shift + Control + i (Shift + Command + i ) = Pick the inverse of the selected objects
Control + Alt + a (Command + Option + a) = Choose all layers
Control + Shift + E (Command + Shift + e) = Combine all layers
Alt +. (Option +.) = Choose top layer
Alt + , (Option + ,) = Pick bottom layer
Alt + [ OR ] (Option + [ OR ]) = Choose next layer down or up
Control + [ OR ] (Command + [ OR ]) = Move target layer down or up
Control + Shift + [ OR ] (Command + Shift + [ OR ]) = Shift layer to the bottom or top
Shift + Control + n (Shift + Command + n) = Form a new layer
Control + g (Command + g) = Group selected layers
Control + Shift + g (Command + Shift + g) = Ungroup selected layers
Control + e (Command + e) = Combine and flatten selected layers
Control + Shift + Alt + e (Command + Shift + Option + e) = Merge all layers into a new layer on top of the other layers.
Control + t (Command + t) = Convert your object, which contains resizing and rotating.
How to Save Your Work for Later
Control + Shift + s (Command + Shift + s) = Save your work as …
Control + Shift + Alt + s (Command + Shift + Option + s) = Save for web and devices.
And that’s all of the shortcuts that you’ll ever use in Photoshop. Find out what’s going on with Photoshop on TrickyPhotoshop.
In the present day, people love taking photos and keeps it with them as it stands as a great tool to keep some loving memories forever. People always love to take some quality images and they used to do everything to make their images look like as excellent as possible. People have a good amount of mediums available to them to make their image of top quality. People can edit their images these days with most modern technologies in order to make their image look as it great. One of the top tools available to people to make their images top quality is Photoshop.
Photoshop is good software that allows people to organize, edit, and create images. Photoshop and its tools are well known for its ability to edit and make changes to the picture that you have already taken. There are many people in the world who make use of Photoshop mediums in order to make their photos in exceptional quality. Photoshop is wonderful software as it can be used to edit the digital image application, assists you to perk up the quality of a photograph and let’s make special effects to the image. It aids the artists to make the artwork and give a final touch to the images to give fresh visual effect.
Here is a look at how Photoshop graphics helps you to make special effects for your images:
Great Finishing Touch
Photoshop graphics can give a great finishing touch to the images. The images and photos that you created or edited in Photoshop let you make a great finishing touch. As far as the people are concerned, there is a need to give finishing touches to the content because it not only helps them to make the image better quality but also look as it professional. The finishing touches can come in the type of editing their work down to a superior cut, blending the audio, and even building up the titles or graphics for the content.
Do Wide Range of Tasks
Photoshop helps people to do a wide range of tasks with ease and effectively as well. Photoshop persists to be the design software of option for millions of designers across the world for a number of people to carry out their wide range of tasks. Some of the most notable tasks that they do with the help of Photoshop include photo editing, graphic design, typography, illustration, 3D modeling, and animation. Photo editing, graphic design, typography, illustration, 3D modeling, and animation are common that can be seen in the entertainment industry. However, you can make use of these tools to retouch your marriage photos or other photos that you took during some other important functions.
Improves Creativity
Photoshop is a good tool for the people to improve their creativity when it comes to editing their images. Creativity is an essential thing for the editors and people who are closely associated with photo editing to make their tasks as effective as possible. With the most recent tool of Photoshop, people can improve a lot of features of a photo that they have already taken. Photoshop has some potent facial detection skills, allowing it to identify parts of the face, such as the eyes, mouth, and nose and on the whole face shape.
Digital Effects
Photoshop helps people to make some special effects in their images. Today, we live in a digital world and the field of photo taking has become attached to the changes made by the digital world. With the Photoshop tools, people can make digital effects in their chosen images. Photoshop elements make it effortless to touch up your digital photos and make it exceptional by adding special effects, filters, and styles. Photoshop lets you make Animated GIFs which is a great method to make your designs more stunning. With the use of Photoshop tools, you can modify any animated GIF to go well with the style of your task.
Other Notable Features:
Photoshop helps you to improve your skills and knowledge in editing images. Some of the most notable tools of Photoshop allow people to resolve the blemishes and the defects that are common in the photos.
Photoshop is a great medium that assists you to improve the overall nature of a picture. You can take away and adjust the backgrounds in the photos in order to look the image as perfect as possible.
Photoshop is a better tool that allows you to fix the issues found in your photo and using it, you can make your image error free. The images can be amended to repair the faults. It is possible for you to give a professional look to your images using Photoshop. It also has techniques to create images and edit the images for its better look.
It is very effortless to start editing the photos using Photoshop even for beginners. It helps people to help you to amend the skin tones of people in your pictures.
You can bring into play Photoshop to import the videos and the photos into the software rapidly and without difficulty.
You can set photos in a neat and orderly way using Photoshop. You can keep your images in an organized way especially when you take care of hundreds or thousands of photos and videos.
Using Photoshop tools, you can change photos to black and white, resize them, generate diverse effects, and unite stylish techniques and a lot of others.
Photo manipulations and photo special effects are amusing. There are a lot of people who love to manipulate and bring in special effects in photos. By Using Photoshop you can carry out lots of innovative, ingenious and incredible special effect to your photo.
Being capable of layering multiple layers, filters, effects and much more, Photoshop is one of the finest editors and manipulators of images around. It has progressed to generate and edit video, make 3-D images and make an easy graphic design.
This is a guest post from Stephen. Should you have any queries, please reach out directly to him. You can find his details in the author box below.
Photoshop Apps have become more popular amid people in the modern era because it lets people to edit their photos and make it excellent. More and more people are using Photoshop Apps today due to its many benefits and it is used to edit the digital image application. Enhanced features of Photoshop Apps assist you to improve the quality of a photograph. There many new features in Photoshop Apps that aids the photographers and artists who depend on Photoshop apps to make the artwork.
The benefits of using Photoshop Apps are plenty and new features of Photoshop Apps make your life so easy and unproblematic. With the use of new features of Photoshop Apps, it is possible for you to sort out the flaws and the defects in the photos. You can also take away and modify the backgrounds in the photos with the new features of Photoshop apps. With the enhanced features of Photoshop apps, the images can be amended to fix the slipups, the photographs can be offered a professional appearance, and fresh images can be formed and edited. Here are some enhanced features of Photoshop apps that allow you to adjust the effect of images:
Typekit integration
Typekit Integration starts to hit its pace. Typekit syncs fonts for use in an extensive array of applications including Photoshop. By means of the integration with Typekit, Photoshop fetches a set of typographic possibilities to your artistic projects. You can make use of fonts from Typekit that are matched with your computer. The users can opt to observe only fonts from Typekit in the Text tool options bar and the Character panel font lists. When Photoshop apps don’t locate fonts utilized in a file you opened, it is able to look for absent fonts on Typekit. Photoshop allows you to restore the absent fonts with correspondent fonts from Typekit.
Content-Aware Crop
Photoshop used to provide new features every now and then in order to improve its user’s experience. Content-Aware Crop is an excellent advanced feature in Photoshop that lets people to make their image more effective. Content-Aware Crop is able to fill in the open areas when a picture is enlarged or rotated further than the original image size. It offers more choices when editing an image to make a faultless crop. With Content-Aware Crop, Photoshop views all the pixels around the borders of your image and automatically, effortlessly fills in the empty place with content when you enlarge or rotate a picture.
Face-Aware Liquify
Face Aware Liquify takes the Liquify tool in Photoshop to a new height. It automatically identifies the diverse facets of a face when using the liquify tool and offering users direct control over facial features like eyes, nose, and mouth for making fast imaginative modifications. With Face-Aware Liquify, You can give a fresh look to your image by modifying eyes, mouth, and other facial features. Face-Aware Liquify in Photoshop has the ability to automatically notice facial features and aid you to fiddle with them to boost a picture or include creative character to an excitement shot. Face Aware Liquify in Photoshop can modify a face to give the impression of someone else. It can spot a single face or different faces in an image. It discovers and lets you to amend eyes, nose, mouth, jaw, face width, etc.
Match Font
There are quite a few new features obtainable in Photoshop including Match Font. Photoshop’s new and advanced Match Font tool helps you to discover fonts utilized in photos and designs. This useful fresh Match Font tool allows you to spot the font used in a chosen region of text. Match Font is an effective advanced feature in Photoshop apps that makes it a snap to discover fonts in posters, stamps, pictures, and more. You can bring into play Match Fonts to locate the adjoining match out of your font library and the online Adobe Typekit. Match Font examines an image to find out what font was used.
Swap image
Swap image is a great new feature in Photoshop apps and it gives you a lot of advantages. With the new and advanced image swapping feature, you just require choosing the thumbnail of the image you would like to restructure and pull it towards the back or frontwards.
Support for artboards
One of the main advanced features in Photoshop apps is its support for artboards. The Artboards tool allows designers who work on mobile and web apps to generate several artboards for diverse layouts in a single file.
3D Portraits
3D portraits let you to form a 3D portrait of a usual 2D portrait right inside Photoshop. With this new feature in Photoshop apps, you will be able to choose the eyes, ears, nose, hair, chin, neck etc are, and correct those by clicking and dragging them to a more perfect place.
New Blur Effects
One of the advanced and new blur effects helps to replicate realistic motion blurs to your images devoid of wanting to capture the effect in the camera. The blur new effects in Photoshop apps allow you to add Field Blur, Motion Blur, Iris Blur, Spin Blur and Tilt Shift.
I hope that you’ll find all above features interesting.
Hey, guys! Welcome to another tutorial from 30 Days to Learn Photoshop series. Last time I discussed Patch Tool in Photoshop which is quite useful in facial flaws. Today, I am going to discuss probably the most used Photoshop tool that is Brush Tool in Photoshop.
Brush Tool in Photoshop is used for many tasks. Be the task is changing color, drawing, skin smoothing, etc., Brush Tool will always be there to help you. Alone Brush Tool cannot do many things but with help of other tools and blend tools, Brush Tool can do miracles. In this tutorial, I am going to show you how you can use the Brush Tool to change color.
But as usual, before we begin, let me show you before and after image.
Before
After
So, let’s begin the tutorial.
What is Brush Tool in Photoshop
Brush Tool is one of the most basic tool in Photoshop which is generally used for designing. It paints the brushed are with the foreground color.
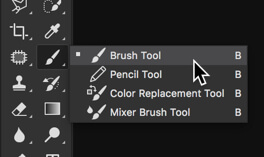
Where is Brush Tool Located in Photoshop
You need to grab Brush tool from the tool panel. Alternatively, you can press Shift+B again and again until it comes.
How to Use Brush Tool in Photoshop
Now I am going to show you how you can use Brush Tool in Photoshop.
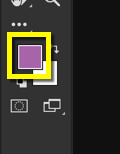
Step 1: Choose Foreground Color
Brush Tool is probably the easiest tool that we have in Photoshop. You need to change the foreground color. It is present in the toolbar at the bottom.
Click on the square shape box and choose your color.
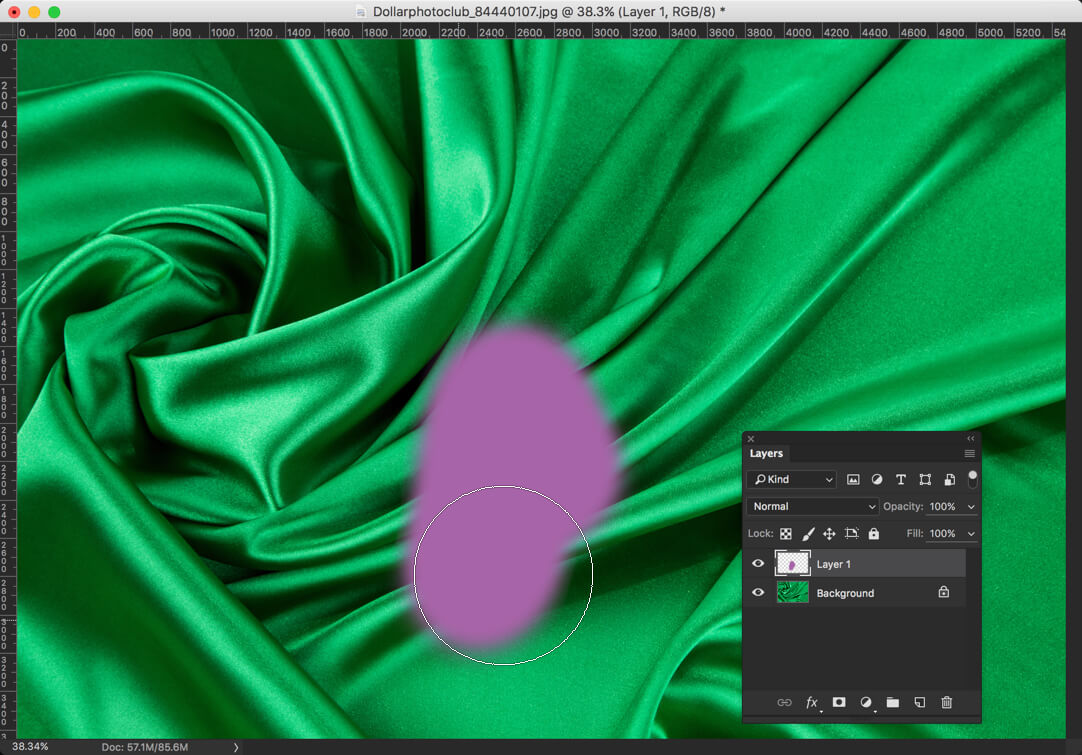
Step 2: Paint it
Create a new layer by pressing Cmd+Shift+N/Ctrl+Shift+N. You, of course, don’t want your work to be destructive in nature.
Now that we have already grabbed the Brush Tool, we can simply start brushing.
As I already mentioned, alone Brush Tool is not of much importance. So, let’s mix it with a blend mode.
Change the blend mode of the newly created layer to “Color”.
Did you see what happened? Photoshop just changed the green color to purple.
Let’s do it with the whole image.
Wow! With the help of a Brush Tool, we are able to change the color of an image. Look, how natural the image is looking. No one can say that the image was originally green in nature.
Hey, guys! How are you? Welcome to another Instagram tutorial. Last time I showed you how to create Instagram Crema filer in Photoshop. This time, let me show you how to create Instagram Ludwig filter in Photoshop.
Ludwig filter adds a bit of redness and yellowness in the photo and boosts up the contrast. We are going to do the same in Photoshop with the easiest way possible. This is a short tutorial and should not take more than 10 minutes to complete.
But before we begin, let me show you the final image:
Final
Video
If you like watching videos, here’s the video tutorial for you.
Step 1: Tweak Brightness and Contrast
Let’s increase the brightness and contrast of the image.
Go to Layer>New Adjustment Layer>Brightness/Contrast.
Increase the Brightness to 23 and Contrast to 100.
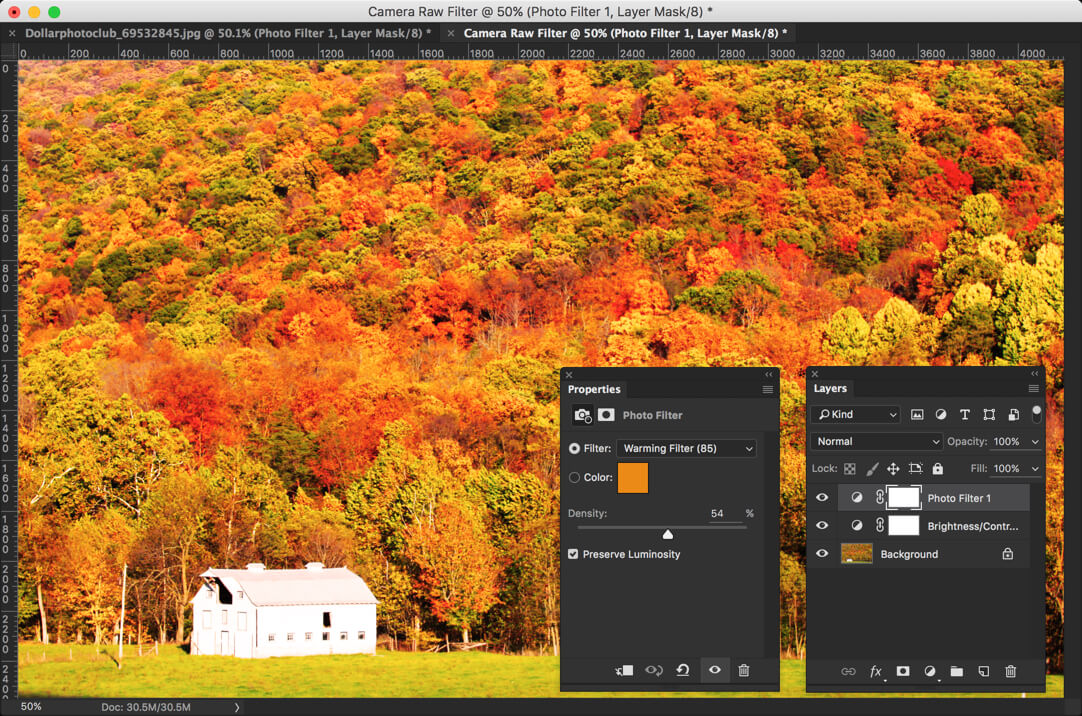
Step 2: Insert Warm Effect
Time to give a warm touch to the photo. Let’s make use of Photo Filter.
Go to Layer>New Adjustment Layer>Photo Filter.
Choose the filter as Warming Filter (85) and increase the density to 54%.
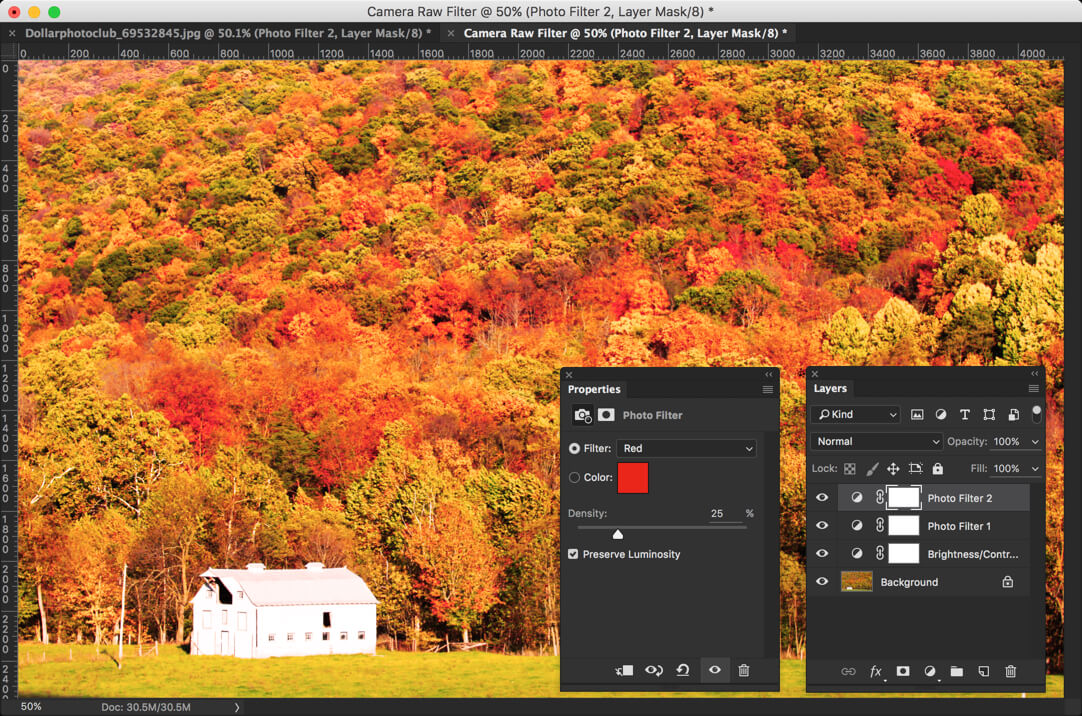
Step 3: Add Redness to the Photo
Let’s give a reddish tone to the image.
Again head back to Layer>New Adjustment Layer>Photo Filter.
This time, choose “Red” as filter and increase the density to 25%.
Isn’t the photo start to look exactly same as Ludwig filter? But still there’s one more step to do.
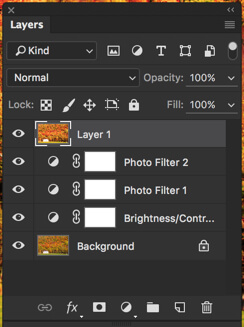
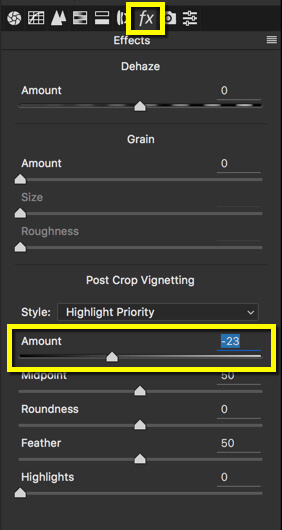
Step 4: Add Vignette Effect
Let’s add vignette effect. The easiest way to do it by using Camera RAW filter. But before using that, we need to stack all the layer onto a new layer. Press Cmd+Opt+Shift+E/Ctrl+Alt+Shift+E to do it.
This will create a new layer at the top of your layer panel. To make you understand better, the newly created layer is just a merger of all layers.
Time to open the Camera RAW. Press Shift+Cmd+A/Shift+Ctrl+A to open the image in Camera RAW.
Straightaway move to the Effects tab and decrease the amount to -23. This will add a nice looking vignette to the photo.
And now we’re done with the tutorial. Here’s the final image again for your reference.
Please support TrickyPhotoshop by sharing this tutorial with your friends and family on Facebook and Twitter.