Hello, guys! Welcome to my another tutorial from 30 Days to Learn Photoshop series. Today, I’ll be showing you what is Shape Tool in Photoshop. Last time I wrote a tutorial on Text Tool in Photoshop which is a must read tutorial because of two things. First being that it’s the only way to add vector text in your images. Second being that we’re going to use Text Tool in this tutorial also.
Before we begin, let me show you the final image. I just added a rounded rectangle and used the text tool.
So, let’s begin with the tutorial.
Step 1: Grab Rounded Rectangle Tool
The first thing that you need to do is to grab the Rounded Rectangle Tool.
If you hover over the Shapes in the toolbar, you’ll see 6 tools to draw shapes. You can use the combination of them to create some creative designs. The first thing that you need to do is to grab the Rounded Rectangle Tool. You can also do it by pressing Shift+U again and again until it comes.
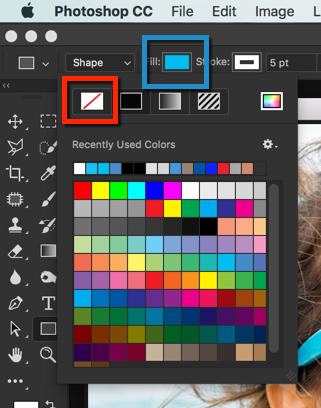
Step 2: Choose the Background Color and Border Color
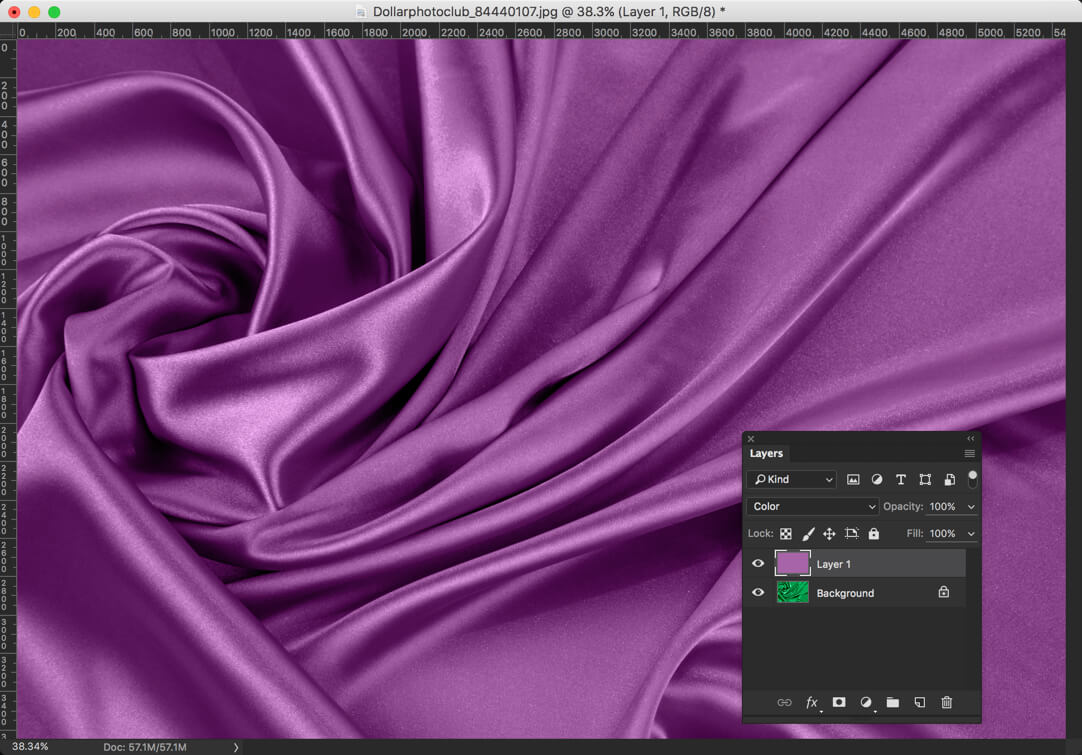
Time to choose the background color and color of the border. I am going to choose #00BFF3 as my background color and #000000 (white) as my border color.
You can do it with the help of Option bar. Background color can be chosen with the help of Fill and border color can be chosen with the help of Stroke. The numerical value next to the Stroke is the width of the border.
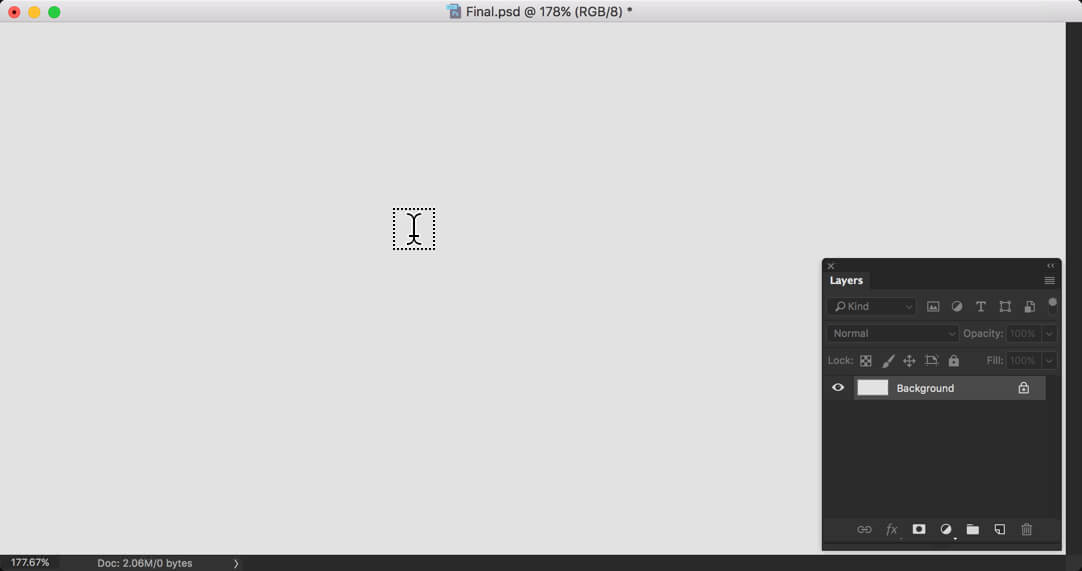
Now, draw the shape.
Note – If you don’t want to choose either background or border or even both, you can turn it off.
Simply, click on the color that is highlighted with the blue color and click on the no-fill button which is highlighted with red color. Do the same with the stroke to turn it off.
Step 3: Write Text
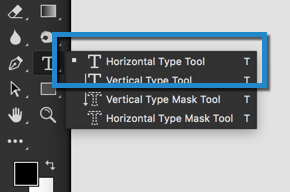
Now, we’re going to write the text. Grab the text tool from the Tool Panel or pressing Shift+T again and again until it comes. You may want to refer to my tutorial on Text Tool in Photoshop to understand the tool better.
Hey, guys! Welcome to my another tutorial on 30 Days to Learn Photoshop series. This time we’re going to learn everything about Text Tools that a beginner should know. We’ll cover what is it, how are we going to use it, and its option bar.
Last time we learned: Dodge and Burn Tool in Photoshop. If you want to know about it then check it out. The link will open in another tab.
The text tool is one of the most important tools in Photoshop. Be it adding a caption, write something, and creating a design (yes, design!), you can use text tools. If you’re a web designer, you can add icons also using this text tool. You probably heard of Font Awesome. Those icons can be used in Photoshop using Text Tool. The title and cast names that see in movie posters are written with the help of Text Tool in Photoshop.
Below is probably the easiest thing that you can do with a text tool.
I just wrote a text with black color against a 30% gray background.
What is Text Tool in Photoshop?
Text tool in Photoshop helps you write texts. Be it adding a caption, some fancy title, or beautiful text effect, Text Tool got it covered.
Where is Text Tool Located in Photoshop?
You can grab Text Tool by pressing Shift+T again and again until it comes or by grabbing it from the Tool Panel.
How to Use Text Tool in Photoshop?
Now let’s learn how to use the Text Tool
Step 1: Grab the Tool
Using a text tool is very much simple. You just grab the tool and start writing it.
As soon as the tool gets activated, your cursor will change.
Step 2: Write the Text
Wherever you click, your text will start from there. I know that you want to write a text at a certain place. Usually what I do is that I write text anywhere in the Photoshop document and then move it.
The shortcut to move is here: Make sure that text layer is activated. Hold down Cmd/Ctrl and start dragging the text.
Step 3: Align the Text
Photoshop CC has a very cool feature that is Snap To. What it does is that it gives you a hint whenever your text is aligned to some boundaries or layers. In the example shown below, you’re seeing two lines. The vertical line shows that my text is at center. The horizontal line also shows that my text is at center.
Option Bar of Text Tool in Photoshop
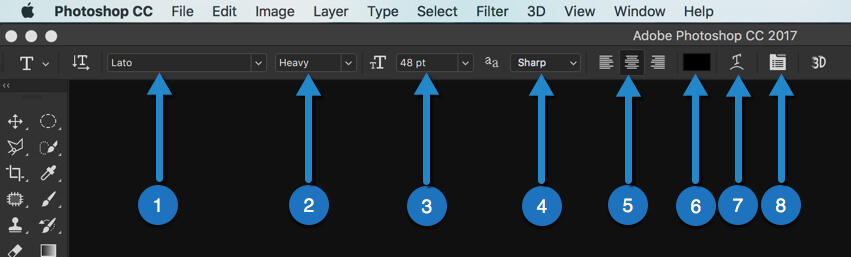
Below is the option bar of Text Tool.
Let’s start understanding one by one.
Note: We’re not going to touch 3D as it is for extremely advanced users and out of the scope of this article. I have written a separate tutorial for 3D. You can check that out.
Font: This is where you select the font. The font, Lato, that I am using is a paid font that I downloaded from TypeKit (Adobe repository for fonts). You can find all the fonts on your desktop here. If you have installed a new font and want it to show up here, you need to restart Photoshop
Font Type: This is the type of font. Your bold, regular, heavy fonts come here.
Font Size: Here you can define the font size.
Optimize Text: You can optimize the text for LCD, print, web here.
Alignment: You can align the text to the left, center, or right aligned. There are more options to the alignment that comes when you can click on the 8th icon.
Font Color: You define the font color here
Wrap Text: You can give funky effects to your font here.
Character and Draft Panel: Here you’ll find more options for text tool like space between characters, cases, more alignment options.
This is all about Text Tool.
This article is a part of 30 Days to Learn Photoshop.
Hey, guys! Welcome to my another tutorial from 30 Days to Learn Photoshop series. Last time we discussed Gradeint Tool in Photoshop and today we’ll discuss Dodge and Burn Tool in Photoshop. Dodge and Burn Tool give us better control on highlights and shadows of the image. Of course, you can use your contrast bar but that feature gives us very less flexibility. All you can do is to move the slider.
Dodge and Burn tool gives you full control over the image. It takes a whole lot of time, effort, and skills but the results are much better.
So let’s begin with the tutorial.
What are Dodge and Burn Tools in Photoshop?
Dodge and Burn are two different tools in Photoshop. Dodge tool is used to brighten an area while the burn tool is used to darken an area. The feature that makes them unique is that rather than being a slider like contrast, both are brushes. So, you get the full flexibility.
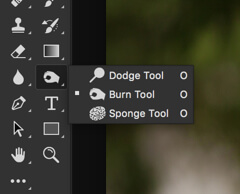
Where are Dodge and Burn Tools Located in Photoshop?
You can either grab them from tool panel or press Shift+O again and again until it comes.
How to Use Dodge and Burn Tools in Photoshop?
Now, from here the question starts. I will show you how to use both tools step by step. Let’s start with Dodge Tool.
You’ve been reading my tutorials a lot and you must have noticed that I am a huge fan of non-destructive editing. You also know that non-destructive editing means editing a photo without harming the original photo so that you can go back to your original photo anytime if you make a mistake.
This time, we’re going to do the same.
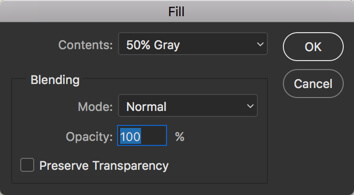
Step 1: Create a New Layer and Fill it with 50% Gray
Press Cmd+Shift+N/Ctrl+Shift+N to create a new layer. Name it anything.
Go to Edit>Fill or press Shift+F5. Choose the contents as 50% gray. Press OK.
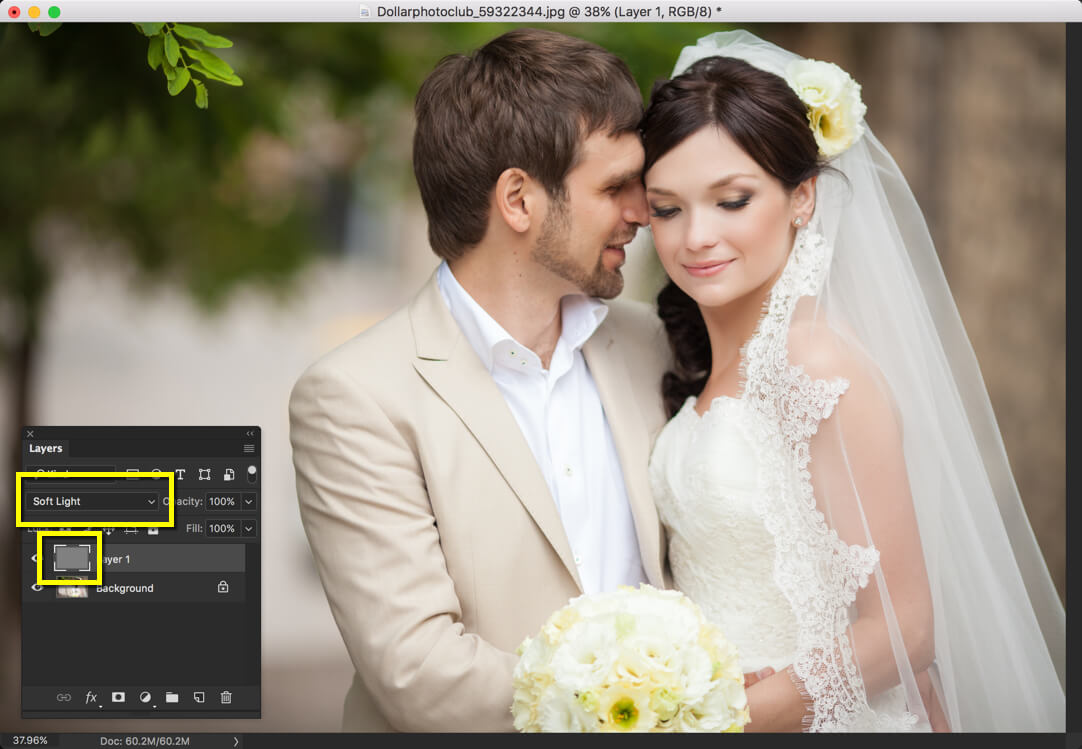
Now, change the blend mode of that layer to Soft Light. You’ll see that there’s no effect on the image. In fact, the newly created layer is transparent.
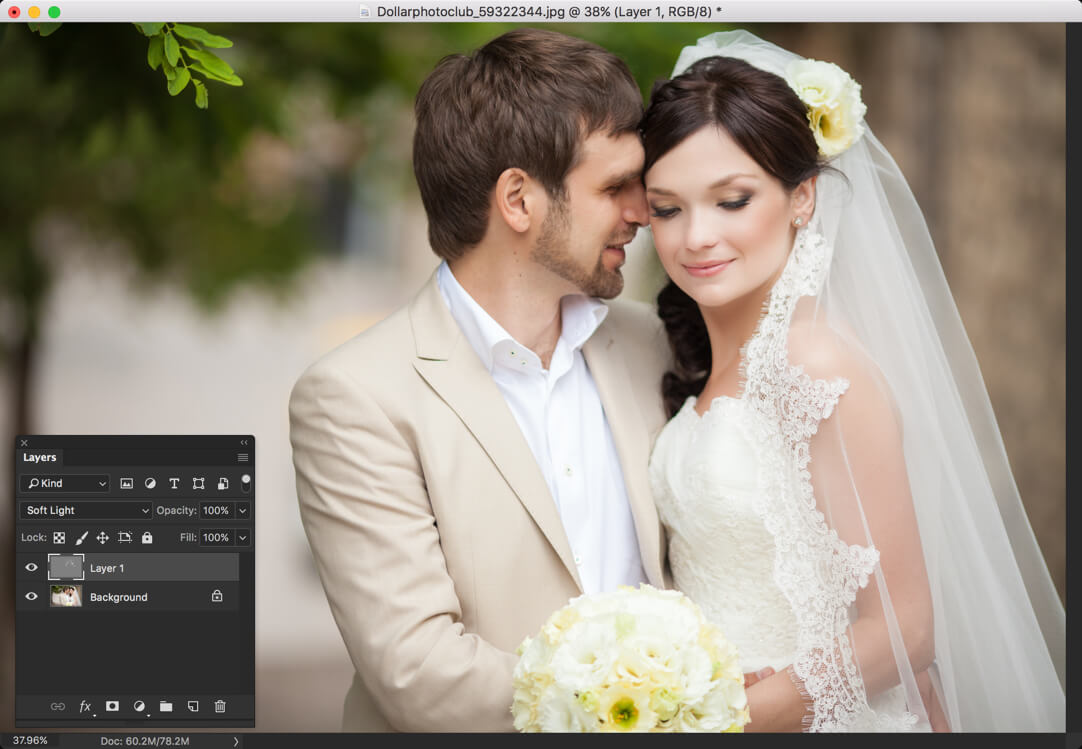
This is the layer on which we’re going to use our Dodge and Burn tools.
Step 2: Select Dodge Tool
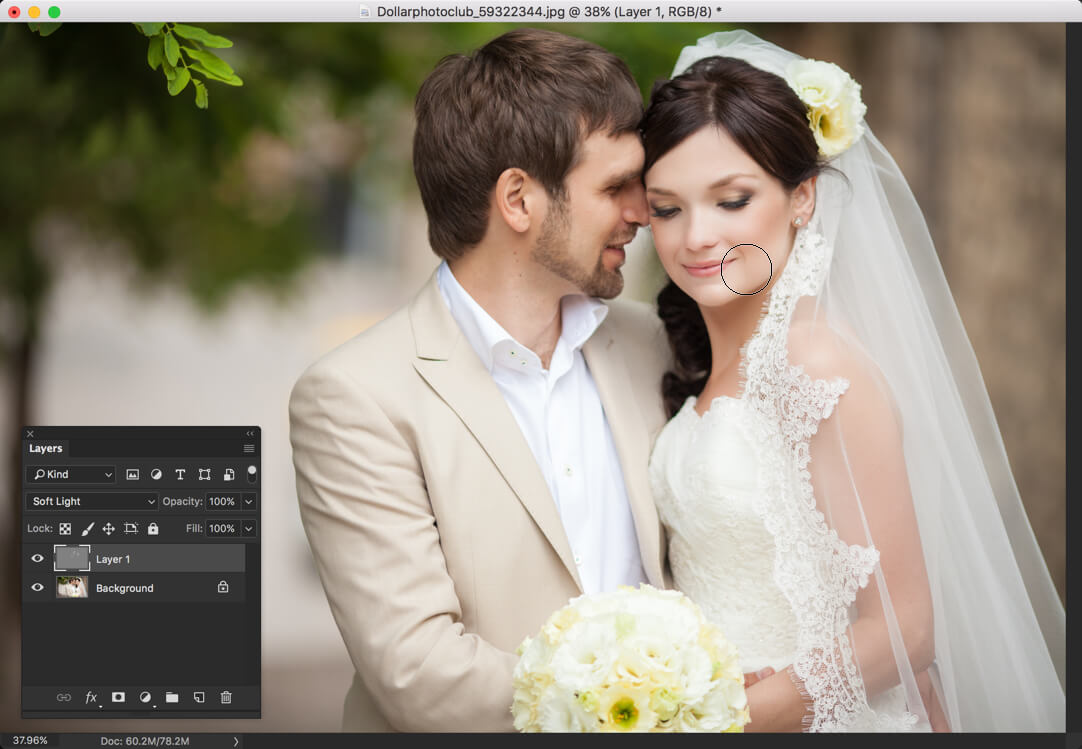
Let’s start with dodge tool first. Dodge tool is used to brighten the area. I am going to use to on the bride’s face. I’ll use it only on those places where highlights are present.
The result will look very minimal to you and you may not notice it. But if you look at the bride’s skin in the below image, you’ll see that it is popping up a bit more.
Step 3: Select Burn Tool
The result would be more visible after using the Burn Tool. Grab the burn tool from the tool panel or press Shift+O again and again until it comes.
Let’s apply it on the face where the shadow is present i.e. the cheeks.
Aren’t you seeing the difference? I know that it has not made the image any better and did exactly opposite of good but the point was to show you the result.
Got the point? Yes? Great!
Option Bar of Dodge and Burn Tool in Photoshop
Option Bar of both the Dodge tool and Burn tool is exactly the same.
Let’s understand what it is:
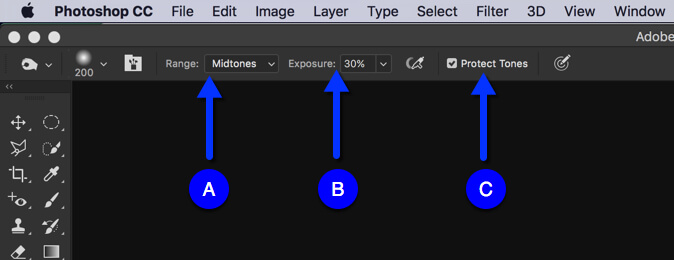
A: Range This is probably the best that this tool can get. This feature restricts Photoshop to affect only the selected pixels. For example, if “Midtones” is selected as Range, Photoshop will only use Dodge or Burn Tool when you’re applying it on Midtones. It will not affect highlights and shadows.
B: Exposure This sets the strength of the tool. If sets to 100%, the tools will be much more effecting against the one when it’s set to 30%. So Dodge tool will highlight much more when exposure is 100% as compared to the situation when it’s set to 30%.
C: Protect Tones When turned on, Photoshop will not wipe out the details of pixels. For example, dodge tool will not make any pixels completely white so that restoration is pixels will not be possible and burn tool will not make any pixels completely black. It’s best to have this feature always turned on.
Hey, guys! Welcome to my another tutorial from 30 Days to Learn Photoshop series. Last time, we discussed Clone Stamp Tool in Photoshop and today, we’re going to discuss the Gradient Tool in Photoshop. You’re not going to use it much but you may use it when you want to give some artistic effect to your photos. Just look at the image below. The image is made with just 3 clicks.
So, let’s start with few basic questions.
What is Gradient Tool in Photoshop?
A gradient is a tool in Photoshop which helps you make a combination of two or more colors where you can see the subtle transformation from one color to another.
FYI – You can also use Gradient with one one color.
Where is Gradient Tool Located in Photoshop?
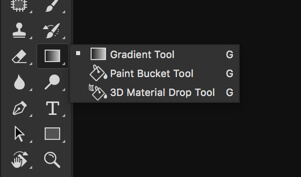
You need to grab Gradient Tool from the tool panel or activate is by pressing Shift+G again and again until it activates.
How to Use Gradient Tool?
If you use Gradient Tool at the beginner level, this tool is probably the easiest tool you can ever use.
You just need to draw a line. That’s it!
Refer to the below image, are you seeing a line? That’s all you need to draw.
So, let’s begin with step by step.
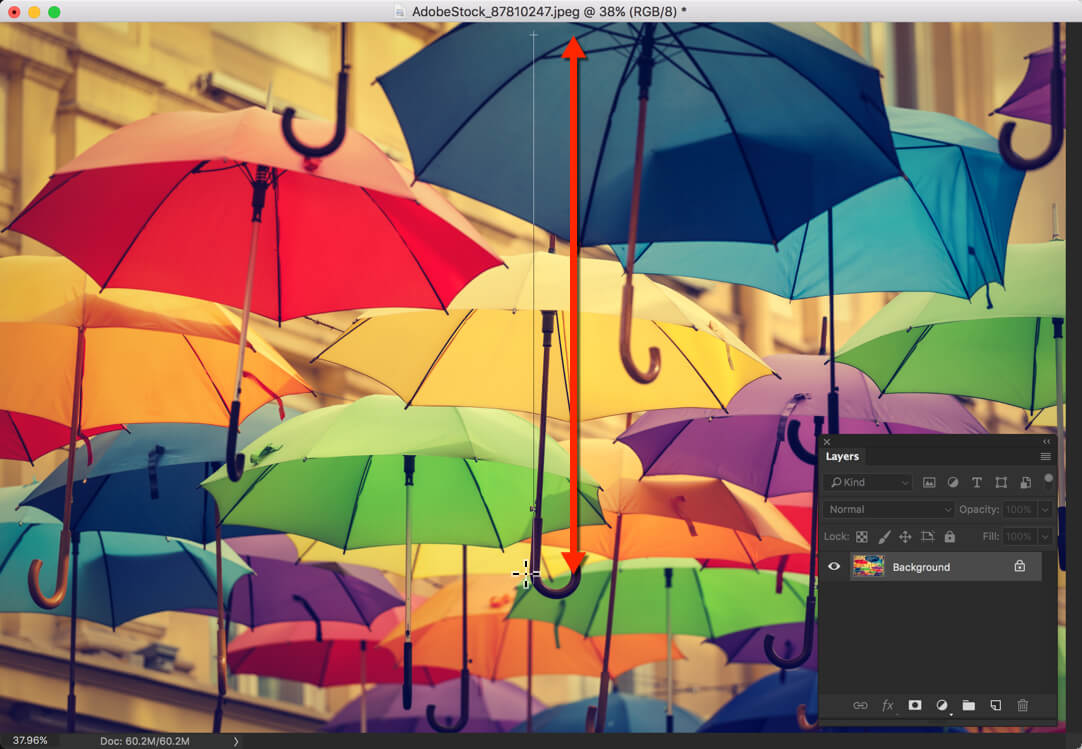
Step 1: Choose the Starting and Ending Point
As you’ve grabbed the Gradient Tool, time to check the foreground and background color.
I am going with Black as my foreground color and White as my background color.
Now, whenever you draw a line, the starting point will have 100% of your foreground color and the ending point will have 100% of your background color. The middle area will have a transition from the foreground to the background color.
You can see it in the image below.
Step 2: Creative Effects with Gradient Tool
Now let’s do some creative effects.
Create a new layer.
Head over to Option Bar and click on the drop-down button first and then click on the second option. Unlike the previous one, this gradient goes from the foreground color to transparent.
Now again make a gradient.
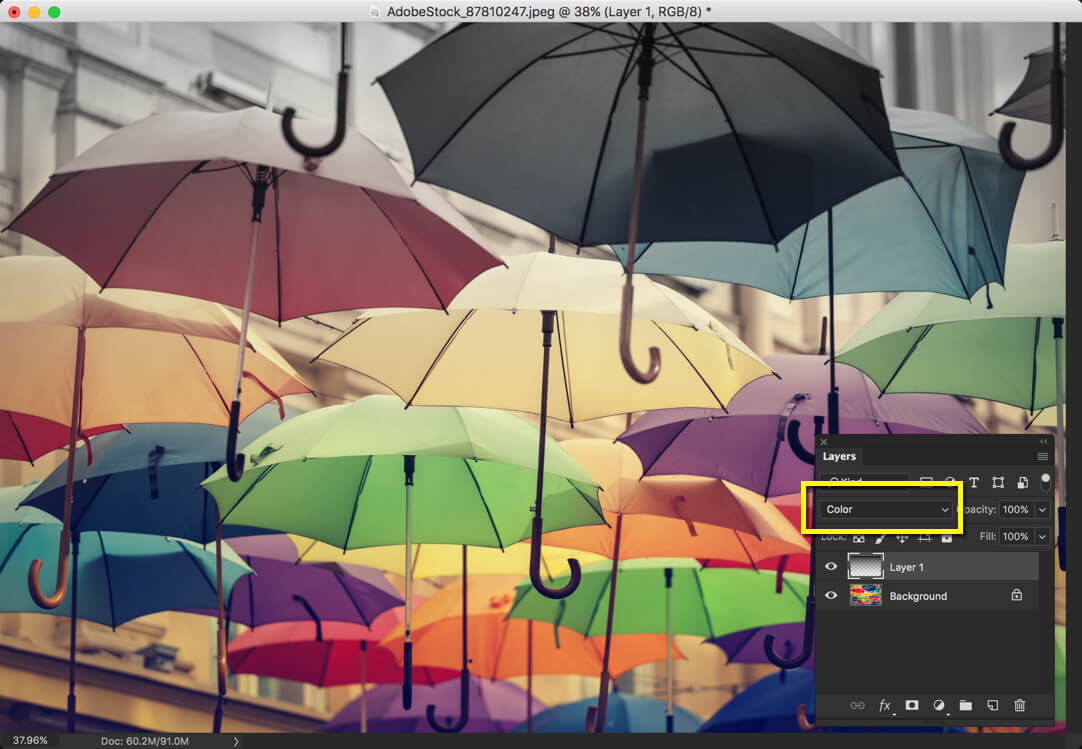
Now, change the Blend Mode to Color.
The possibilities with Gradient Tool are seamless. You can get more creative by playing with this tool.
Time to head over to the menu bar of Gradient Tool.
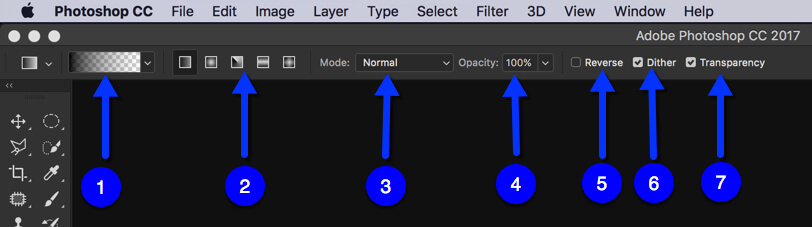
Option Bar of Gradient Tool
Gradient: This is where you can choose your gradient. Just click on the drop-down arrow and you can see a lot more possibilities.
Type of Gradient: Photoshop comes with 5 types of gradients. Linear, Radial, Angle, Reflected, and Diamond. The one that was shown is above example is Linear.
Mode: Of course, this is Blend Mode.
Opacity: This determines the opacity of your gradient. I’d like to keep it as 100%.
Reverse: This one is cool. If it’s not checked, the gradient goes from Foreground color to Background color. If checked, the gradient goes from background color to foreground color.
Dither: Dithering is the process of using two colors to simulate the shade of a third color by placing dots of the two colors close together. The application using the dithering process can use several strategies of placing the dots over the region showing the third color. It can place dots in particular patterns or at random. – by Chron.com
Transparency: Remember that we created a cool effect in Step 2 where the gradient went from the foreground color to transparent? This is because the transparency was turned on. If it’s not, the result would’ve been a black image.
I hope that you enjoyed this tutorial.
Please support TrickyPhotoshop by sharing this tutorial with your friends and family on Facebook, Twitter, and Google+.
Hello! Welcome to my another tutorial from 30 Days to Learn Photoshop series. Last time I wrote on Brush Tool in Photoshop. This is one is a bit different. Today, I’ll show you what’s the secret behind the removal of objects in Photoshop. Yes, you saw it right. Today, you’ll see how do Photoshoppers remove objects in Photoshop. They do it with the help of the Clone Stamp Tool. Although, there are many ways and tools available in Photoshop to remove objects, the most famous one is Clone Stamp Tool.
Remember what you learned in Healing Brush Tool, you have source and target. The same things are also present here. You have a source and a target. You choose source by holding down Opt/Alt key and you choose the target by clicking with the mouse.
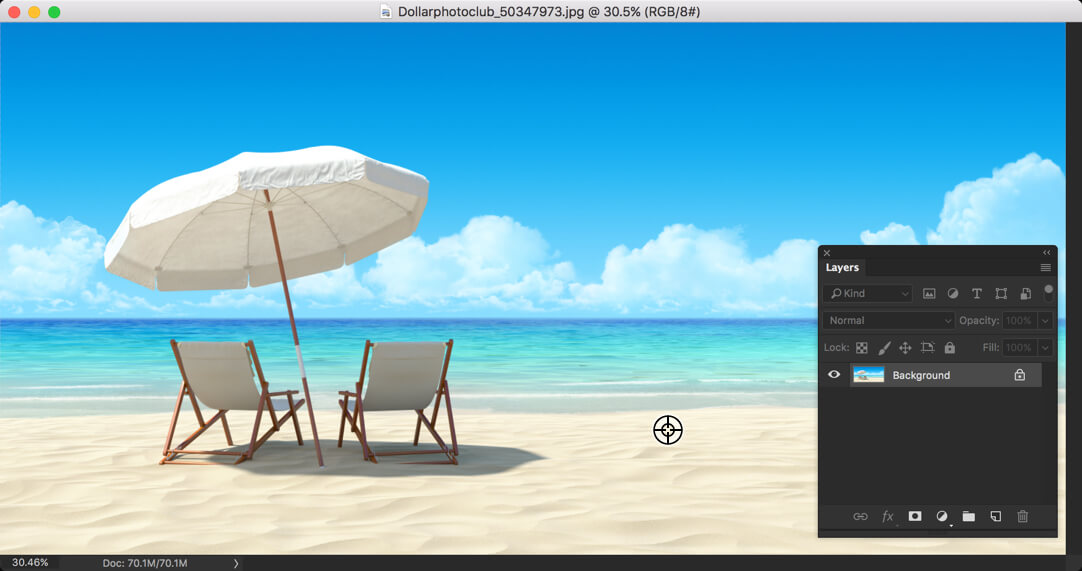
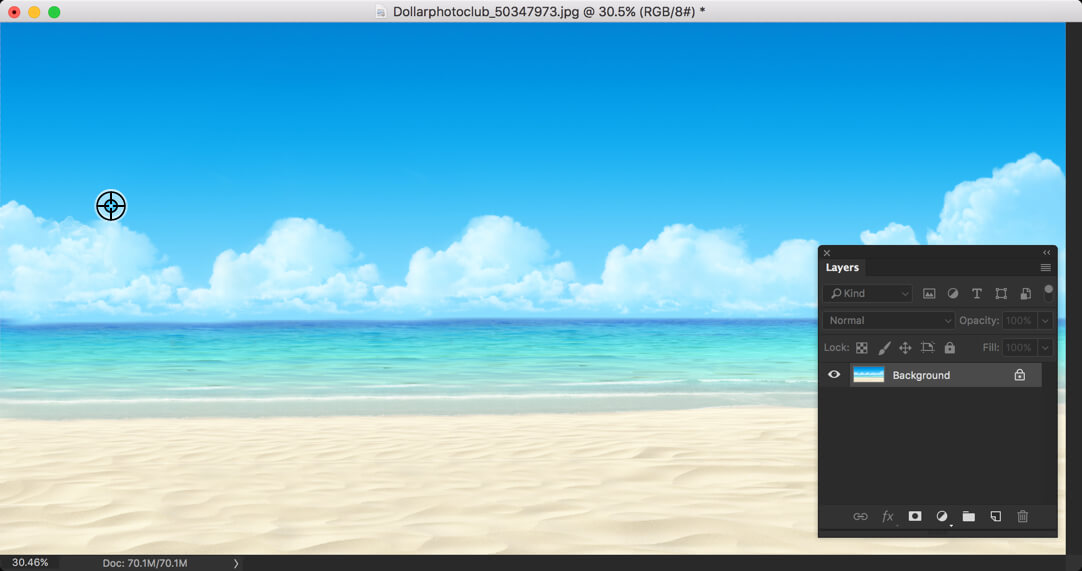
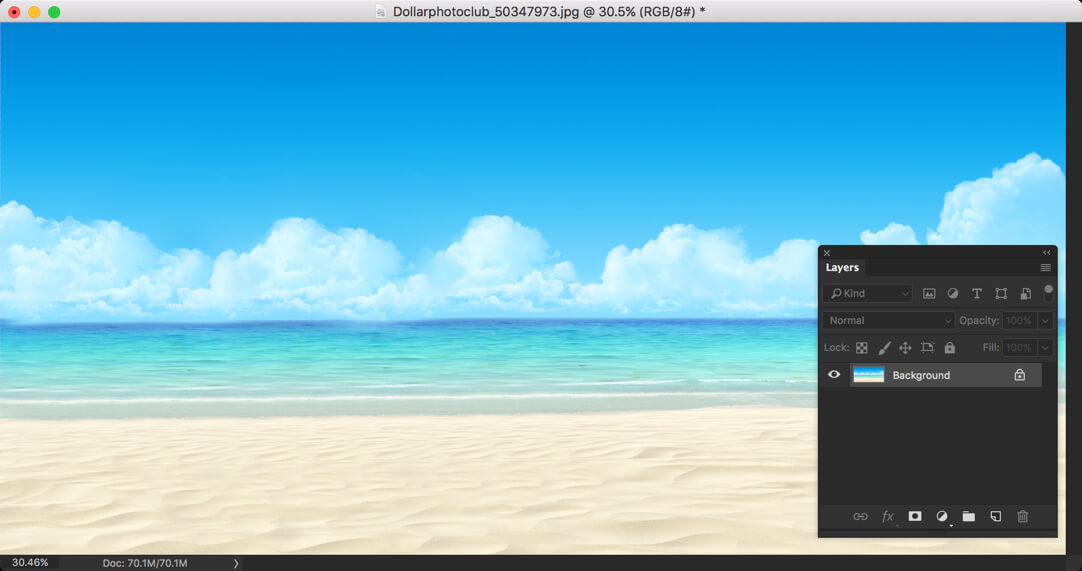
I’ll share everything in more details in this tutorial. But before we proceed, let me show you the before and after pic of an image where I magically removed chairs and umbrella.
Before
After
Now let’s begin with few questions
What is Clone Stamp Tool in Photoshop
Clone Stamp is a tool from which you can copy one part of the image and paste it on another part.
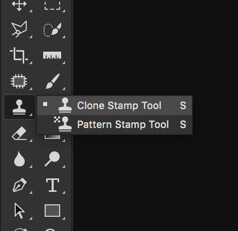
Where is Clone Stamp Tool Located in Photoshop
You need to grab Clone Stamp Tool from the tool panel or activate is by pressing Shift+S again and again until it activates.
How to Use Clone Stamp Tool in Photoshop
Now. let’s learn how to use the Clone Stamp Tool in Photoshop.
Step 1: Define the Source
As said earlier, Clone Stamp is used to copy pixels from one part of the image and paste them on another part. To use the Clone Stamp Tool, you first need to define the source pixels. This will be pixels are going to be copied. You can do them by holding down Opt/Alt key.
Once you hold it down, the cursor will change to a sniper cursor.
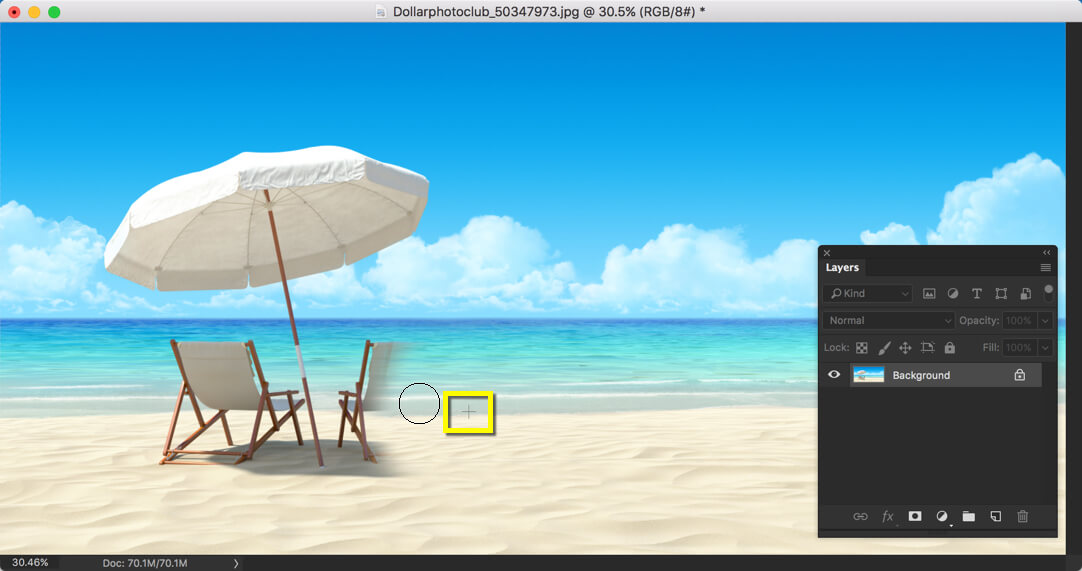
I need to remove the chairs and umbrella. What I’ll do is to copy the nearby pixels of beach sand, water, and sky, and paste them on the area where chairs and umbrella are present.
So, for now, I am choosing my source as the sand.
Step 2: Paint the Target
Now that I have selected my source, I am going to paint those pixels onto my target. When you do that, you’ll see a cursor that moves synchronously with your cursor. This cursor denotes the pixels that are being copied.
Simply, do this for all over the image.
For best result, you may need to define your source multiple times.
Step 3: Refine the Result
If you do it multiple times, your result should look like below.
But you have noticed a very big flaw in the image. As I have basically copied and pasted pixels from one place to another, I have created a design that repeats itself and this looks fake.
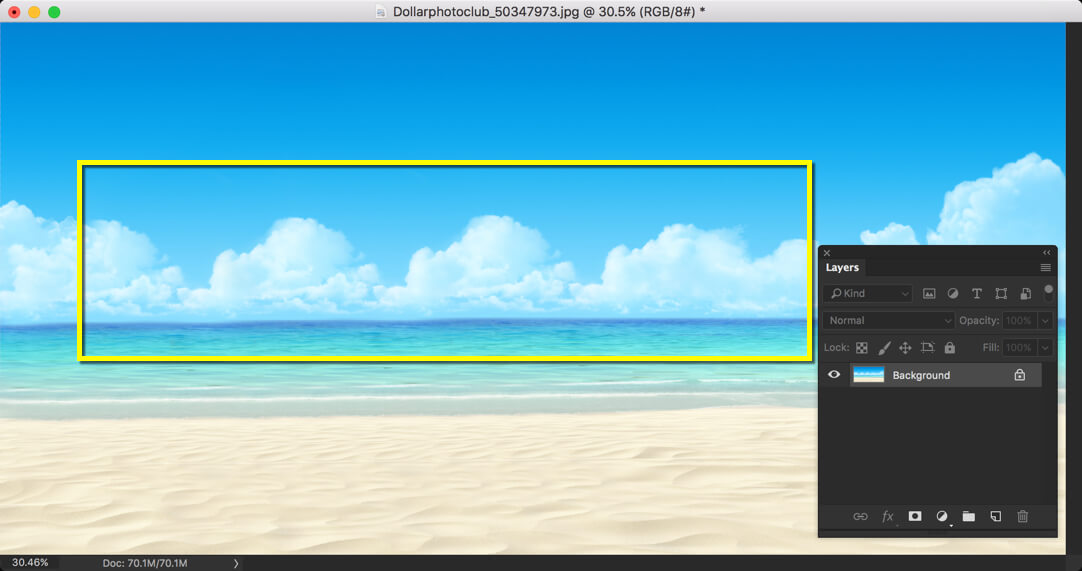
To fix this, usually, I make some random designs by choosing some random areas as the target. In this case, I am choosing the left cloud as my target. If you want, you can choose something else.
And I am going to fill the cloud adjacent to it with my newly chosen target.
Like it? I bet you would.
Now, let’s go a bit deeper.
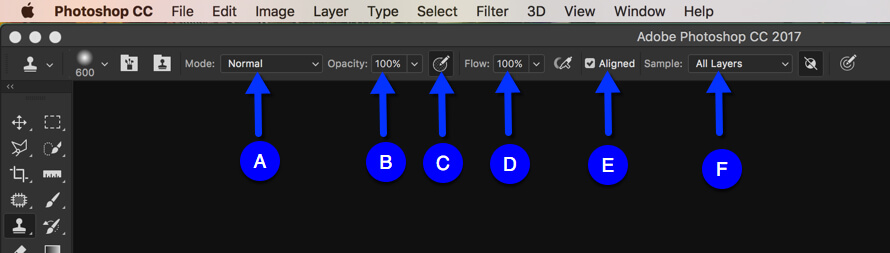
Option Bar of Clone Stamp Tool
Before we proceed, let me show you the option bar of the Clone Stamp Tool.
I have given a name to important of them. You can leave the rest.
A: Mode – This is probably the most common option you get when you use any tool that is related to Brush Tool. This is nothing but the Blend Mode. I have written a vast tutorial on Blend Mode in Photoshop.
B: Opacity – Opacity is used define the opacity of the brush. If it’s 100%, the copied pixels are opaque. If it’s 0%, the copied pixels are transparent, and if it’s anywhere between 0% to 100%, the copied pixels will be translucent.
C: Pressure –This is something you can use when you use pressure sensitive pads like Wacom tablets. If turned on, the harder you press, the harder your target gets brushed.
D: Flow – For now, you can think that flow works exactly the same as opacity (but it doesn’t). The proper use of Flow comes in the advanced version.
E: Aligned –This is what I keep turned on most of the time. What this keeps is that it keeps the Source brush and Target brush aligned. In case you are having difficulty understand this feature, simply turn it off and try to use the Healing brush tool.
F: Sample –This lets you decide which layer to choose while taking your source as a reference. If you work non-destructively like me, it’s better to go with “All Layers”.
Photoshop Apps have become more popular amid people in the modern era because it lets people to edit their photos and make it excellent. More and more people are using Photoshop Apps today due to its many benefits and it is used to edit the digital image application. Enhanced features of Photoshop Apps assist you to improve the quality of a photograph. There many new features in Photoshop Apps that aids the photographers and artists who depend on Photoshop apps to make the artwork.
The benefits of using Photoshop Apps are plenty and new features of Photoshop Apps make your life so easy and unproblematic. With the use of new features of Photoshop Apps, it is possible for you to sort out the flaws and the defects in the photos. You can also take away and modify the backgrounds in the photos with the new features of Photoshop apps. With the enhanced features of Photoshop apps, the images can be amended to fix the slipups, the photographs can be offered a professional appearance, and fresh images can be formed and edited. Here are some enhanced features of Photoshop apps that allow you to adjust the effect of images:
Typekit integration
Typekit Integration starts to hit its pace. Typekit syncs fonts for use in an extensive array of applications including Photoshop. By means of the integration with Typekit, Photoshop fetches a set of typographic possibilities to your artistic projects. You can make use of fonts from Typekit that are matched with your computer. The users can opt to observe only fonts from Typekit in the Text tool options bar and the Character panel font lists. When Photoshop apps don’t locate fonts utilized in a file you opened, it is able to look for absent fonts on Typekit. Photoshop allows you to restore the absent fonts with correspondent fonts from Typekit.
Content-Aware Crop
Photoshop used to provide new features every now and then in order to improve its user’s experience. Content-Aware Crop is an excellent advanced feature in Photoshop that lets people to make their image more effective. Content-Aware Crop is able to fill in the open areas when a picture is enlarged or rotated further than the original image size. It offers more choices when editing an image to make a faultless crop. With Content-Aware Crop, Photoshop views all the pixels around the borders of your image and automatically, effortlessly fills in the empty place with content when you enlarge or rotate a picture.
Face-Aware Liquify
Face Aware Liquify takes the Liquify tool in Photoshop to a new height. It automatically identifies the diverse facets of a face when using the liquify tool and offering users direct control over facial features like eyes, nose, and mouth for making fast imaginative modifications. With Face-Aware Liquify, You can give a fresh look to your image by modifying eyes, mouth, and other facial features. Face-Aware Liquify in Photoshop has the ability to automatically notice facial features and aid you to fiddle with them to boost a picture or include creative character to an excitement shot. Face Aware Liquify in Photoshop can modify a face to give the impression of someone else. It can spot a single face or different faces in an image. It discovers and lets you to amend eyes, nose, mouth, jaw, face width, etc.
Match Font
There are quite a few new features obtainable in Photoshop including Match Font. Photoshop’s new and advanced Match Font tool helps you to discover fonts utilized in photos and designs. This useful fresh Match Font tool allows you to spot the font used in a chosen region of text. Match Font is an effective advanced feature in Photoshop apps that makes it a snap to discover fonts in posters, stamps, pictures, and more. You can bring into play Match Fonts to locate the adjoining match out of your font library and the online Adobe Typekit. Match Font examines an image to find out what font was used.
Swap image
Swap image is a great new feature in Photoshop apps and it gives you a lot of advantages. With the new and advanced image swapping feature, you just require choosing the thumbnail of the image you would like to restructure and pull it towards the back or frontwards.
Support for artboards
One of the main advanced features in Photoshop apps is its support for artboards. The Artboards tool allows designers who work on mobile and web apps to generate several artboards for diverse layouts in a single file.
3D Portraits
3D portraits let you to form a 3D portrait of a usual 2D portrait right inside Photoshop. With this new feature in Photoshop apps, you will be able to choose the eyes, ears, nose, hair, chin, neck etc are, and correct those by clicking and dragging them to a more perfect place.
New Blur Effects
One of the advanced and new blur effects helps to replicate realistic motion blurs to your images devoid of wanting to capture the effect in the camera. The blur new effects in Photoshop apps allow you to add Field Blur, Motion Blur, Iris Blur, Spin Blur and Tilt Shift.
I hope that you’ll find all above features interesting.
Hey, folks! it’s been a few weeks since I have uploaded a new article on TrickyPhotoshop. I must say that I am quite busy with my another venture, I Innovate Magazine – the magazine for Entrepreneurs, these days. But this should not be an excuse. I know that you get upset about not seeing any new tutorial for weeks and I also know that I need to upload more frequently. I will also try my best to upload at least a new article every week. Last time I discussed Brush Tool in Photoshop. Today, as the title already gave you a hint, we’re going to see the brand new Select and Mask feature in Photoshop 2017. Yes, you saw it right. Photoshop 2017 is here.
Since the past few years, or at least I am noticing, Adobe has been trying hard to make the selection as easy as possible. This can be seen by removal of extraction and introduction of Refine Edge back in Photoshop CS3. Now with the addition of Select and Mask tool, the selection is now easier than ever.
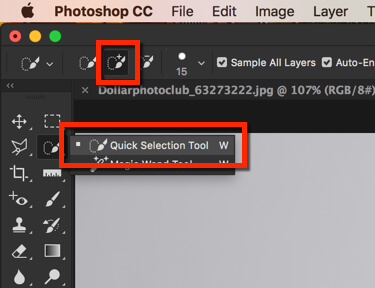
Let me show you how to use this feature. All you need to have is the Quick Selection Tool activated.
Select Using Quick Selection Tool
Let’s grab Quick Selection Tool from the tool panel or press Shift+W again and again until it comes. Make sure that “Add to Selection” is turned on.
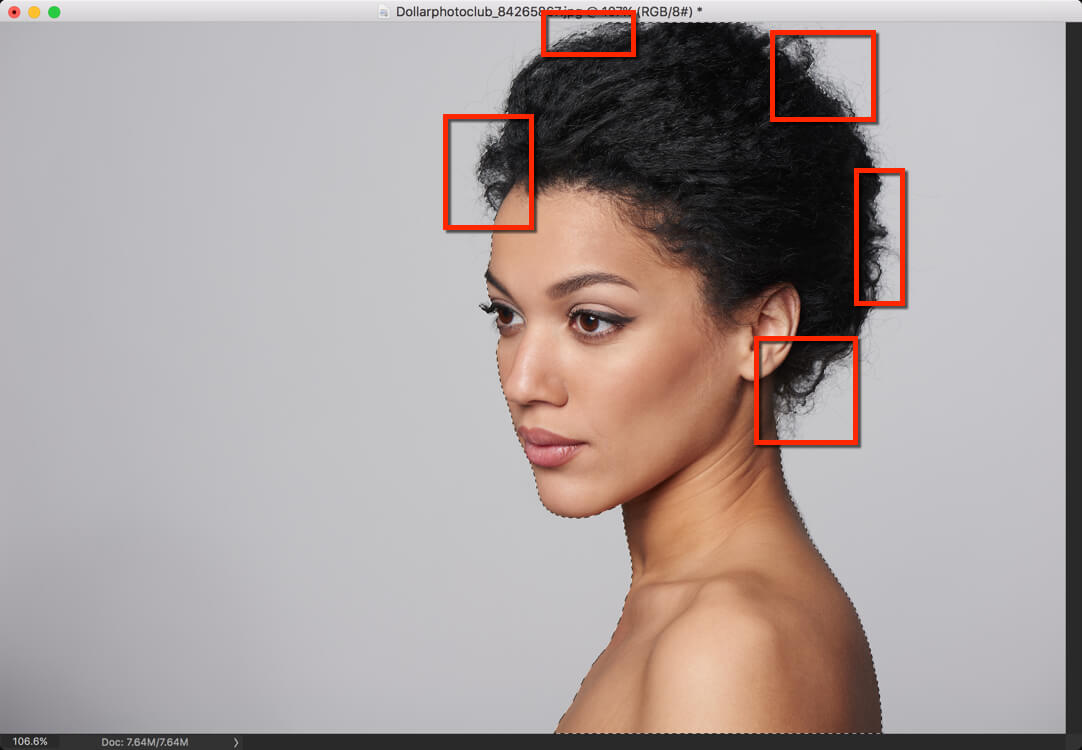
Once you’re done with the selection, you need to make sure every single part is selected. In hurry, usually what happens is that we forget to select every bit of the thing that we want to select. Later, when we use Refine Edge (it’s gone in Photoshop 2017, at least in version 20161012.r.53 x64), we struggle to get the desired outcome.
In below image, I have made few rectangles that show where we usually miss the selection.
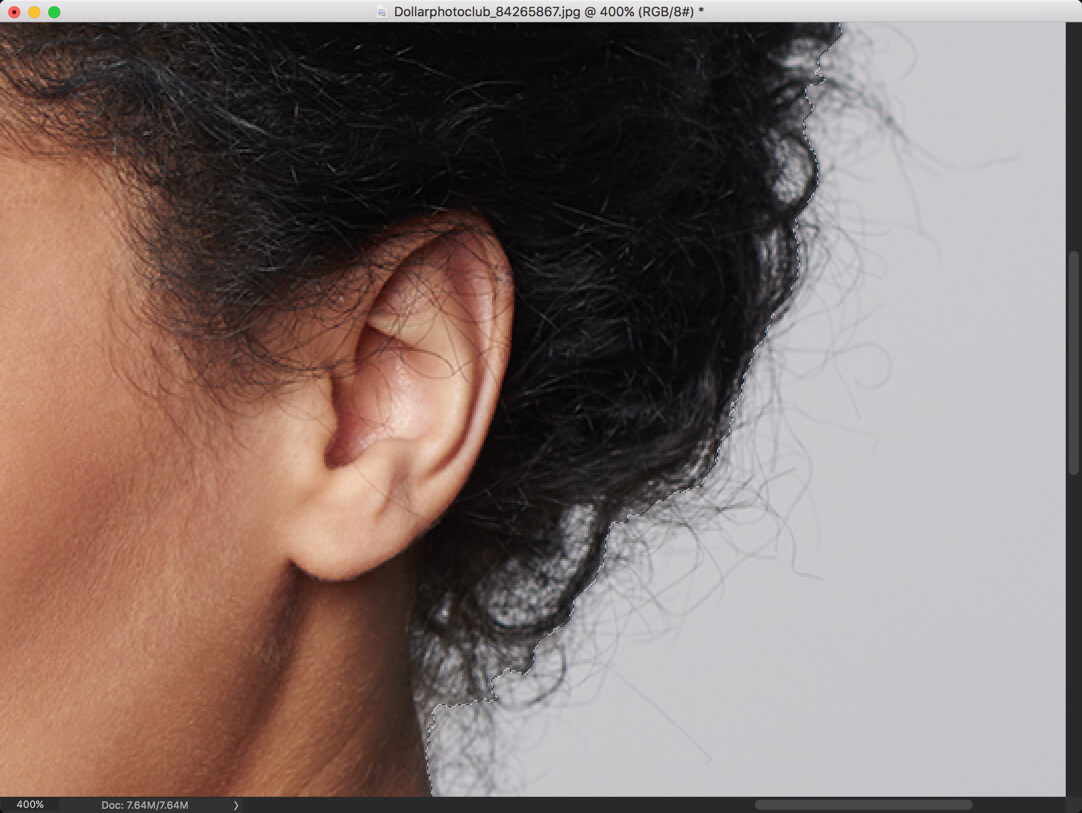
Let’s zoom in to see it better. Are you seeing the marching ants? See how precisely are the walking around the hair.
Refine the Selection Using Select and Mask Tool
Now, let’s go to Select and Mask. Activate it by pressing Cmd+Opt+R/Ctrl+Alt+R.
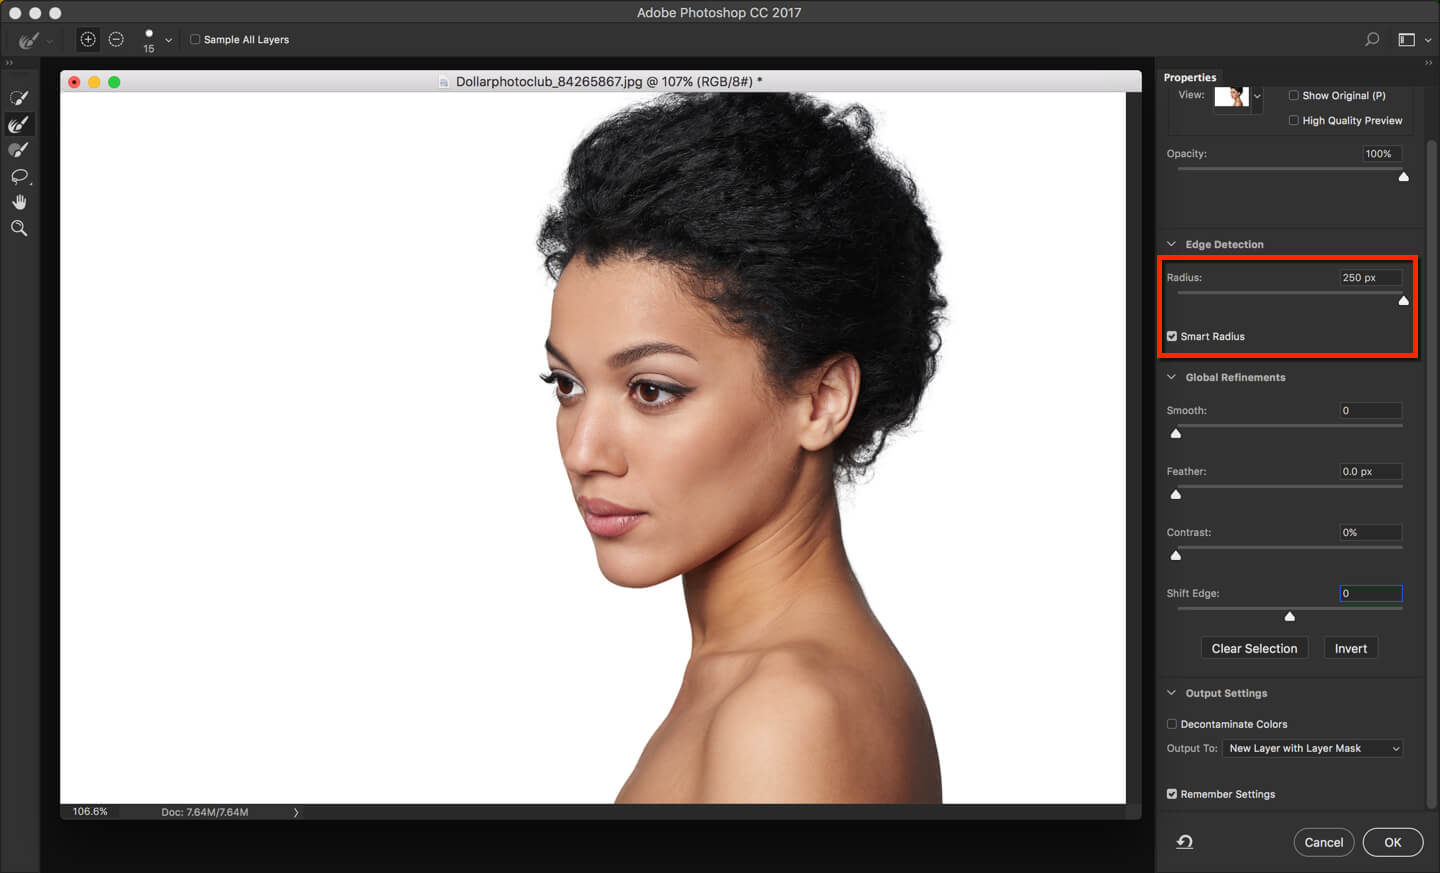
As my image is quite big, one thing that I usually always go is turning on “Smart Radius” and increase the radius all the way to 250 pixels.
This does all of the work.
Did you see how efficiently it worked around the hair? It selects the hair flawlessly.
Did you notice one more thing? All of the other settings are the default. This means alone Radius did all of the work.
Isn’t it amazing?
Now, let your friends know about this tool by sharing this with them on Facebook and Twitter.
Also, make sure that you make most of the offer below.
Hey, guys! Welcome to another tutorial from 30 Days to Learn Photoshop series. Last time I discussed Patch Tool in Photoshop which is quite useful in facial flaws. Today, I am going to discuss probably the most used Photoshop tool that is Brush Tool in Photoshop.
Brush Tool in Photoshop is used for many tasks. Be the task is changing color, drawing, skin smoothing, etc., Brush Tool will always be there to help you. Alone Brush Tool cannot do many things but with help of other tools and blend tools, Brush Tool can do miracles. In this tutorial, I am going to show you how you can use the Brush Tool to change color.
But as usual, before we begin, let me show you before and after image.
Before
After
So, let’s begin the tutorial.
What is Brush Tool in Photoshop
Brush Tool is one of the most basic tool in Photoshop which is generally used for designing. It paints the brushed are with the foreground color.
Where is Brush Tool Located in Photoshop
You need to grab Brush tool from the tool panel. Alternatively, you can press Shift+B again and again until it comes.
How to Use Brush Tool in Photoshop
Now I am going to show you how you can use Brush Tool in Photoshop.
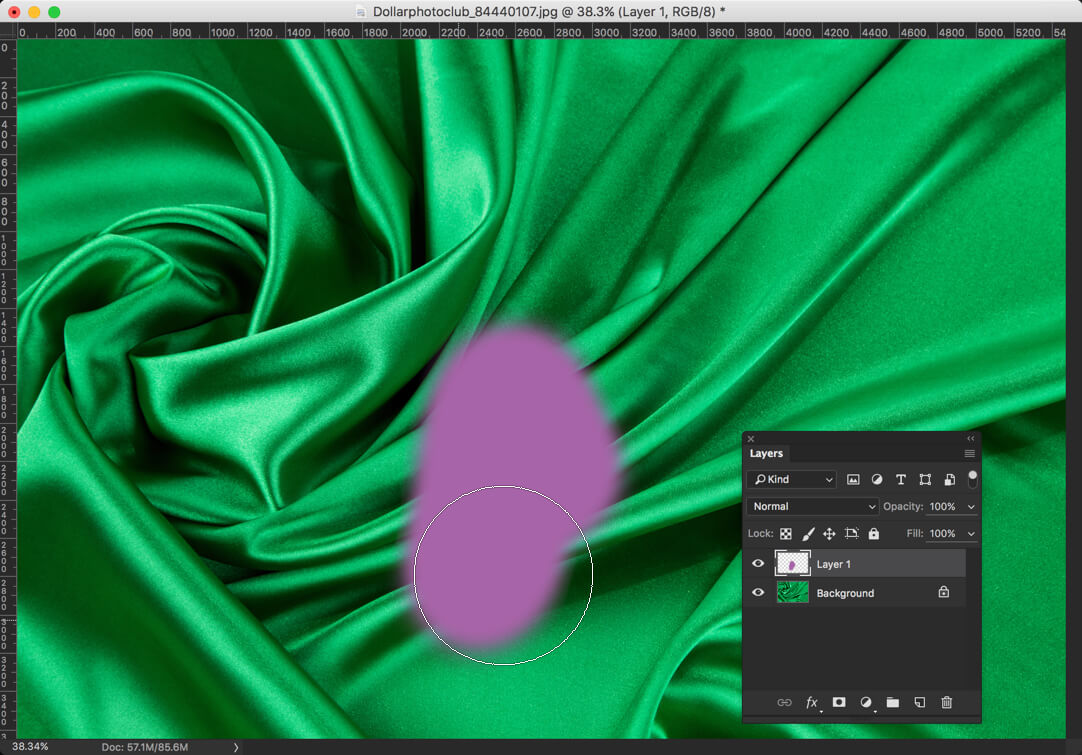
Step 1: Choose Foreground Color
Brush Tool is probably the easiest tool that we have in Photoshop. You need to change the foreground color. It is present in the toolbar at the bottom.
Click on the square shape box and choose your color.
Step 2: Paint it
Create a new layer by pressing Cmd+Shift+N/Ctrl+Shift+N. You, of course, don’t want your work to be destructive in nature.
Now that we have already grabbed the Brush Tool, we can simply start brushing.
As I already mentioned, alone Brush Tool is not of much importance. So, let’s mix it with a blend mode.
Change the blend mode of the newly created layer to “Color”.
Did you see what happened? Photoshop just changed the green color to purple.
Let’s do it with the whole image.
Wow! With the help of a Brush Tool, we are able to change the color of an image. Look, how natural the image is looking. No one can say that the image was originally green in nature.
If you ask me the algorithm behind the Patch tool, I have no idea. But, I do know that whatever it is, it works like a charm. To prove this, I am going to remove 3 moles from this beautiful lady’s face. I know that those moles are adding beauty to her, but for the sake of this tutorial, let’s remove them.
As usual, before we proceed, let me show you before and after images.
Before
After
Let’s begin the tutorial:
What is Patch Tool in Photoshop?
Patch tool in Photoshop is a tool that creates a pattern on the applied area either by using Photoshop’s Content-Aware technology.
Where is Patch Tool Located in Photoshop?
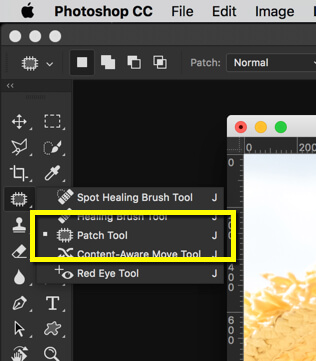
You can activate Patch tool in Photoshop either by grabbing it from the tool panel or press Shift+J again and again until it comes.
How to Use Patch Tool in Photoshop?
Now, let’s learn how to use the Patch tool.
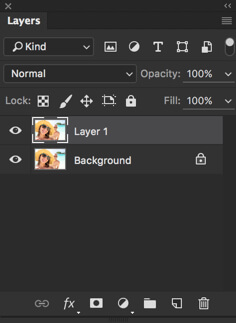
Step 1: Duplicate the Background Layer
First of all, you don’t want your work to be destructive. You always want to work non-destructively so that you can go back to original image whenever you have made any mistake.
To do so, we need to duplicate the background layer. Press Cmd+J/Ctrl+J to duplicate your background layer.
Note – Unlike Healing Brush, Patch tool doesn’t work in transparent layers. It is yet to have “Choose Layers” functionality.
Step 2: Encircle the Flaw
Now encircle the area you want to remove.
Step 3: Move the Selection
Now, gently move the selection to the area that you want to fill the flaw.
Step 4: Deselect the Selection
Now release the mouse. Press Cmd+D/Ctrl+D to deselect the selection.
Ist’s it looking cool?
Let’s remove other two moles also. One is below her right nostril and another in on her left cheek.
Now that we know how to use Patch Tool, let’s understand this tool a little bit deeper.
Option Bar of Patch Tool in Photoshop
Let’s learn each option one by one.
1. Patch
This defines the technology that Patch Tool use. “Normal” lets Patch Tool use the old technology by matching the source pixels against target pixels and then fills the source pixels. “Content Aware” uses the new Photoshop Content-Aware technology. To be frank, I have faced any situation where I needed to use Content-Aware technology. “Normal” technology has always worked for me.
2. Source/Destination
The demo that I showed you is demoed with the “Source” option. In the option, you can encircle the flaw and move it to the area of where you want the pixels of. In “Destination”, you just do the opposite. You encircle the destination and move it on the flaw. The generally saves time when you want the same pixels to placed in several places.
3. Transparent
This is something you always want to turn off. If your image has transparency, you may want to turn it on. If you don’t know what is transparency in the image, just skip to the next point.
4. Use Pattern
This feature allows you to use pattern along with the blending of pixels.
5. Diffusion
Diffusion slider controls how quickly the pasted region adapts to the surrounding image. As a general guideline, low slider values are good for images with grains or fine details whereas high values are good for smooth images.
Hey, guys! Welcome to my another tutorial from 30 Days to Learn Photoshop Series. In this tutorial, I am going to show you how to use Healing Brush Tool in Photoshop. For the demo, I’ll be removing wrinkles from this beautiful lady’s face.
Unlike Spot Healing Brush Tool in Photoshop, Healing Brush is a tool is not only for minute flaws but also works for removal bigger imperfections. To demo this, let’s remove the wrinkles together.
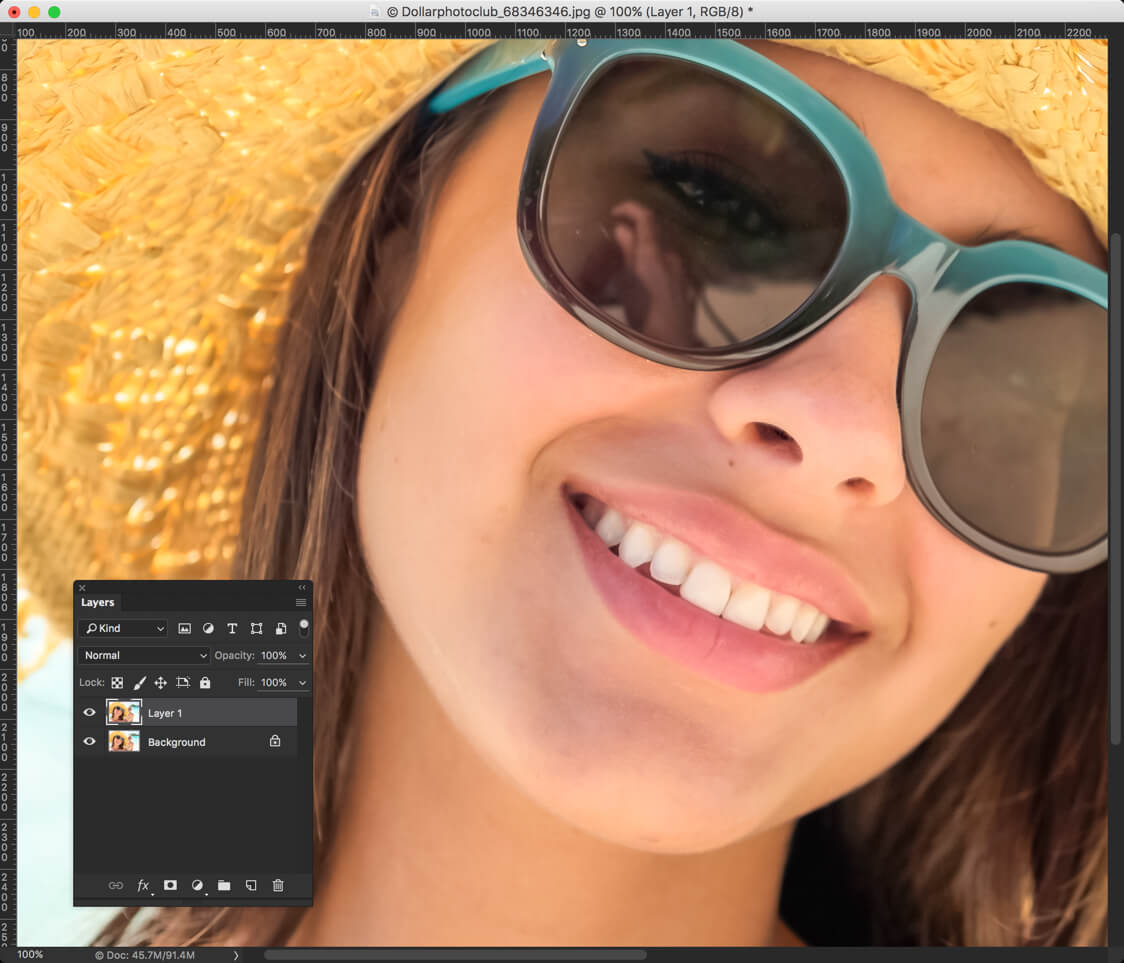
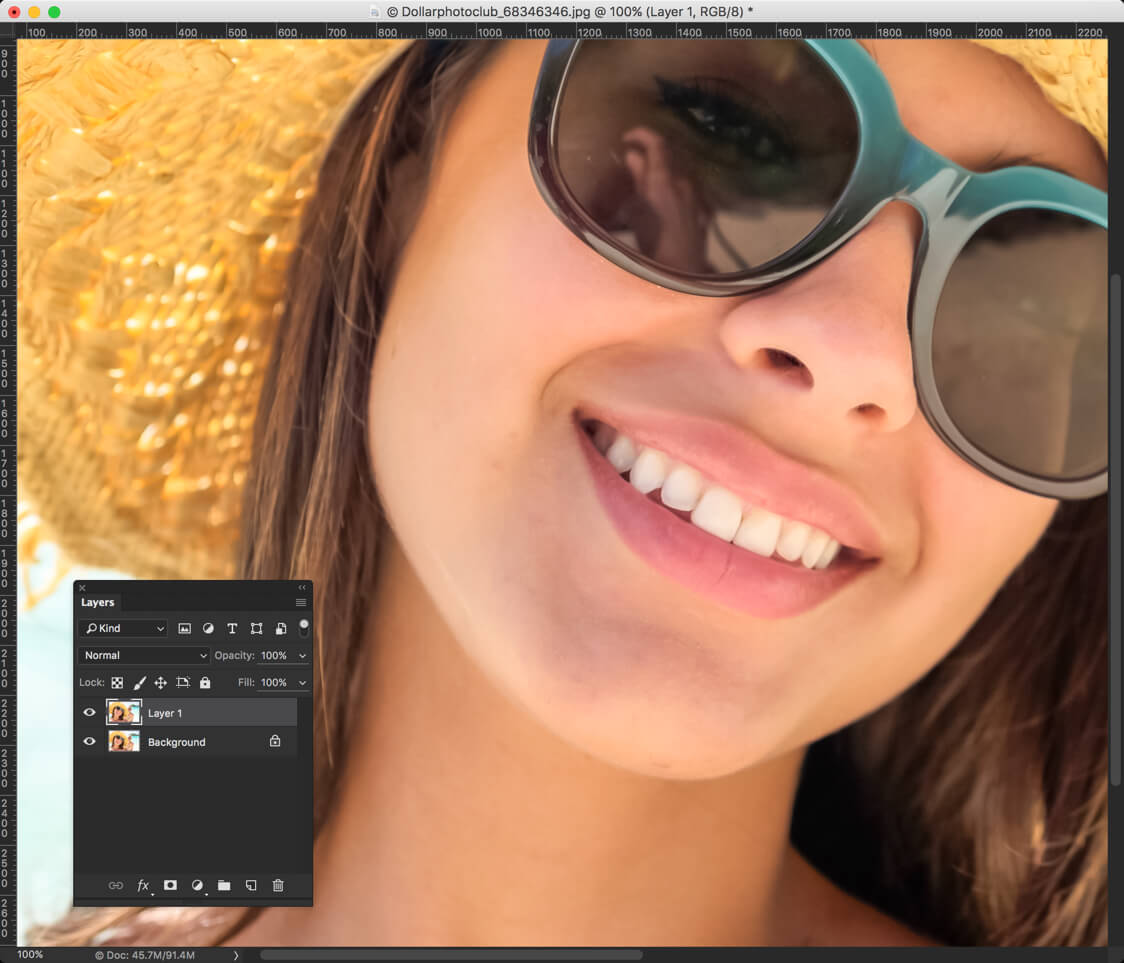
Before I go further, let me show you the final image. Note that I could have easily taken the whole wrinkles out but that would’ve made the image looks unnatural.
Before
After
Let’s begin with the tutorial.
What is Healing Brush Tool in Photoshop?
Healing Brush tool in Photoshop is a brush tool that creates a pattern on the brushed area either by using Photoshop’s Content Aware technology or by matching its nearby pixels.
Where is Healing Brush Tool located in Photoshop?
You can activate this tool either by grabbing it from the tool panel or pressing Shift+J again and again until it comes.
How to Use Spot Healing Brush Tool
It’s pretty much simple to use Healing Brush Tool in Photoshop.
Step 1: Activate Healing Brush Tool
As shown above, you need to activate it by either grabbing from the tool panel or press Shift+J again and again until it comes.
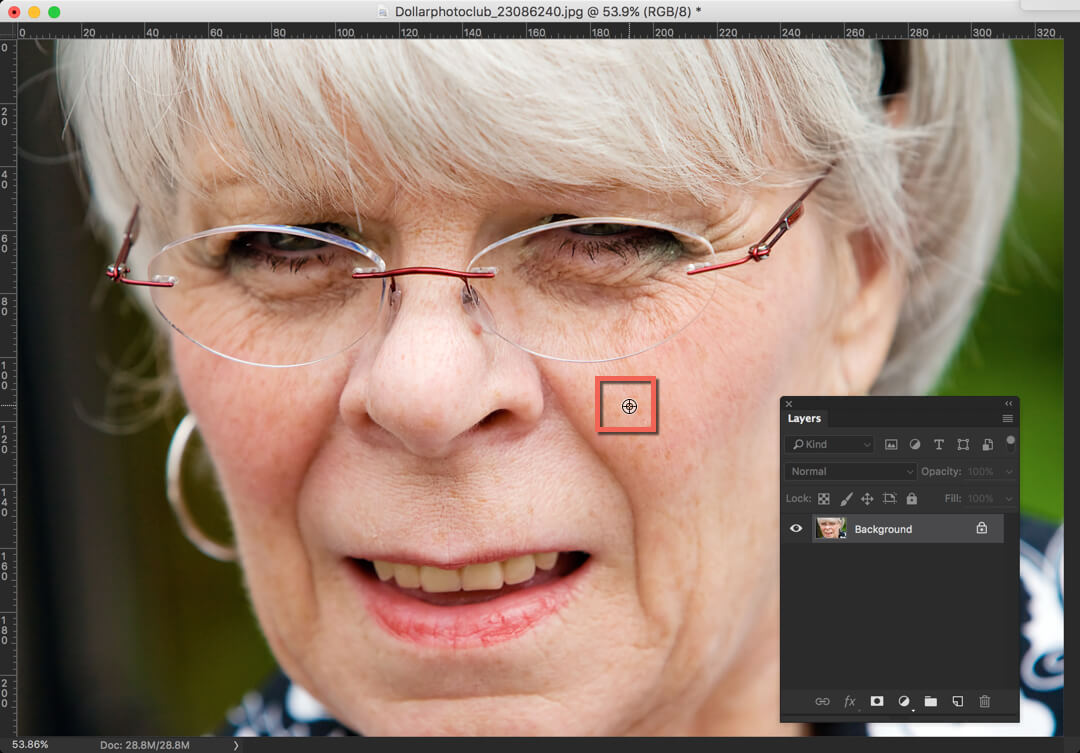
Step 2: Select Source
To use Healing Brush Tool, you need to select “Source” first. By choosing the source, you are telling Photoshop that you need this area to be used on the flaws.
In the below image, I need to use the area on which I have placed the cursor. Now, when I remove the wrinkle, Photoshop will know that it needs to take this part as a reference to remove the wrinkle.
To select source, you need to hold down Option/Alt key.
Step 3: Brush on the Flaw
Create a new layer so that you are doing non-destructive editing. Now brush on the flaw. In the below image, the blue rectangle shows our brush and yellow rectangle shows our source.
Photoshop calls the brush that is surrounded by:
Blue color as “Target”
Yellow color as “Source”
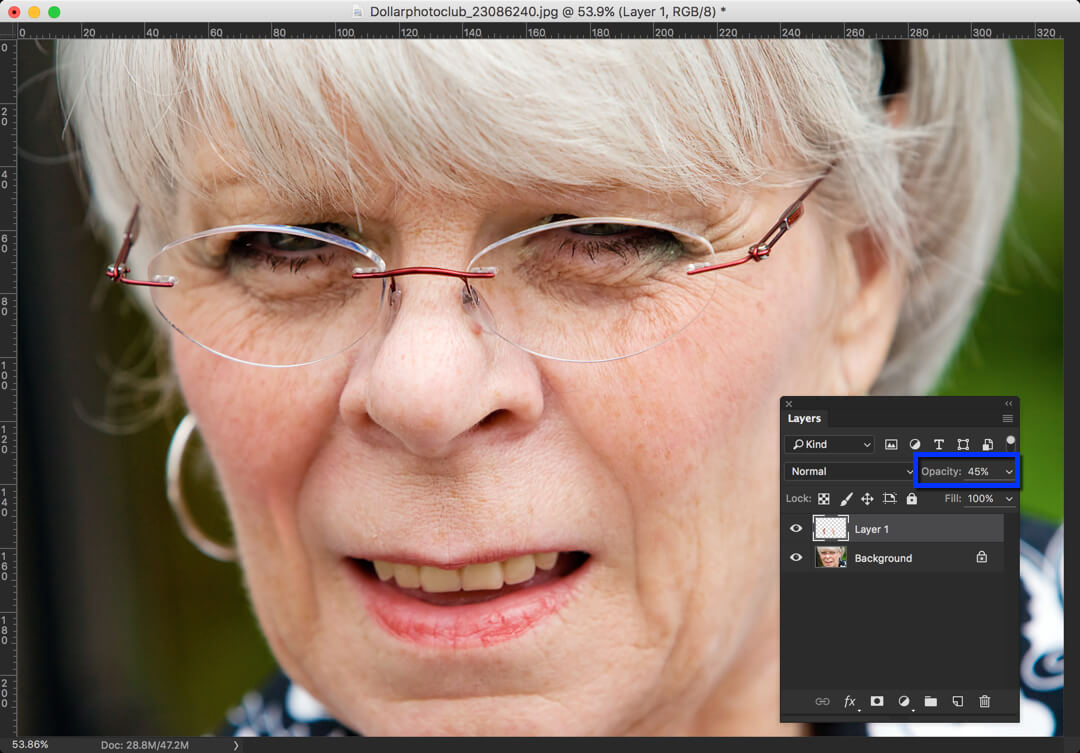
Step 4: Decrease the Opacity
Let’s decrease the opacity to 45% to keep this image looking natural.
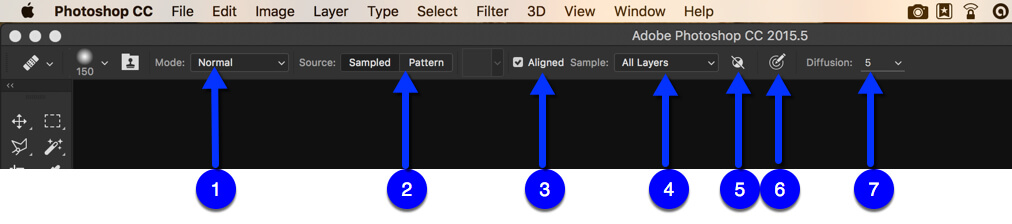
Option Bar of Healing Brush Tool in Photoshop
As soon as you activate this tool, you might have noticed that the option bar has changed. To make this tool even more effective, we can make use of this option bar.
Let’s understand each tweak one by one.
Mode: This is something that we had already discussed in details on Blend Modes. This option lets you choose blend mode of the picture.
Source: If we choose Sampled, Photoshop lets us choose the source that it can use as a reference to remove the flaw. This is what I chose the demo the above tutorial. If we choose Pattern, Photoshop will create a pattern to remove the flaw. In my opinion, it makes the image even more of flaw.
Aligned: This is what I keep turned on most of the time. What this keeps is that it keeps the Source brush and Target brush aligned. In case you are having difficulty understand this feature, simply turn it off and try to use Healing brush tool.
Sample: This lets you decide which layer to choose while taking your source as a reference. If you work non-destructively like me, it’s better to go with “All Layers”.
Ignore Adjustments: If turned on, Photoshop will ignore adjustment layers when painting on your target. Generally, brightness, contrast, vibrance, etc. are called as adjustment layers. We’ll read more about it in later tutorials.
Pressure: This is something you can use when you use pressure sensitive pads like Wacom tablets. If turned on, the harder you press, the harder your target gets brushed.
Diffusion: Diffusion slider controls how quickly the pasted region adapts to the surrounding image. As a general guideline, low slider values are good for images with grains or fine details whereas high values are good for smooth images.
Time to wrap up this tutorial. I hope that you have enjoyed it. If you have any doubt, don’t forget to ask it in the comment section below.
Please support TrickyPhotoshop by sharing this tutorial with your friends and family on Facebook, Twitter, and Google+.