Lightening skin in Lightroom takes time. You grab Adjustment Brush and then selectively lighten the skin. What if I tell you that you can brighten skin in Lightroom in just 1 minute? Wouldn’t you like it?
This method is super duper fast. But it has a tradeoff. You don’t get super duper flexibility like the Adjustment Brush.
So, let’s start. But I want to show you after and before first.
If you like watching videos then here’s the video for you.
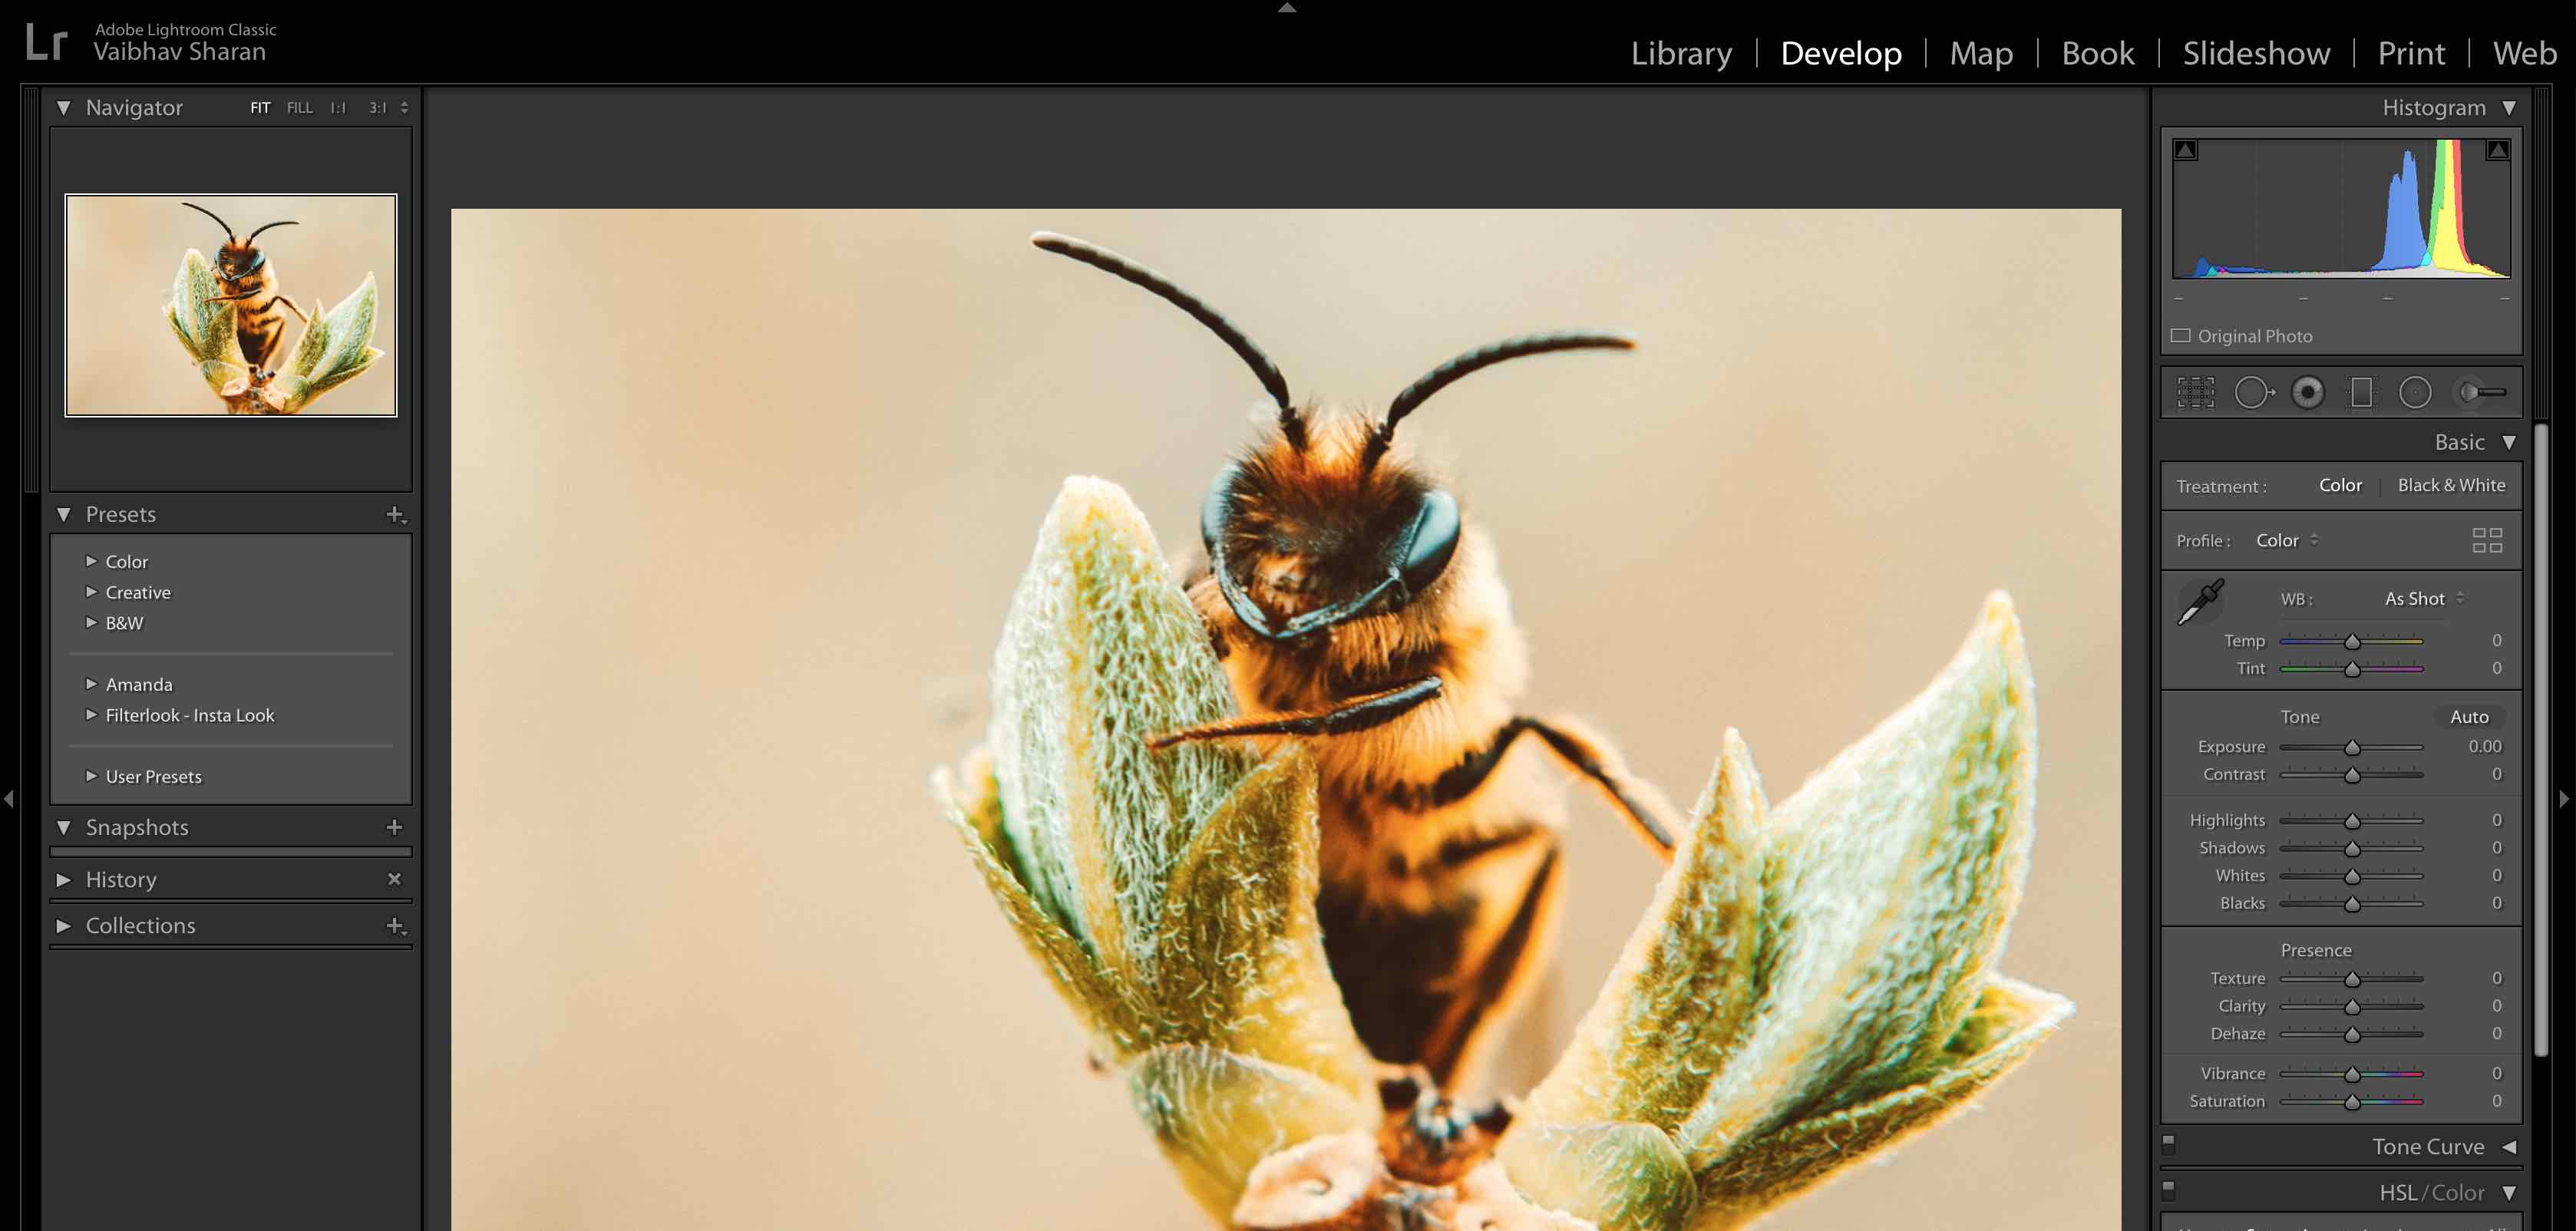
Step 1 – Find the HSL panel
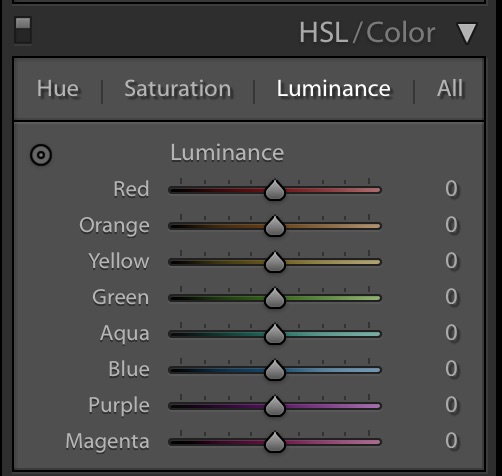
Go to the HSL panel. Click on the Luminance.
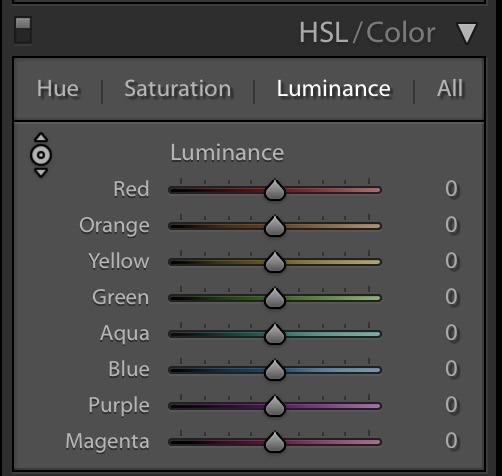
Now, click on the circular icon at the top left.
After the click, the icon will change and you’ll see two arrows. One at the top and another at the bottom.
Step 2 – Brighten the skin in Lightroom
Now, place the cursor on the skin. Drag the cursor upwards. This will brighten the skin in Lightroom.
In the panel, you’ll also see that the luminance value of Red, Orange, and Yellow increases because our skin is basically made up of these three colors.
This is all, guys. Didn’t it take just 1 minute?
Summary
Open the photo in Lightroom
Activate the Luminance tab in the HSL panel
Click on the circle icon at the top left
Put the cursor on the skin and drag it upwards
Correspondingly, check the value of the Red, Yellow, and Orange in the Luminance tab.
I have written tons of tutorials on Lightroom. Check that out if you want to see more Lightroom tips like this. I have also made free Lightroom presets. Download them to speed up your work.
If you like to see more tips like this on Photoshop, check out my Photoshop tips. If you want to learn Photoshop in-depth, check out my free course on 30 days to learn Photoshop.
You shot a photo and the camera captured every single pore in the skin. This is one of the cons of having a good camera. Yes, a good camera captures all the details but sometimes they also capture those details which are not required. I bring you the easiest way to soften skin in Lightroom.
What’s even better? I am also giving you the free preset that you can download to soften the skin.
Level: Easy Expected time: 5 minutes
Let’s start the tutorial. But I want to show you the before and after first.
If you want to download the preset, click here. This link
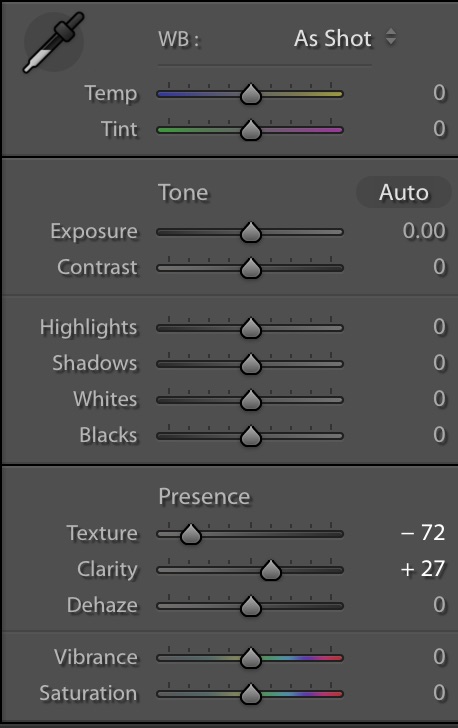
Step 1: Edit the texture and clarity to soften skin in Lightroom
Adobe added Texture in Lightroom 2019. The main purpose of this slider is to adjust the texture in the photo. One of the ways we can use this slider is to soften the skin. We’re going to do the same.
Open the photo.
Bring down the texture of -72
Increase the clarity to +27.
This is how your photo will look.
Note: You can also play with the Clarity slider here. Sometimes, increasing the Clarity improves the photo.
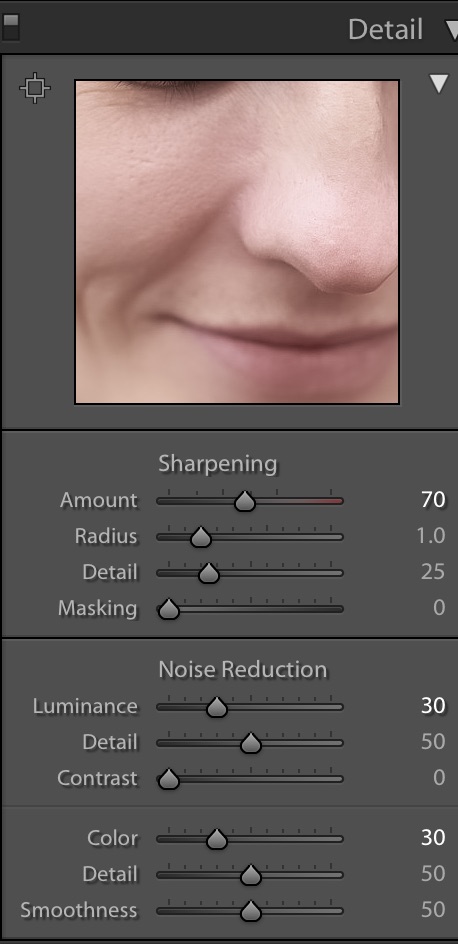
Step 2: Adjust the Details
Time to sharpen the edges like eyes, nose, lips, face cut, etc. Head over to the Details panel.
Increase the sharpening amount to +70
Increase the Luminance to +30
Increase the Color to +30
Leave other fields as they are
This will sharpen the edges.
This is how the photo is looking. Did you notice that the eyes and nose are sharper now but the skin is still softened? This is the power of the Sharpening slider.
This is all guys.
I remember that I said that you get the free preset also. Here it is.
You’ve downloaded a free Lightroom preset and ready to give your photos a new look. But you have no idea how the hell you’re going to install the Lightroom preset. This is why I bring you the tutorial on how to install Lightroom presets.
This is going to to be a short tutorial with only a few steps. Because Lightroom has made it very easy for you to install Lightroom presets.
I am going to use macOS Adobe Lightroom Classic CC for this tutorial. But, you can follow this tutorial for other versions also.
Are steps different between Lightroom for macOS and Windows?
No. Adobe has made sure that the interface and keyboard shortcuts remain the same in macOS and Windows.
I am going to install the Lightroom preset on macOS. But you can follow the same steps for Windows. Everything is the same for Windows. Good job, Adobe!
Step 1: Import the photo and go to the Develop tab
You already know how to import the photo. Now go to the Develop tab by opening the photo and then pressing D. You can also Develop module by click on the Develop by clicking on the second option in the menu.
This is how the Develop tab looks like.
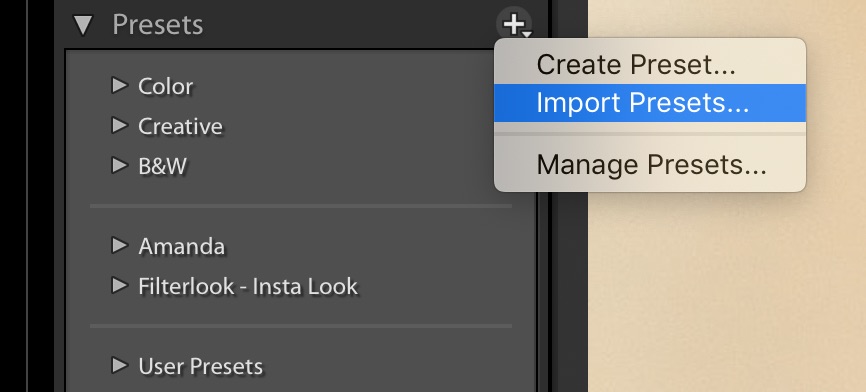
Step 2: Install the Lightroom preset
Click on the Plus icon next to the Presets. You’ll find this in the left sidebar. Click on Import Presets…
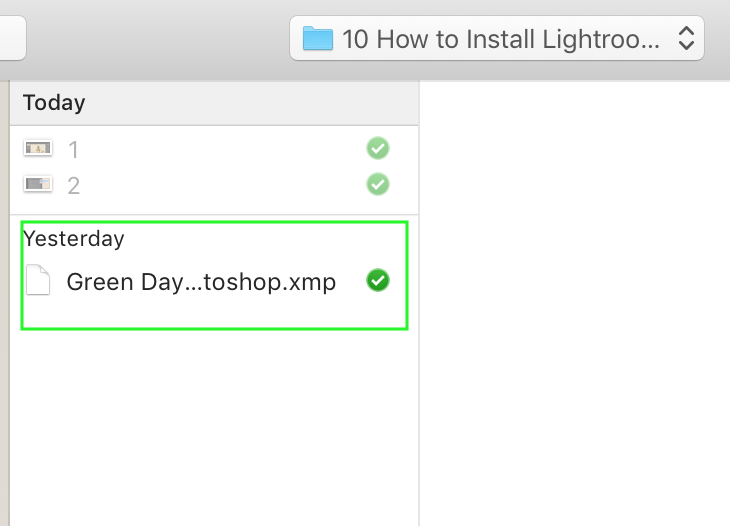
Locate the preset that you just downloaded. Click on it and press OK.
Step 3: Use the preset
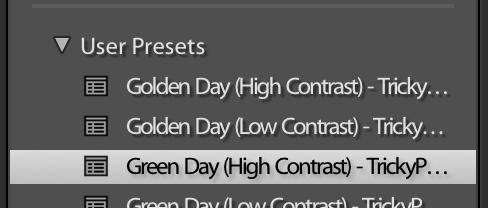
Your new preset would be added inside User Presets. There’s ba chance that a new folder would be created here for the preset.
If you look at the below screenshot, Amanda folder is created because I downloaded a preset from Amanda. But, the preset that I just imported is inside the User Presets folder.
Expand User Presets. Locate your preset. Here’s mine.
There are some apps that can create a paint effect. But the problem with those apps is that they don’t give you that much flexibility as the Lightroom does. Do you know what gives even more flexibility? Photoshop. But Photoshop is not we’re going to discuss in this tutorial. So, let’s see how can we create a paint effect in Lightroom.
Before we begin, here are the before and after photos.
After the paint effect in Lightroom
Before
Download the free preset (no email required)
If you’re interested in downloading the preset for free, here’s the link to download the Lightroom paint effect preset.
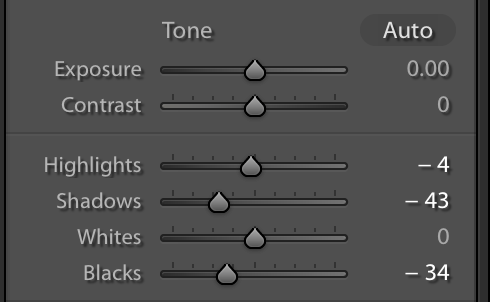
Step 1: Adjust the tone
A real painting does not have a high contrast. And, this is what we’re going to do.
Highlights: -100
Shadows: +100
Whites: +35
Blacks: +100
This is how the photo looks. Above setting work with almost all photos. If it makes your photo weird, change the values.
Step 2: Adjust the details
Before we do anything else, head straight to the Details section
Luminance: 100
Detail: 6 (this varies for every photo; the goal is to create a nice looking paint effect in Lightroom)
Color: 100
Detail: 6
This is how your photo should look.
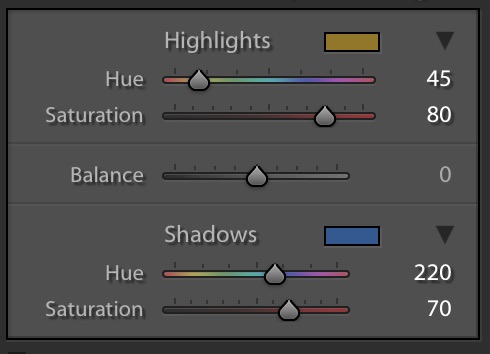
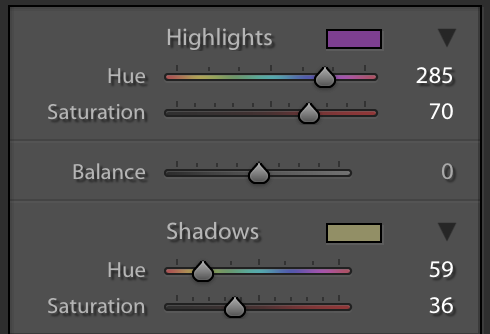
Step 3: Adjust the Split Toning
Time to give a nice color effect to the photo.
Highlights
Hue: 60
Saturation: 62
Shadows
Hue: 235
Saturation:53
Here’s how the photo looks.
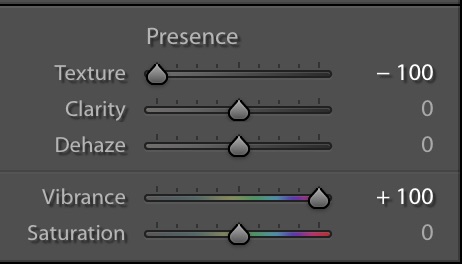
Step 4: Adjust the Presence
There’s a new slider in Lightroom CC 2019. They added the Texture slider which basically softens the photo.
Texture: -100
Vibrace: +100
If you don’t have Lightroom CC 2019 or newer version then you can skip this step. Luminance had done most of the job. This slider is just an add on.
This is how the photo should look.
FREE – Download the preset to create paint effect in Lightroom
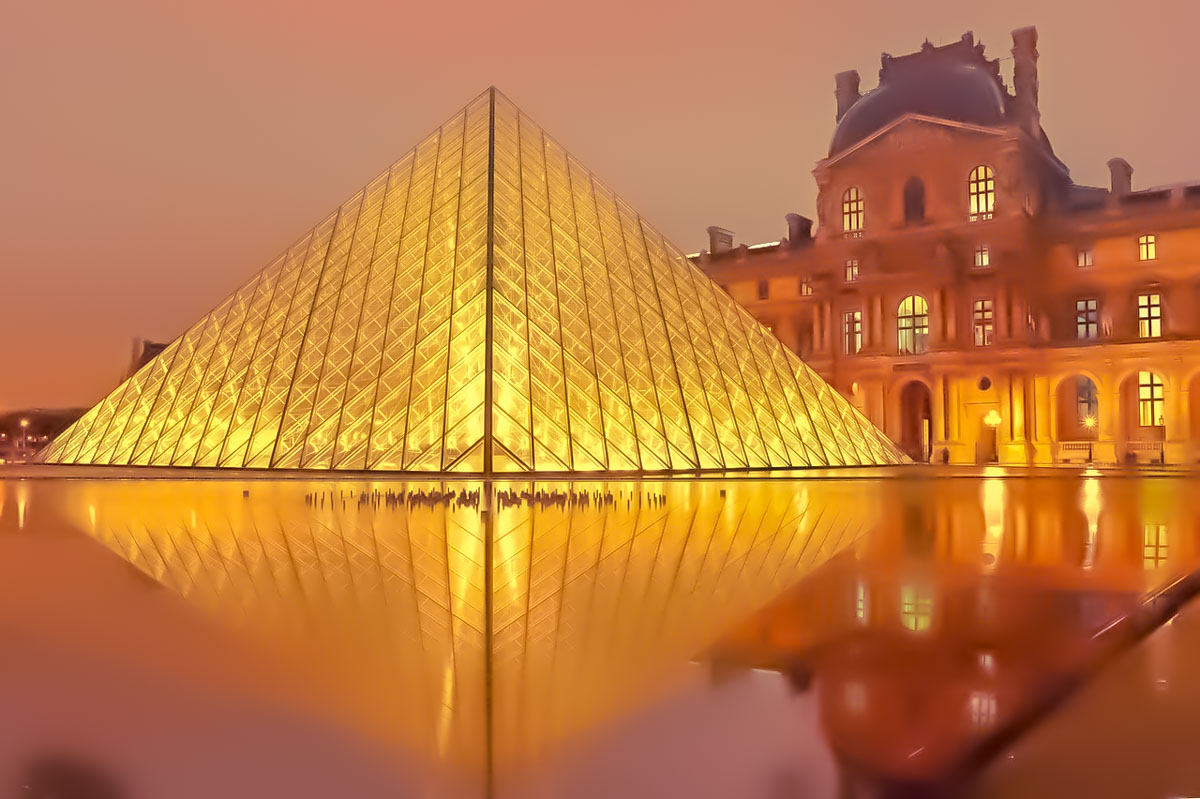
It’s difficult to capture the actual golden sunset in a photo. First of all, it’s rare to find a golden sunset. Even if you find it, your camera’s auto WB messes up everything. It reduces all the yellow tint from the photo. Even if you turn off Auto WB, the camera still doesn’t capture the actual golden sunset. But, you and I have Lightroom where we can create a sunset effect. So, I bring to you the best tutorial on creating beautiful sunset effect in Lightroom.
Let’s start with the basics. A golden sunset photo has a golden or yellowish tint. This tint basically covers the Highlight region. The shadow part is covered by a blue tint. We’re going to do the same. The main game changer is going to be the Split Toning and White Balance.
I wrote a tutorial on creating a sunset in Lightroom back in 2013 but it’s 2019 now. Who cares about 2013?
Let’s begin the tutorial. But, before we begin, I want to show you the before and after.
Before
After 1
After 2
Video
If you like watching videos, here’s the video tutorial for you.
Step 1: Create a Sunset Effect in Lightroom using Split Toning
The first thing we need to do is to change the Split Toning. Use below values.
This will give a beautiful tint to your photo.
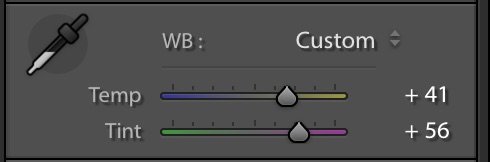
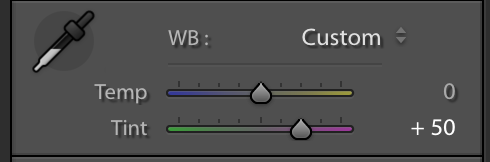
Step 2: Enhance the Sunset with White Balance in Lightroom
Now that we have the color we are looking for, time to enhance the sunset effect.
Sunsets have a yellowish magenta tint. We’re going to create the same tint.
Increase temp to 41 and tint to 56.
This will further enhance the photo and give you a natural looking sunset effect.
Step 3: Adjust the Tone
Time to change the tone. I am going to change the tone according to my image. The values of the tone sliders may be different for yours.
You don’t need to copy my values if you understand what you’re trying to achieve. Your goal is to reduce the highlights by a small fraction and shadow by a big fraction. This is because the photo is not properly exposed during a sunset. You don’t want the shadowy region to be properly exposed.
I am going to use these values because they suit my image. These may or may not suit yours.
Here’s the image.
Bonus Step
I also have split toning values for a purple sunset.
This article is submitted by Terence Murray. He is a journalist and an editor from London. He loves to meet new people and talks with them about literature, photography and jazz music. Join him on Facebook and Google+.
One question that comes from our readers what is the best photo editing software to choose between Photoshop and Lightroom. To the beginner, it’s hard to choose between these two Adobe products.
Noel Anderson, The Senior UI Designer of Essay on timesaid,
If you are a UI designer, you would love to pick Adobe Photoshop. It’s a powerful design tool to create the UI of a website, mobile app, and desktop app.
By using Photoshop, the UI designer can design any custom graphics for websites that include logos, patterns or custom background images.
The creators of Photoshop then created a new app for the photographer to edit photos called Lightroom. Though both of the applications are related to photo editing, there are some factors on which they can be different. It’s becoming a burning question what form you should learn and use? In this article, I am going to show you the main differences between Adobe Photoshop and Adobe Lightroom.
The Main Differences between Photoshop and Lightroom
Adobe always tries to improve user experiences. To provide excellent opportunities to edit photos, they created Photoshop and Lightroom one after another. Both of their photo editing apps offer the users to edit and manipulate photos. Still, there are some differences between these applications.
Price: You can use Adobe Creative Cloud to get both of the software buying the subscription. The cost is as low as $10 a month.
Keep Historical Changes: If there are no layers created in Photoshop, you can not go back to the previous settings as Photoshop cannot keep historical changes. On the other hand, using Lightroom, you can go back to your last settings and restore it.
Advanced Retouching: Both Photoshop and Lightroom can do retouching using the retouching tools. But, for advanced retouching, you’ll love to pick Photoshop as there are some great options to patch and remove the blemish.
Compositing Multiple Images: If you want to combine multiple images and their elements into a single one, Photoshop is the best option. You can mix, manipulate and save the composition in Photoshop whereas using Lightroom it’s difficult.
Display Image Metadata: Lightroom can display the image metadata to make an overlay to the image where Photoshop cannot display image metadata. You cannot show image metadata when an image is opened.
Batch Process Multiple Images: Lightroom is way better than Photoshop when it comes to batch process multiple images. Though you can batch process with Photoshop using Actions, the presets and the smooth workflows of Lightroom is more straightforward than Photoshop.
Layer Management: In Photoshop, you can use layer managementto add effects and modifications. On the other hand, there is no layer management option in Lightroom. You can store multiple layers within a master file and modify or enhance the layers separately.
In The End, Both Programs Are Great Depending On Your Needs
Based on the differences and features of both Adobe programs, we can say that both apps are great photo editing tools. It’s a draw between both apps as you can use it for different purposes. If you want to use photo editing software to edit or tweak your images only, then Lightroom can be your best choice. But, if you’re going to do more with photo editing software, Photoshop is the best choice for having extra options that boost your task.
One of the hottest queries that keep beginners awake is regarding the software that should be used to edit photos professionally. While the free options have Picasa and iPhoto among other commercial software like Pixelmator, the most popular ones are the Adobe Photoshop and Lightroom. They have a lot in common but they still possess a few unique features sufficient to boost “What’s the actual difference between Adobe Photoshop and Lightroom?” query.
Today, I am going to share few of the differences between Adobe Photoshop and Lightroom. So, let’s begin.
1: File Handling Varies
The first case where the Lightroom differs from the Adobe Photoshop is the way it handles the file fed to it. It neither edits your photos nor can be used to transfer them between multiple locations. The changes you make in a photo via Lightroom gets stored in a separate file named “Catalogue”. This means that while you are altering or modifying any pic, Lightroom will record this sequence of alterations into the Catalogue. It leaves the original file intact.
Photoshop on the other hand has no Catalogue and does edits on the same image. The original image is altered without any scope of re-modifying it from the initial state again. There is a way called as “non-destructive” editing where you get to preserve your image.
2: Workflow
Lightroom offers end-to-end workflow solutions to the photographers stepping newly into this profession. From importing pictures from your storage to organising, editing, sharing and finally printing them, Lightroom takes care of almost everything that you expect from it. It even has virtual folders to track the images being edited and organised.
Photoshop, however, fails to transfer files and doesn’t even organize them into slide shows or photo books. It’s editing is still better and powerful than the Lightroom. Photoshop Bridge is something which is can be engaged to import and organize photos in Photoshop (if urgently required). The workflow is not as streamlined as in Lightroom, but Photoshop is undoubtedly a great deal to compromise with a few points.
3: Variety in the Tools
Lightroom’s quickly editing feature helped it gain a major popularity over Photoshop. It was specifically designed for editing hundreds of pictures in one-go. Lightroom basically has all the tools from Photoshop bundled together in an easy to handle package.
From adding Adjustment Layer to the Blend Mode and Dodge Layer, Photoshop truly has made real editing possible. Lightroom however has a few features less than the Advanced Photoshop program. Photoshop also supports adding 3D support and text to your pictures. This is why it is ideal for every editing situation. Lightroom is a collection of only those editing tools which shutterbugs or professionals utilize the most.
Wrapping Up
So this was all about the difference between Adobe Photoshop and Adobe Lightroom. Thanks to the Adobe’s Creative Cloud Option under which you can own these two at $10 monthly subscription.
Both the programs have a lot to offer. The choice depends upon the type of modifications you want to implement to your snaps. If you too are familiar with these two programs, do share your feedback with us. There might be more differences which we need to spread. I hope you guys enjoyed this. Share this piece with as many as you can. We’ll be back with more such articles. Till then, good luck and stay tuned.