Do you know that you can merge layers in Photoshop and use all kinds of filter and go back to any point in time? Yes, you can. You can merge all layers in Photoshop without flattening your image.
You can do this with Cmd + Alt + Shift + E. But, hold on. There’s one trick. There’s one step that you need to do before using this shortcut. This keyboard will not give the correct result if you don’t do that step.
Video
If you like watching videos then here’s the video for you.
Merge Layers in Photoshop with Flattening
What’s wrong in this step?
There’s nothing wrong. It’s just that you lose the original image. So, if you want to go back in time and decrease the brightness that you increased then you can’t. Because that brightness adjustment layer is no more present.
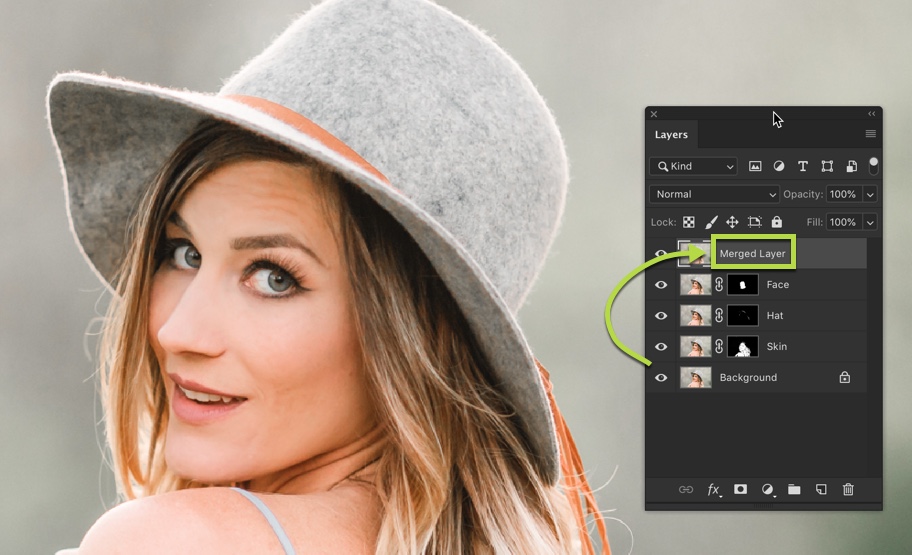
See the below image. You have four layers in the left photo. You made some changes in the face, hat, and skin and now you want to use Camera RAW in the final version of the photo. Camera RAW applies only to one layer so you need to have a layer which is a superimpose of all layers.
The only way to do that is to make a layer which is a superimposed layer of all layers. If we go with the traditional method that all the layers merge together. The problem here is that you lost all the layers and let’s say you want to undo the changes you made in the hat. Now, you can’t.
If you still want to merge all layers together by flattening them then you can go to Layer > Flatten Image.
According to me, the only positive side of merging all layers together is that your PSD will be smaller in size.
Merge Layers in Photoshop without Flattening
So, here’s the trick to merge all the layers together without flattening your image.
Open the layer panel by going to Window > Layer or by pressing F7.
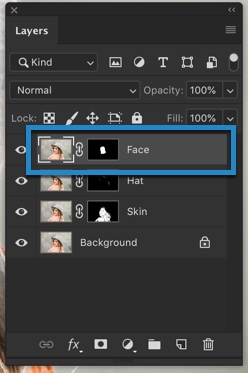
Click on the topmost layer. This was the step I talked about in the second paragraph of this tip.
Now, press Cmd + Shift + Opt + E / Ctrl + Shift + Alt + E. There you go. Now you have the merged layer at the top of the layer.
Why clicking on the topmost layer is important?
Photoshop will only merge the layers that are present below the clicked layer. So, if you select the 2nd layer from the top and use the keyboard shortcut then Photoshop will merge then 2nd layer and layers below it. It will not merge the 1st layer.
If you select the 3rd layer from the top and use the keyboard shortcut then Photoshop will merge then 3rd layer and layers below it. It will not merge the 1st and 2nd layer.
Do you know that just by tweaking a little in JPEG save options in Photoshop and we can save more than 10 GB of hard drive space? We can also increase the site loading speed by as much as 45% using this option.
I would like to clarify some facts before I go ahead. One of them is whether JPG and JPEG are different.
JPG vs. JPEG
There is no difference between JPEG and JPG. It’s funny that many people think they are different. I also explained this in one of my old post on JPG vs. JPEG.
They both are same and developed by Joint Photographic Experts Group. The only reason behind its two names is an old version of Microsoft’s Window. The old version of Window takes only three characters for any format. As JPEG has four characters, the group shortened its name to JPG so that the format can also be accessible by Window’s users.
Most of the users nowadays use Window. This is why you’ll see JPG more often than JPEG. With the advancement in technology, Window now supports extensions with four character and hence you can now view JPEG on your PC.
JPG Fun Facts
JPEG stands for Joint Photographic Experts Group.
It’s a format to store digital images which supports a maximum size of 65,535 x 65,535 pixels.
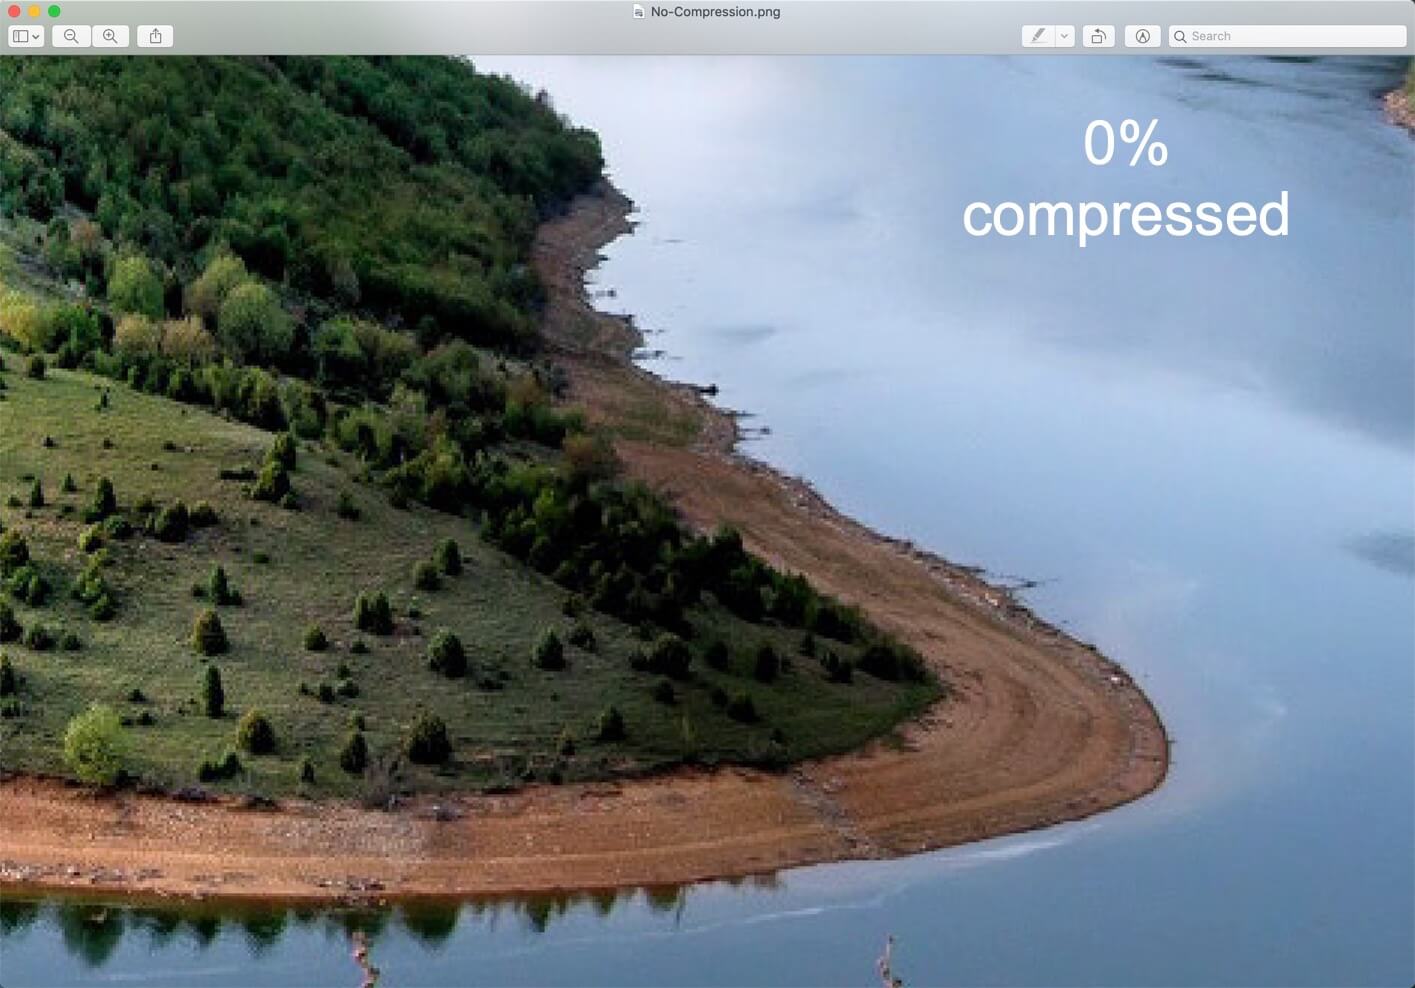
It compresses file size by selectively discarding data. Check the below images.
It supports only 8-bit images. If you save a 16-bit image to this format, Photoshop automatically lowers the bit depth.
It doesn’t preserve transparency.
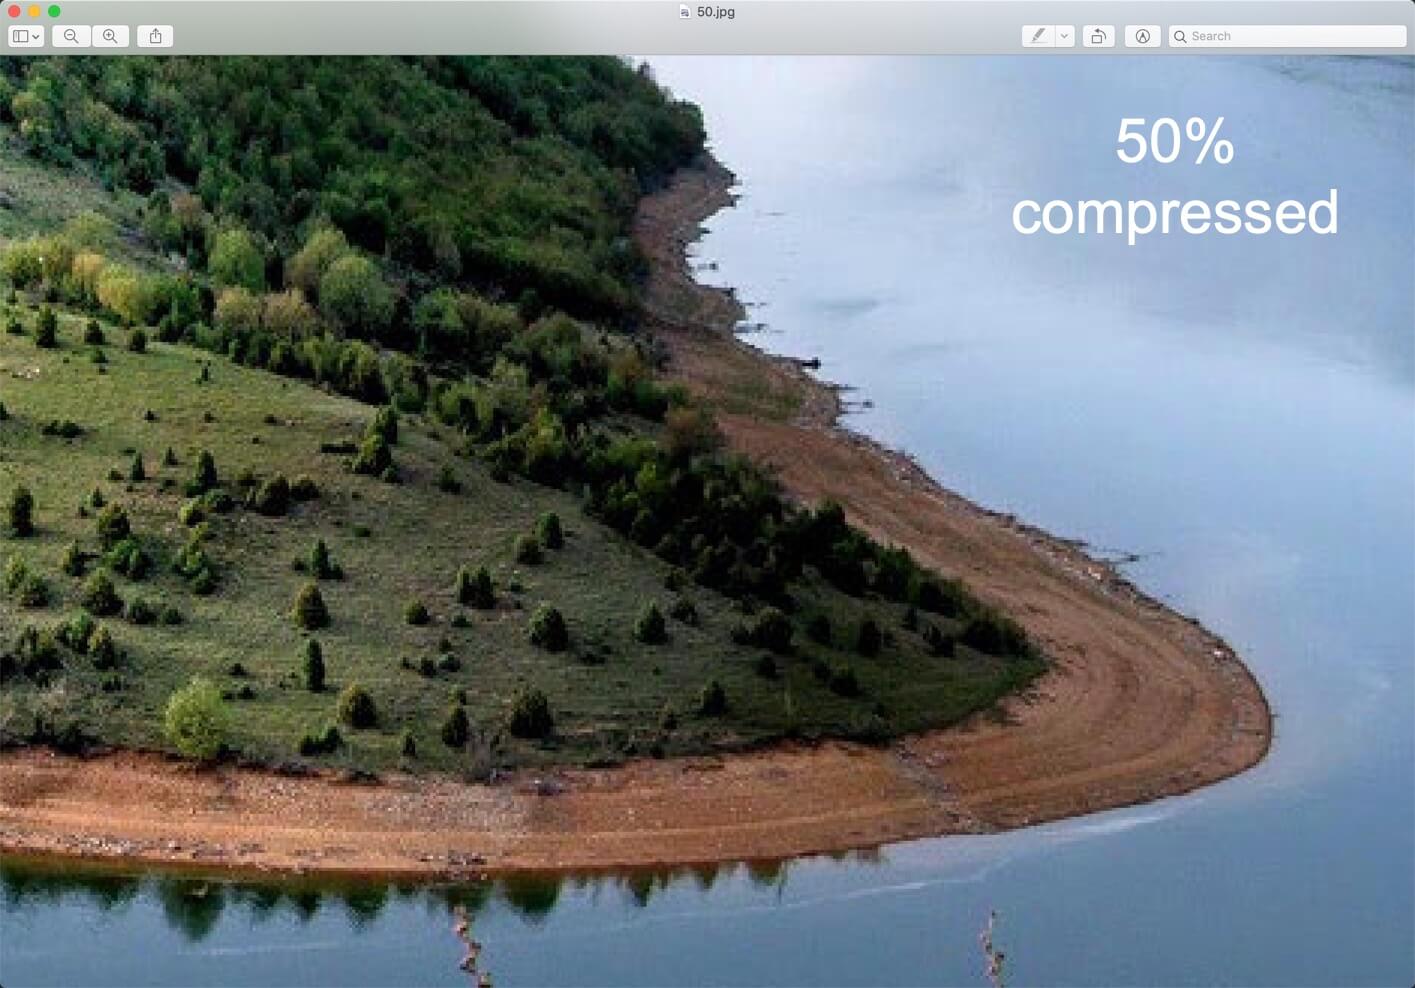
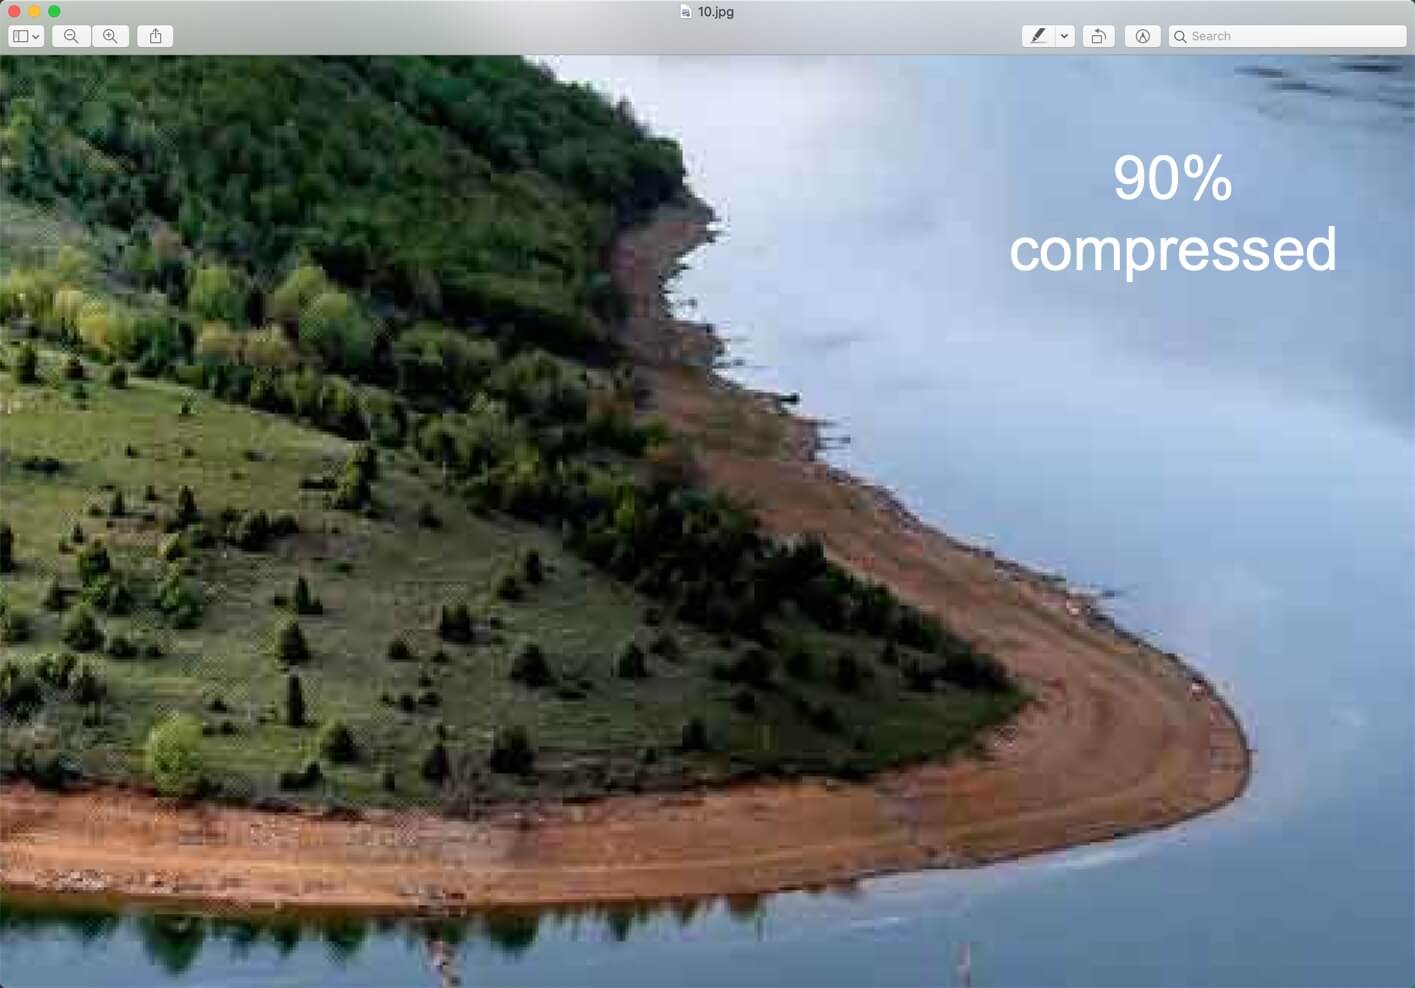
Below is an example for you. You can see a huge loss in details between the first photo and the third photo. This photo is 90% compressed.
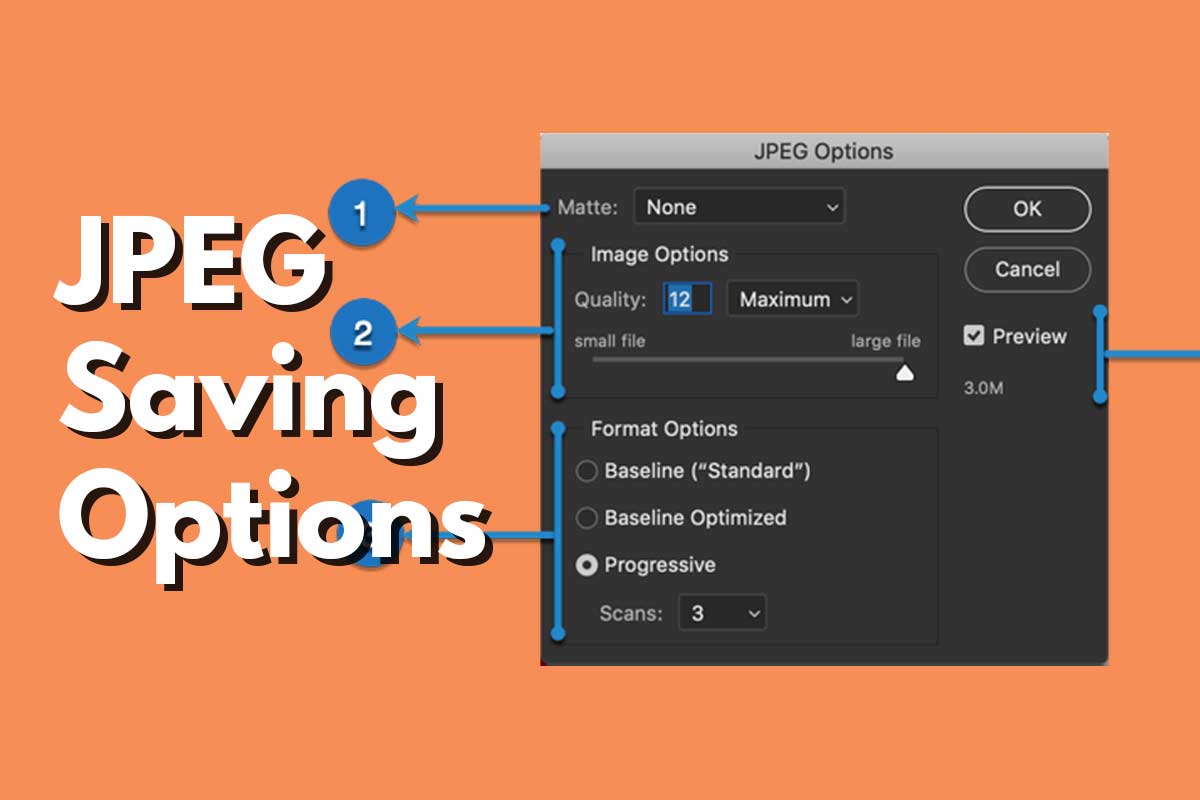
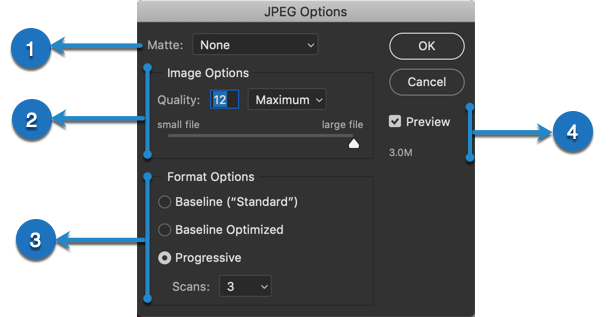
JPEG Save Options in Photoshop
1: Matte
The JPEG format does not support transparency means if there’s any part in the image which does not have any pixels then JPG won’t support that. Some common examples are like a photo with no background, logo, etc.
When you save an image as a JPG file, transparent pixels are filled with the matte color.
To simulate the effect of background transparency, you can match the matte color to the web page background color. If your image contains transparency and you do not know the web page background color, or if the background is a pattern, you should use a format that supports transparency (GIF, PNG‑8, or PNG‑24).
2: Image Options
This thing does wonder. It lets you compress the photo which reduces its size.
If you’re saving a photo for your website then you don’t want that photo to be 5 MB. You’d rather want it to be in the range of 50 – 150 KB. This field does that. But this field does it at the cost of the quality of the photo.
Quality box and slider work together. You can either right any value in the range of 0 and 12 and the slider will adjust accordingly.
Here’s the dropdown also work synchronously. If you drag the slider then the dropdown value will set automatically.
3: Format Options
Specifies the format of your JPEG file. Adobe says that
Baseline (“Standard”) uses a format recognized by most web browsers.
Baseline Optimized creates a file with optimized color and a slightly smaller file size.
Progressive displays a series of increasingly detailed versions of the image (you specify how many) as it downloads. Not all web browsers support optimized and Progressive JPEG images.
4: Preview
Ticking the “Preview” lets you preview the photo with the selection options. You can see how the photo would look before saving it. I always keep it ticked.
Just below that Photoshop tells the approx. size of the photo after saving. It won’t matter much if you’re saving your personal photographs but will a lot if you’re saving photos for your website.
You don’t want the web photos to be in MBs but rather in the range of 50 – 150 KBs. Heavy photos will take more time to load and increasing the website loading time. Google says that 1 sec. increase in load time reduces the pageviews by 20%. So, if you get 100 page views and your website loading speed is 3 secs. You will get around 80 pageviews if your website loading speed in 4 secs.
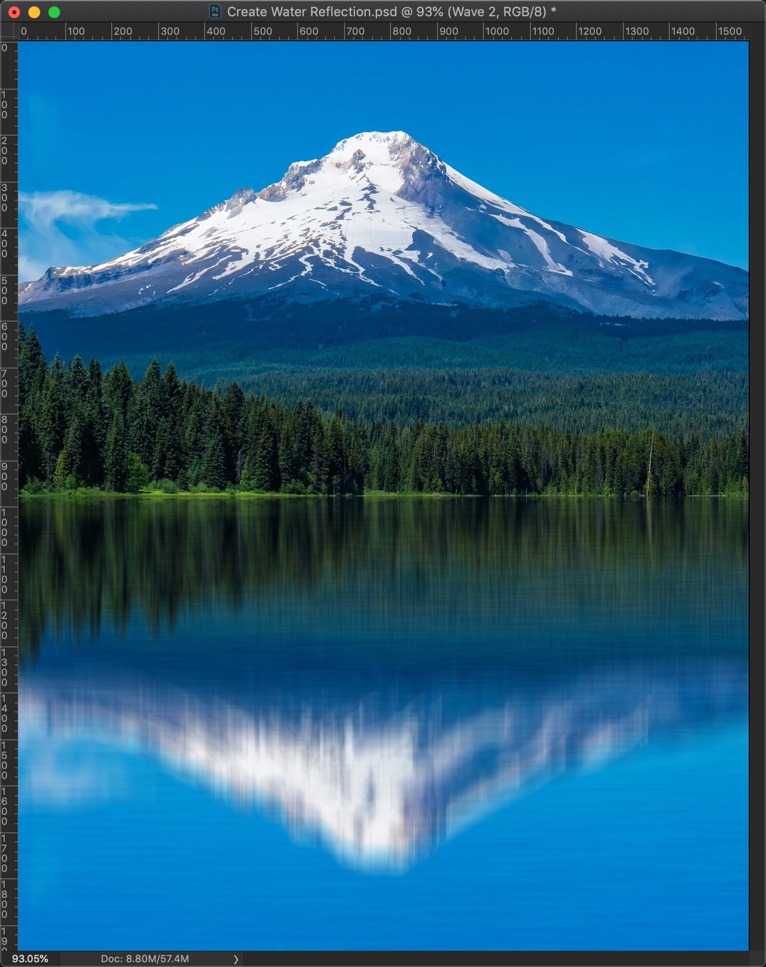
We’re going to use two filters and blend modes to create a water reflection in Photoshop. The approximate execution time is written just about this paragraph.
I shot a photo of the mountain last year and there was a beautiful lake by the mountain. The lake was not showing mountain’s reflection and there’s nothing I could do about it. So, the only option left to me was to artificially create a water reflection.
I played in Photoshop for a while and found these steps to create water reflection. I’ll show you how to create it.
Below are the before and after photos. This is not the photo that I shot. I downloaded this photo from Pexels.
Sidebar: If you want to know how to remove glare from glasses or remove reflection from glasses, check our tutorial on how to remove glare from glasses.
Video
If you like watching videos, here’s the video for you.
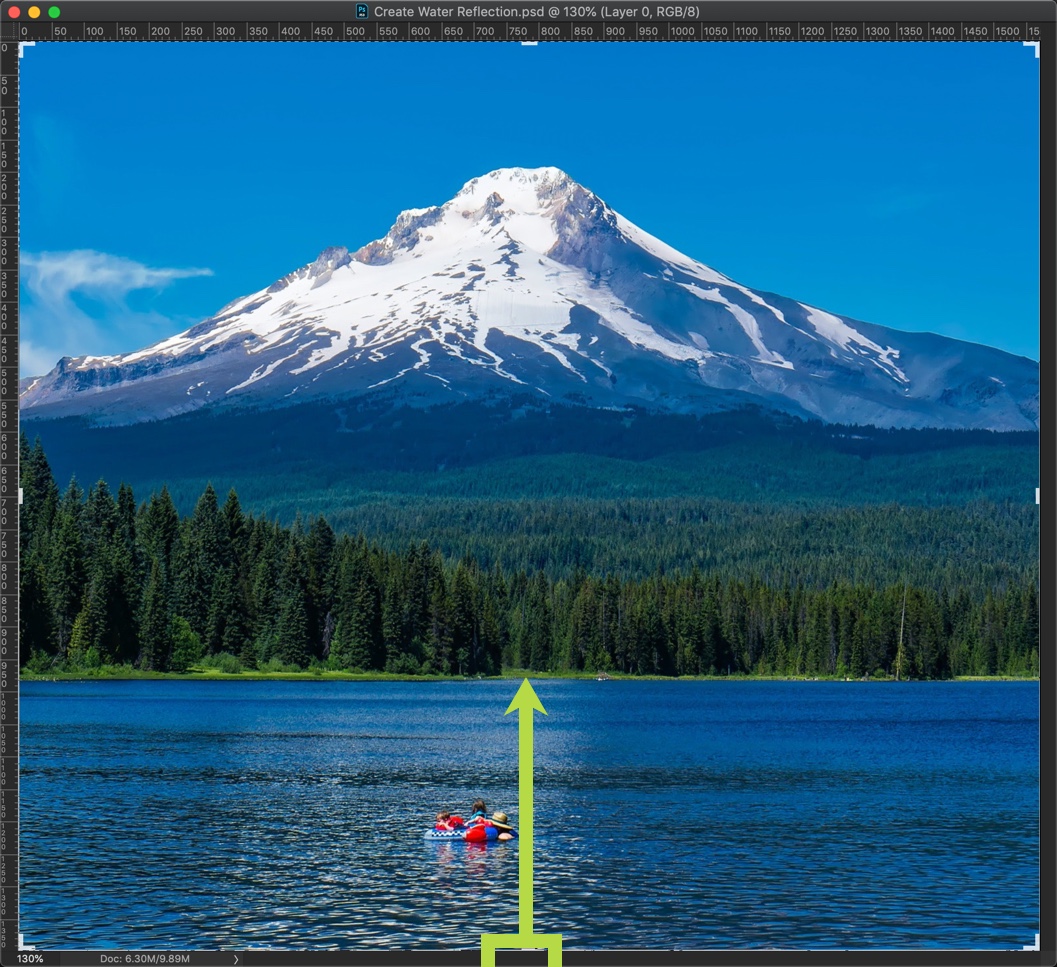
Step 1: Crop the photo
Here’s the photo. I am going to crop out the water.
Grab the Crop Tool from the tool panel or press C.
Make sure “Delete Cropped Pixels” is turned on.
Grab the handlebar ar the bottom center and drag it to the point where water is cropped out.
Here’s the photo.
Step 2: Create Water Reflection in Photoshop
Now we’re going to create a reflection.
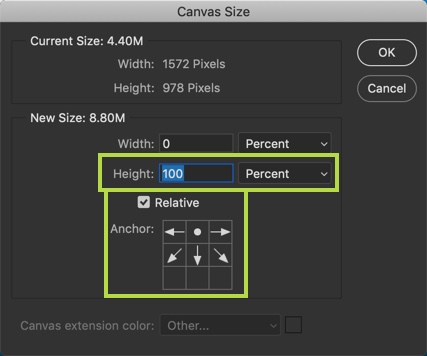
We’re going to increase the space at the bottom of the photo. Space would the same as the height of the photo.
Open the Canvas Size box by pressing Cmd + Opt + C / Ctrl + Alt + C.
Change the scale to percent and write the height as 100. In the Anchor point, click on the top middle box. This notifies Photoshop that canvas will only increase at the bottom. Press OK
And, here’s our photo.
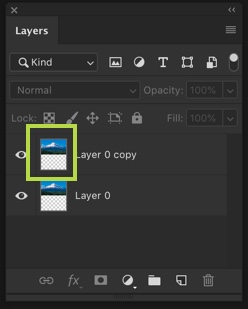
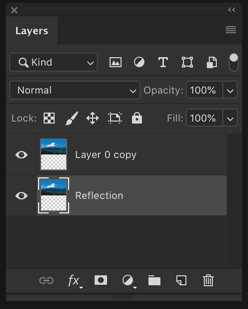
Press F7 to open the layer panel. Duplicate the layer by pressing Cmd + J / Ctrl + J.
Name the bottom layer as Reflection.
Make sure that the Reflection layer is activated.
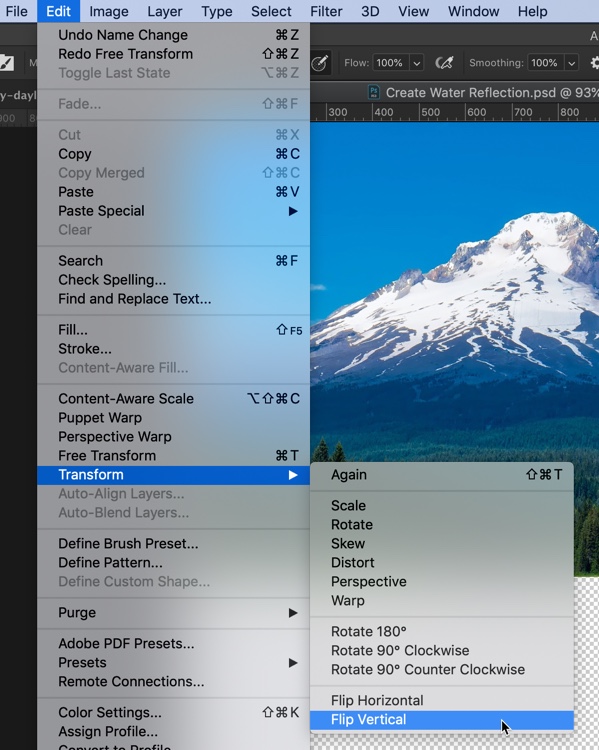
Go to Edit > Transform > Flip Vertical.
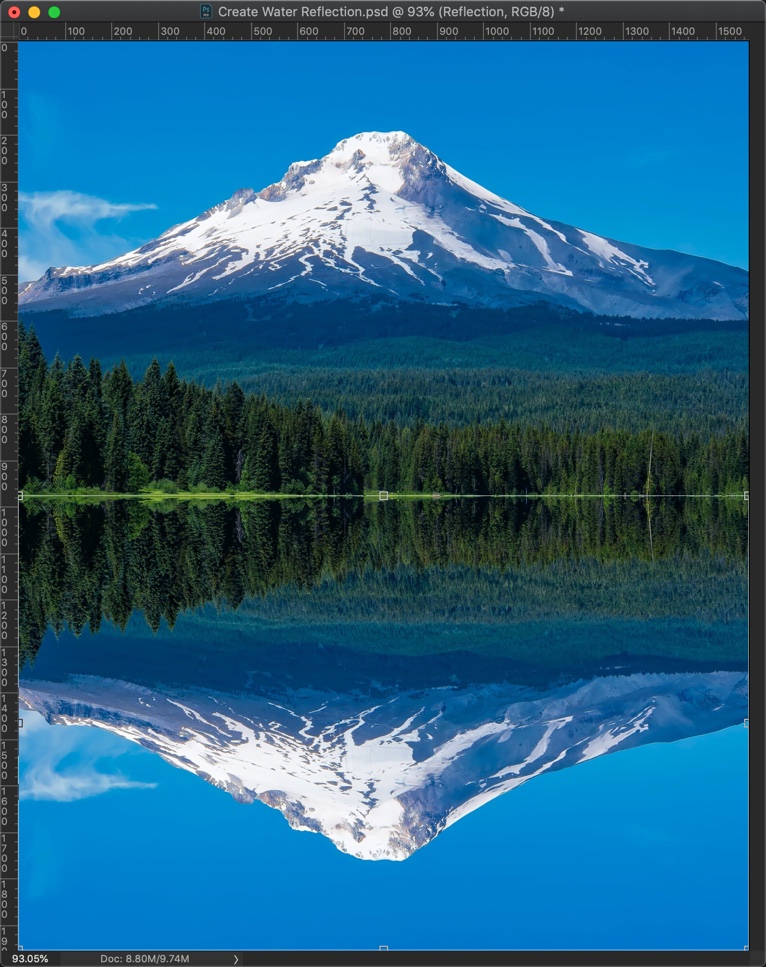
Activate Free Transform Tool by pressing Cmd + T / Ctrl + T. Now drag the photo from the top to the bottom.
Here’s a GIF for you.
Step 3: Time to give it add some effects
Duplicate the Reflection layer by pressing Cmd + J / Ctrl + J. I am naming this layer Reflection 2.
Make sure that the Reflection 2 layer is activated.
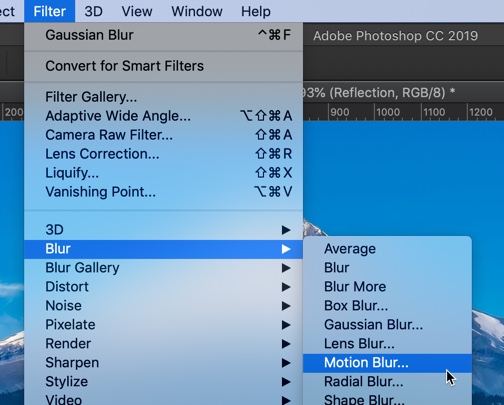
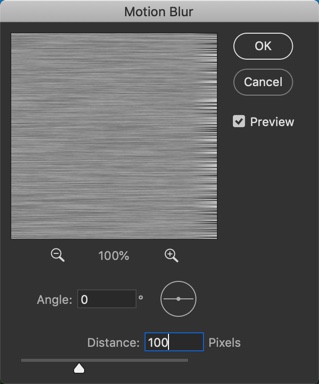
Go to Filter > Blur > Motion Blur.
Change the angle to 90 degrees and increase the distance which gives a nice effect. The distance depends on the size of the photo. I am choosing 75. My photo is 1956 pixels in height. Press OK.
Step 4: Create Waves
Time to create some waves.
Create a new layer above the Relfection 2 layer by pressing Cmd + Shift + N / Ctrl + Shift + N.
Make the background color white.
Fill the Wave layer with the background color by pressing Cmd + Delete / Ctrl + Backspace.
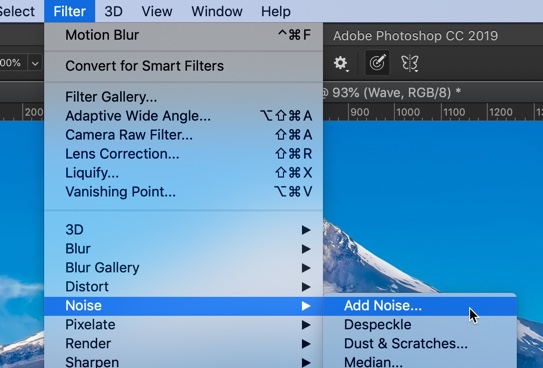
Go to Filter > Noise > Add Noise.
Increase the amount to 400%. Change the distribution to Gaussian and turn on Monochromatic. Press Ok
Time to give it a wave effect.
Go to Filter > Blur > Motion Blur.
Change the angle to 0 this time. Increase the Distance to such an amount that noise starts looking like waves.
Here’s what the photo would look.
Step 5: Giving the Final Touch
Zoom out the photo a lot by pressing Cmd + (-)/ Ctrl + (-).
Go to Edit > Transform > Perspective.
Drag the bottom left handlebar towards the left. Later, drag the top left handlebar towards the right. Make sure that the middle handlebar is exactly at the center.
Here’s a GIF for you.
Duplicate the Wave layer by pressing Cmd + J / Ctrl + J. Name it Wave 2. Invert the layer by pressing Cmd + I. Change the blend mode to Overlay and reduce the opacity to 20%.
This wouldn’t give any change in appearance to your photo.
Activate your Wave layer. Change the blend mode to Soft Light and reduce the opacity to 20%.
We all are familiar with the JPG (or JPEG) as it is the most common image file format that we all know about. Also, there are so many reasons why this format is the most used one. JPG conversion gives you the ease of making your image file size smaller without disrupting its quality. Thus, the majority of people change their image formats to JPG, to keep their disk space well-managed. Today, we’re going to see how can we convert other images format to JPG.
Now there are different ways in which you can alter the image formats. However, a lot of people are not aware of them all. Thus, we have summed up 3 best way to convert images in JPG format whenever you want to.
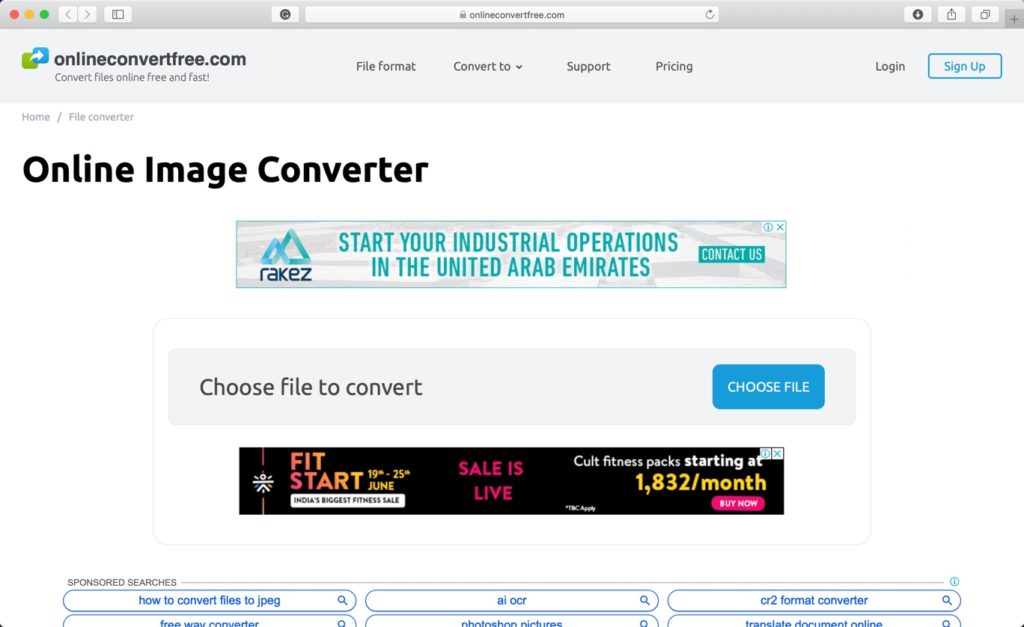
1. Use a Free Online Web Service: Online Convert Free
Online Convert Free is a free online file converter which allows you to convert your images into JPEG or any other format that you want. Whether your image is in GIF or PSD or PNG; you can easily convert it into JPEG through this amazing online file converter. It is very easy to use and extremely fast in converting the file format as well. Within no time, you can sit back and see your image being converted into JPEG.
Also, if you want to change the JPG version into PSD or PNG or BMP format; you can do that too. Either way, this online file converter is an incredible tool that works for you rapidly. With simply no effort to put in; you drag the file to the website and let it convert your file into your desired format.
2. Use Paint in Windows
We all know about Paint, don’t we? For the 90’s kids, this has been a massive time pass activity. However, it can be used to convert the image format too. Open Paint and open the image that you want to convert it, in it. Once opened, click FILE, and you will see an arrow beside the option “Save As.” Click on that arrow, and you will see that a range of different image formats will be offered to you. Click on JPEG or any other format that you want and save the file!
3. Download a Software; Movavi Video Converter
If you often require altering your image format, then you can download a software too. Movavi Video Converter is not just confined to changing video types; it can also change your image format easily. It is available for both Windows and IOS, and you can download it through the internet easily. Also, the best part about Movavi is that it is completely free of cost, whereas the majority of online converter software are now paid. Thus, if you want a permanent software downloaded in your PC, then you can rely on this one.
Final Verdict
Well, these are the 3, easiest and simplest ways to convert images into your desired format. We recommend using Online Convert Free as it is free of cost and is very quick. Using Paint is old fashioned and does require time. Once you use the web-based online free converter, you will realise that they are way swift than the old trends. Do try it out and you are going to love. Movavi is also a little time taking but is a good option for someone who loves software or wants to download one, for their “on the go” purposes.
I know that you don’t like dark circles and you’re using all kinds of creams and home remedies to remove them. You already have reduced by a small percentage but they’re still visible. Before posting a photo. you do all kinds of things to reduce them. But, if you want to remove them completely, you’ve come to the right place. I am going to show you how to remove dark circles in Photoshop.
This is a fairly simple tutorial. I am going to use the Clone Stamp Tool to remove them. I’ll also add a bonus step where I’ll show you how to reduce them by 80% (or any other percentage).
Before we begin, I want to show you the before and after photo.
If you’re looking forward to removing the dark circles, you can also hire me. The cost will be $10 for one image and will go down as number of images increases. Mail me at hello@tricky-photoshop.com.
Video
If you like watching videos, here’s the video tutorial for you.
Step 1: Create a New Layer
We are creating a new layer. We’ll use this layer to remove the dark circles.
Go to Layer > New > Layer or press Cmd + Shift + N / Ctrl + Shift + N to create a new layer.
We’re going to name this as Removing Dark Circles.
Step 2: Use the Clone Stamp Tool to remove Dark Circles in Photoshop
We’re going to remove the dark circles using the Clone Stamp Tool.
Grab the Clone Stamp Tool from the tool panel or press S.
In the option panel, change the blend mode to lighten and turn off the Align.
Lighten blend mode compares each pixel of the current layer and the layer below it, and shows the pixels that are brighter. You’ll understand later in this tutorial.
Clone Stamp Tool is used to copy pixels from one part of the image and paste them on another part. To use the Clone Stamp Tool, you first need to define the source pixels. This will be pixels are going to be copied. You can do them by holding down the Opt / Alt key.
Select the cheek as the source pixels.
Right click on the photo. Set the hardness to 0.
Now brush on the dark circles. See the below GIF.
Here’s the photo. I know that it’s too much. We’ll make it natural.
Finding it difficult? You can also hire me. The cost will be $10 for one image and will go down as number of images increases. Mail me at hello@tricky-photoshop.com.
Step 3: Reduce the Opacity
Change the opacity to 60% in the layer panel.
Here’s how the photo will look.
Do the same thing for the other eye also.
Couldn’t do? You can also hire me. The cost will be $10 for one image and will go down as number of images increases. Mail me at hello@tricky-photoshop.com.
You found a beautiful font for your design and you want to use it in Photoshop. But, you don’t know how to use that font in Photoshop. I have been there. This is why I am writing this tutorial on how to install fonts in Photoshop for you.
I am going to show you how to install fonts in Photoshop that is powered by either macOS or Windows.
If you like watching videos, here’s the video for you.
Install fonts in Photoshop for macOS
Photoshop for macOS shows the fonts that are installed in your macOS Operating System. To use a font in Photoshop, you need to install the font in your macOS first.
Let’s see how we can install a font in macOS.
Step 1: Download the font
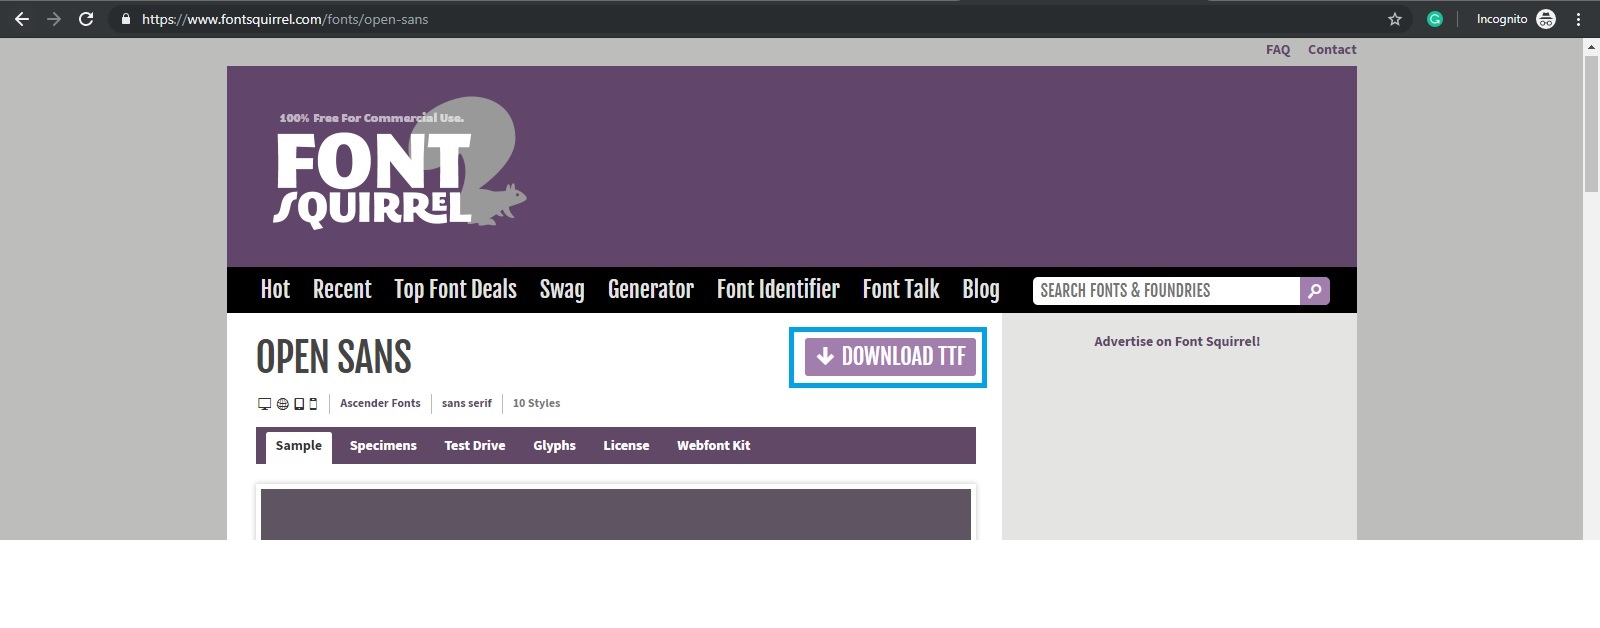
Open the site from where you can download the font. Not all sites let you download fonts for free. I am going to download Open Sans font from Font Squirrel.
Open the font and click on the Download TTF button.
Step 2: Install the font
Generally, when you download a TTF file, it gives you all versions of the font. You can install all the versions you want but I am interested in OpenSans-Regular.ttf version.
Open the font and click on Install.
That’s all. Restart Photoshop and you would see the font.
Install fonts in Photoshop for Windows
Photoshop for Windows shows the fonts that are installed in your Windows Operating System. To use a font in Photoshop, you need to install the font in your Windows first.
Let’s see how we can install a font in Windows.
Step 1: Download the font
Open the site from where you can download the font. Not all sites let you download fonts for free. I am going to download Open Sans font from Font Squirrel.
Open the font and click on the Download TTF button.
Step 2: Install the font
Generally, when you download a TTF file, it gives you all versions of the font. You can install all the versions you want but I am interested in OpenSans-Regular.ttf version.
Open the font and click on Install.
That’s all. Restart Photoshop and you would see the font.
I know how bad it feels when you have a nice photo but it’s not big enough to print or post. I had so many photos that I wanted to enlarge badly but I didn’t know how to. Finally, I am glad that I finally found how to enlarge photos in Photoshop and I am going to share this knowledge with you.
Enlarging photo reduces its quality. Yes, it’s the truth and you cannot do anything here. The thing we will focus on is to enlarging a photo and keeping as much quality as we can.
Let’s start the tutorial.
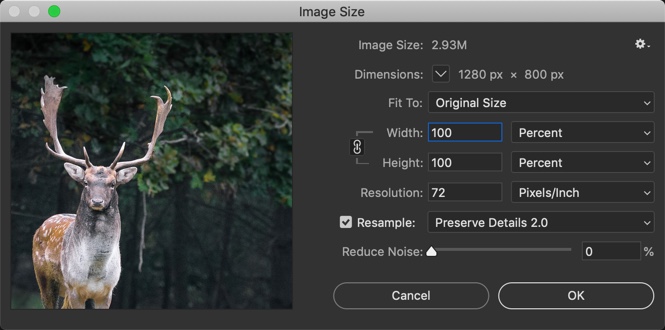
I am going to enlarge this photo in Photoshop. I downloaded it from Pixabay. I wrote a tutorial back in 2012 but it’s 2019 now and who cares about 2012.
Its size is 1280 by 800 pixels.
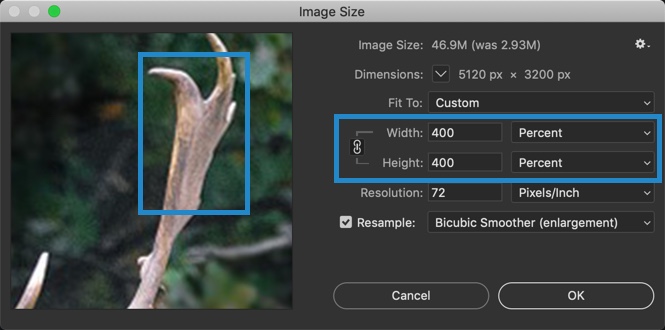
Step 1: Open the Image Size Box
Go to Image > Image Size or press Cmd + Opt + I / Ctrl + Alt + I.
This will open the Image Size box.
Step 2: Enlarge Photos in Photoshop
You are wondering what is resampling, right?
Resampling means you’re changing the pixel dimensions of an image. When you downsample, you’re eliminating pixels and therefore deleting information and detail from your image. When you upsample, you’re adding pixels. Photoshop adds these pixels by using interpolation.
We’re going to discuss each of the resampling methods one by one and see which one is the best.
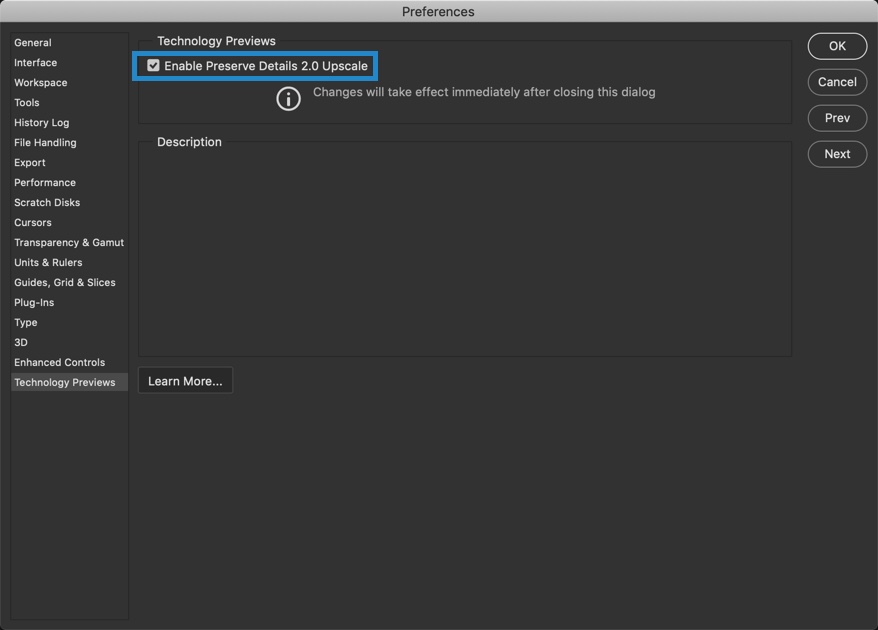
But, we need to turn on Preserve Details 2.0 in the Photoshop Preference. Preserve Details 2.0 is available only for testing purpose and not turned on by default. Go to Photoshop > Preference (macOS) or Edit > Preference (Windows).Go to Technology Preview.
Turn on the “Preserve Details 2.0.”
Now, come back to the Image Size box. Here’s a screenshot of 8 resampling methods.
Here are the 8 resampling methods that are not of much use.
Automatic
Photoshop will decide the best resampling method for your photo and enlarge it. I am not a fan of this though.
Preserve Details
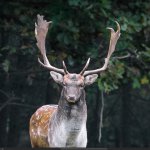
Preserve Details keeps the edges sharp when you enlarge a photo in Photoshop. Let’s see a sample. I am going to enlarge the photo by 400%. Let me show you before and after.
Preserve Details 2.0
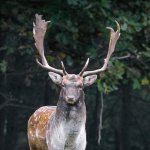
Preserve Details 2.0 uses advanced deep learning artificial intelligence to detect and maintain important image details without oversharpening anything else. In a common man’s language, it sharpens the edges when you enlarge a photo in Photoshop but it makes sure that the edges don’t get oversharpened. Let’s see a sample. I am going to enlarge the photo by 400%. Let me show you before and after.
This method creates lesser noise than the previous method and edges are even sharper.
Bicubic Smoother
Bicubic Smoother resampling method is similar to Bicubic in the way it creates new pixels. But, this method blurs pixels slightly to blend the new ones into the old ones, making the image smoother and more natural looking.
This method softens and slightly blurs the image. Also, this method does not have “Reduce Noise” slider like the previous two methods.
Bicubic Sharper
Bicubic Sharper resampling method is also similar to Bicubic in the way it creates new pixels. But, instead of blurring whole pixels to improve blending between the new and old like Bicubic Smoother, it softens only the pixels’ edges. Adobe recommends this method for downsizing images, though some Photoshop gurus claim that it also produces better enlargements than Bicubic Smoother.
Bicubic
Bicubic resampling method tells Photoshop to figure out the colors of new pixels by averaging the colors of even more pixels surrounding the new one in order to make a better guess. This method takes longer than the previous two but produces smoother transitions in areas where one color fades into another.
Nearest Neighbor
Nearest Neighbor resampling method gives you the lowest image quality. With this method, Photoshop looks at the colors of surrounding pixels and copies them. It is infamous for creating jagged edges, so you’ll want to use it only on images with hard edges like vector images.
Bilinear
Bilinear resampling method tells Photoshop to guess the color of new pixels by averaging the colors of the pixels surrounding it. It produces slightly better results than the Nearest Neighbor and is still pretty fast.
Bicubic Smoother vs. Preserve Details vs. Preserve Details 2.0
I am going to show you the enlarged images which are resampled by the three most popular resampling methods. Yes, the three most popular resampling methods are Preserve Details 2.0, Preserve Details, and Bicubic Smoother.
Bicubic Smoother softens the edges which make the images slightly blurry. Preserve details does a good job but the edges get oversharpened. Preserve Details 2.0 does the best job and the edges don’t get oversharpened.
So, Preserve Details 2.0 is the best choice as of now till Adobe launches a new and better resampling method in Photoshop.
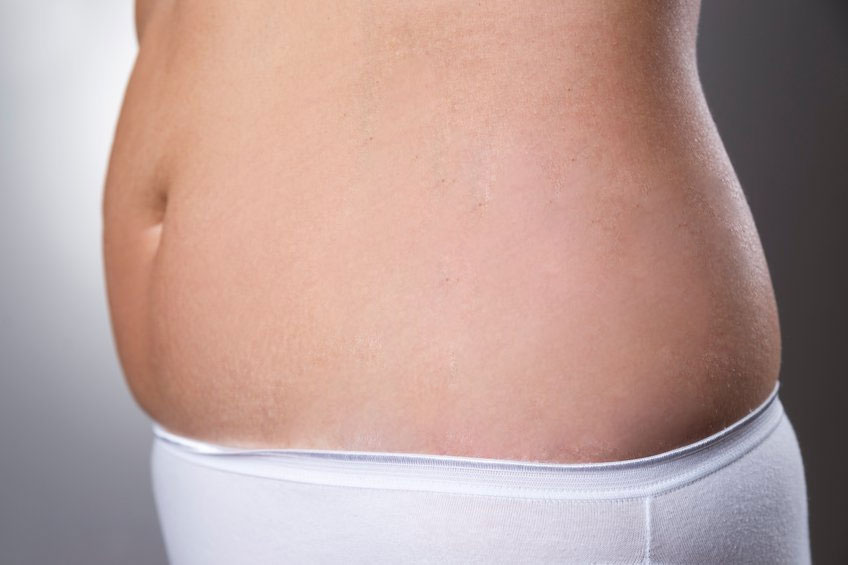
Stretch marks don’t look good. It doesn’t matter how much you’re asked to love your body and embrace your flaws like stretch marks. The reality is that you and I cannot. The stretch mark on the belly, hips, thighs, and arms don’t look good. The laser removal of stretch marks is expensive and costs around $2500 per session. So, this is why I bring you a workaround. You can remove stretch marks in Photoshop.
You just want to post a photo and realized that your belly stretch marks are showing and you badly want to post that picture. Going to a doctor and laser remove those stretch marks are not an option. The quick workaround is to remove that stretch mark.
So, let’s begin the tutorial on removing stretch marks in Photoshop.
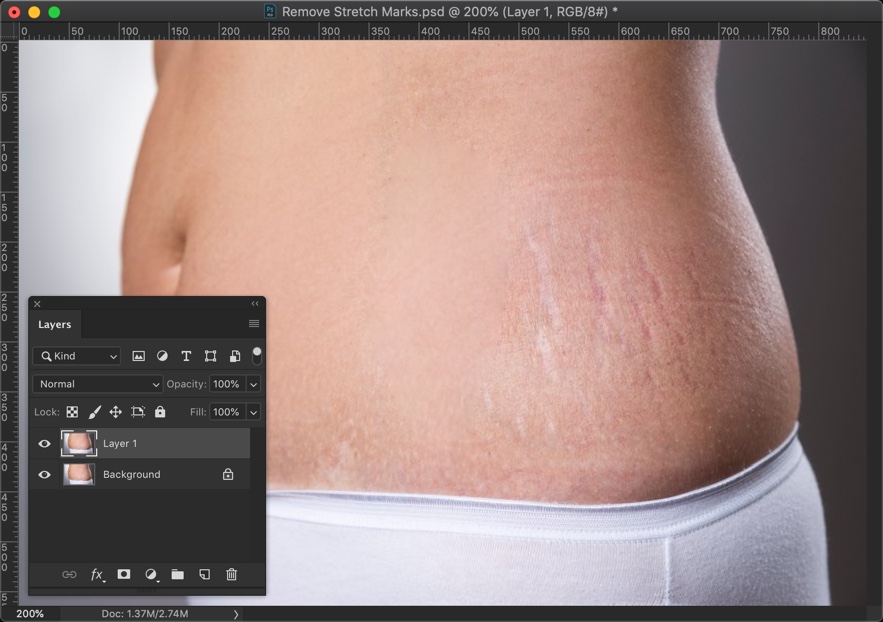
Before we begin, I want to show you the after and before image.
Final
Initial
Let’s begin the tutorial
Video
If you like watching video tutorials, here’s the video tutorial for you.
Step 1: Duplicate the layer
We’re going to remove the stretch marks with the Patch tool. There are many tools out there like Mix Brush, Healing Brush Tool, Clone Stamp Tool, etc. but I personally like the Patch Tool.
We want the editing to be non-destructive. So, we’ll duplicate the background layer and work in that layer.
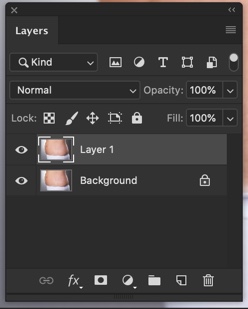
Open the Layer panel by going to Window
[vc_message message_box_color=”warning” icon_fontawesome=”fa fa-picture-o”]Just in case, if you’re feeling lazy to remove the stretch marks then you can hire me to remove that for you. The min cost is $4 per image and the max cost is $10 per image. Send me the image at hello@tricky-photoshop.com.[/vc_message]
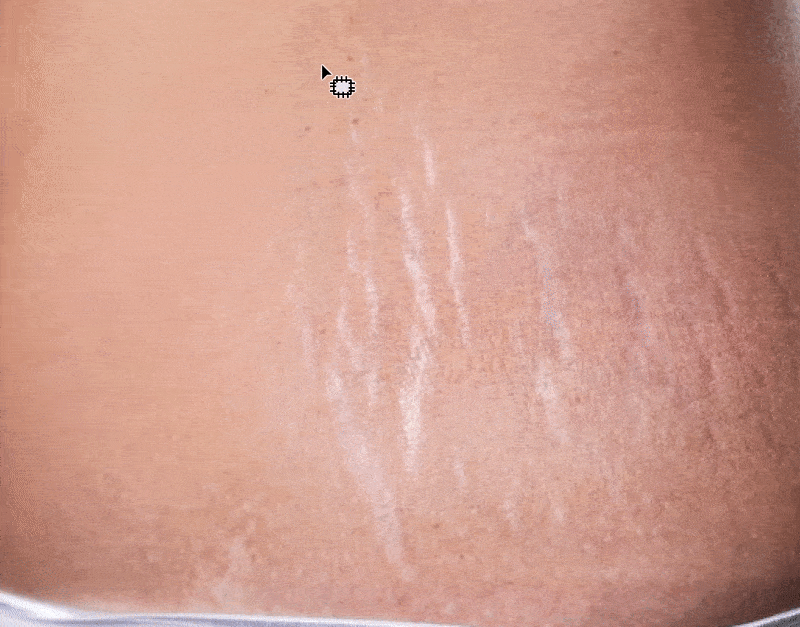
Step 2: Remove the Stretch Marks in Photoshop
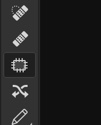
Grab the Patch tool from the tool panel or press Shift + J again and again until it comes.
Make sure that the normal is turned on in the option bar.
Roughly draw a selection across one of the stretch marks. Now, drag the selection to the area which does not have any stretch mark.
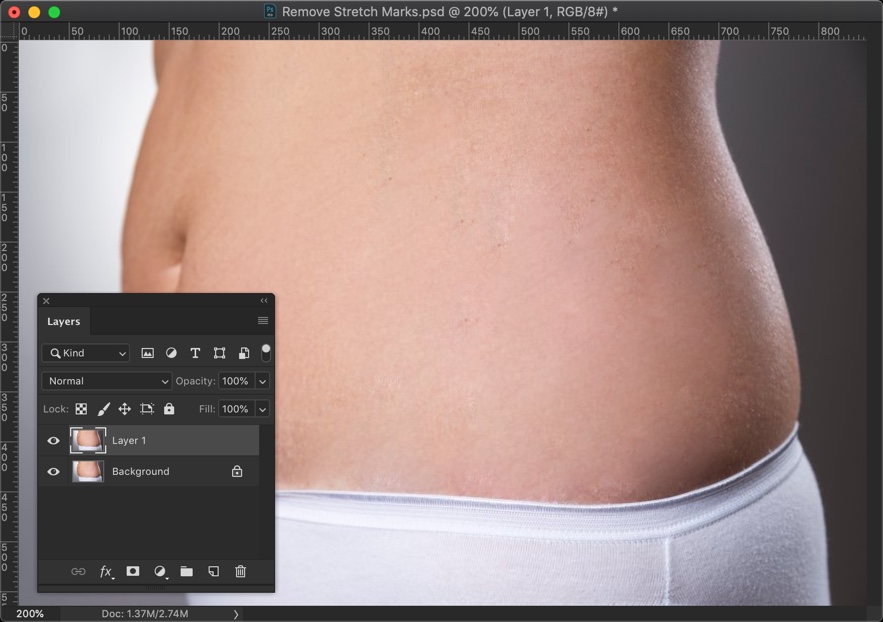
Did you see how beautifully it removed the stretch mark?
Now, do this with other stretch marks also.
Here’s my result.
[vc_message message_box_color=”warning” icon_fontawesome=”fa fa-picture-o”]If you’re feeling lazy to remove the stretch marks then you can hire me to remove that for you. The min cost is $4 per image and the max cost is $10 per image. Send me the image at hello@tricky-photoshop.com.[/vc_message]
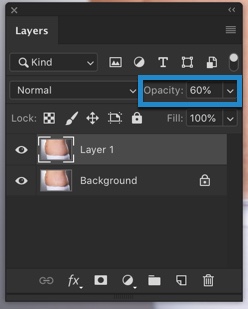
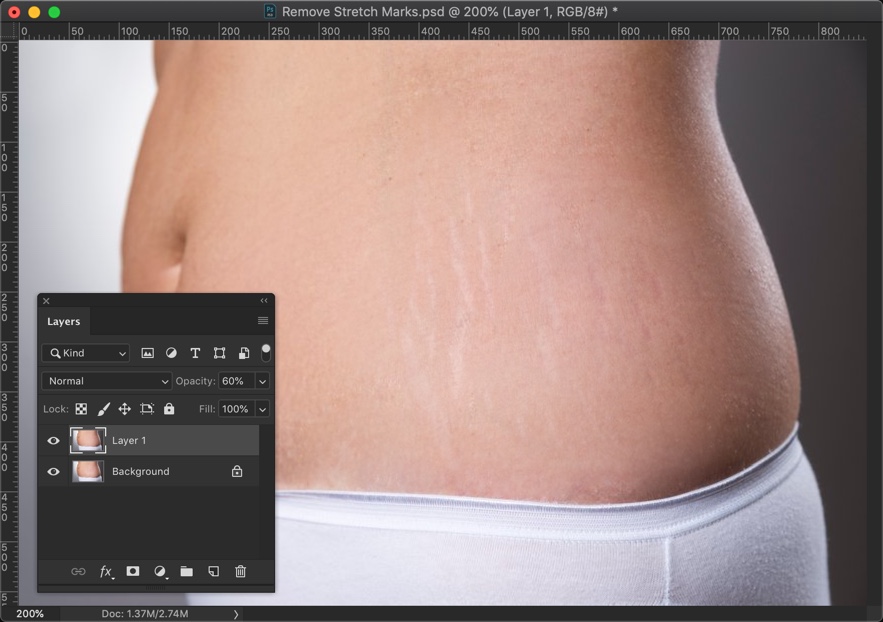
(Optional) Step 3: Make the stretch marks partially visible
If you don’t want to remove it completely then you may want to read this step.
Bring down the opacity of the duplicated layer. Decide the amount as per your requirement. I am going to choose 60%.
This will start showing the stretch marks but it will not be as visible as it was.
[vc_message message_box_color=”warning” icon_fontawesome=”fa fa-picture-o”]If you’re feeling lazy to remove the stretch marks then you can hire me to remove that for you. The min cost is $4 per image and the max cost is $10 per image. Send me the image at hello@tricky-photoshop.com.[/vc_message]
It’s difficult to capture the actual golden sunset in a photo. First of all, it’s rare to find a golden sunset. Even if you find it, your camera’s auto WB messes up everything. It reduces all the yellow tint from the photo. Even if you turn off Auto WB, the camera still doesn’t capture the actual golden sunset. But, you and I have Lightroom where we can create a sunset effect. So, I bring to you the best tutorial on creating beautiful sunset effect in Lightroom.
Let’s start with the basics. A golden sunset photo has a golden or yellowish tint. This tint basically covers the Highlight region. The shadow part is covered by a blue tint. We’re going to do the same. The main game changer is going to be the Split Toning and White Balance.
I wrote a tutorial on creating a sunset in Lightroom back in 2013 but it’s 2019 now. Who cares about 2013?
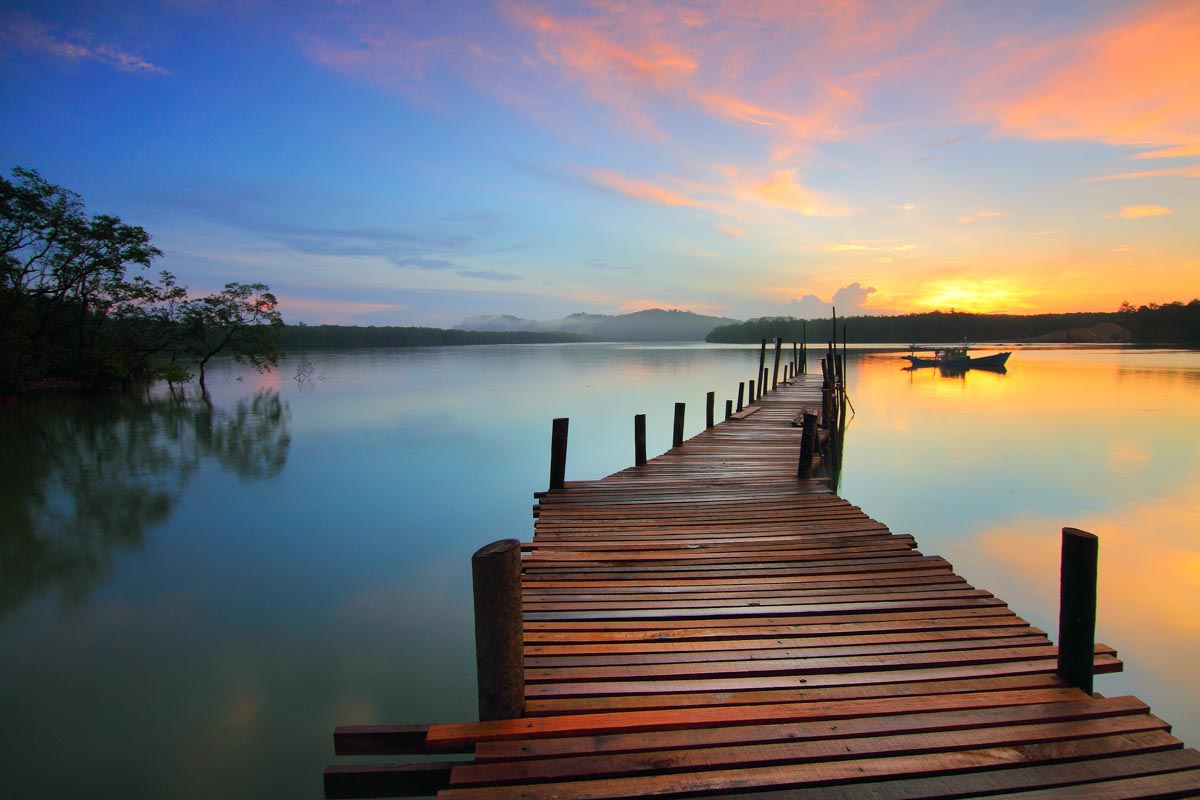
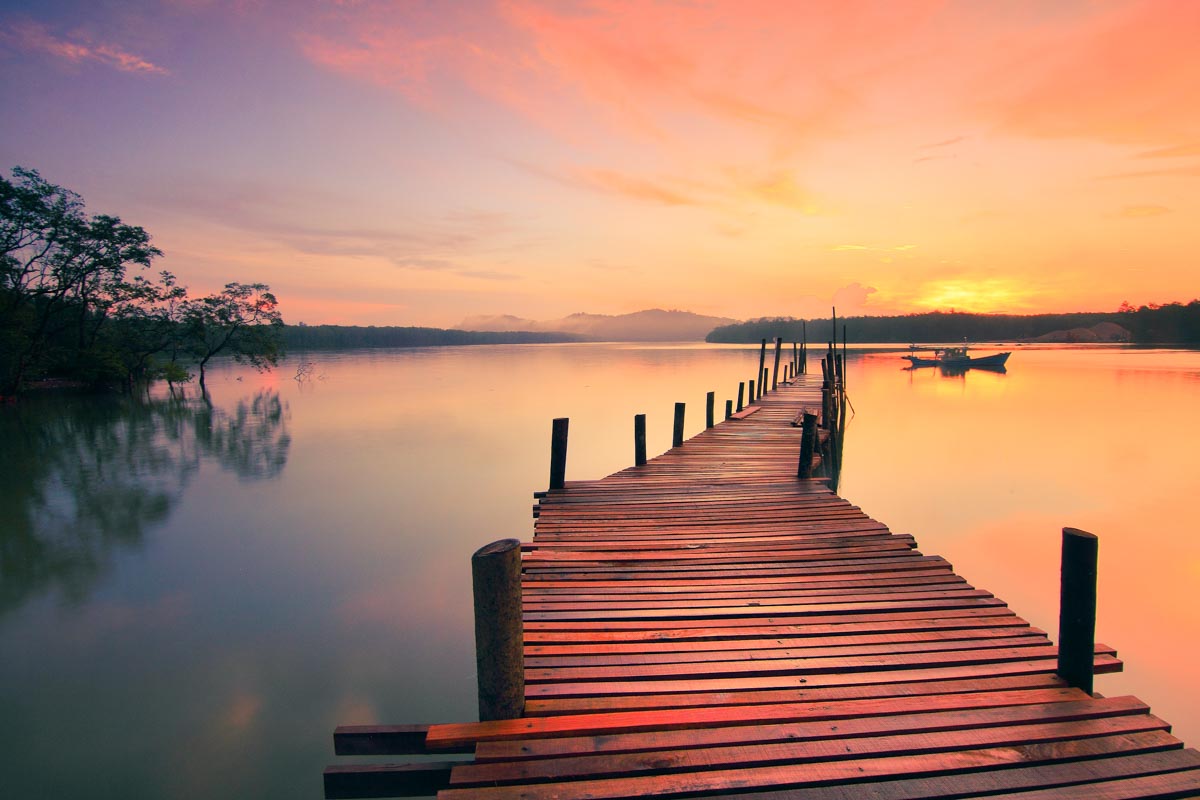
Let’s begin the tutorial. But, before we begin, I want to show you the before and after.
Before
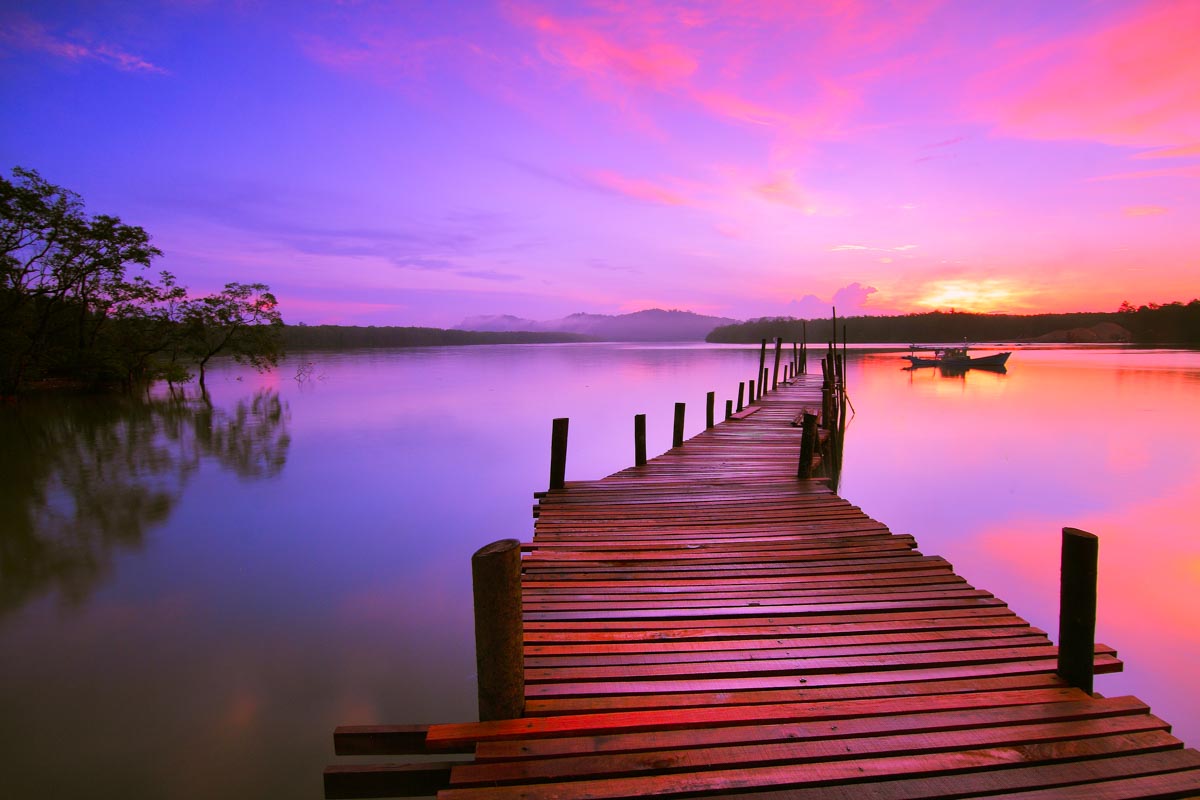
After 1
After 2
Video
If you like watching videos, here’s the video tutorial for you.
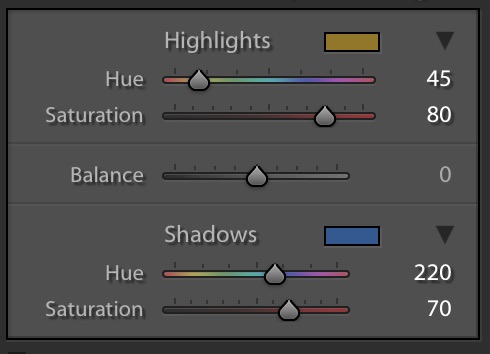
Step 1: Create a Sunset Effect in Lightroom using Split Toning
The first thing we need to do is to change the Split Toning. Use below values.
This will give a beautiful tint to your photo.
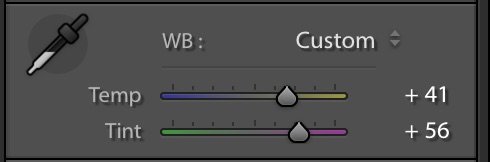
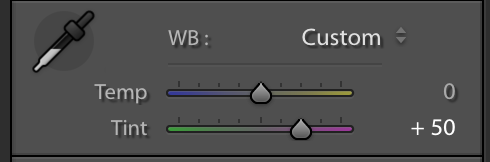
Step 2: Enhance the Sunset with White Balance in Lightroom
Now that we have the color we are looking for, time to enhance the sunset effect.
Sunsets have a yellowish magenta tint. We’re going to create the same tint.
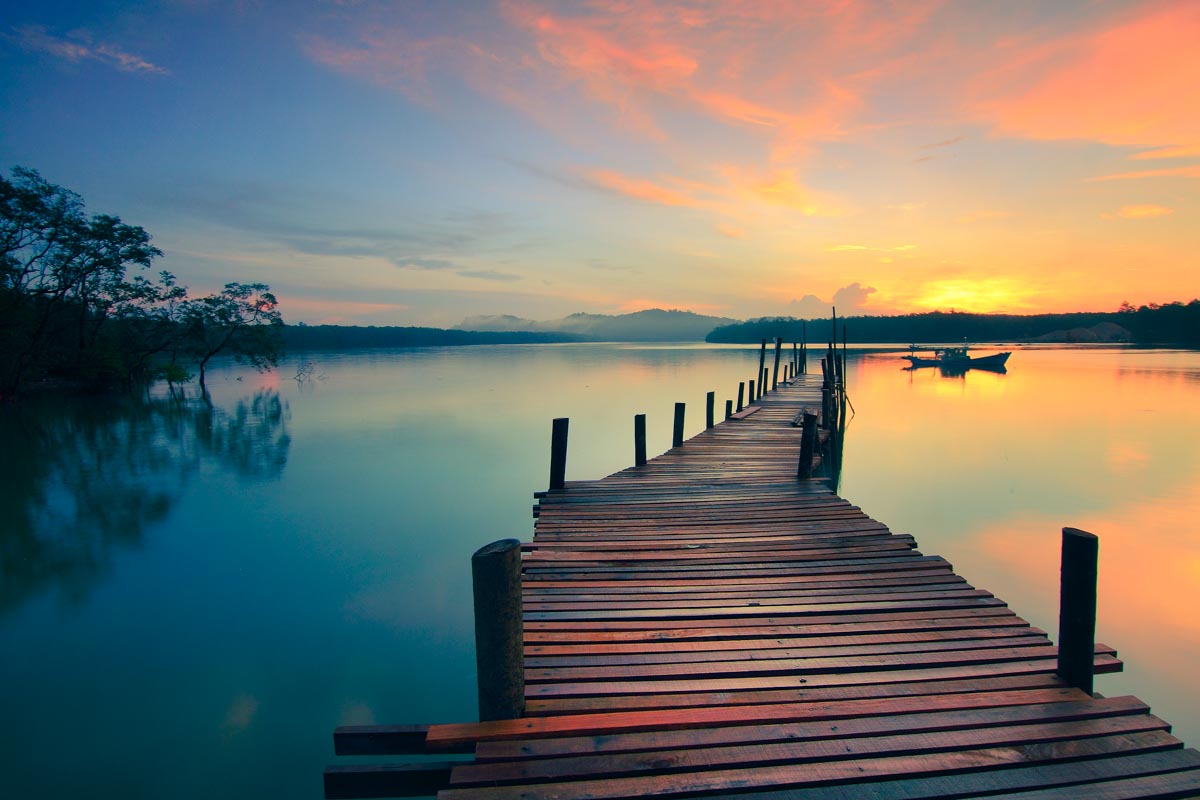
Increase temp to 41 and tint to 56.
This will further enhance the photo and give you a natural looking sunset effect.
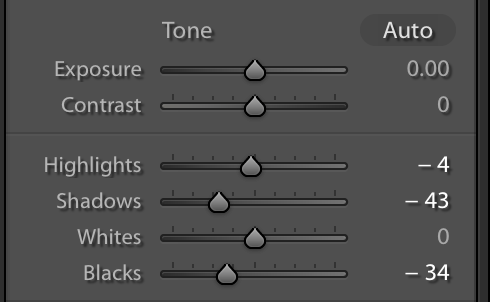
Step 3: Adjust the Tone
Time to change the tone. I am going to change the tone according to my image. The values of the tone sliders may be different for yours.
You don’t need to copy my values if you understand what you’re trying to achieve. Your goal is to reduce the highlights by a small fraction and shadow by a big fraction. This is because the photo is not properly exposed during a sunset. You don’t want the shadowy region to be properly exposed.
I am going to use these values because they suit my image. These may or may not suit yours.
Here’s the image.
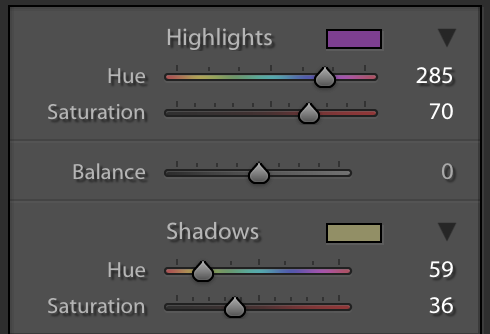
Bonus Step
I also have split toning values for a purple sunset.
Lately, I have started posting more on Instagram Filters because I see a rise in people who want to create Instagram filters in Photoshop. More and more users are reading Instagram filters on my website every month. Today, we’re going to see how to create Instagram X-Pro II filter in Photoshop.
Download the Instagram Charmes Filter Photoshop action – click here to download the action. It will scroll you down to the bottom of the page.
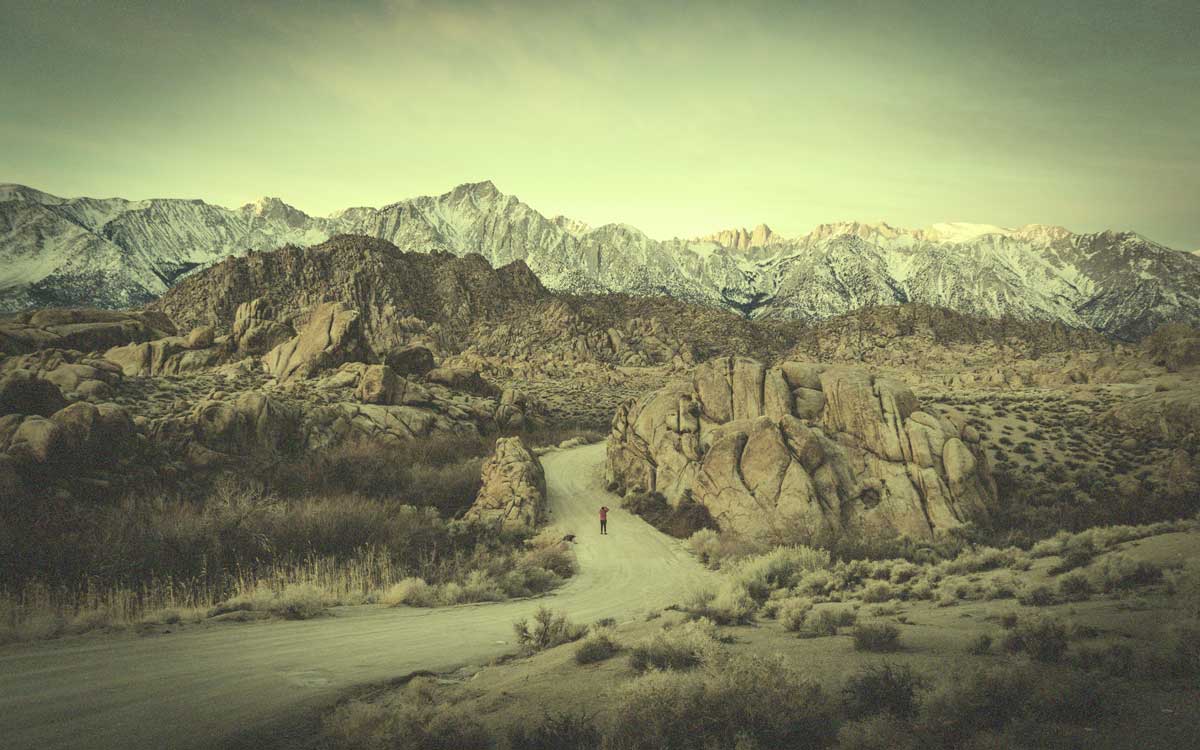
Let’s begin the tutorial. But before we begin, I want to show how the final image would look like.
Final
Initial
Video
If you like watching videos, here’s the video for you.
Step 1: Create a Black Vignette
Instagram X-Pro II filter has a black vignette. So, we’re going to create one. There are many ways to create a black vignette and we’re going to use the easiest way. Yes, we’re going to use the inbuilt Vignette slider in Camera RAW.
Duplicate the layer by pressing Cmd + J / Ctrl + J.
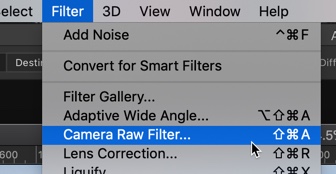
Go to Filter > Camera Raw Filter or press Cmd + Shift + A / Ctrl + Shift + A.
Go to the Effects tab. Decrease the Amount slider to -70. Press OK.
This will create a nice black vignette.
Step 2: Add Multiple Photo Filters
Instagram X-Pro II filter has a greenish yellow tint. Guess what? We’re going to give a similar tint to our photo.
Go to Layer > New Adjustment Layer > Photo Filter.
Change the Filter to Green and increase the density to 42.
This will give a nice green tint to our photo.
We’re going to give a yellow tint now. Go to Layer > New Adjustment Layer > Photo Filter.
Change the Filter to Yellow and increase the density to 77.
With an addition to the green filter that we added earlier in this step, this will give you a greenish yellow tint.
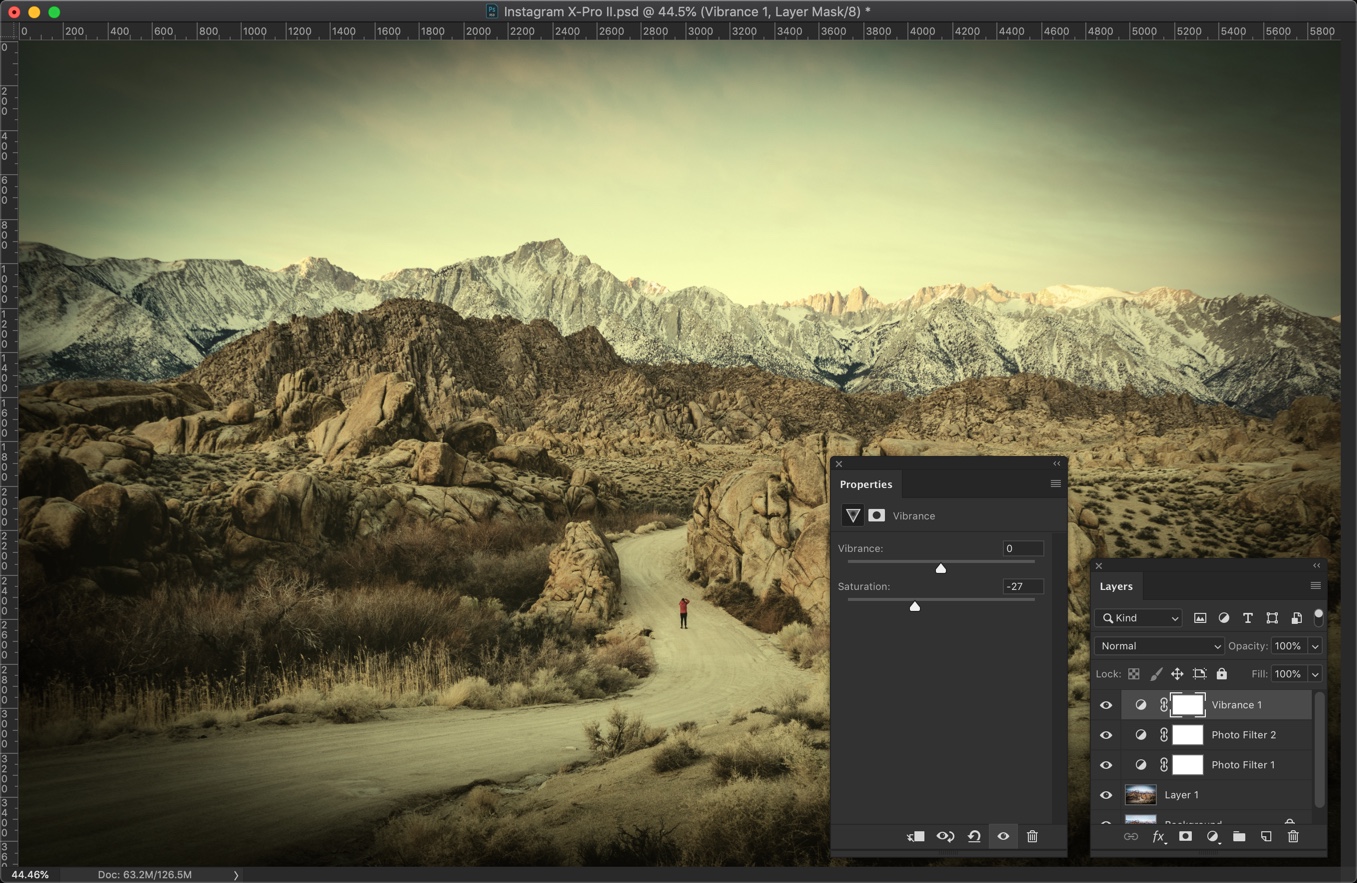
Step 3: Decrease the Saturation
I personally feel that the image is very saturated. I think that we need to decrease some saturation.
Go to Layer > New Adjustment Layer > Vibrance.
Decrease the saturation to -27.
This will desaturate the colors and give you a nice looking retro effect.
Step 4: Add Some Noise
The last step is to add some noise.
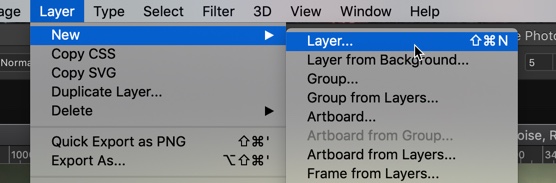
Create a new layer by pressing Cmd + Shift + N / Ctrl + Shift + N or by going to Layer > New > Layer.
Name it Noise.
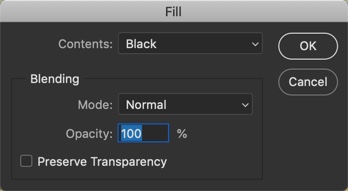
We’re going to fill black color in this layer. Go to Edit > Fill.
Change the Content to Black. Press OK.
This will fill tha layer (and also the image) with black color.
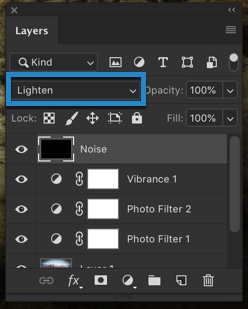
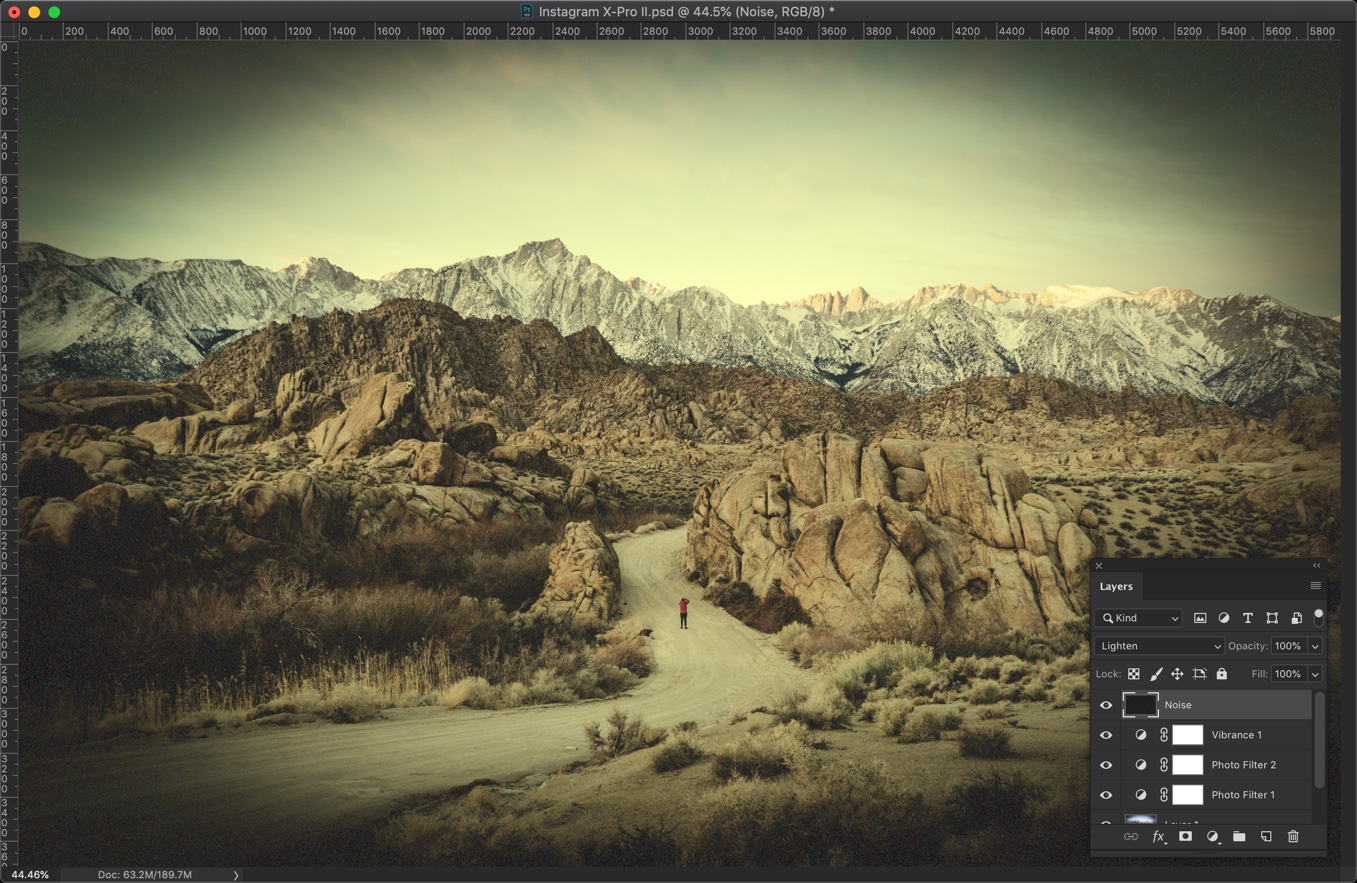
Change the blend mode to Lighten.
Lighten blend mode compares each pixel of the current layer and the layer below it, and shows the pixels that are lighter. If you want to know more about Lighten blend mode, read the lighten subtopic (point #7) on blend modes in Photoshop.
This will bring back the original color of the photo.
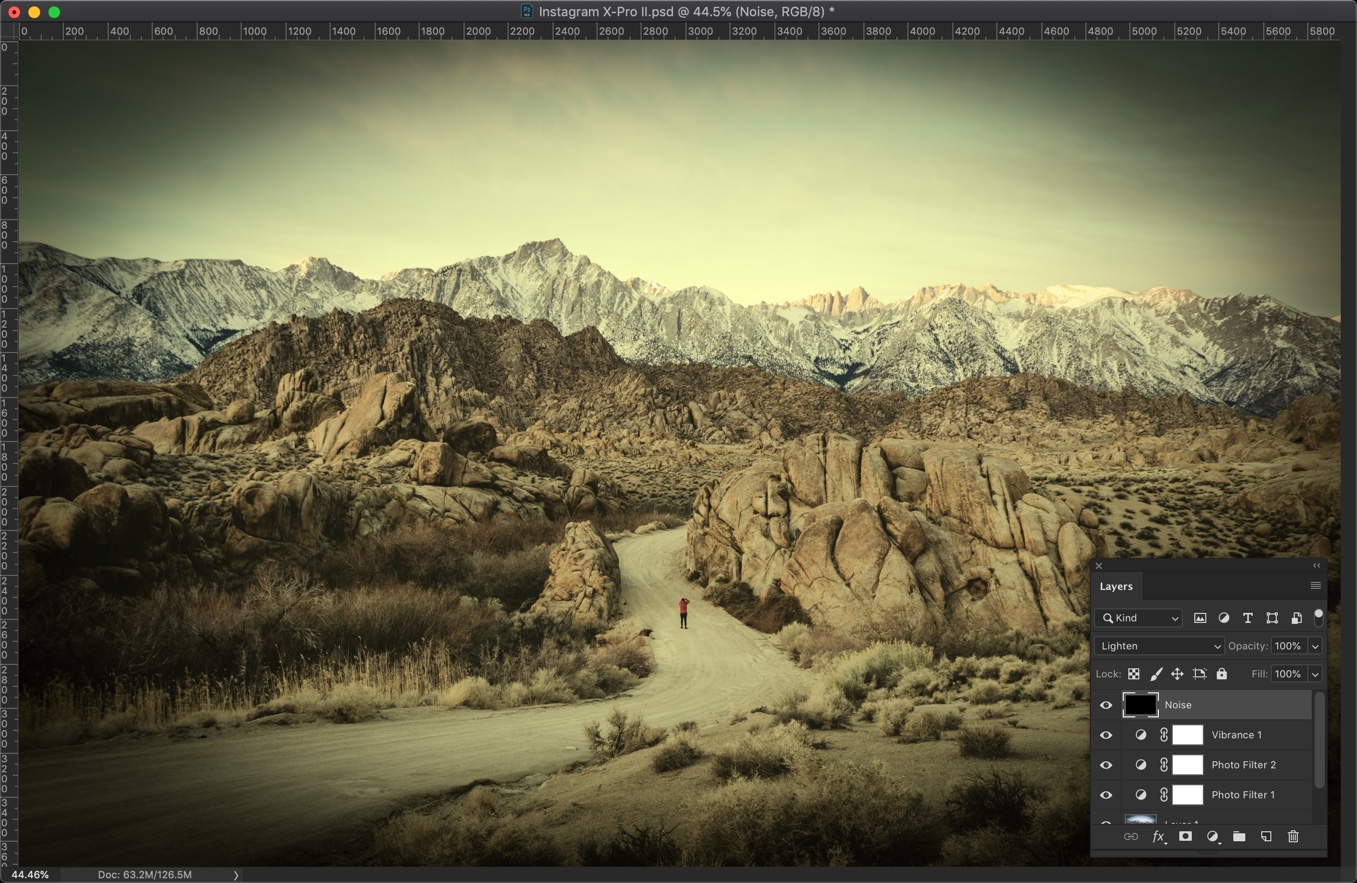
Go to Filter > Noise > Add Noise.
Change the distribution to Gaussian.
The amount depends on the size of the image. My photo is 5700 pixels wide. So, I am choosing 30%. If your image is bigger then choose a higher amount. If it’s smaller then choose a lower amount.
For example, if your image is 3000 pixels wide, you may want to go with 20.
Press OK.
This is how the image should look. The goal was to add the noise but made them barely visible.
Download The Photoshop Action For Instagram Charmes Filter
If you’re interested in the Photoshop action for the Instagram Charmes filter, download it from the below link.