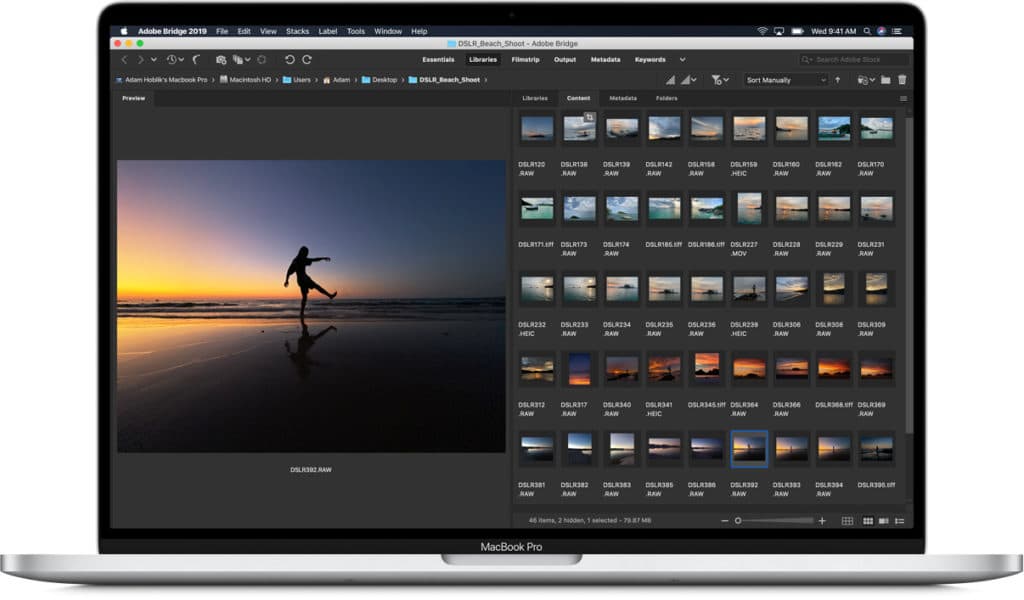
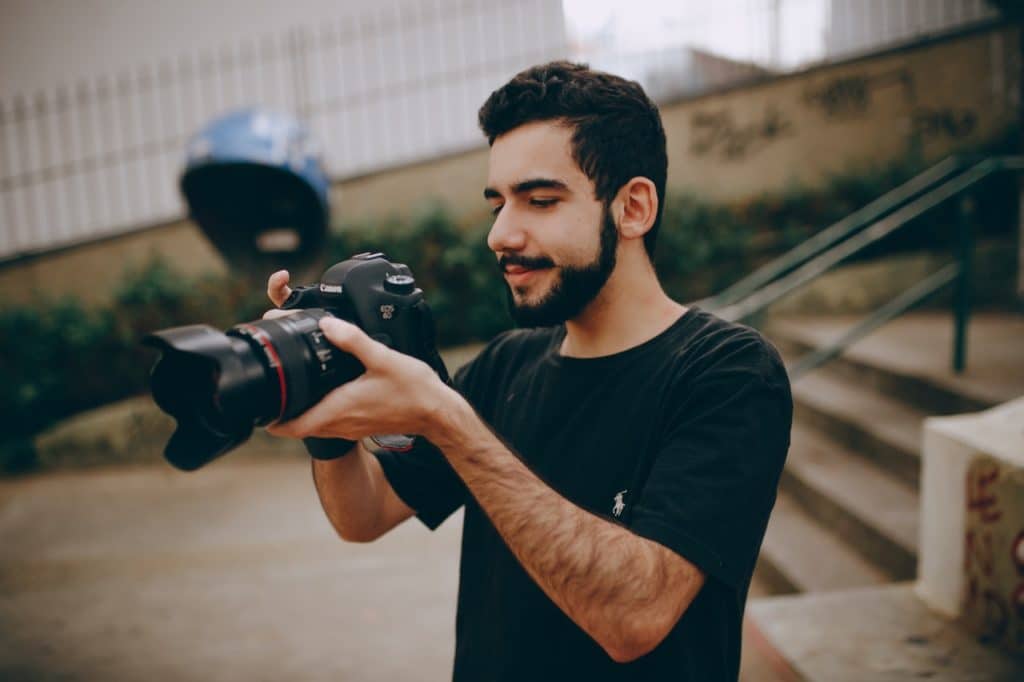
Luminosity masks are an advanced technique in Photoshop that allows you to manipulate an image based on the tonal values, from the deepest Shadows through to the brightest Highlights and all the range in between.
They can be used to creatively select areas of an image adjusted. Examples of using luminosity masks are when blending exposures to create correct high tonal ranges (similar to HDR). They can also be used to make Image Adjustments to only select areas – such as Hue/Saturation, Color Replacement, etc. – really any circumstance where you want to fine-tune a selection based on tonality.
Creating Luminosity Masks is a manual process – but one that is relatively straightforward. I recommend creating an Action of this process so that you can reuse these steps in any document in the future.
Let’s start
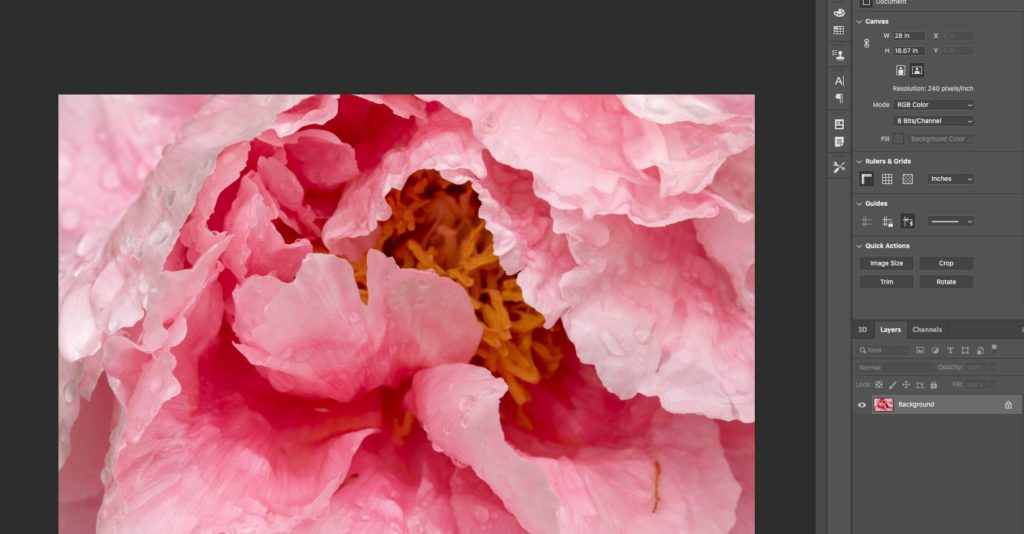
Open a document.
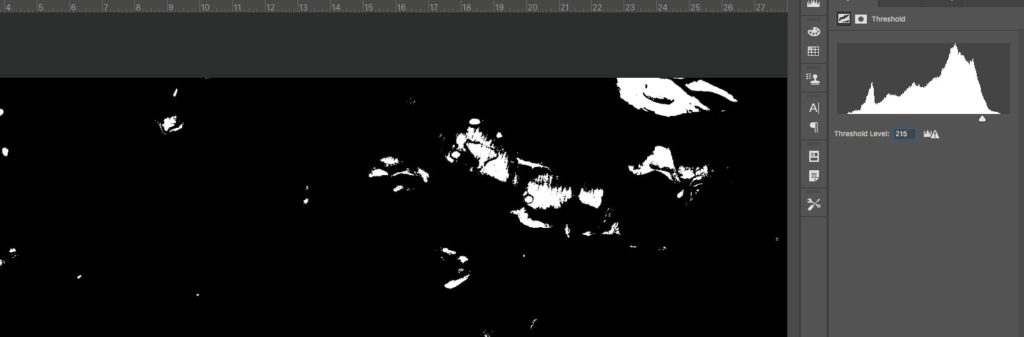
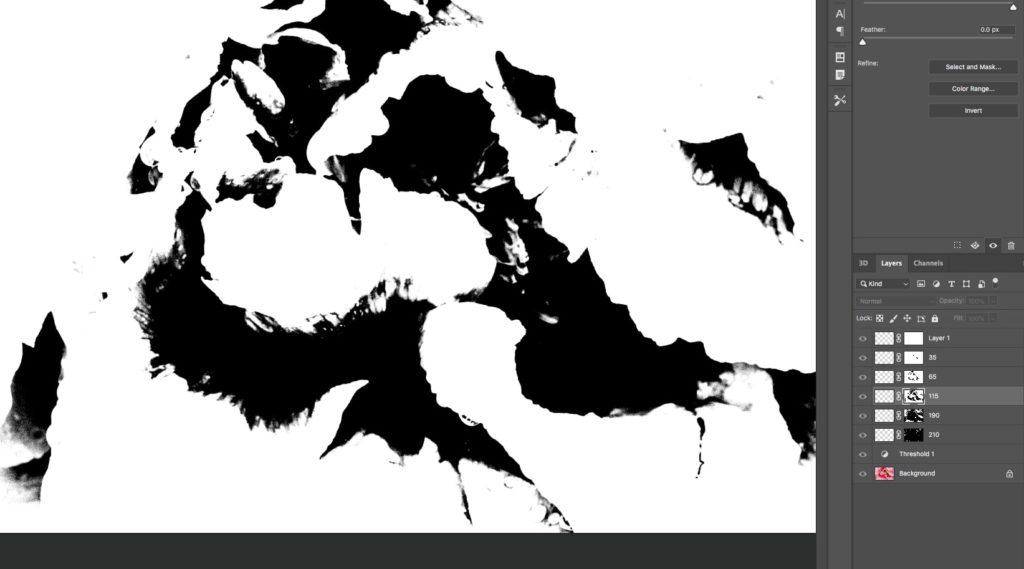
Choose Layer – New Adjustment Layer – Threshold. Set the Threshold Level to 215. This will create a selection of the deepest shadows in the picture as illustrated below.
Next, we want to create a layer mask that using only the white areas that correspond to the deepest shadows by using Select – Color Range on Shadows with Fuzziness at 20% and Range at 65.
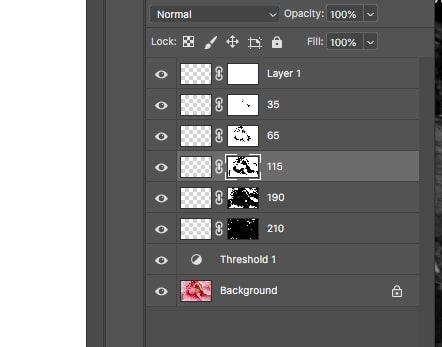
Create a New Layer and ALT-Click on Mac (or Option-Click on Windows) on the mask icon in the Layers panel to create a black mask with the selected areas colored in white.
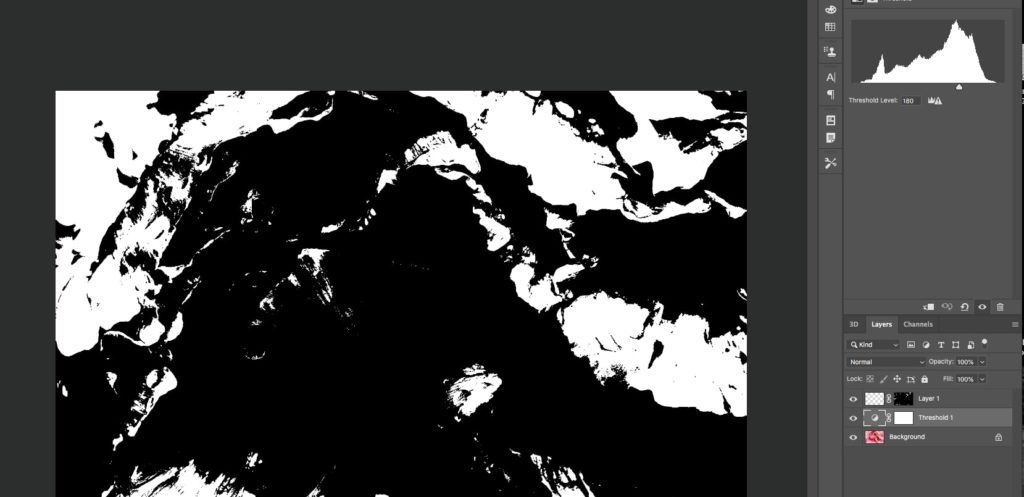
Now we want to repeat the steps above creating selections that move down the tonal range from shadows to highlights. Start by adjusting the Threshold Layer to a Level of 180, select the color range, and create a new layer and mask. Continue to adjust the Threshold Layer and creating new layers and masks with Levels of 115, 65, 35, and 15.
Delete or turn off the Threshold Layer. Now you are ready to use your new Luminosity Masks.
To load a tonal range to work with, CMD- Click (WIN-Click on some windows keyboards) in the MASK section of any layer to load that selection. To display what is on each layer, ALT-Click (or Option-Click) on the mask icon – only the areas in white will be affected by your actions.
By placing the Tonal masks on individual layers, you are also free to take actions – like painting – on any layer and are guaranteed to only affect that tonal range.
A Luminosity Mask can be a powerful tool in post-processing images – and now you have a straightforward way to create and manipulate them.
Karen Foley is a freelance photographer and frequent contributor to dreamstime.com.
Back in 2011 when I used to shoot landscape photos with my Nikon D7000, I used to come across one big problem. I had to zoom in to see the minor details. This zooming in used take 2-3 seconds per photo. And I usually shoot 4-5 shots of the same frame and I shoot at least 20-30 frames in a day. By doing the mats, it takes as much as 450 seconds just to zoom in. I’ll tell you why a large screen laptop for photography matters.
To make the problem even bigger, I didn’t have a Full HD laptop back then. Full HD is now a common thing but it was as uncommon 4K is now. You get to see 4K in usually premium laptops.
There’s no definite term of large screen laptops. I am calling all the laptops with a size of at least 15.6″ a large screen laptop.
All the laptops in my list are more than 15.6″ in display size. The largest one goes to as big as 17.3″ in screen size.
Why is it better to have a large screen laptop for photography?
If you don’t already have a large screens laptop then you’re missing a very biggie time saver. If you own a 12″ or 13″ laptop then you usually see that you need to zoom in a lot to see minor details like fringes, dirt, acne, etc.
In large screen laptops with a 4K display, you don’t need to zoom in to see those minor details. You can see them without zooming in.
How did I create the list of best 5 large screen laptops for photography?
I took 9 laptops as a sample and then I started ranking them based on screen quality, CPU, GPU, memory, storage, SD card slot availability, battery performance, and more.
The brands that I included are Apple, Dell, HP, Asus, Acer, Razer, MSI, Gigabyte, and Huawei. They all have a limited number of laptops which are larger than 15.6″.
Out of the 11 laptops that I researched from the point of view of a photographer, these five laptops scored the most.
Best 5 large screen laptop for photography in 2020 at a glance
Here is large screen laptop for photography.
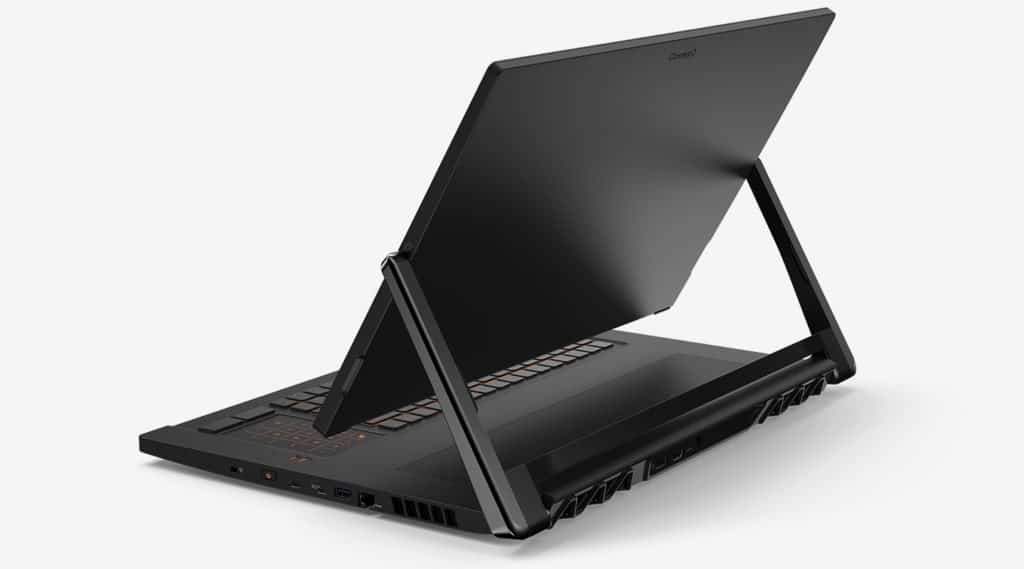
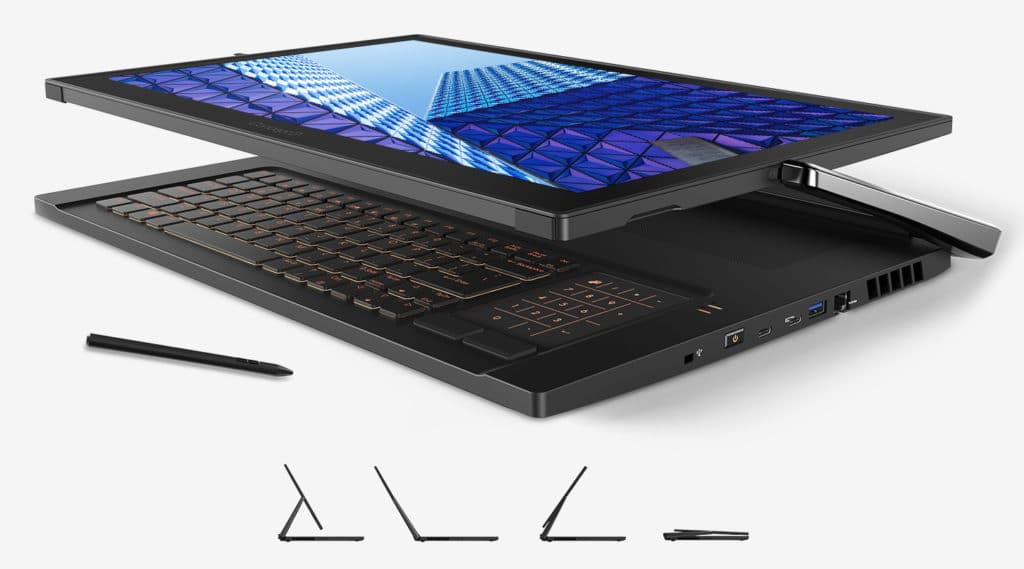
Asus Concept D
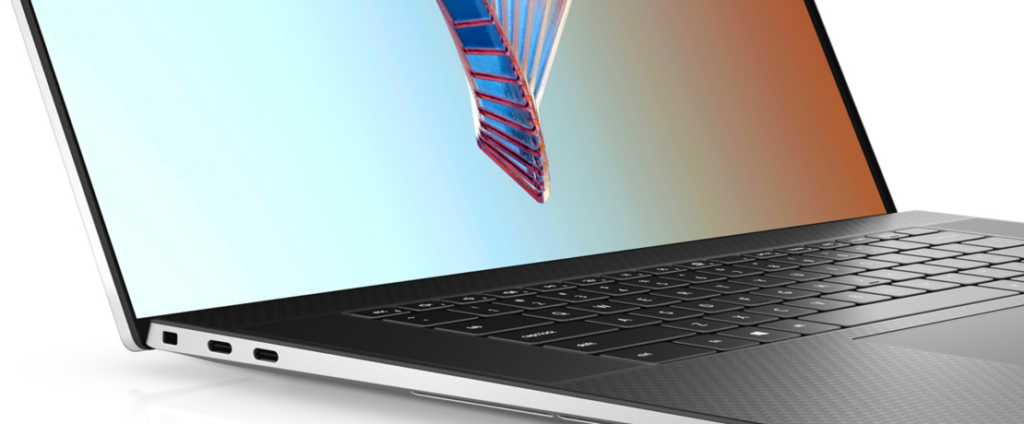
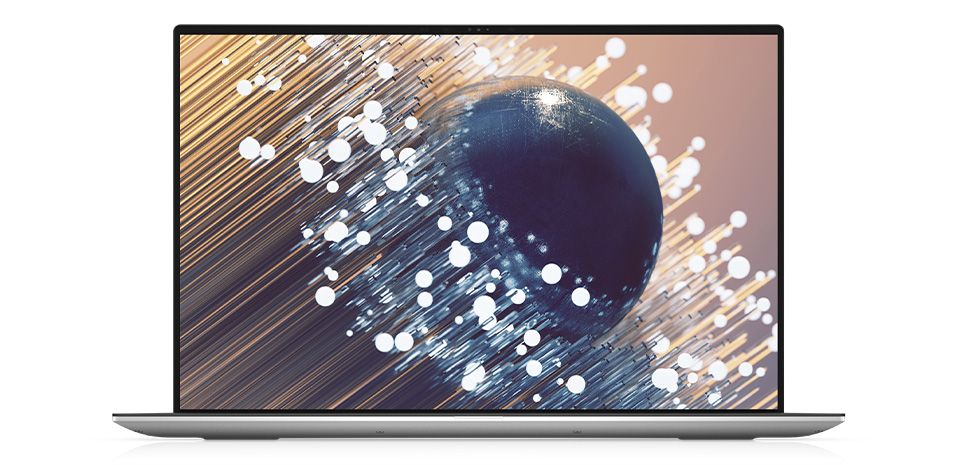
Dell XPS 17
Apple Macbook Pro 16″
Razer Blade Pro 17
Gigabyte Aero 15 OLED
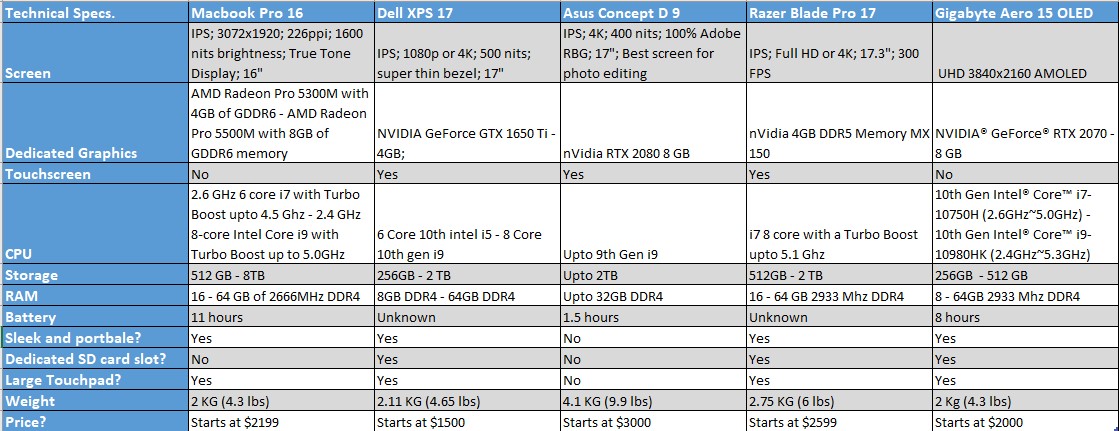
Before we begin, here’s the technical comparison.
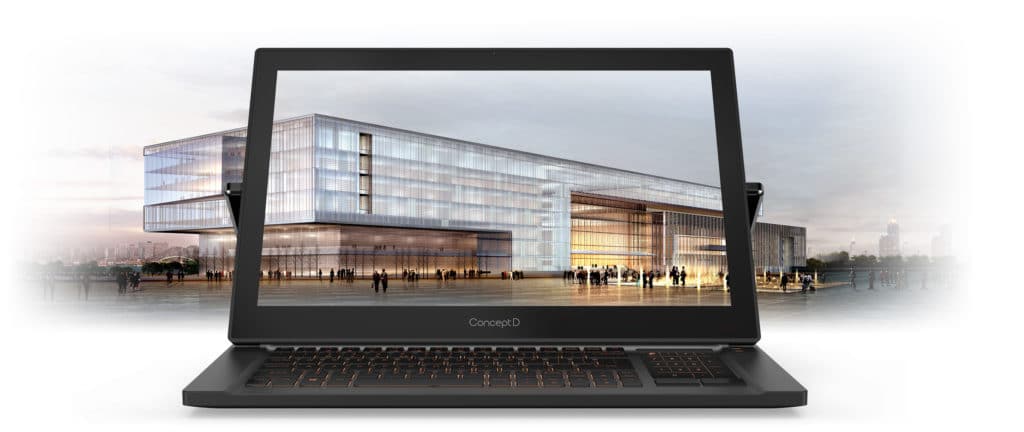
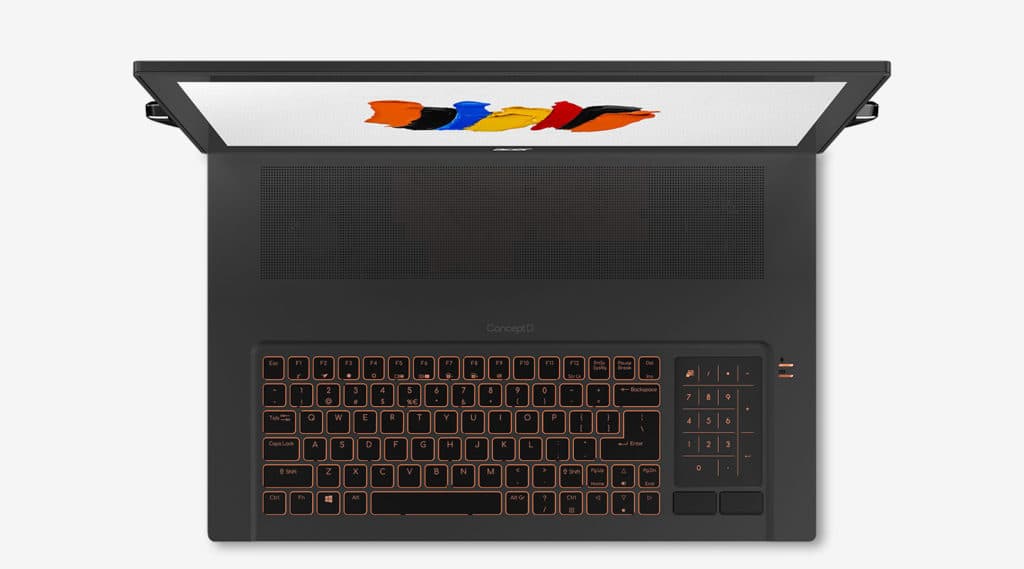
1. Asus Concept D 9
Technical Specs
Screen: IPS; 4K; 400 nits; 100% Adobe RBG; 17″
Graphic memory: Nvidia RTX 2080 8 GB
Touchscreen: Yes
CPU: Up to 9th Gen i9
Storage: Up to 2TB
RAM: Upto 32GB DDR4
Battery backup: 1.5 hours
Sleek and portable: No
dedicated SD card slot: No
Large touchpad: No
Weight: 4.1 KG (9.9 lbs)
Price: Starts at $3000
Did you notice that it’s very heavy and has such a low battery back? Still, I placed it at the top.
This is because of its screen. For a photographer, the screen matters the most. The screen of this laptop is most calibrated and most accurate among all the large screen laptops for photography.
It has a 100% Adobe RGB 17″ display. It also has a good CPU and GPU which will make sure that you don’t feel lag when you’re editing photos.
Pros: Best screen and ultra-fast GPU
Cons: Not portable, extremely low battery backup, and no SD card slot
2. Dell XPS 17
The laptop is not launched yet but will be my favorite laptop once it’s launched.
It’s large (17″ display) and yet sleek. I personally like the touchpad very much even though it is not as good as the Macbook’s. I am judging the touchpad’s quality by the fact I have used its smaller brother which is XPS 13. They both share the same design (form factor), and the only difference in design is the screen size.
Dedicated Graphics: NVIDIA GeForce GTX 1650 Ti – 4GB;
Touchscreen: Yes
CPU: 6 Core 10th intel i5 – 8 Core 10th gen i9
Storage: 256GB – 2 TB
RAM: 8GB DDR4 – 64GB DDR4
Battery backup: Unknown
Sleek and portable: Yes
Dedicated SD card slot: Yes
Large Touchpad: Yes
Weight: 2.11 KG (4.65 lbs)
Price: Starts at $1500
Pros: 4K display looks very sharp; dedicated SD card slot; cheaper than the laptops in the current segment
Cons: Can’t think of any according to the technical specs.
3. Apple MacBook Pro 16
The best (and only) laptop if you like macOS more than Windows.
Apple has stopped shipping the earlier 15″ laptop and now ships only 16″ laptop. Interestingly, the 16″ version is very slightly bigger than 15″ because it has thinner bezels. You can compare the size below.
Dedicated Graphics: AMD Radeon Pro 5300M with 4GB of GDDR6 – AMD Radeon Pro 5500M with 8GB of GDDR6 memory
Touchscreen: No
CPU: 2.6 GHz 6 core i7 with Turbo Boost up to 4.5 GHz – 2.4 GHz 8‑core Intel Core i9 with Turbo Boost up to 5.0GHz
Storage: 512 GB – 8TB
RAM: 16 – 64 GB of 2666MHz DDR4
Battery: 11 hours
Sleek and portable: Yes
Dedicated SD card slot: No
Large Touchpad: Yes
Weight: 2 KG (4.3 lbs)
Price: Starts at $2199
Pros: Retina display; macOS; doesn’t reduce performance when unplugged unlike Windows; faster than the Windows laptop of the same segment
Cons: No SD card slot
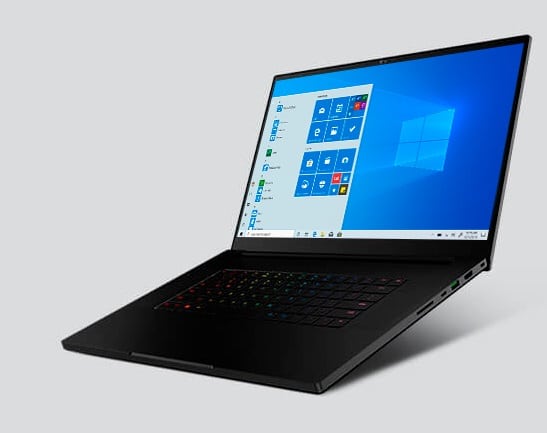
4. Razer Blade Pro 17
There’s no doubt that the Razer Blade is a beautiful laptop.
The laptop is actually designed for high-end video games but is equally capable of performing other resource-intensive tasks like Photoshop and Premiere Pro. If you use Photoshop filters a lot, this is the laptop you should be looking for.
Screen: IPS; Full HD or 4K; 17.3″; 300 FPS Dedicated Graphic:s Nvidia 4GB DDR5 Memory MX 150 Touchscreen: Yes CPU: i7 8 core with a Turbo Boost up to 5.1 GHz Storage: 512GB – 2 TB RAM: 16 – 64 GB 2933 Mhz DDR4 Battery: Unknown Sleek and portable: Yes Dedicated SD card slot?: Yes Large Touchpad?: Yes Weight: 2.75 KG (6 lbs) Price: Starts at $2599
Pros: 4K display on high-end models; dedicated SD card slot
Cons: More expensive than other laptops of the same segment
5. Gigabyte Aero 15 OLED
Looking for a laptop that is cheap and the screens look beautiful? Here it is. The screen is AMOLED and looks much better and lively than IPS screens.
But make sure that color calibration is a nightmare in OLED screens because all the almost all laptops selling nowadays are using the IPS screen. So, you need to make sure that the OLED screen is calibrated enough so that it looks good when someone is viewing your photos on IPS screens then it should look good.
Screen: UHD 3840×2160 AMOLED Dedicated Graphics: NVIDIA® GeForce® RTX 2070 – 8 GB Touchscreen: No CPU: 10th Gen Intel® Core™ i7-10750H (2.6GHz~5.0GHz) – 10th Gen Intel® Core™ i9-10980HK (2.4GHz~5.3GHz) Storage: 256GB – 512 GB RAM: 8 – 64GB 2933 Mhz DDR4 Battery: 8 hours Sleek and portable: Yes Dedicated SD card slot: Yes Large Touchpad: Yes Weight: 2 Kg (4.3 lbs) Price: Starts at $2000
Pros: OLED display; dedicated SD card slot; has old school ports like USB A and HDMI; cheaper than the laptops in the current segment.
Cons: No USB C port;
Conclusion
Here comes the conclusion.
Giving a final conclusion depends on many scenarios. I’ll create a segment and then recommend the laptop based on that.
If you just want macOS more than anything else
The only option you have in Apple Macbook Pro 16. You don’t have any other options.
If you want a portable, fast, and a good screen laptop
Dell XPS 17 is the best option for you
If you want the photos to look amazing on your computer
Gigabyte Aero 15 AMOLED is for you because it’s the only laptop that is an OLED screen which is much better than an IPS screen.
Graphic design professionals receive their training from various accredited schools and colleges and online programs. Students seeking to enter careers in this field can do so by researching various educational programs. Students can train for a career in various specialized areas of graphic design. Diplomas and continuing education are also available.
Advertising design
Students can study to enter a variety of careers in the field of graphic design with education in advertising design.
Students can train for career pursuits by working with magazines, newspapers, newspapers, publishers, and more. With an accredited degree in this area of the field, students will be required to complete courses that may include internet marketing, e-commerce, copywriting, copywriting, and more.
Accredited programs provide students with the opportunity to earn an associate’s or bachelor’s degree in advertising design.
Students can gain the knowledge necessary to become art directors, graphic designers, creative directors, and many other related professionals.
Digital design and animation
Students seeking an education in digital design and animation can do so with an accredited educational program.
Students can enroll in multiple schools and colleges for an associate or bachelor’s degree in the field. Career opportunities in this area of graphic design include working for television stations, the gaming industry, video production houses, multimedia companies, and much more.
With an accredited degree program, students will have the option to study courses such as web design, architectural design, digital video, CAD, video production, and other related subjects. Digital design and animation degrees can open up a world of opportunity for those seeking to enter the workforce.
Moving graphic design
There are a variety of degree options for those looking to enter a career in graphic design on the move.
Students can complete educational training for an associate’s. Career opportunities will depend on the degree level desired and the school or university you attend.
Career options include video game designer, texture artist, animator, 3D designer, visual effects specialist, and many other professions. Course work may cover topics such as Flash, Photoshop, Adobe Premiere, Final Cut Pro, After Effects, and other related courses.
A degree in motion graphic design will prepare students for employment in television, movies, the internet, and more.
Visual communications
Visual communication can be obtained at various levels through various schools and colleges. Students can obtain an education that will allow them to pursue careers working as web design professionals.
Students can choose to specialize in Flash animation, search engine optimization (SEO), e-commerce, and more. With an accredited educational program, courses can consist of design and build, JavaScript, basic design, Dreamweaver, PHP, Photoshop, and more. With an accredited degree, students can begin the career they desire.
Accredited programs allow students to obtain an education in a variety of areas in this field. Students can learn more about the grade of their choice by researching and requesting more information. Graphic design course subjectsare as follows.
Web design
Product design
Design
Typography
History of art
Drew
Video production
Commercial design
Environmental design
And many more. The course program you go to will determine what classes are other than your curriculum. Deciding to follow the formal route of 4 or two years or self-taught will also change what you study. We give our classes in the evening time is 7:30 pm to 10:30 pm.
Choose which path you want to become a designer (logo design, web packaging design, etc.) and get as much knowledge as possible.
It is difficult to classify a particular graphic design in the category of good design or bad design since there are multiple factors on which the success of graphic design is based.
Graphic designs are a perfect combination of both the world of art and design. While art refers to the personal interpretation of things and is, therefore, subjective, graphic designs fulfill a particular function. Graphic design is essential in the entertainment industry, as it is a powerful device for storytelling.
A single design can speak for the product. It is related to the sale or promotion of a product, services, or brand. Even movies, TV shows, and other features can be promoted through graphic designs.
If you want to have a unique and competent graphic design, you must follow the following considerations:
Have clear ideas: for good graphic design, you must have a clear vision. This would help you communicate your ideas well with the designer so that he/she can work accordingly and help you realize the graphic design of your dreams.
Choose a good graphic designer: half the battle is won if you choose a good graphic designer. The graphic designer must be well equipped with all the latest graphic design software and techniques. Additionally, the graphic designer must be well versed in finishing tools to deliver a fully finished product to the customer that includes page layout, color, and typography.
The designer must have a professional approach: a good graphic designer is always a good listener. It is your responsibility to lend a patient ear to the client to understand what the client really needs. Furthermore, the message to be transmitted through graphic designs must be made clear to the designer for the best results.
Relate to the target audience: The graphic designer must consider himself as a member of the target audience in order to verify if the design captures or attracts or motivates the audience. Also, check the visibility and clarity of the text for design success.
Clear images and images: A good graphic design should have images that are crystal clear and not pixilated. There should be no involuntary blurring of edges. The chosen photos must be clear and unique and be in tune with the message of the product. The presentation should be professional in approach to give authenticity to the graphic designs. The colors in the photograph should be in tandem with the background and the rest of the projected image, although a contrasting tone can be used to give it prominence.
Color theme: a vital part of the design is the colors. But it becomes even more important in graphic design as product and logo designs are always at the forefront in competitive industries. Colors in designs express emotions and feelings strongly and even help companies communicate with little effort. The colors alone and, in combination, inspire intensely.
The market for second-hand optics has experienced rather significant growth among photographers and videographers all across the world. But even as an experienced photographer, you still need to be aware of the lens you need as well as its capabilities. Below is a guide of tips you need to keep in mind when buying previously used lenses so that you don’t get ripped off your hard-earned cash.
1. Who Are You Buying From?
We’re not saying that you have to take them out for a basketball game or anything, but it’s a good idea to get to know more about your seller before buying the lens.
Try and get referrals from people who have done business with them depending on how you came across them. The more you know about their character and approach to business, the better. You can search the Surplus Database to find great deals on optics.
If you’re buying from an eCommerce site such as eBay, look up buyer reviews and avoid people without feedback from buyers if possible.
It’s a good idea to know why the lens is being sold in the first place and if the answer provided is unsatisfactory, avoid buying from the vendor because they may be trying to sell to you a faulty lens.
2. How is the State of the Lens’s Body
This is the first check you are going to do so its absolutely fundamental that you be thorough.
A few scratches are fine because they will not impact how the lens functions, but if you find any dents that look a bit serious, don’t hesitate to ask your seller about how they came about.
3. Use A Light for Further Inspection
Use a torch to inspect the aperture for any dust clumps or fungus that have crept into the lens.
Small specks of dust should not prove to be much of a problem, but bigger ones could affect how the lens operates as well as the quality of images produced.
If you notice big dark spots in the light path then the lens is probably damaged and it’s wise that you keep your money until you find something better.
4. How Good is the AutoFocus
Attach the lens to a camera and see how well it focuses.
Naturally, different lenses are made with varying autofocus capabilities but you can’t be too sure. Do not be afraid to experiment with the lens on different focus modes, distances, and angles. Also, remember to check whether its focusing is as smooth and fast as you’d like it to be.
Don’t rush as you do this and do not hesitate to confer with your seller concerning anything that bothers you.
5. Check its Zooming Power
If its a zoom lens you’re buying, the zoom ring should rotate smoothly but not too easily – if it’s loose, then the lens has probably been in use a lot and might fail you in future, even worse while shooting.
6. How Are Its Aperture Blades
A lens that has not been in use for extended amounts of time can develop oil around its aperture blades, especially a lens kept in an overly warm environment.
This oil ruins the efficiency of the lens as it causes viscosity that creates friction thus preventing smooth aperture changes.
7. How Is The Quality of Images
Last but not least, don’t be comfortable with the images you see on the camera screen. The quality of pictures the lens takes is important so try and take a few pictures and view them from a computer screen with a good display monitor.
Keep in mind that a minor speck today can evolve tomorrow into a blemish that ruins all the pictures you take using that lens. It can be such a let down especially if you coughed out a lot of money for the lens. Go with a laptop along to meet the buyer if you can and inspect the images on site. You simply cannot afford to be too careful!
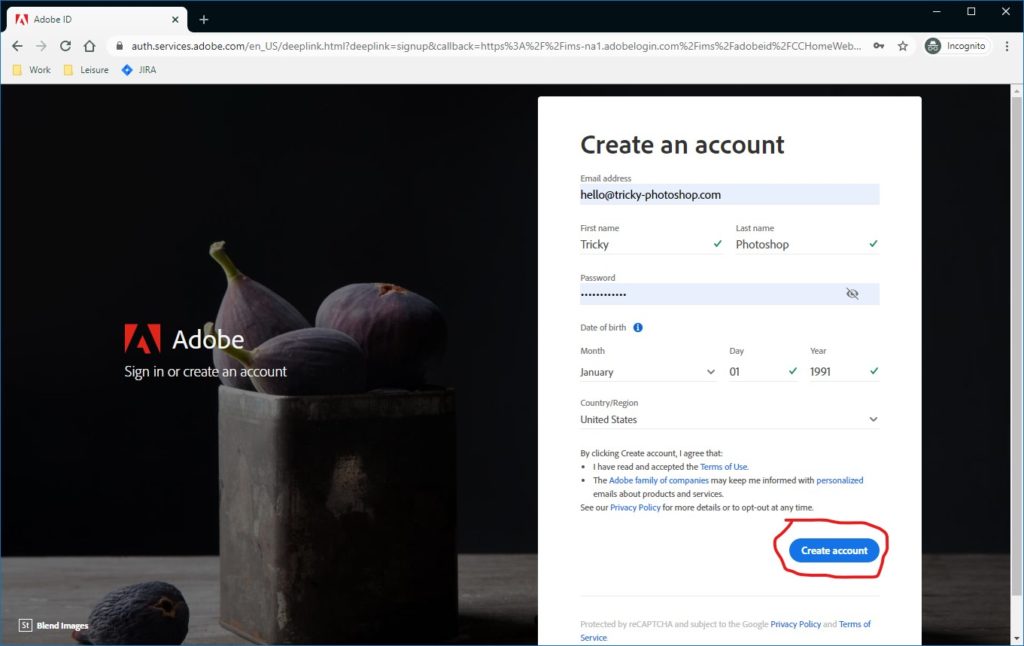
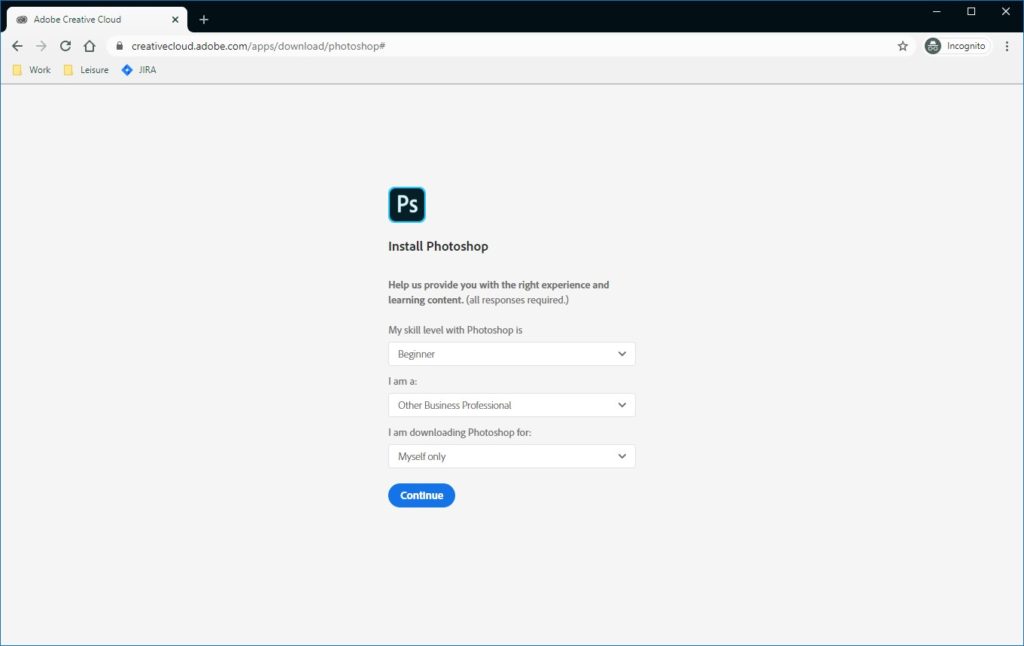
I remember when I was in college in 2011 and wanted to start my photo editing business. I heard about Photoshop at that time but I didn’t know how to use Photoshop and watched a few tutorials on YouTube was thinking how to download Photoshop for free.
After that, I went to Adobe’s website and found out that it was paid software. But its free trial comes to the rescue.
Fill all the details and click on “Create Account”.
Fill the details and click on “Continue”.
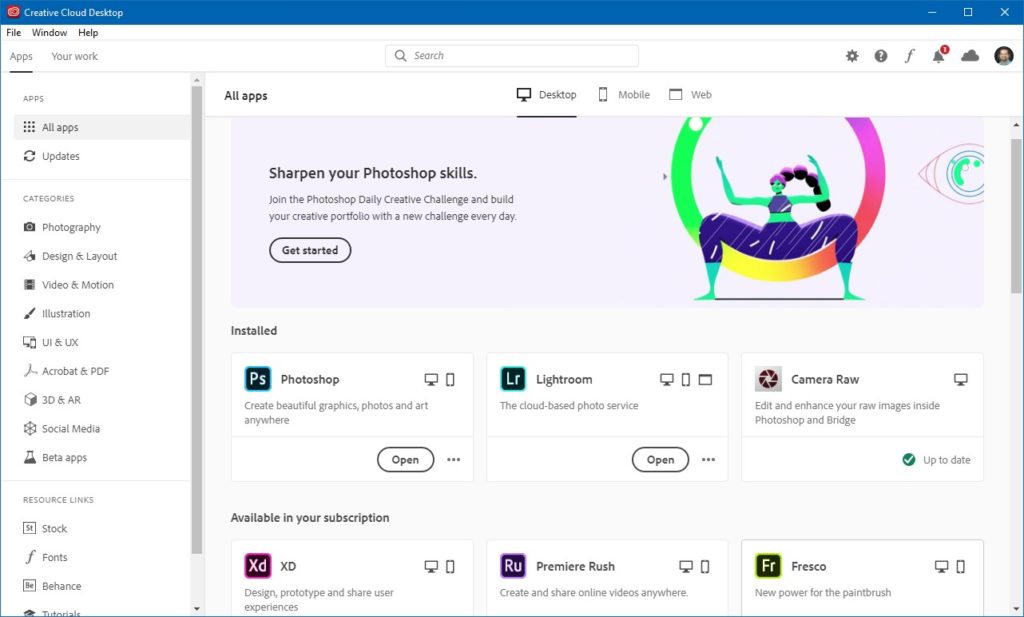
Now, Adobe will install the “Creative Cloud” software. It is basically a catalog of all Adobe software. You can install the Photoshop trial from here. See the below screenshot. Because I already have Photoshop installed, it’s showing “Open” for me.
You should click on “Try”.
That’s all. Enjoy Photoshop for free for 7 days. If you already know Photoshop, 7 days are enough for your one-time photo editing need. If you don’t know Photoshop and then you can hire me to edit for your photos. Get your free demo now.
2. What are the plans for Photoshop?
Photoshop is available in four plans of Adobe if you want to buy it. Here’s a screenshot.
Photography plan ($9.99/month): This is the best and cheapest plan. You get Photoshop, Lightroom, and 20 GB cloud storage.
Adobe Photoshop Single App ($20.99/month): Why does this plan even exist? You’re getting only Photoshop at $20.99 a month that you can get at $9.99 a month in the above plan.
All apps ($52.99/month): You get access to the entire collection of Adobe. This includes Photoshop, Lightroom, Premiere Pro, After Effects, Illustrator, InDesign, and so many more,
Students and teachers ($19.99/month): If you’re either a student or teacher, you can get the “All apps” plan at a discount of 60%. You get access to all the apps at only $19.99 a month.
3. What are Photoshop minimum system requirements?
In case you already don’t, you should know that Photoshop is a resource-intensive software. It needs a well-configured desktop or laptop to run smoothly.
Below are the minimum system requirements for Photoshop 2020.
Processor
Intel® or AMD processor with 64-bit support; 2 GHz or faster processor
Operating system
Microsoft Windows 7 with Service Pack 1 (64-bit), Microsoft Windows 10 October 2018 update (64-bit) version 1809 or later
RAM
2 GB or more of RAM (8 GB recommended)
Graphics card
nVidia GeForce GTX 1050 or equivalent; nVidia GeForce GTX 1660 or Quadro T1000 is recommended
Hard disk space
3.1 GB or more of available hard-disk space for 64-bit installation; additional free space required during installation (cannot install on a volume that uses a case-sensitive file system)
Monitor resolution
1280 x 800 display at 100% UI scaling with 16-bit color and 512 MB or more of dedicated VRAM; 2 GB is recommended
OpenGL
OpenGL 2.0-capable system
Internet
An Internet connection and registration are necessary for required software activation, validation of subscriptions, and access to online services
Note: A good point to note that a laptop that just meets the minimum requirements would be just able to run Photoshop. Photoshop will freeze intermittently many a times.
4. Can you download Photoshop CS2 free for a lifetime now?
Photoshop CS2 was launched in 2005. Some sites claim that Adobe is letting you download CS2 for free. Yes, it did but not anymore. Adobe is stopped giving away Photoshop CS2 free for a lifetime. In fact, Photoshop CS2 is not available to download anymore even for paid users.
You also should not be using it because the software is 15 years old (launched in 2005) now.
Select the plan. If you’re just going to use Photoshop then you should select the Photography plan.
Now, enter your card details and click on the “Place your order” button.
6. What are the discounts in Photoshop for teachers and students?
Teachers and students get 60% off on the “All Apps” plan. This means that you get access to all the Adobe products (Photoshop, Lightroom, Illustrator, After Effects, etc.) at just $19.99/month. The normal cost is $52.99/month.
6.1 Eligibility
To qualify for a student discount, you must be at least 13 years of age and enrolled in one of the following:
University or college — accredited public or private university or college (including community, junior, or vocational college) that grants degrees requiring not less than the equivalent of two years of full-time study
Primary or secondary school — accredited public or private primary or secondary school providing full-time instruction
Homeschool — defined by state homeschooling regulations
6.2 How do I purchase?
The best way to purchase is directly from Adobe through our website or by calling 800-585-0774. You can also find Adobe Student and Teacher Editions through many campus bookstores and other online retailers. See the “Online stores” section.
At checkout, you’ll need to provide the name of your school and indicate whether you are a student, educator, or administrator.
6.3 What is proof of eligibility?
Use a school-issued email address: If you provide a school-issued email address during purchase you are instantly verified. (A school email address may include .edu, .k12, or other email domains sponsored by educational institutions.) If you do not have a school-issued email address or your email address cannot be verified, additional proof of eligibility may be requested after purchase.
Students and educators at accredited schools Proof of eligibility must be a document issued by the institution with your name, institution name, and current date. Types of proof of enrollment include: • School ID card • Report card • Transcript • Tuition bill or statement
Homeschooled students Proof of eligibility may include: • Dated copy of a letter of intent to homeschool • Current membership ID to a homeschool association (for example, the Home School Legal Defense Association) • Dated proof of purchase of curriculum for the current academic school year
No. Earlier you could buy Photoshop permanently but Adobe has shifted to a subscription model. You have to pay some money (lowest is $9.99) every month to keep on using Photoshop.
Q: Is Photoshop free for students?
No, It is not free. However, you get 60% off on the “All Apps” plan. This means that you get access to all Adobe apps (Photoshop, Lightroom, Illustrator, After Effects, etc.) at a discounted rate of $19.99/month rather than $52.99/month.
Q: Is there a free Photoshop version?
No, there is no free Photoshop version. But, you can access Photoshop for free for 7 days. Adobe calls it Photoshop’s trial period. A software glitch made Photoshop CS2 available for free for some years but Adobe has now fixed it and it’s no longer available to download.
Q: Which software are free alternatives to Photoshop?
There are some Softwares like GIMP and websites like PicMonkey which are free of cost but they are nowhere as good and powerful as Photoshop. Scroll down to see the list of alternatives to Photoshop.
Q: How long is the Photoshop trial?
7 days. Photoshop trial is 7 days long
Q: Can you illegally download Photoshop?
Possibly. Some YouTube videos claim that you can illegally download Photoshop but I don’t know how correct the claims are.
Q: What version of Photoshop is available for free?
No version. There’s no version of Photoshop that is available for free? A software glitch made Photoshop CS2 available for free for some years but Adobe has now fixed it and it’s no longer available to download.
Q: Where can I learn Photoshop?
You can learn Photoshop using my free 30 days to learn Photoshop course. All tutorials are available here in my 30 Days to Learn Photoshop series.
8. Which are free alternatives to Photoshop?
There’s no such free tool that is as advance and powerful as Photoshop. However, if your needs are very limited then you can try some of the free tools.
8.1 GIMP
GIMP is often called as the closest rival to Photoshop but it’s free. It’s a downloadable software like Photoshop.
Photo editing apps are an excellent way to market your products online on different eCommerce platforms. You can use them on Windows, Android Phones, and iOS. Plenty of applications keep coming every day. Marketers opt for the best one to advertise their products through social media marketing.
Attracting your target audience is crucial for the growth of any business. On the other hand, if you wish to edit your photos for personal reasons, even then photo editing apps play a major role. A good app will help you in fixing colors, removing blemishes, brightening backgrounds, and much more.
Those who are fond of photo editing apps will know the charm of photo objects like customized cushions, mugs, frames, watches, albums, and way more. You may know about My Picture voucher codes for finding high-quality photo gifts. The charm in any of these items comes with the quality of pictures.
Therefore, look through these photo editing apps that are compatible with all types of devices. Prefer the best ones according to your needs and print the best pictures every day.
List of the Best Photo Editing Apps
A lot of recognized photo editing apps with high-quality tools for fixing a photo require a subscription after some days of use. Or else, you may only be able to use a few features from them in their free version. However, these picture editors will bring you the best results without much effort.
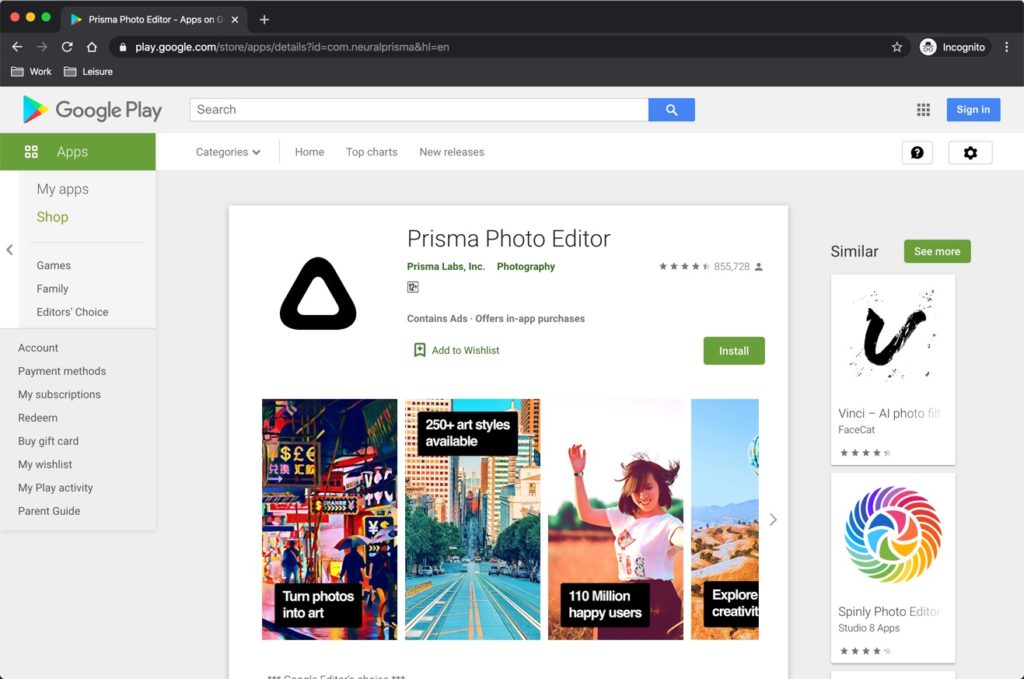
Among the most popular apps for editing all sorts of images, Prisma is famous for transforming your picture into art. People use it for making sure their photos can look like a painting. It does offer a subscription and users can pay to the app for advance features.
Still, its basic features are more than enough to edit a photo. Marketers can make the best use of this app to turn their product photos into marvelous works of art and promote them.
Also, the app offers a particular Prisma community similar to that of Instagram for sharing edited masterpieces with the app’s community.
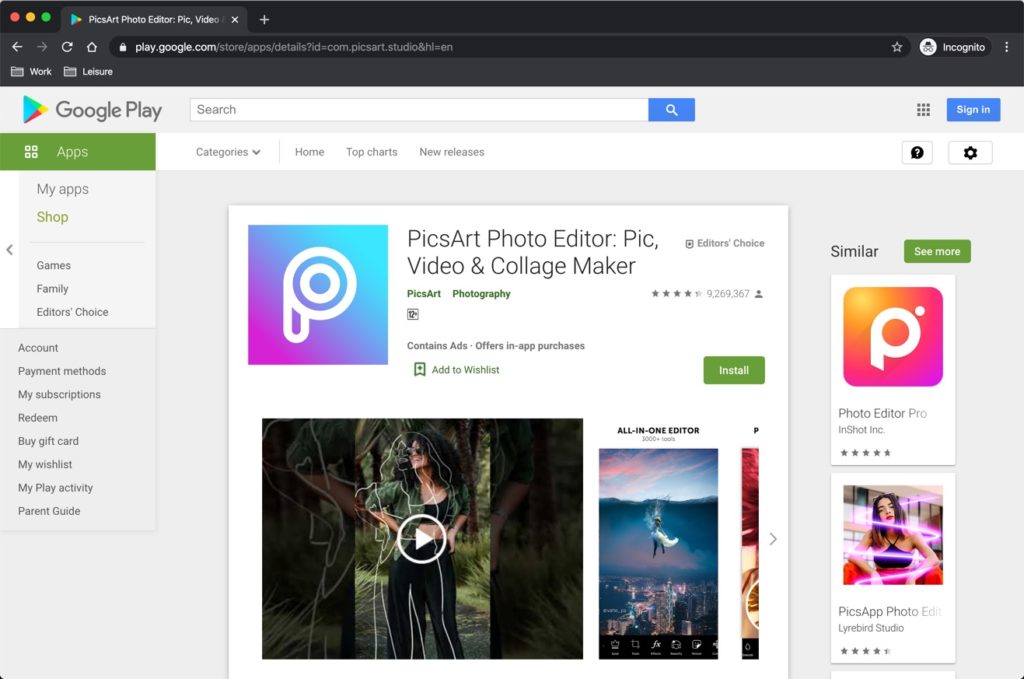
Editing pictures for free is enticing and PicsArt enables you to perform your edits on all sorts of pictures. It is one of the most amazing collage makers for your Smartphone. It has special editing tools like clipart library and color effects available in the downloaded version.
It allows users to draw on their photos easily and also encourages them to snap directly through the app. Along with this, you can also make customized clip arts and stickers on every picture.
Making a collage on this app is easy as it offers grids that help in customizing individual pictures within the collage.
Adobe is a popular name in the world of photo editing. Marketers, photographers, and all smart phones users are well aware of it. The Adobe Photoshop Express allows users to add text and border to images for free. Also, you can quickly enhance the features of your photos and edit captions for your favorite picks.
It has an additional security feature for the protection of photos on your phone. Most often, new users utilize their auto-correct option to enhance their images.
You can correct distortion, noise, blur, and much more in your photos. It is one of the main reasons; retailers prefer it for product marketing.
Among one of the best photo editing apps for android and iPhone, Google Snapseed ranks atop the list. It offers correction features of photos like color, brightness, contrast, and sharpening adjustments. It is flexible for all types of users and also enables cropping, resizing rotation, and straightening of images.
You can make the best use of its healing feature for adding glow and sparkle in the picture or introducing frames in family photos.
The app contains plenty of filters for fun and entertainment. You can edit almost every picture format in this Google Snapseed.
The Facetune app is better known as a selfie photo editor and works in portrait form. It is a perfect choice for editing pictures on smart phones. It is common among Flickr and Instagram users and works without Photoshop on the Smartphone.
It allows you to add natural makeup to the picture while fixing the blurs and blemishes in the picture. Also, it entertains by shaping the face with one of its features.
It is not an app for the business platform but photo editors will most likely love it. People can switch to its paid version but, the basic one is perfect and worth it.
After Prisma and Instagram, VSCO is popular for connecting picture lovers on one platform by creating one community. It works by combining the camera and editing tools together. This app is all about filters and it offers plenty of them for adding almost every desirable look to the picture.
You can switch to individual filters by sliding over the photos and find the best one easily. Also, it enables users to fix exposures, contrasts, skin tones, and temperature in the picture.
In addition to this, you can make the most of this app and adjust the shape and size by crop feature. People love to share their best edits in the VSCO community.
Photo Collage is a free collage maker for creating ultimate collages of your choice on Android and iPhone. Use it for making the best of collages quickly by downloading from the Play Store or App Store. The app offers a variety of layouts for enabling users to find the best one.
It provides numerous backgrounds for customizing the collage as much as possible. Also, it has basic photo editing tools for making sure you can shape a picture without switching between the apps.
Additionally, the app allows users to add text and personalize all types of fonts. Add your favorite colors in the photos and enjoy.
Final Thoughts
These are some of the best photo editing apps you can find on the web. No matter if you are an eCommerce retailer or a basic picture lover. These photo editors will help you in giving a professional look to the photos.
All of these are free versions and compatible with almost every type of Smartphone. You can check on all of them and stick to the one you want. Compare the results of each app and finalize the app as per your need!
Losing a person is tough but all of us here are bound to go someday. I know that it’s tough but we must move on. In this tutorial, I am going to show you how to create a memorial photo in Photoshop.
I’ll be using basic tools like the Selection tool, adjustment layers, and filters.
Before we begin, let me show you the before and after photo.
Step 1 – Open both photos to create memorial photo in Photoshop
Open the sky photo first or any other photo that you want to be put in the background. Go to File > Open and locate the photo.
Now open the person photo. Go to File > Open and locate the photo.
Step 2 – Put the person photo on the sky photo
Time to put the person photo on the sky photo.
Press Cmd + A / Ctrl + A to select the entire photo. Press Cmd + C / Ctrl + C to copy the photo.
Now, go to the sky photo and paste it by pressing Cmd + V / Ctrl + V.
Step 3 – Remove the background of the man in Photoshop
Grab the Quick Selection Tool from the tool panel or press Shift + W again and again until it comes.
Now select the man. See the below GIF where I used the Quick Selection Tool to select the man. It’s 12 MB in size. Give it some time to load if it’s not loaded.
Now use Select and Mask to refine the selection. Go to Select > Select and Mask.
Make sure that Output To: New layer is selected.
Press Cmd + D / Ctrl + D to deselect. This is what the photo now looks like.
Step 4 – Give the portrait an oval shape
Grab the Elliptical Marquee tool in Photoshop from the tool panel or press Shift + M again and again until it comes.
Create an oval shape around his face.
Now we’re going to remove the body that is outside the oval shape so that only face is shown in the final photo.
Invert the selection using Cmd + Shift + I / Ctrl + Shift + I. Open the layer panel and click on the layer mask.
Change the foreground color to Black.
Press Opt + Delete / Alt + Backspace to hide the area outside the selection.
Press Cmd + D / Ctrl + D to deselect. This is what the photo would look like.
Step 5 – Give the faded effect in Photoshop
Grab the Brush tool from the tool panel or press Shift + B again and again until it comes.
Reduce the Hardness of the brush to 0. Now brush on the lower edges of the man.
That’s all. This is what the final photo looks like
Whether we like it or not, we live in a digital world. Photos, videos, advertising, and visual stories have become an inevitable part of web content. We receive a tremendous amount of information from these sources. Speaking about visual content, perhaps, there isn’t a person who hasn’t heard about Adobe Photoshop.
While studying at college, you might have already thought about acquiring Photoshop skills. But a lack of time or motivation can stop us from a lot of things. Let’s try once more together. In terms of time, you can save yourself several hours for training when you delegate your college assignments to professional writing services such as https://essaypro.com/. Then, you can spend that time on something that matters to you.
What about motivation? Let’s try to figure it out too. Why do you need to spend time on learning such a complex software package like Photoshop? What is the practical use of mastering the intricacies of this program to an ordinary student, who is far from the design realm? The best reasons are gathered below.
1. Editing Shots
The internet, which has invaded our everyday life, seems impossible without raster images. Even if you are just communicating with your friends on a social network, sooner or later, you will want to share some pictures. Exchanging photos, memes, and even emojis is a part of our daily life. That’s where Photoshop will become an indispensable tool.
This editor helps correct the photographer’s mistakes. Adjust lighting, shadows, remove the “red-eye” effect, fix the horizon line, or remove extra objects from the frame. You can quickly make shots black and white, or add brightness in 1-2 clicks using filters, color or tone correction.
At the moment, the development of Photoshop impresses with its functionality. It allows you to process images, radically transforming them. But it also gives a solution to such simple tasks as making yourself a cool avatar or editing some Instagram pics.
2. Career Possibilities
Knowing the basics of editing will be a useful skill for those who study in the field of digital marketing, visual communications, event management, advertising, or SMM. As running pages on socials is an important part of their job, Photoshop skills will surely prove their worth. With unique visual content, it will be easier to create a post or article on Facebook or Instagram, and attract a larger audience.
There are also a lot of highly paid professions that require Photoshop skills. So, if you are interested in working as a graphic designer, web designer, or mobile app designer, it’s time to go ahead and acquire solid editing skills.
3. Self-Expression
With Photoshop and its tools, it’s easy for anyone to express their creativity. You no longer need to be Leonardo da Vinci or Pablo Picasso to create impressive art. This editor helps you realize your graphic projects, edit images, and even make greeting cards.
4. Saving Money
The editing skills allow you not to spend additional costs on simple design services. If you run a website, you will no longer have to pay for images or poster design. Also, in your future career, you can make business cards and advertising materials yourself. Both quickly and for free.
5. Developing Business
Photoshop can help you develop a business based on your own artistic product in the future. Today, in the era of technology, the e-Commerce business is rapidly growing. Beautiful and fancy shots are a very important factor in attracting customers nowadays. You can make your products’ pictures more glamorous and thus help them stand out on the market.
6. Creating Family Album
Besides professional opportunities, Photoshop skills can help you solve the problem of a family gift. How much disk space do your pictures occupy? And how many can you proudly show to your guests? Definitely not all of them. But these shots can become a wonderful material for creating masterpieces in Photoshop.
With this editor, you can fix anything: framing, color, brightness, contrast, sharpness. Then, you can save everything in a more compact format without losing quality. Moreover, do not rush do delete the shots that seem completely failed they can become a great basis for collages.
7. Earning Money
There is a fairly large group of people for whom working with pictures has become not only a pleasant hobby but also a good way of making a living. There are lots of online stock image marketplaces where you can sell your creations. Why do people buy those pictures? Mainly for website design or promotion materials.
Conclusion
Photoshop has unlimited possibilities, hundreds of tools, thousands of functions, and millions of effects. It is almost impossible to learn it perfectly, but it is quite possible to master it at a decent level.
This editor is not just a toy or a fancy program for a small cohort of professionals. It’s an excellent and practical tool for any modern person, which allows you to realize the boldest idea and radically transform an ordinary picture to a masterpiece. Does it sound like a reason to start learning now?
Is 8GB Enough for Photoshop? The answer is a big NO.
If you just wanted to know whether 8 GB is enough for Photoshop or not, you have the answer. If you want to know why then read further.
Photoshop is a resource-hogging software like Chrome. The reason behind is that it has to do many calculations to seamlessly edit a photo. The calculation gets bigger as the image size increases.
When is 4 GB RAM enough for Photoshop?
If the photos are fairly small (max 2000 x 2000 pixels) then 4 GB RAM shouldn’t create any problem.
Also, note that if you open multiple photos of this size then each photo will take some RAM. This ultimately reduces the available or free RAM which then makes Photoshop less responsive.
We already know that the bigger the photo is, the more RAM it requires.
Nowadays, all phones are coming with at least 12 MP camera. The current iPhone 11 also comes with a 12 MP camera. Photos taken by a 12 MP camera are 4000 x 3000 pixels in size.
DSLR cameras are of more megapixels. The most common ones have 24 MP and the photos taken from a 24 MP camera are of 6000 x 4000 in size.
This certainly means that you cannot edit even phone photos smoothly in Photoshop when your PC has only 4 GB of RAM.
A person on Reddit says that it can work with Photoshop on a PC with a 4 GB RAM but can’t save complex GIFs.
Summary: If you edit one photo at a time that is smaller than 2000 x 2000 pixels then you can go for it.
When is 8 GB RAM enough for Photoshop?
I have used Photoshop in the Macbook Pro 2015 model which had 8 GB of RAM.
I could edit photos that were fairly large (8000 x 6000 pixels) on my MacBook Pro with an 8 GB RAM. But the problem starts happening when I open multiple photos and after using the filters.
My Photoshop also used to become less responsive when I do some calculation-intensive tasks like cloning using the Clone Stamp Tool or healing using the Healing Brush Tool.
I remember when I had to deliver a file within the next 15 minutes but the photo size was big. The photo was 12000 pixels wide. Even though the task was very simple (removing a cigarette from one hand), but I missed the deadline because my Photoshop was taking so much time when I was using the Clone Stamp Tool.
Other people also say the same thing. Here’s a comment on Reddit.
Summary: If you edit one photo at a time that is smaller than 6000 x 6000 pixels then you can go for it. Also, if you edit multiple photos that are very small in size then you can go for it.
When should I go for 16 GB of RAM for Photoshop?
When you edit big photos (8000 x 8000 pixels) or when you have a habit of opening multiple multiple photos at a time in Photoshop.
When I bought my current MacBook which has 16 GB of RAM, Photoshop started editing even big Photoshop smoothly.
I have a habit of opening multiple photos in Photoshop and then edit them one by one. My 8 GB MacBook pro was a bit laggy because of this. But, the things are working smoothly in my 16 GB MacBook Pro.
Here’s a very good answer by a Quora user.
Here’s one more comment on Reddit. If Photoshop sees that you have 16 GB, it’ll use most of the RAM so that it runs smoothly. Card
Summary: If you edit one photo at a time that is smaller than 8000 x 8000 pixels then you can go for it. Generally, photos are not this big but the power of 16 GB RAM also shows up when Photoshop still runs smoothly even when you have opened multiple photos in Photoshop.
Exposure is an important part of photography. It determines how light or dark your image is. It also plays a big part in the overall look of the photo. If you’re not familiar with the term, exposure is the amount of light (either from the flash or other light sources) that reaches the film or camera sensor.
It can be difficult to figure out the perfect amount of exposure for your shot. That’s why we’ve put together a list of tips that can help get the proper exposure for your photos.
Understand the Exposure Triangle
Without an understanding of the exposure triangle, you won’t be able to make adjustments to set the correct amount of exposure for an image. The exposure triangle refers to adjusting 3 camera settings: adjusting the shutter speed, ISO, and aperture settings.
Adjusting these settings according to the amount of light in your scene can allow you to get the perfect amount of exposure in your image. To understand how the exposure triangle works, you’ll first need to understand how the shutter speed, ISO, and aperture affect the outcome of an image.
Shutter Speed
The shutter speed is the length of time the shutter is open. This allows a certain amount of light to reach the camera sensor. You can adjust the shutter speed from slow to fast.
Slow shutter speed will allow more light to reach the camera sensor. This works best when you are dealing with poorly lit environments or when photographing at night. Fast shutter speed will give you less light, however, this is preferred to capture freeze motion images that are invisible to the eye.
Aperture
The aperture is the opening of the camera lens. This is how light moves into the camera. How large you adjust the aperture can allow more light to reach the camera sensor.
Aperture also contributes to the sharpness of a photo, which is also known as the depth of field. A small aperture gives you a wider range for the portion of the image that is actually in focus, while a large aperture only allows for a small portion of the photo to be in focus. While photos taken at f/1.2-1.8 look beautiful, you need to make sure you nail the focus.
ISO
ISO is only used when you’re unable to brighten your shots with a wider aperture and a longer shutter speed. The ISO is adjusted by numbers. For a darker photo, adjust lower and for brighter photos, adjust higher. Just keep in mind, that raising the ISO will add more noise to your image which will result in a grainy look.
Adjusting all three of these together can give you the proper amount of exposure that can turn an image into art.
Check the Histogram
Most DSLR cameras are built with a histogram. This is basically a small horizontal graph that runs from 0 to 255, with 0 being black and 255 being white. This doesn’t mean that the middle of the histogram is perfect exposure. It all depends on the image you’re trying to capture.
The histogram will show you how light or dark your image is. With this information, you can adjust the exposure triangle, or lighting you’re using, to get a darker or brighter image.
The histogram is only meant to be a guide for you; you aren’t able to adjust it. You can simply use it as a guide to perfect the exposure in the next photo. However, there is another option. You can use Live View on your camera to view the histogram directly on your screen.
This will allow you to see the amount of exposure before you take the picture. With this option, you’ll be able to adjust the aperture, shutter speed and ISO to achieve a preferred histogram level for your shot.
Keep in mind that checking the histogram is more accurate than viewing the image on your LCD screen. Your screen is often too bright and will make the image appear brighter than it actually is. Never measure your exposure by viewing the image on the screen. It’s best to use your histogram and adjust exposure levels accordingly.
Use Exposure Bracketing
Exposure bracketing is an easy way to figure out how much exposure a photo needs. With this option, you can take 3 or more shots of the same image consecutively with different exposure settings.
You should be able to find this option in your camera. You can choose how many frames you’d like and adjust each one based on the amount of exposure you think is best for the scene.
The camera will then take 3 or more identical photos with different exposure levels. This is a very quick and simple way to get the proper amount of exposure when you aren’t sure how much is needed for the shot.
Keep Your Camera Steady
This is essential for long exposure shots. Using long exposure can give you stunning images, especially during the night. Likewise, keeping your camera steady can help you when using fast shutter speed, as well as with exposure bracketing.
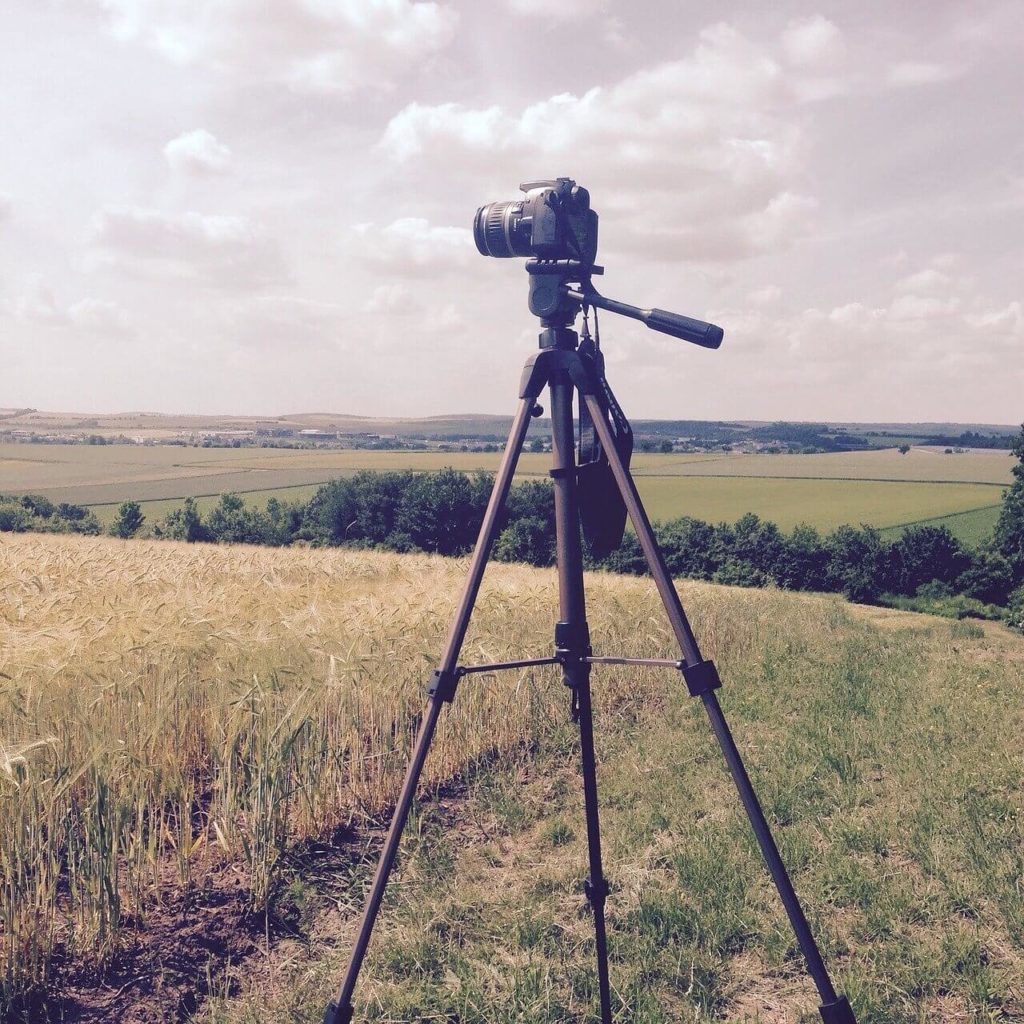
The best way to keep your camera from shaking is to use a tripod. Even the slightest movement can ruin a photo by causing blurriness. For long exposure shots, it’s best to use a timer or remote to capture the image. It’s also important to check the weather. A windy day could be able to cause movement within the tripod, ruining your shot.
Avoid Bright Lights
A bright light is able to reflect off the camera lens and cause an overexposed image. Even adjusting the exposure on your camera won’t be able to help avoid the lights.
Angling the camera might move the light source away from the lens, however, this isn’t always an option. Angling the camera in a different direction can completely change the style of your image.
Avoid taking pictures towards the sun. The sun can completely erase your image to where you won’t be able to recover it using any editing software. Use the sun as a light source, just make sure to keep the sun out of your image or off to the side.
Another light to avoid is the flash; sometimes it’s best to avoid it altogether. A flash can create unnatural lighting that might make your pictures look too sharp. Instead, adjust your ISO setting to a higher level, or set your aperture to the widest setting. This can give you lighting without a bright flash.
Conclusion
Getting the proper amount of exposure in your images might seem difficult, especially for beginners. However, with a little practice and adjustments, you’ll be able to understand how to properly expose your photos quickly and accurately.