Day 13: The Content Aware Crop Tool in Photoshop

And with the launch of brand new Adobe Photoshop 2015.5, here comes a new feature that is Content Aware Crop Tool in Photoshop. Gone are the days when you need to crop your image a little bit whenever you rotate a photo. Before I dive deeper into this tutorial, let me tell you about the feature that came with Photoshop 2015.5., i.e. The brand new Face Liquify Tool.

So let’s begin with the tutorial.

What is Content-Aware Crop Tool?

Wondering?

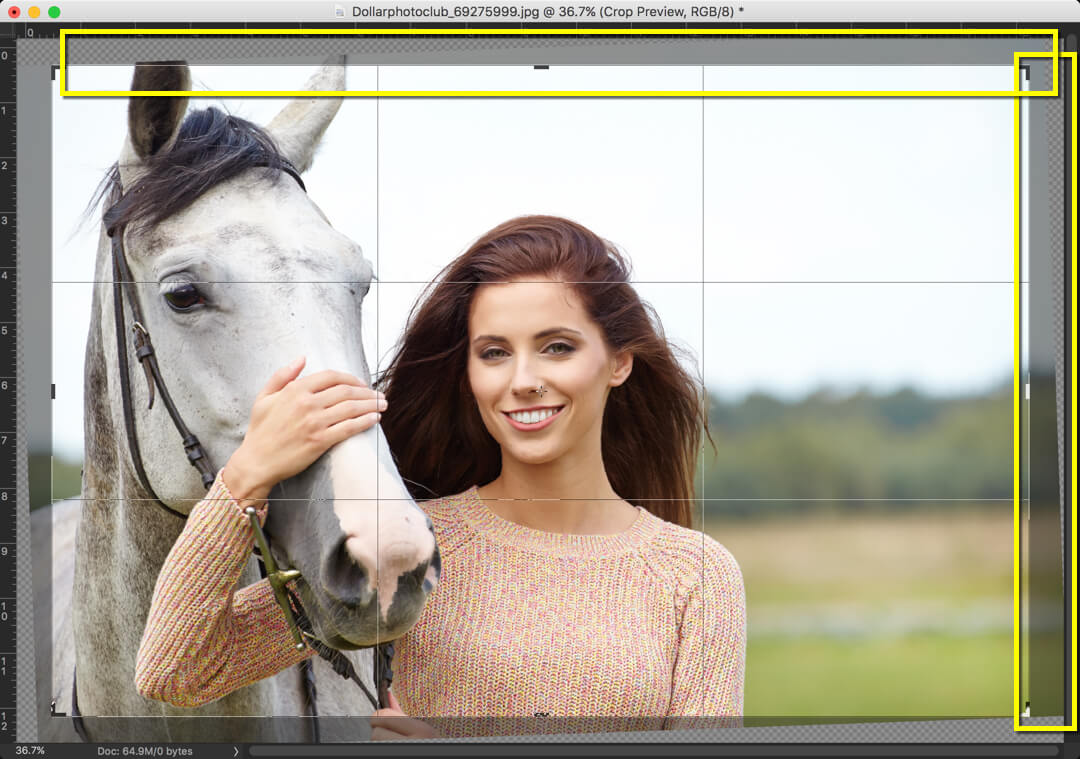
Remember when you used to rotate a photo in Photoshop, Photoshop crops the image a little bit. If you don’t remember it, look at the screenshot below.
1.jpg

Look at the area that is enclosed within yellow color. To keep every single detail and maintain aspect ratio in a photo, Photoshop crops out some part.

Now look at the same image with Content-Aware turned on.
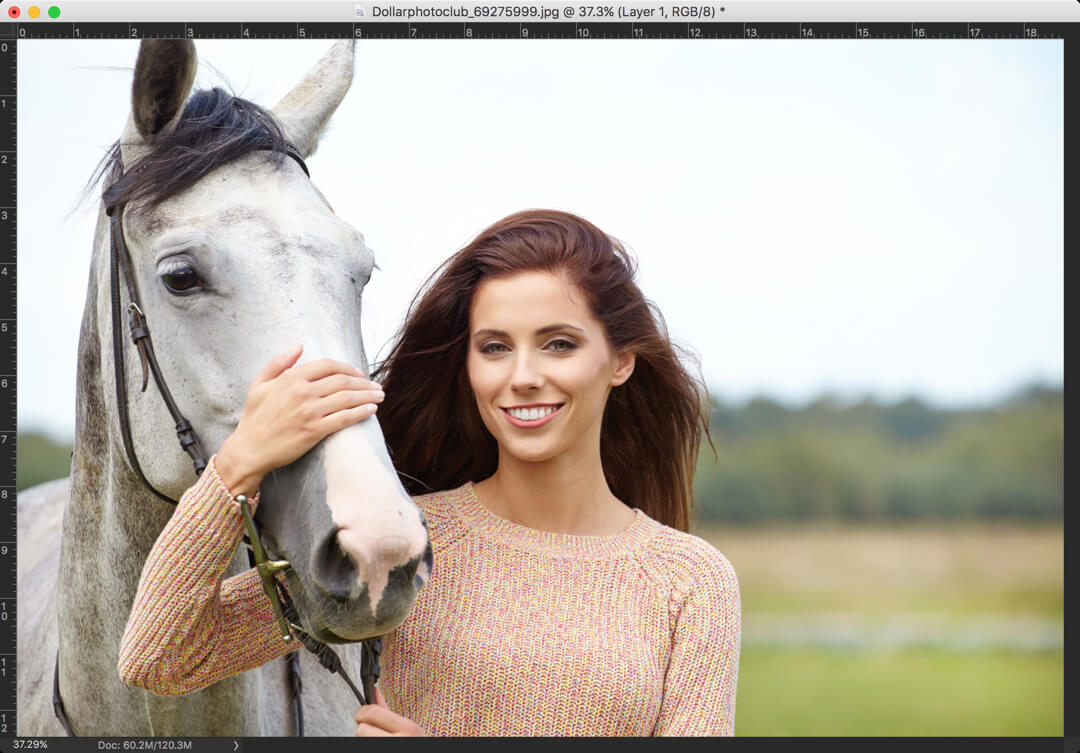
2.jpg

Now let’s find out how to use this tool.

Step 1: Activate the Crop Tool

Grab the Crop Tool from the tool panel or press Shift+C again and again until it comes.
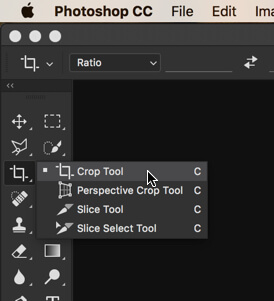
3.jpg

Step 2: Turn on Content Aware Crop

As the image is skewed, we need to straighten it. But before we click on Straighten, are you seeing the Content Aware checkbox at the far right? Did it use be there?

4.jpg

Well, no!

After turning Content Aware on, click on Straighten.

Step 3: Draw a Horizontal Line

Now draw a line along the something that needs to be perfectly horizontal.

In the below image, the place where grass and trees are meeting must be horizontal. After drawing a line, Photoshop will show you the angle by which an image is skewed. In my case, the image is skewed by 4.1 degrees.
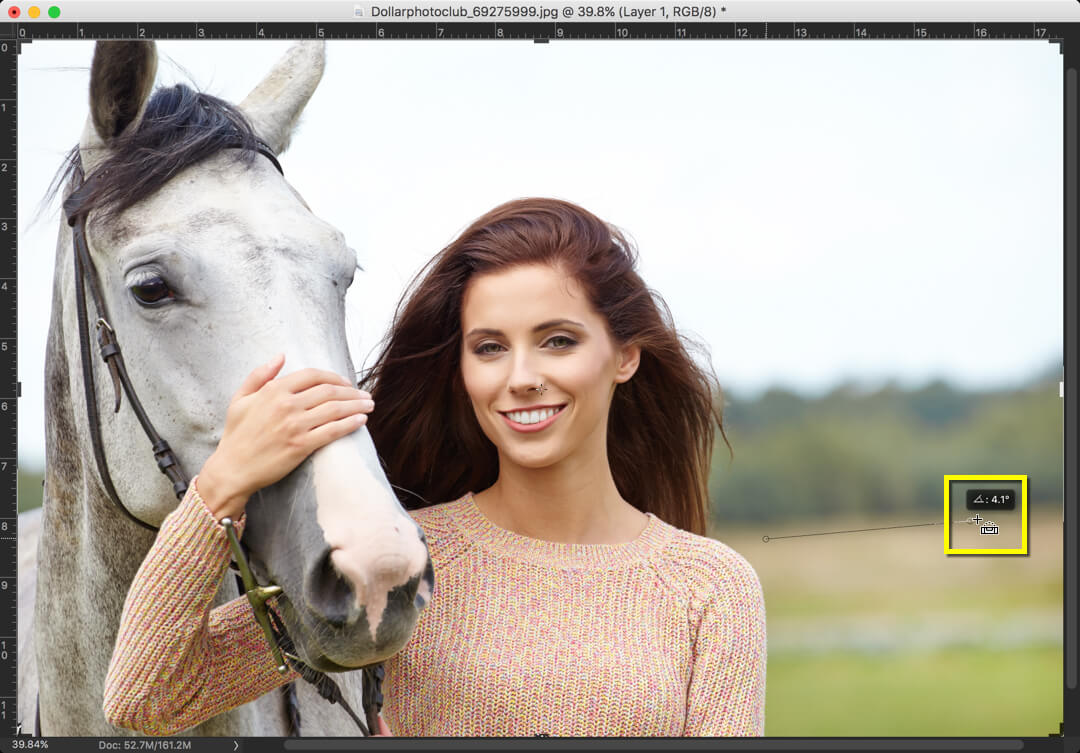
5.jpg

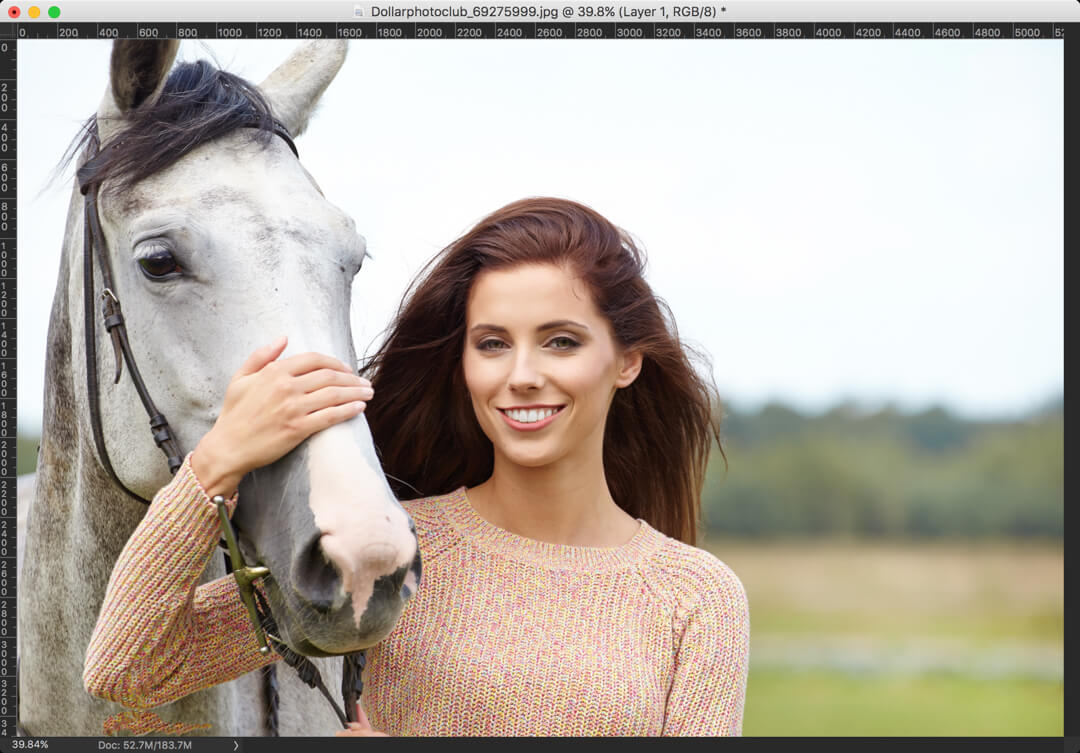
Press Return/Enter. And that’s it. Give few seconds to Photoshop.

And Photoshop has straightened your photo by adding extra added pixels to it. Isn’t that awesome?

6

Let’s move to the next page where I’ll tell you where this tool fails.

Areas Where Content Aware Crop Tool Fails

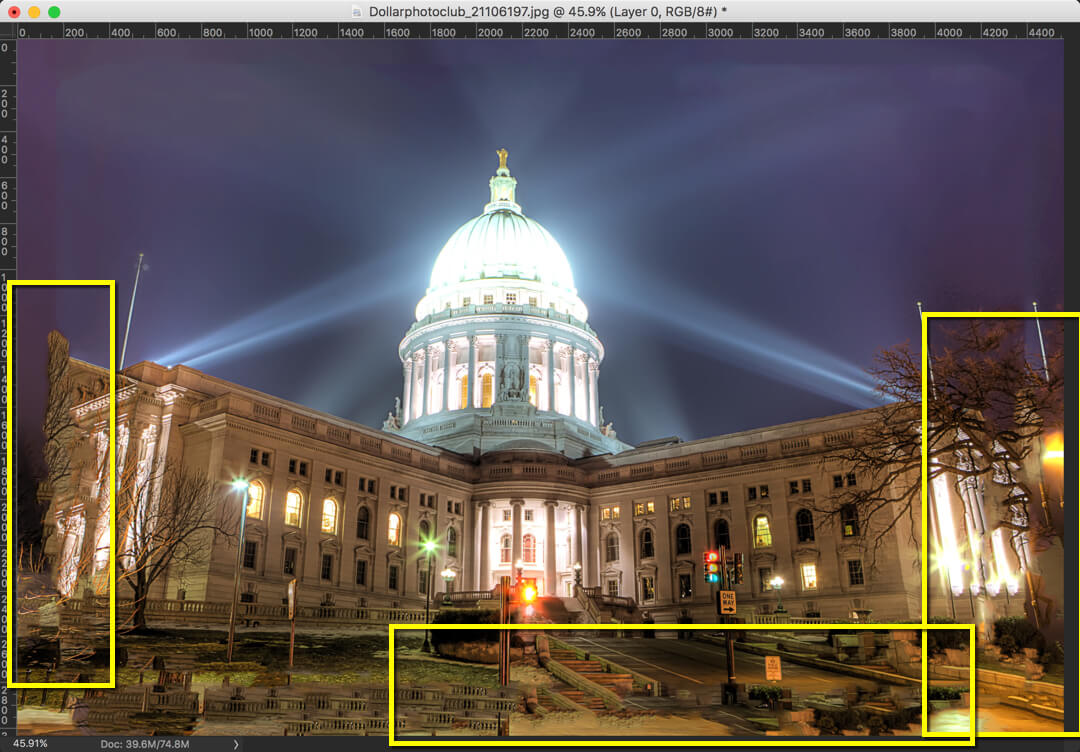
As you can see in the above image, the corners of the image are pretty much simple to create. This tool generally fails when the corners of the photo are complex to create. Just look at the photo below.

Look how Photoshop messed up the image by filling the space with Content-Aware tool.

7

But as I always said, something is better than nothing. At least Adobe thought of adding this feature.

Time to wrap up this tutorial.

Please support TrickyPhotoshop by sharing this tutorial with your friends and family on Facebook, Twitter, and Google+.

Face Liquify Tool in Photoshop- Change that Face Structure

Hey, guys! It’s been a while since I wrote any tutorial, and your patience has paid off because of the introduction of brand new Photoshop 2015.5. Yes, it’s 2016 and I am also wondering why Adobe didn’t go with 2016 in its name. But let’s not go deep into it. It’s a multi-billion dollar company, and I know there must be some reason behind this name. Let’s get directly into the brand new Face Liquify Tool in Photoshop.

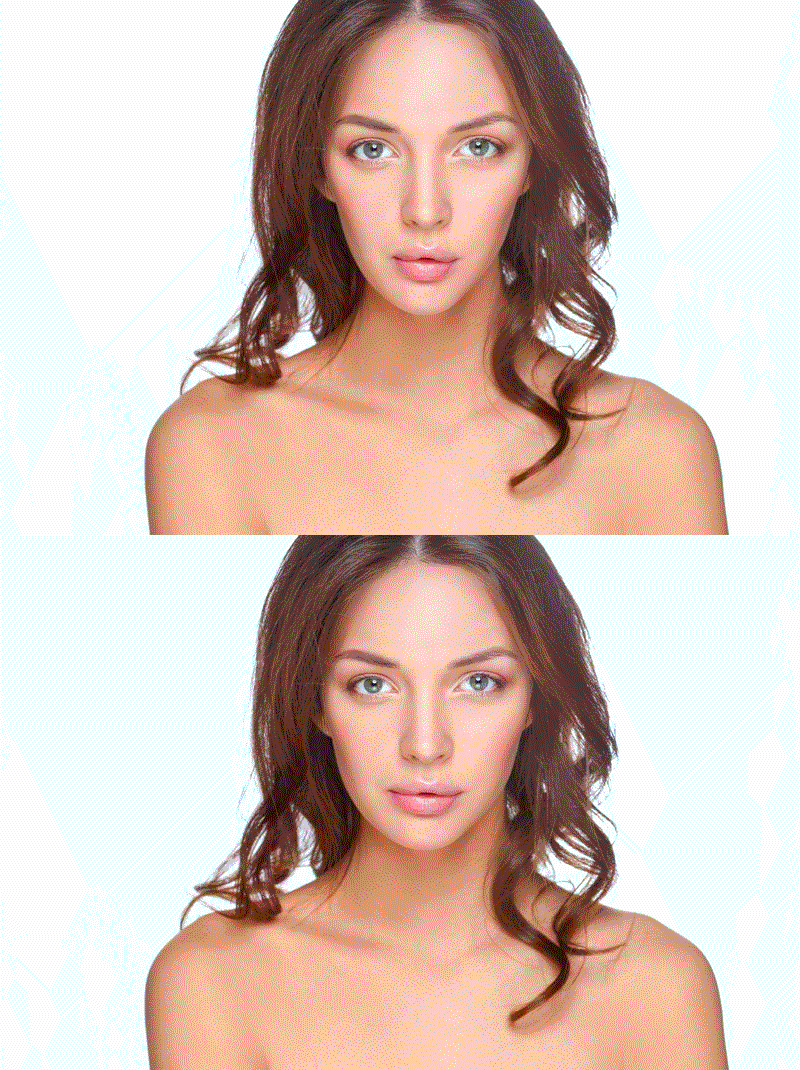
Before we go further, let me show you the Before and After photo.

Before-and-After.gif

Step 1: Open Liquify Tool

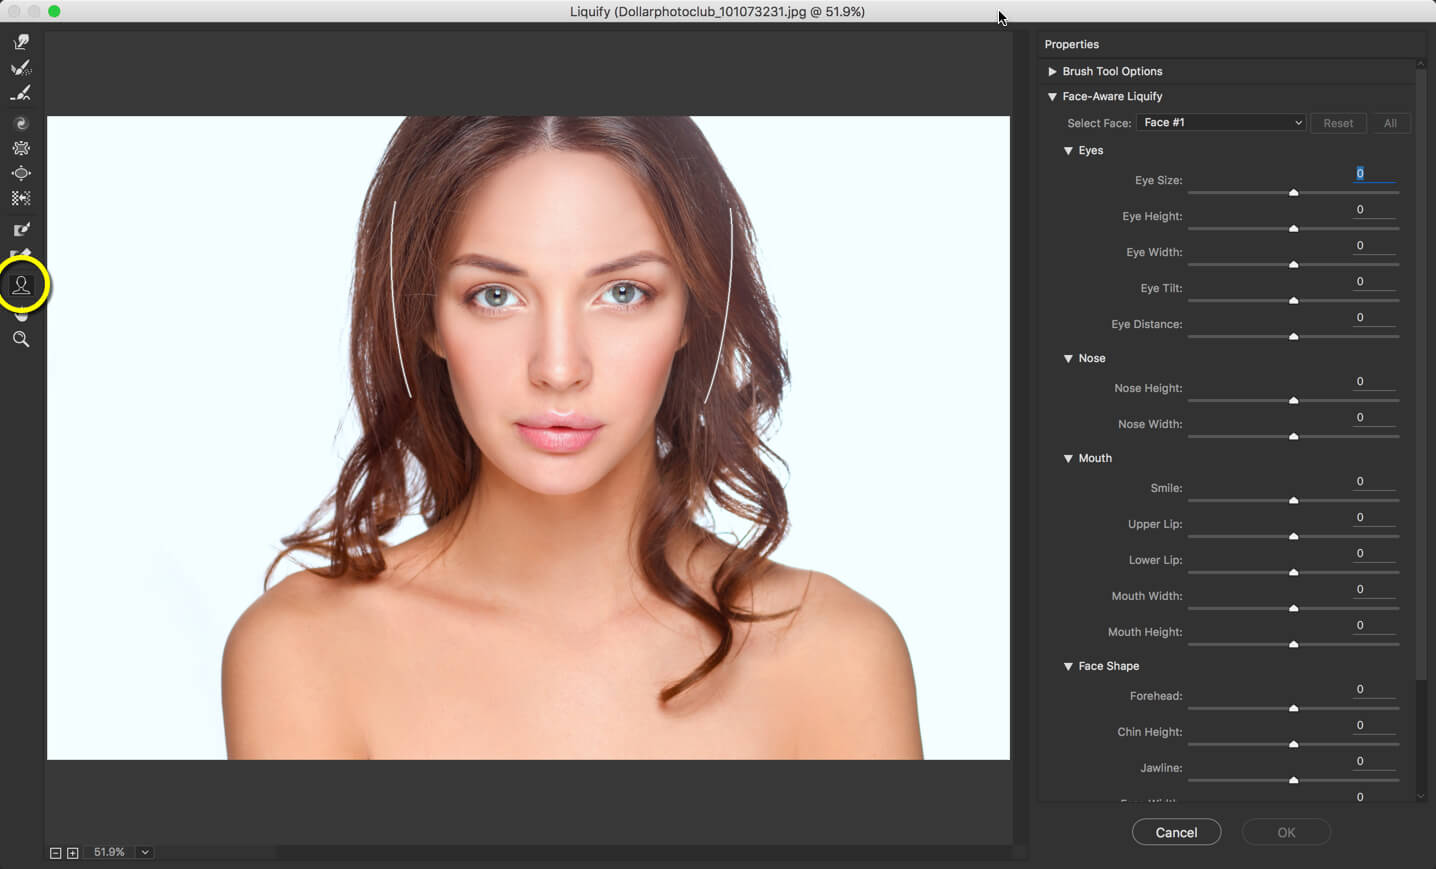
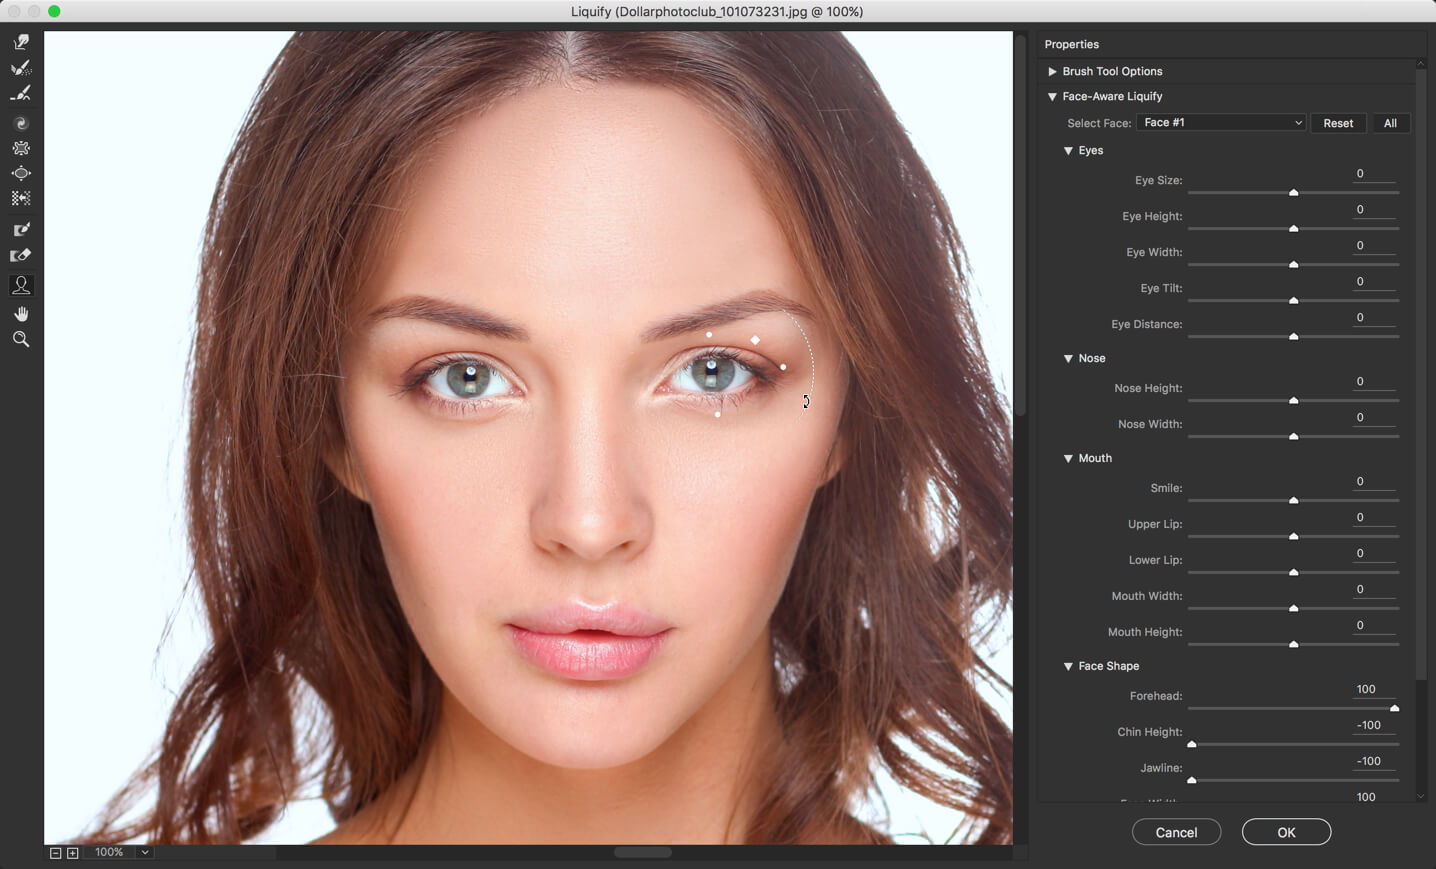
After opening your photo, the first thing you need to do is to open the Liquify tool. You can do it by either going to Filter>Liquify or by pressing Cmd+Shift+X/Ctrl+Shift+X. 

The first thing that you need to do after that is to choose Face Tool or press A.

1.jpg

You’ll notice two beautiful lines surrounding the face.

Step 2: Get to Know the Properties

Now let’s get into the properties of Face Liquify Tool in Photoshop.

1: Face Shape

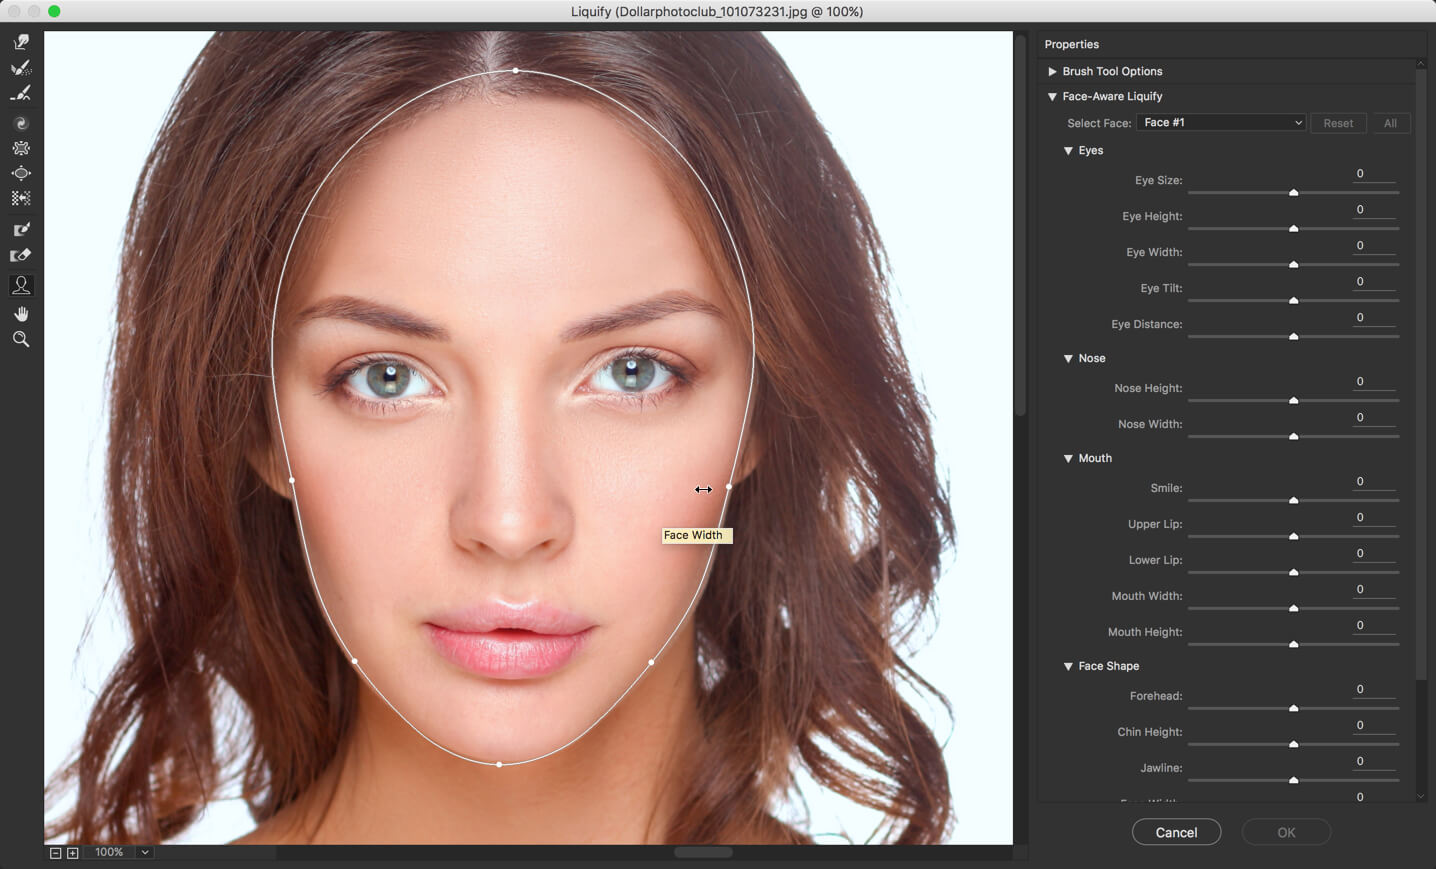
The best thing is that you don’t have to look at the right-hand side of your screen to deal with those sliders. Every single thing can be done within the image itself.

Simply hover your mouse over the edge of the face and Photoshop will automatically pop up the line to change the face shape.

2.jpg

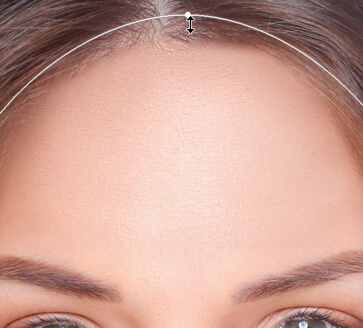
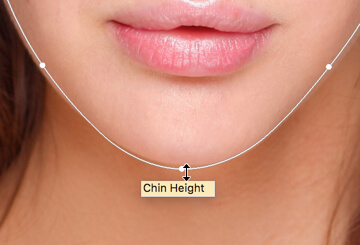
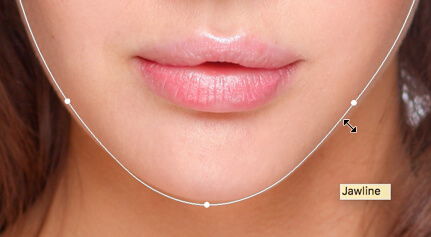
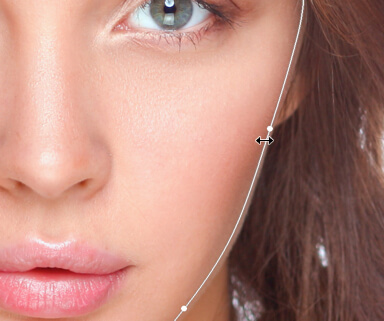
You’ll find four points associated with face shape:

Forehead: Used to increase or decrease the size of the forehead

3

Chin Height: Used to increase or decrease the size of the chin

4

Jawline: Pretty cool feature. Can alter jawline of a face

5

Face Width: Changes the width of a face

6

2: Enhance Your Eyes with Face Liquify Tool in Photoshop

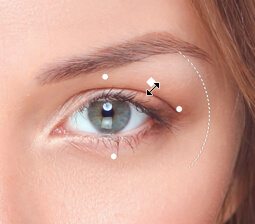
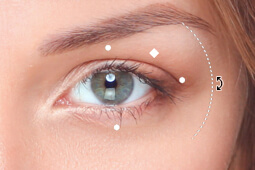
Time to learn how to make beautiful eyes even more beautiful. Simply hover your mouse over the eyes. You can do with either of the eyes, and the same result will reflect in another eye as well.

7.jpg

Eye Size: Used to increase or decrease the size of eyes

8

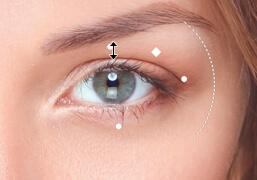
Eye Height: Used to increase or decrease the height of eyes

9

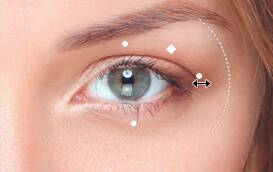
Eye Width: Used to increase or decrease the width of eyes

10

Eye Tilt: Used to tilt eyes

11

Eye Distance: Used to increase or decrease the distance between the two eyes. You need to use the slider for this option. 🙁

12

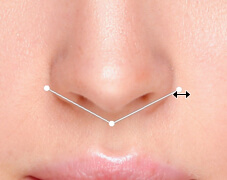
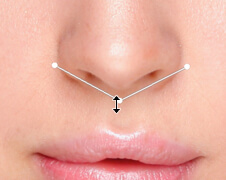
3. Nose – Now You Don’t Have to Pay $45k for Your Nose Job

Time to make the nose better.

13.jpg

Nose Width: Used to increase or decrease the width of the nose

14.jpg

Nose Height: Used to increase or decrease the height of the nose

15.jpg

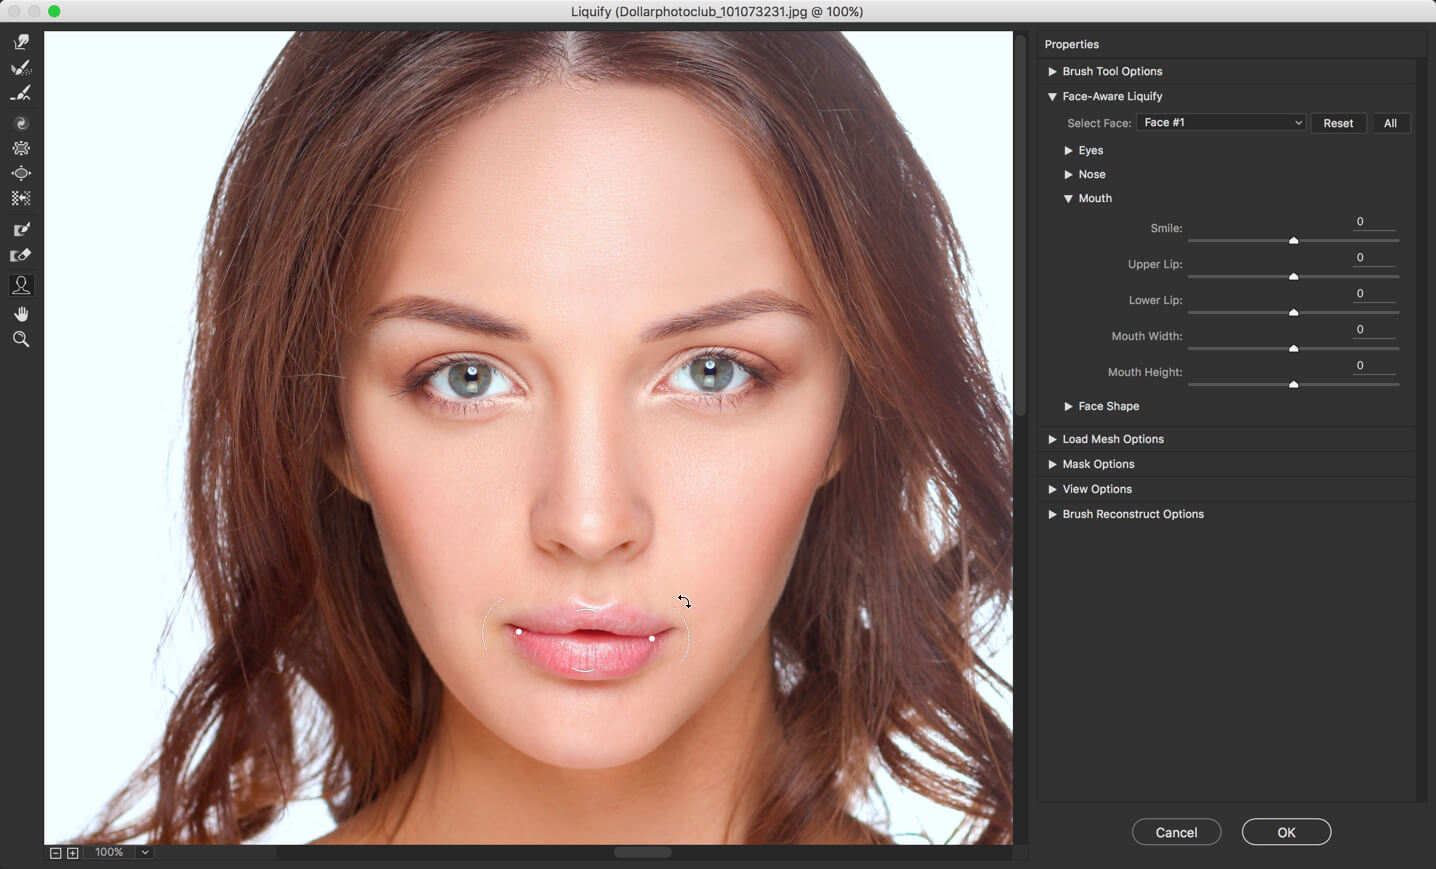
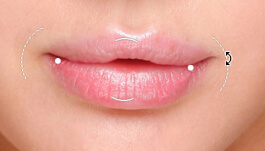
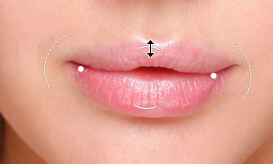
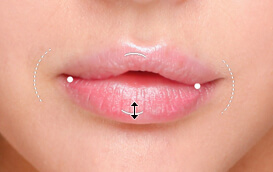
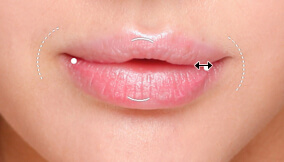
4. Mouth – Make Your Smile Better

You know that Face Liquify tool can’t get any better when it comes with a feature to enhance your smile. You can even make a dull person smile with this feature. Of course, it does much more to your mouth than a smile.

16.jpg

Smile: Increase or decrease your smile

17.jpg

Upper Lip: Increase or decrease your upper lip

18.jpg

Lower Lip: Increase or decrease your lower lip

21.jpg

Mouth Width: Increase or decrease your mouth width

19.jpg

Mouth Height: Increase or decrease your mouth height

20.jpg

And with this said, we’re concluding our tutorial. I hope that you’ve enjoyed it.

Please support TrickyPhotoshop by sharing this tutorial with your friends and family of Facebook, Twitter, and Google+.

Create Condensed Raindrops on Wet Glass in Photoshop

Hey, guys! Welcome to my another tutorial. I had been busy with tutorials on Instagram and as I have written tutorials on every Instagram Filter, I guess it’s time to write on traditional Photoshop effects. Last time I wrote on Creating Instagram Crema Filter in Photoshop on popular demand.

Monsoon is not too far away and time to learn how to create condensed raindrops on a wet glass in Photoshop. After this scorching heat, I must say that I am very much excited about the monsoon, and why shouldn’t be I? I love rain and its smell.

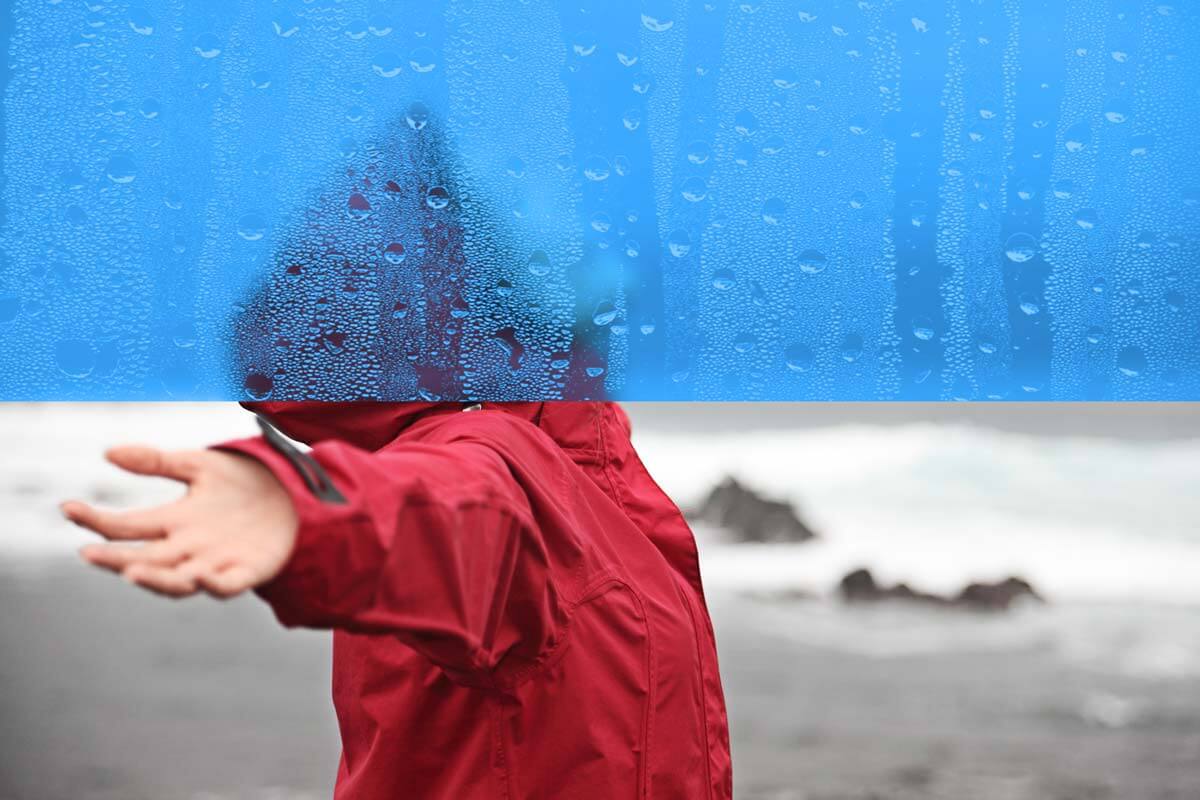
So without further ado, let’s begin the tutorial. But before we begin, I’d like to show you the before and after effect.

Before and After

Before-and-After.jpg

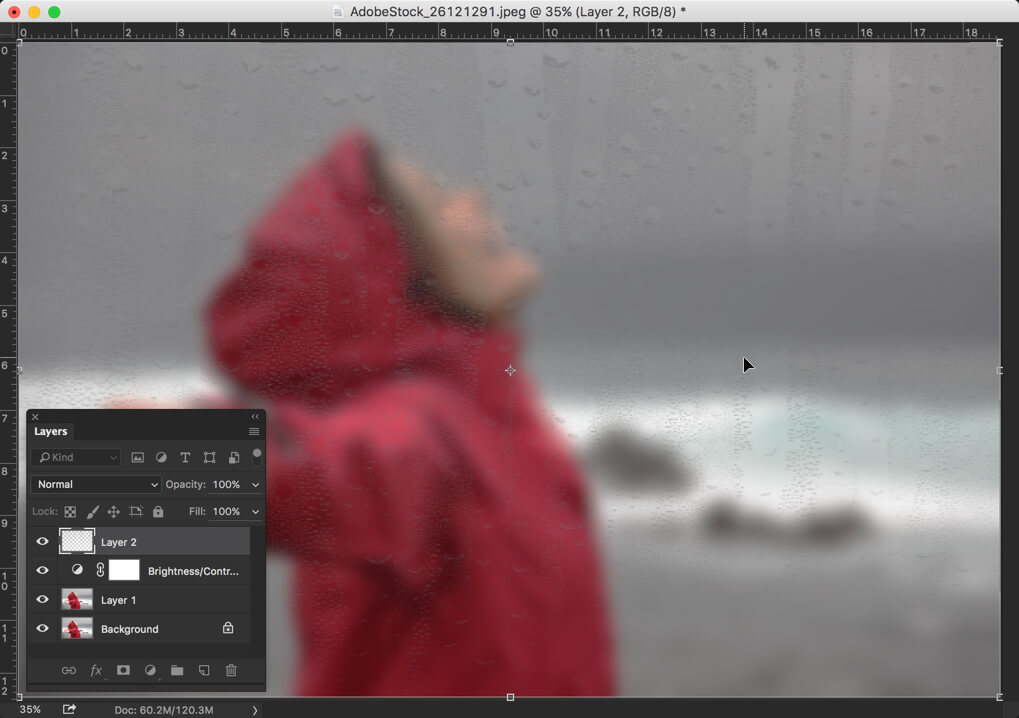
Step 1: Blur the Image

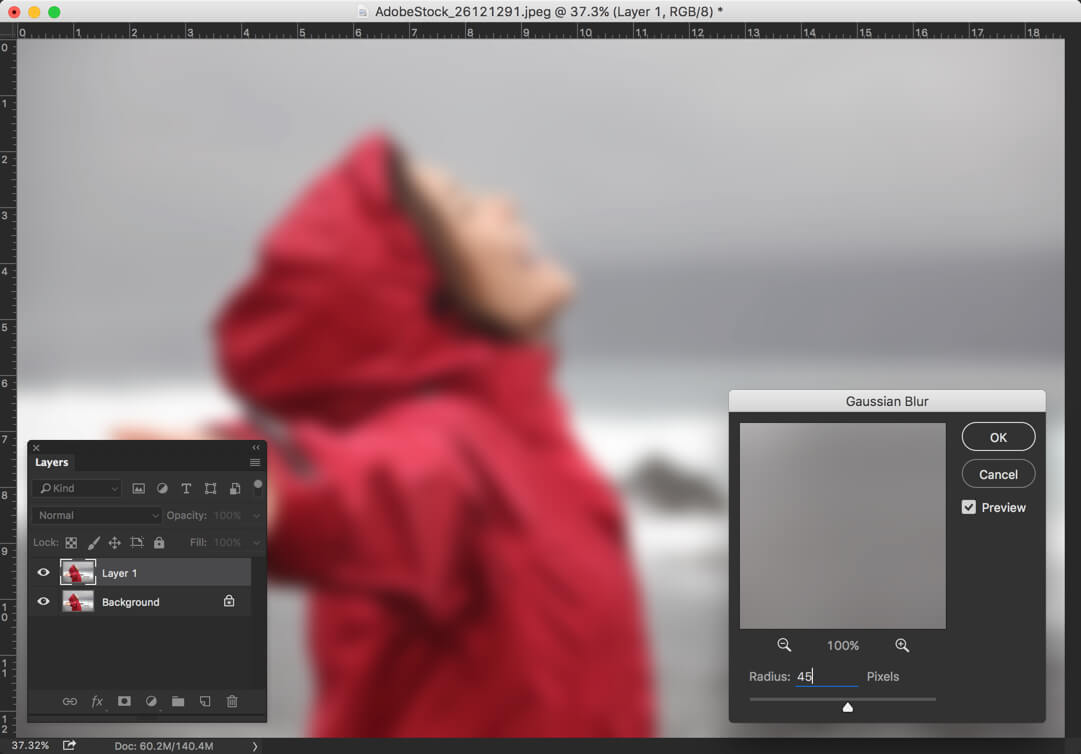
The first thing we need to do is to blur the image. You want your viewers attention on the raindrops that we’re about to create, not on the image.

Sidebar: If you want to know how to remove glare from glasses or remove reflection from glasses, check our tutorial on how to remove glare from glasses.

Duplicate the image by pressing Cmd+J/Ctrl+J. Go to Filter>Blur>Gaussian Blur. The radius of blur depends on the size of photo. My photo’s size is 5616 x 3744 which is pretty much huge. If your photo is 2000 pixels wide, you’d probably like to go with somewhere near 30 pixels.

1.jpg

Step 2: Darken the Background

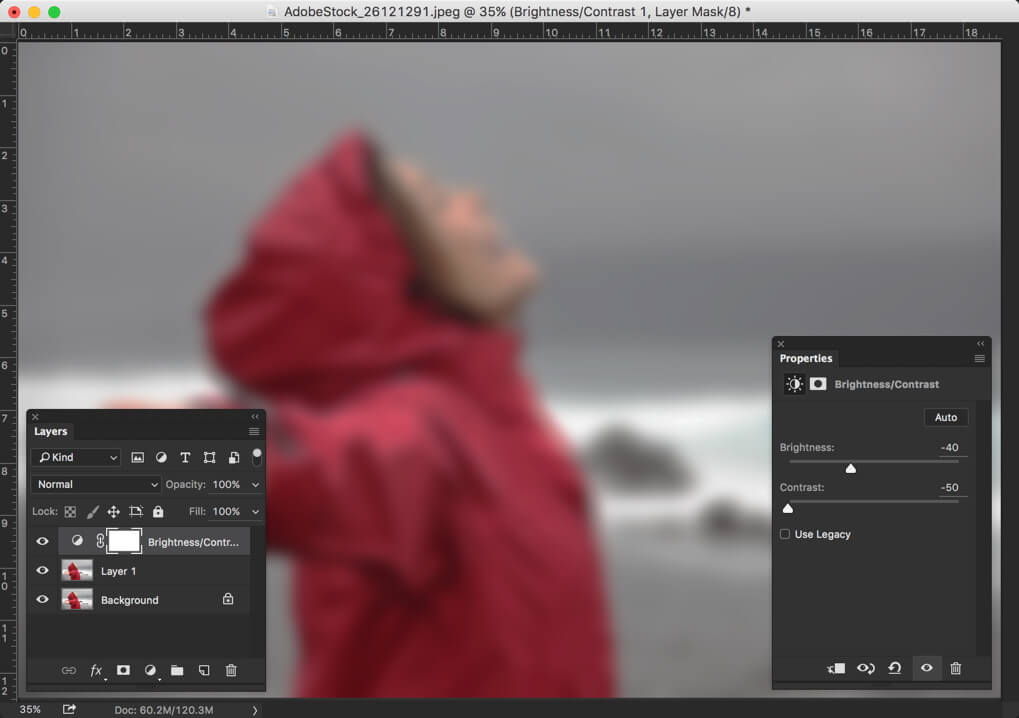
I guess that the image is pretty much lit. Let’s darken it a little bit.

Go to Layer>Adjustment Layer>Brightness

Reduce the brightness to -40 and contrast to -50.

2.jpg

Step 3: Paste the Raindrops Image

The biggest advantage of this tutorial is that ,unlike other tutorials, you don’t have to create raindrops.

Download the image from here: http://madetobeunique.deviantart.com/art/rain-drops-condensation-PNG-180893678

Now open the image in Photoshop, copy it, and paste it on the image you’re working on.

Activate the Free Transform Tool by pressing Cmd+Shift+T/Ctrl+Shift+T, and make it cover the whole background.

3.jpg

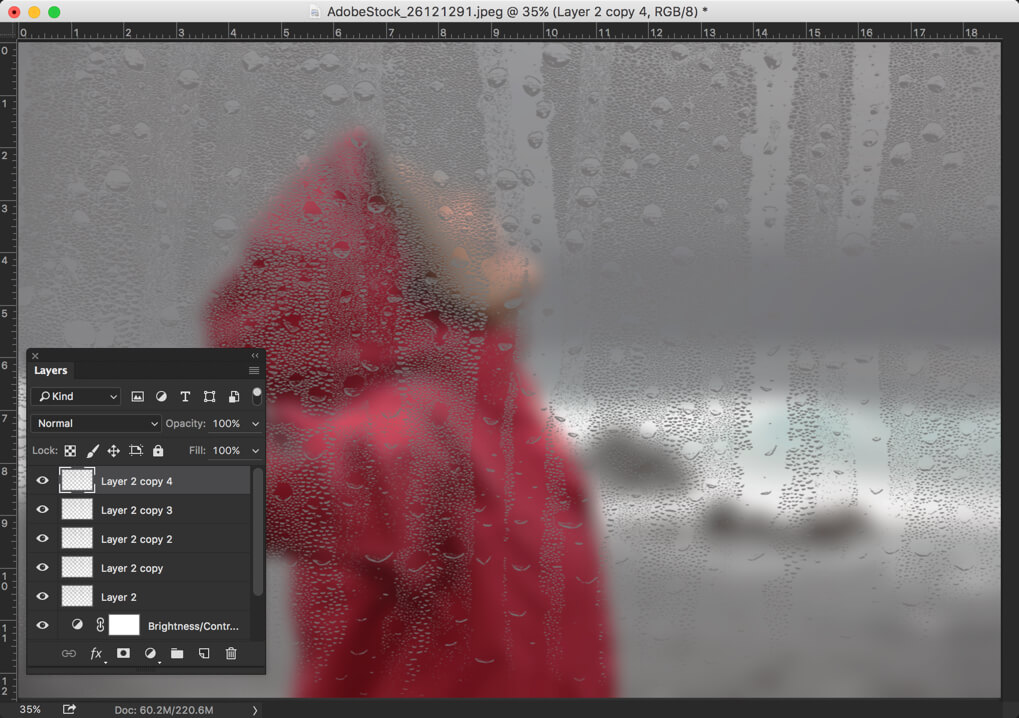
Step 4: Duplicate the Layer

Like me, if you think that your raindrop is not much visible, you can simply duplicate the layer multiple times. I have duplicated it 4 times. Press Cmd+J/Ctrl+J to duplicate a layer. Press it 4 times to duplicate 4 times.

4.jpg

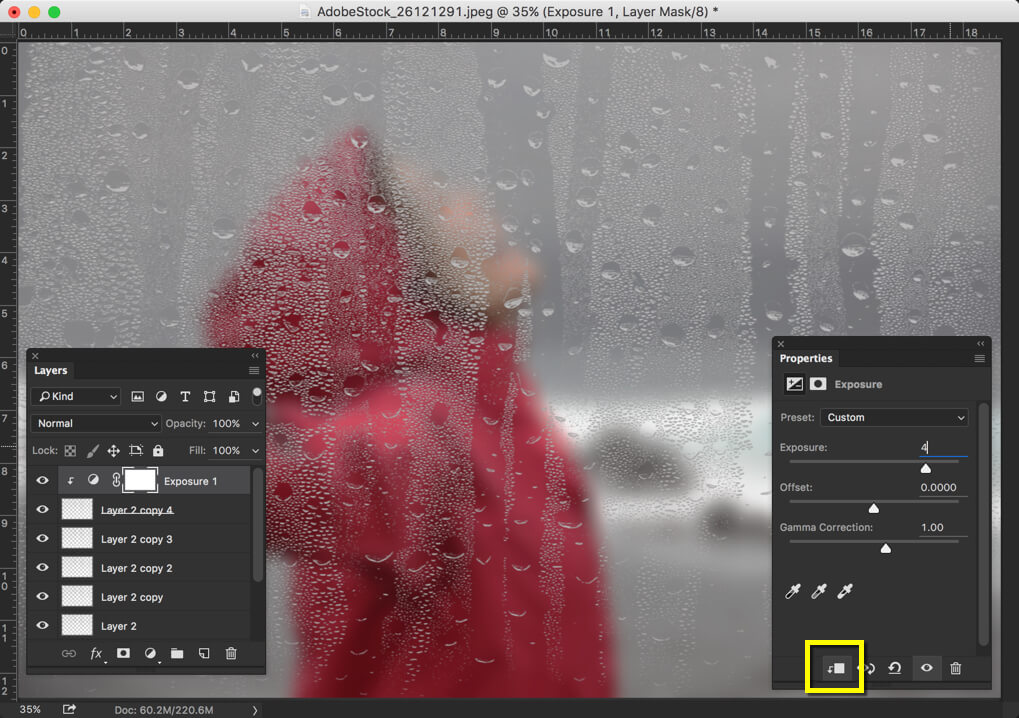
Raindrops seem pretty much dark. Let’s increase the exposure.

Go to Layer>New Adjustment Layer>Exposure.

Increase the exposure to 4. Make sure you also click on the eye icon to clip the layer. By turning this on, you tell Photoshop that the changes will only affect the layer that is just below it.

5.jpg

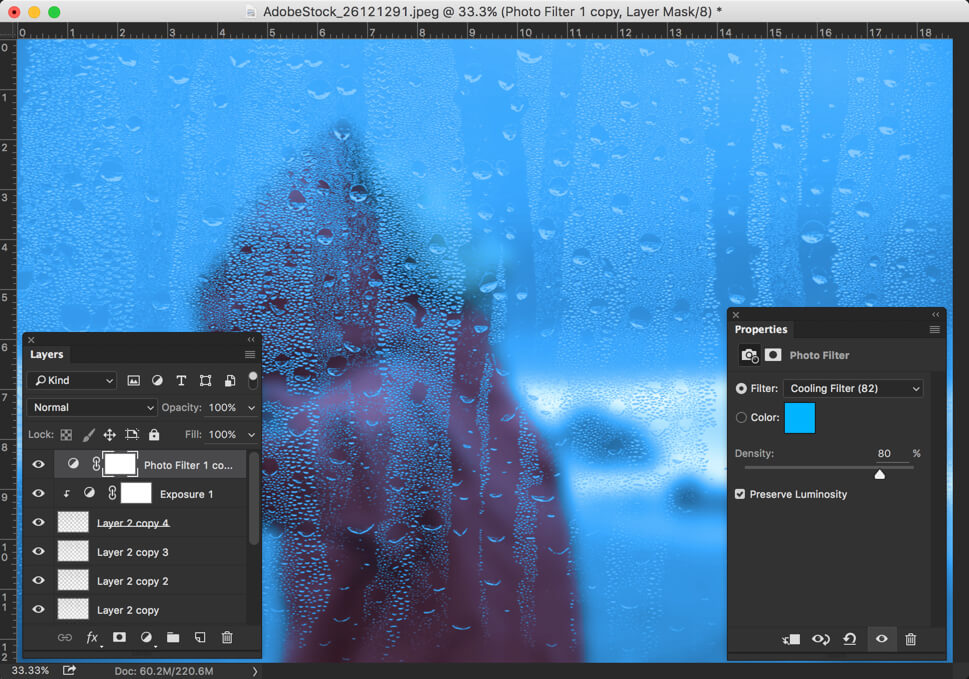
Step 5: Time to Give Cold and Rainy Effect

As we have added raindrops, made it pop, blurred the background, but still something is missing. The mood of the image is not reflecting the rainy season. So let’s change the mood.

Go to Layer>New Adjustment Layer>Photo Filter.

Change the filter to Cooling Filter (82), and increase the density to 80%. I know it’s too much but I kinda like it.

6.jpg

And we’re done with the tutorial here. I hope that you like it.

Please support TrickyPhotoshop by sharing this tutorial with you family and friends.

Create Instagram Crema Filter in Photoshop

Hey, folks! How are you doing? It’s been a while since I am writing only Instagram Filters related tutorials. Today’s is no different. Today I am going to show you how to create Instagram Crema filter in Photoshop. Like most of the Instagram filters, Crema is not much different. With the help of few adjustment tools, we can replicate a filter as good as Instagram Crema Filter.

Throughout the tutorial, we’re going to use adjustment layers. Every layer has its own importance and plays a vital role. We are going to use Levels, Photo Filter, Brightness/Contrast, and Vibrance.

So let’s begin the tutorial. But before we begin, I’d like to show you how the final result would look like.

FINAL

Final

Step 1: First Remove Colorcast

The first thing we need to do is to remove colorcast if your image has any. This is a very much crucial step, otherwise your final result may get imbalanced. The best method I know to remove colorcast is the one with the Levels.

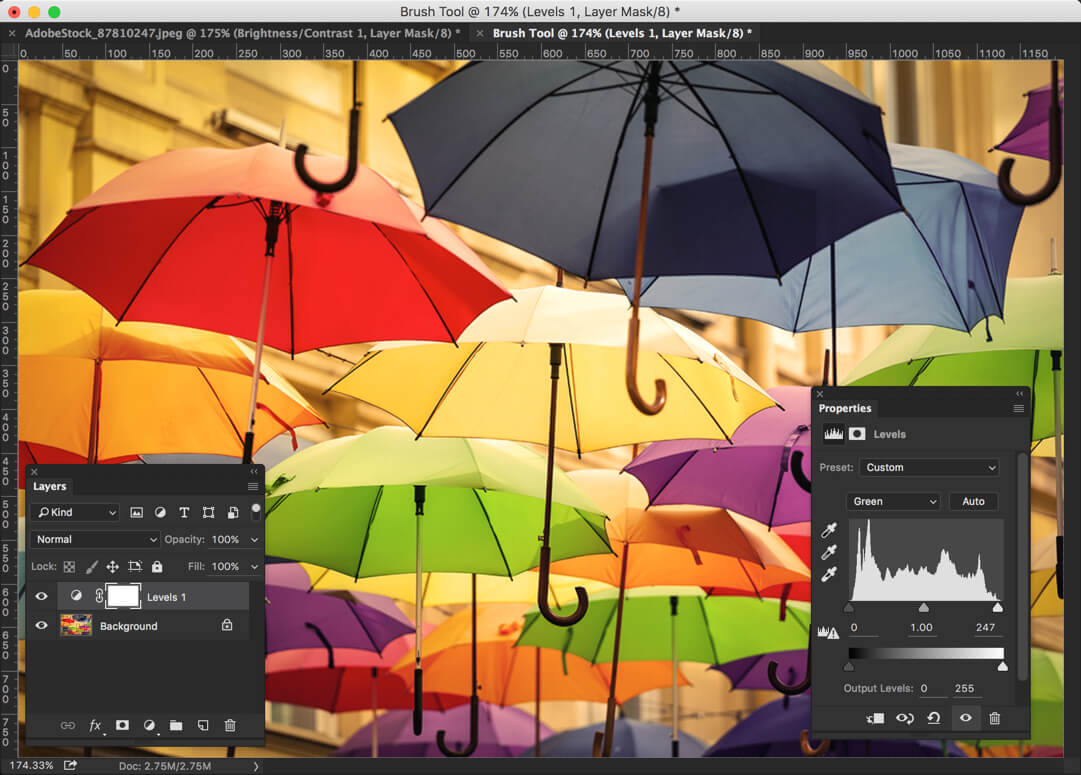
Open your image in Photoshop. Go to Layer>Adjustment Layer>Levels. Now change the channel from RGB to Green. Now you would see a slider with three buttons just above 0, 1.00 and 255. Try to place the black and white buttons with the starting and ending of the histogram. To put it in simpler words, your black button should be placed exactly where histogram starts and your white button should be placed exactly where the histogram ends.

1.jpg

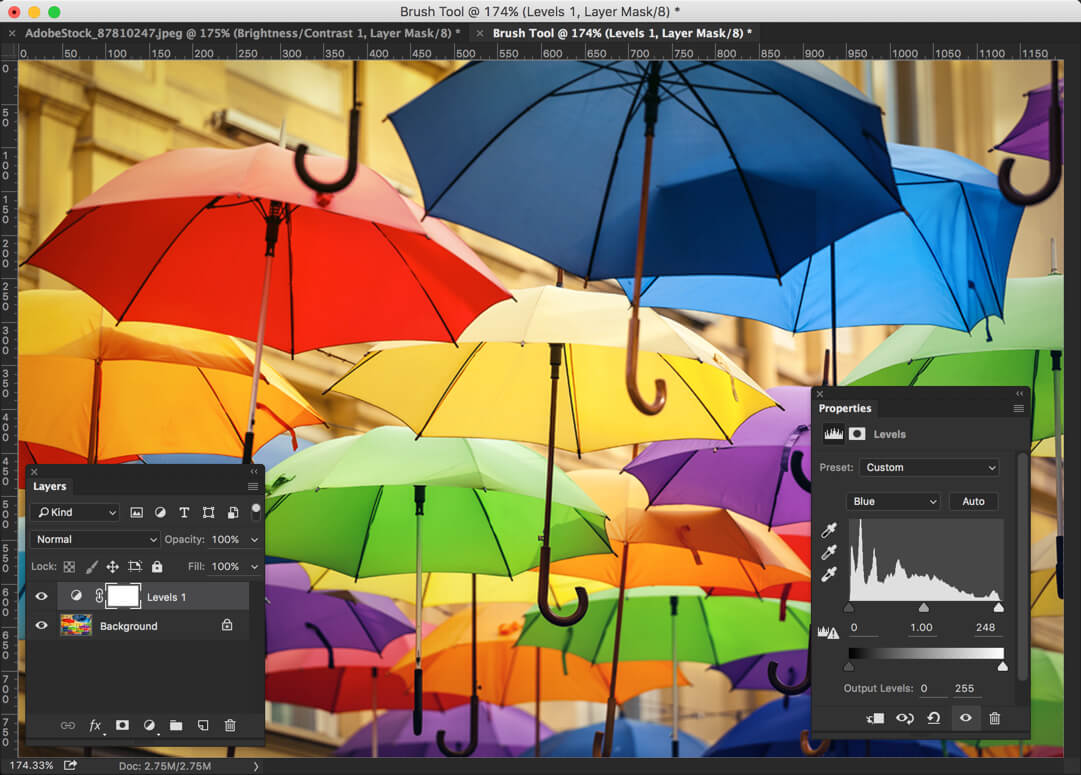
Now change the channel to Blue. Do the same.

2.jpg

Switch to Red channel and do the same. Now you should not have any colorcast or tint present.

Step 2: Add Warm Effect

Now we are going to add yellow colorcast to give warm effect.

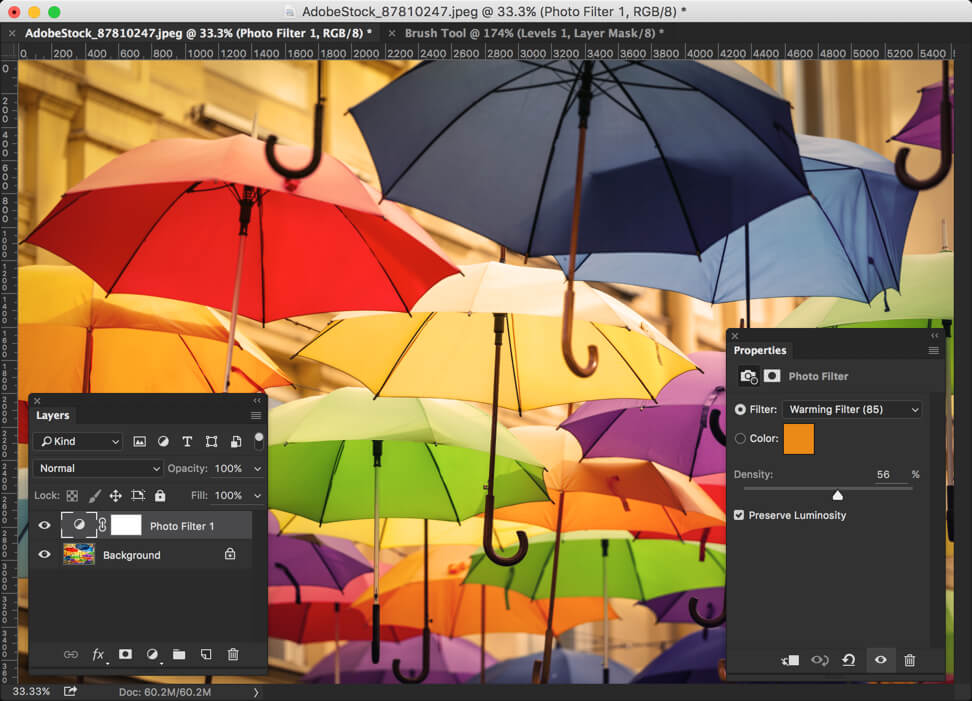
Go to Layer>Adjustment Layer>Photo Filter. Change the filter to Warming Filter (85). Increase the density by 56%.3.jpg

Step 3: Add Green Colorcast

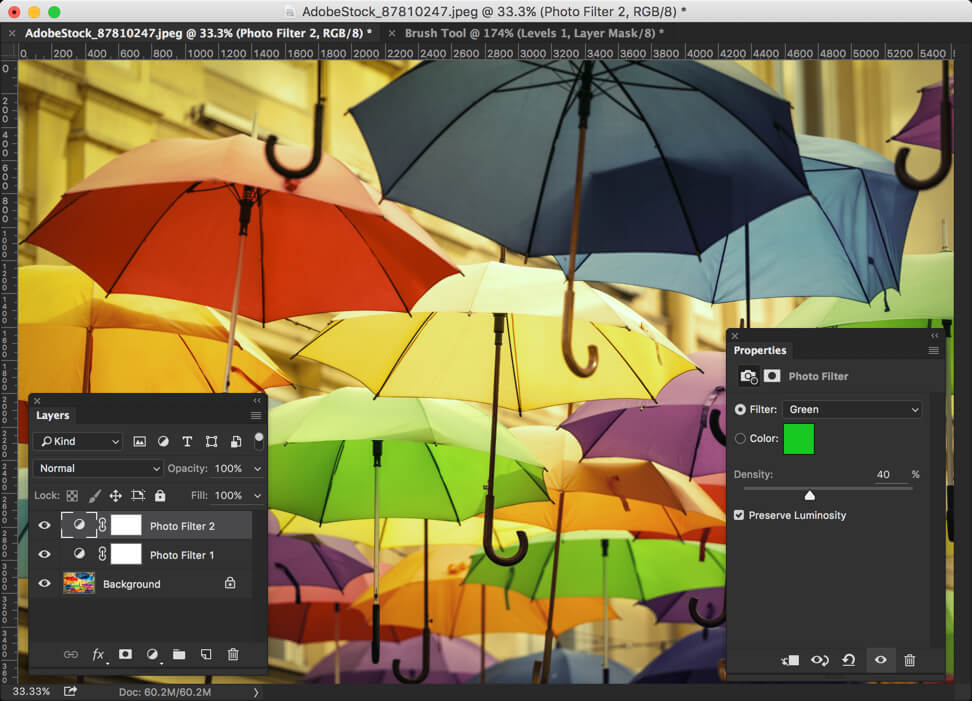
Again go to Layer>Adjustment Layer>Photo Filter. Change the filter to green. Increase the density by 40%.

4.jpg

Step 4: Reduce Saturation

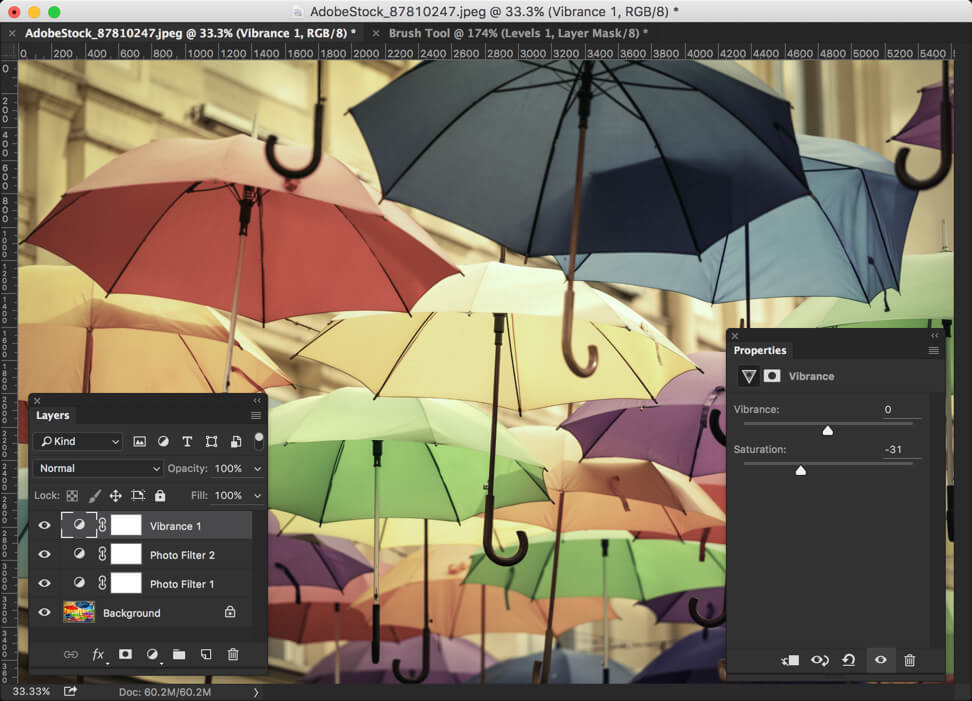
Don’t you think that photo is very much vivid? Let’s decrease the saturation. Go to Layer>New Adjustment Layer>Vibrance.

Reduce the saturation to -31.

5.jpg

Step 5: Reduce Contrast

Time to reduce contrast. Go to Layer>Adjustment Layer>Brightness and Contrast.

Reduce the contrast to -50.

6.jpg

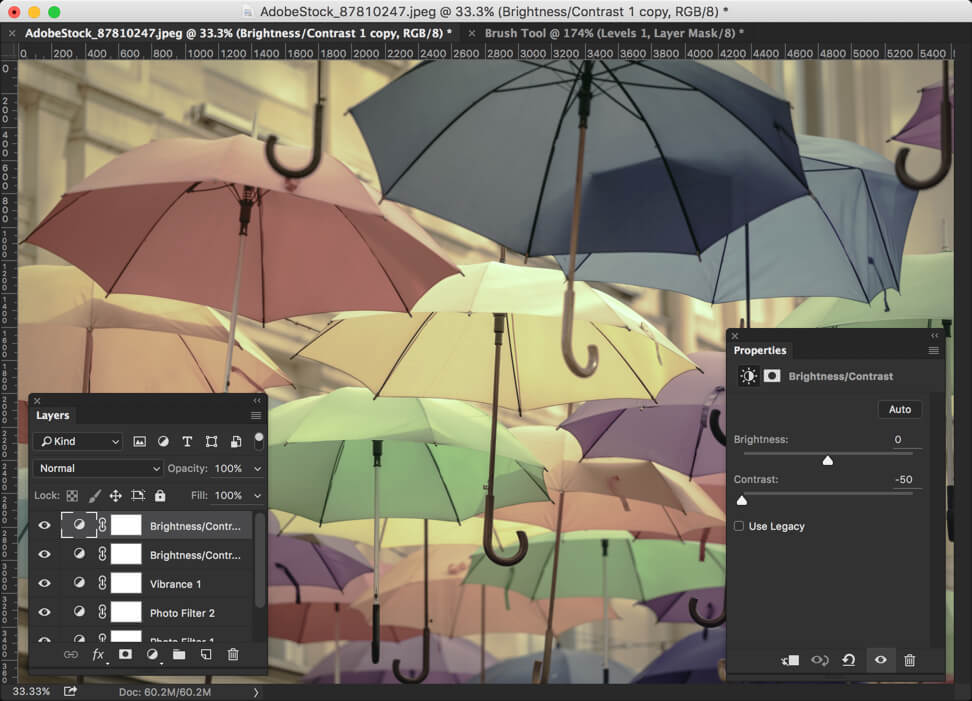
Still there’s too much contrast. We can simply duplicate the layer we just created. Press Ctrl+J/Cmd+J to duplicate a layer.

7.jpg

Now it’s looking perfectly like Instagram Crema filter. Don’t you think so?

Let’s see the final picture again.

Final

I hope that you like this tutorial.

Check out my other tutorials on Instagram also.

Please support TrickyPhotoshop by sharing the tutorial with your friends and family on Facebook and Twitter.

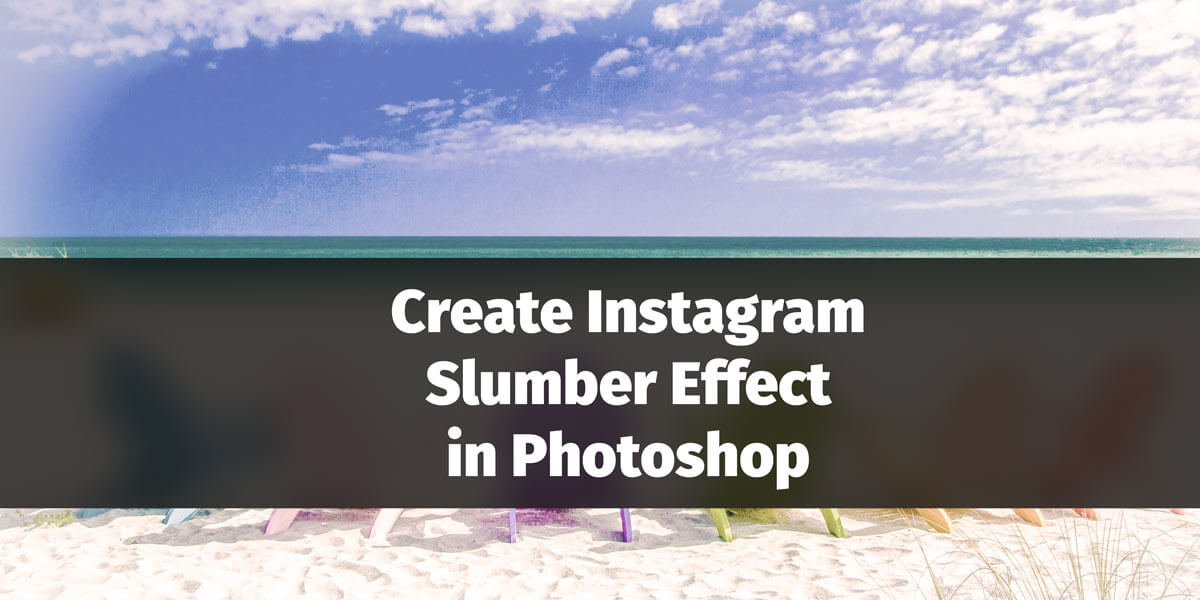
Create Instagram Slumber Effect in Photoshop

Hey, folks! How are you all? I hope you are having a great weekend. You might remember the article that wrote last time i.e. Creating Instagram Juno Effect in Photoshop. This time, I am going to write another tutorial on Instagram effect. How about writing on How to Create Instagram Slumber Effect in Photoshop?

When you have used Instagram Slumber effect, you must have noticed that it generally gives yellow to an image and reduces the contrast but it manipulates an image much more than that. It adds a vignette, reduces colors, adds black & whitish effect (not much visible though).

So let’s dive into the steps. But before we proceed, I’d like to show you the final image.

FINAL

Final

Step 1: Reduce Contrast

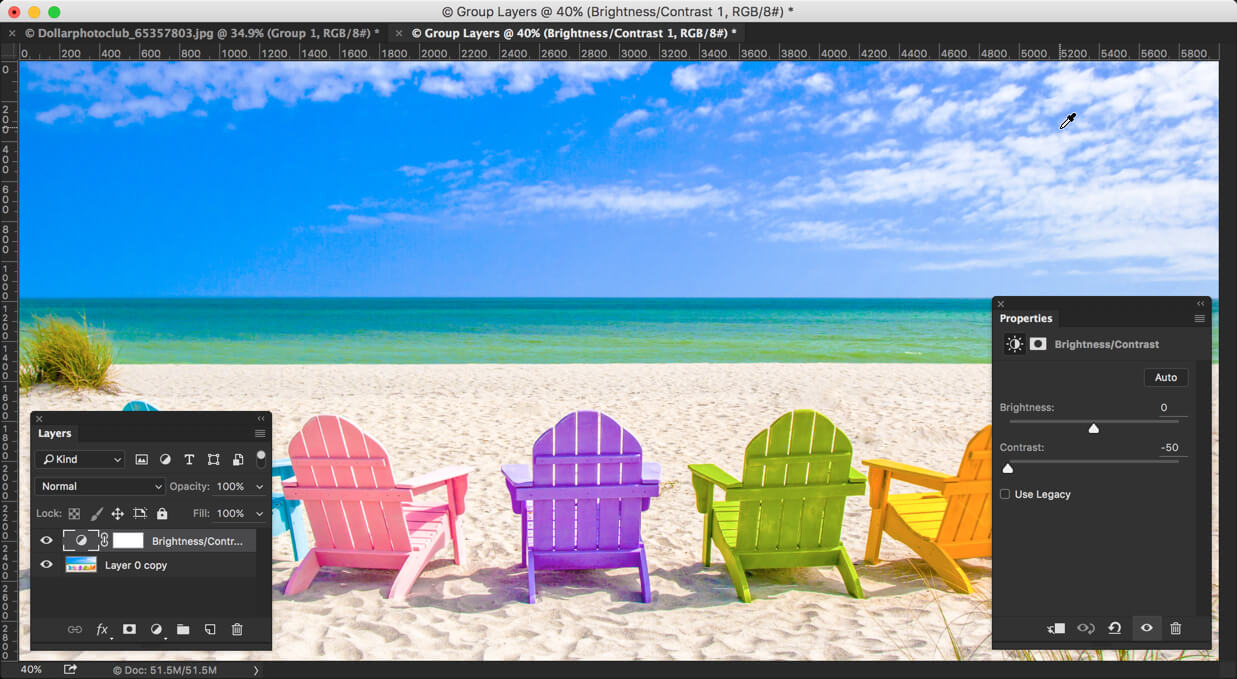
The first we need to do is the reduction of contrast. Go to Image>Adjustments>Brightness/Contrast. Reduce the contrast to -50.

1.jpg

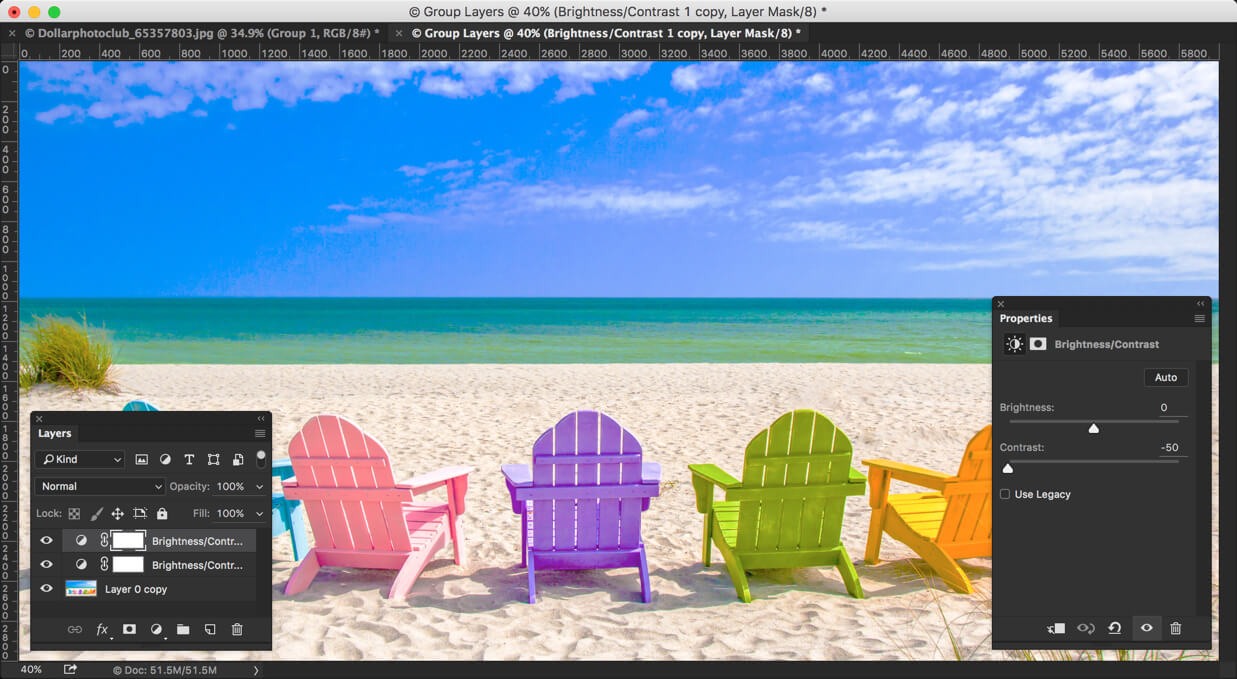
We still have too much contrast. Let’s duplicate the layer so that our contrast minimizes more with least effort. Press Cmd+J/Ctrl+J to duplicate a layer.

2.jpg

Step 2: Let’s Play with Adobe Camera RAW

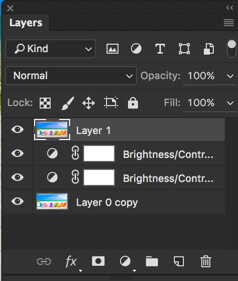
Time to stack all the layers onto a new layer. Press Cmd+Opt+Shift+E/Ctrl+Alt+Shift+E for that. This will create a new layer at the top.

3.jpg

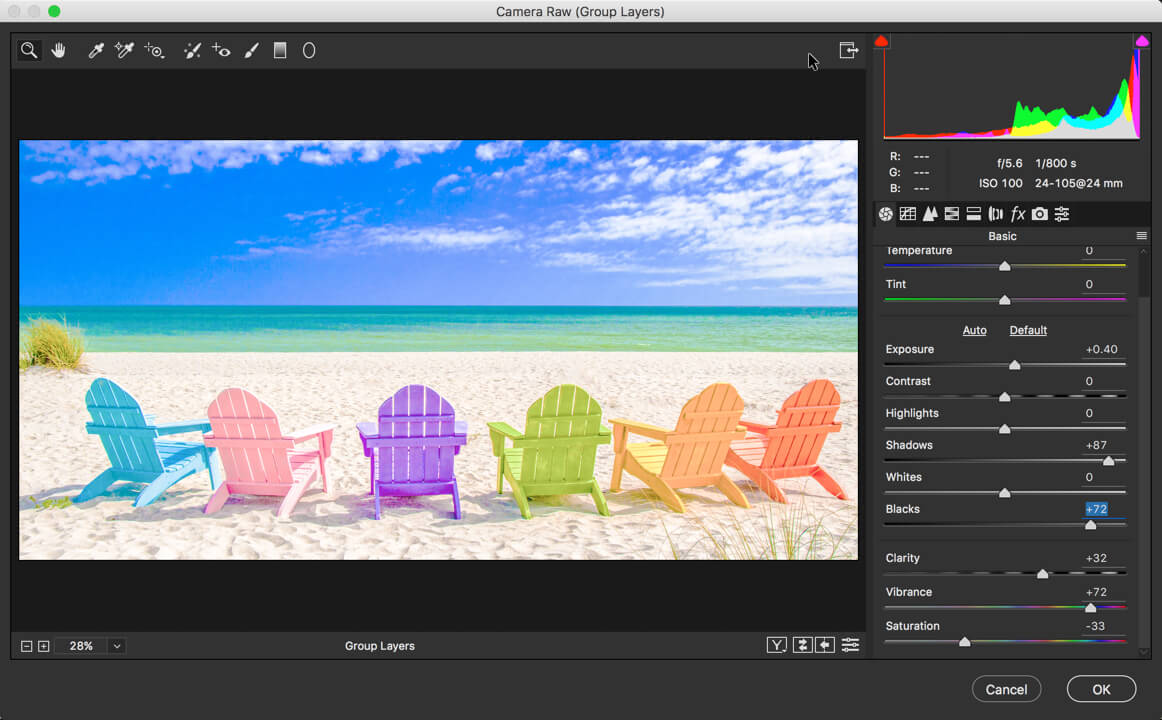
Go to Filter>Camera RAW filter. Give your image a nice and soothing effect. This can only be done if you don’t have too much contrast.

Don’t close the Camera RAW now.

4.jpg

Step 3: Add White Vignette

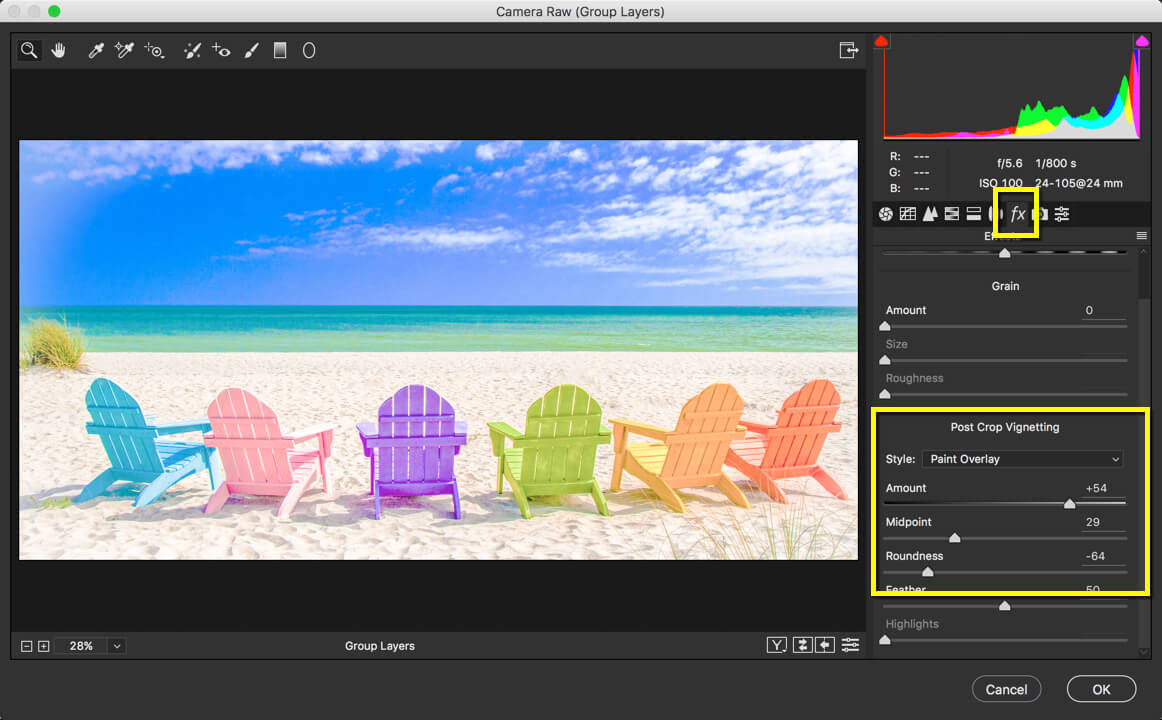
Let’s add a white vignette to the image. Keeping the Camera RAW opened, head over to “fx” tab. Add a nice looking white vignette.

Change the Style to “Paint Overlay”. Sliding the Amount slider to the right adds white vignette and sliding it to left adds a black vignette.

5.jpg

Step 4: Add Warm Effect

Time to give warm effect to the image.

Go to Image>Adjustments>Photo Filter. Change the filter to Warming Filter 85 and increase the density to 37%.

6.jpg

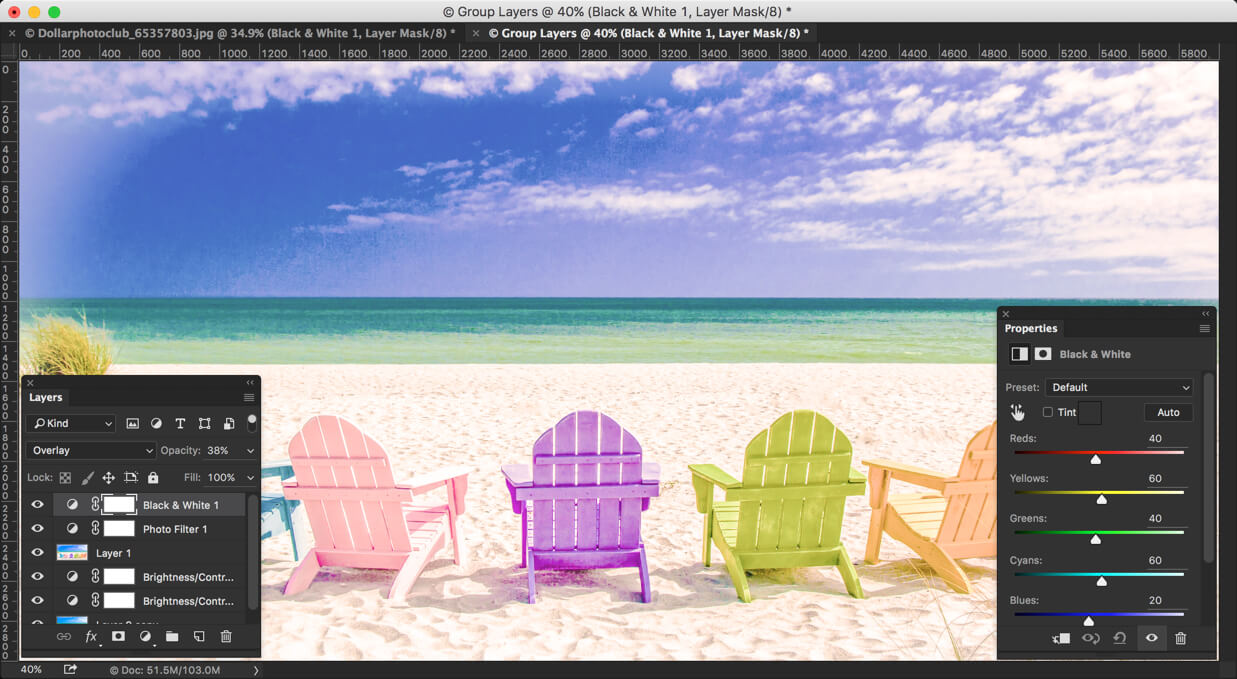
Step 5: Let’s give Black and Whitish Effect

Go to Image>Adjustments>Black and White. Now you need not do anything but change the blend mode to Overlay and Reduce opacity to 38%.

7.jpg

Step 6: Final Step of How to Create Instagram Slumber Filter in Photoshop

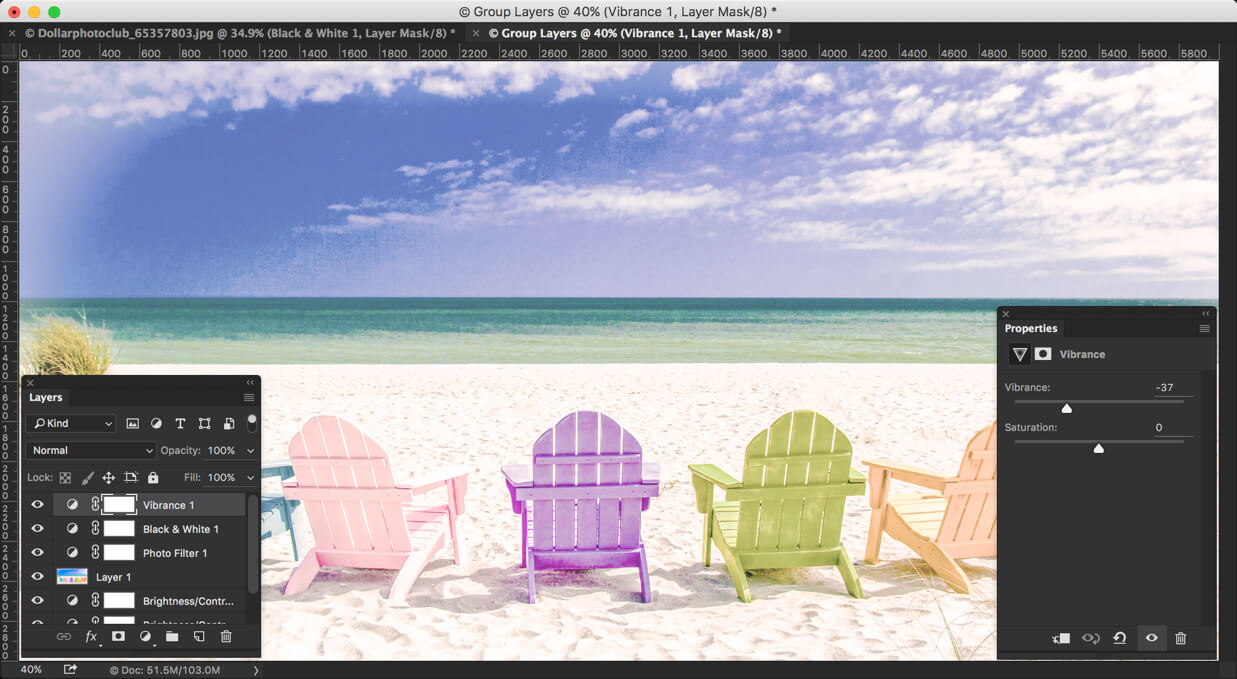
Time to decrease the Vibrance again. Go to Image>Adjustments>Vibrance.

Decrease it to -37.

8.jpg

And now we’re done.

Now that you have enjoyed this tutorial, the next thing you can do is to share it on Facebook and Twitter.

Here’s the final image again.

Final.jpg

How to Create Instagram Juno Effect in Photoshop

Hey guys, welcome to my another tutorial on creating Instagram Effects in Photoshop. Last time I discussed creating Instagram Reyes Effect in Photoshop, and this time I am going to show you How to Create Instagram Juno Effect in Photoshop.

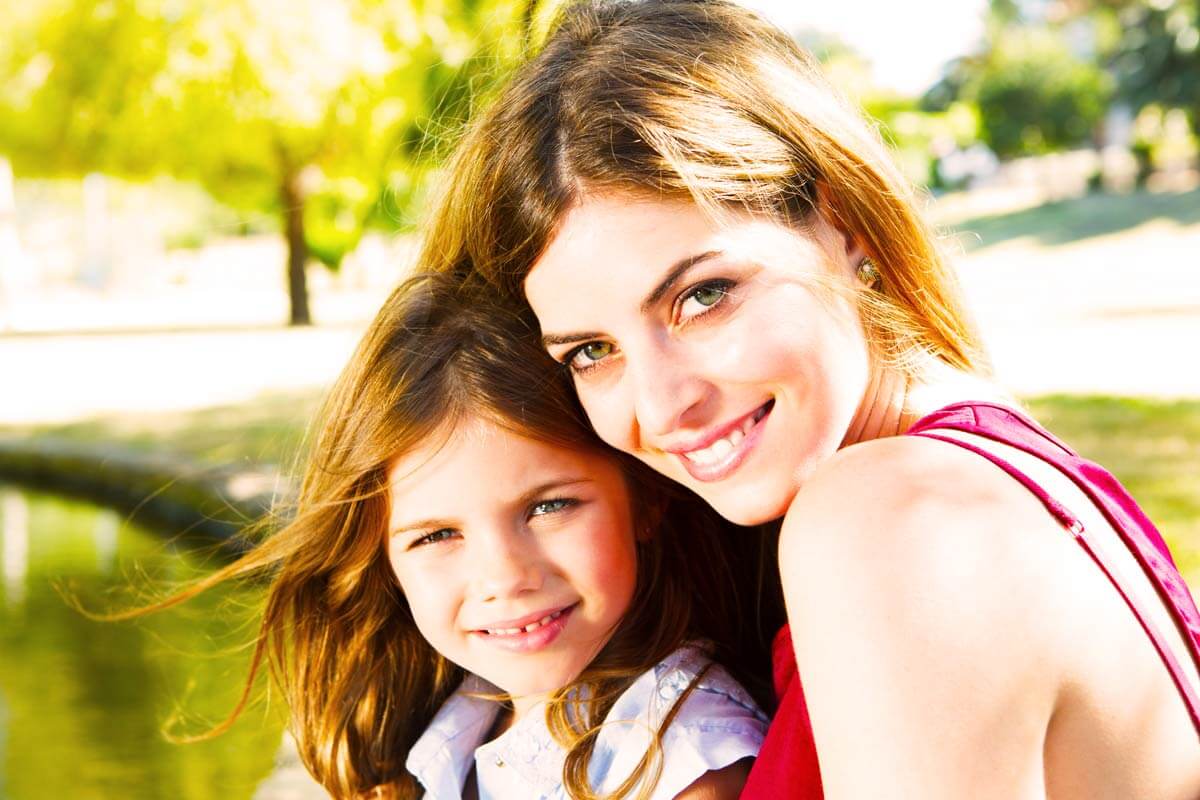
Instagram Juno effect is pretty much a subtle one. It doesn’t do much more than manipulating contrast and vividness of the photo, which makes it perfect for a selfie that is taken on a properly illuminated place.

To do so, we also are not going to do much apart from using a few adjustment layers. The adjustment layers we are going to use are Curves, Brightness, Vibrance, and Photo Filter.

Without further ado, let’s begin the tutorial.

Final

Final

Video

If you like watching videos, here’s the video for you.

Step 1: Use the Power of Curves

Juno effect increases the contrast of the image. We are also doing the same but rather than using traditional Brightness/Contrast Adjustment Layer to manipulate the contrast, we are going to use Curves Adjustment Layer. The reason behind this is that Curves performs slightly better and gives us more control over the contrast.

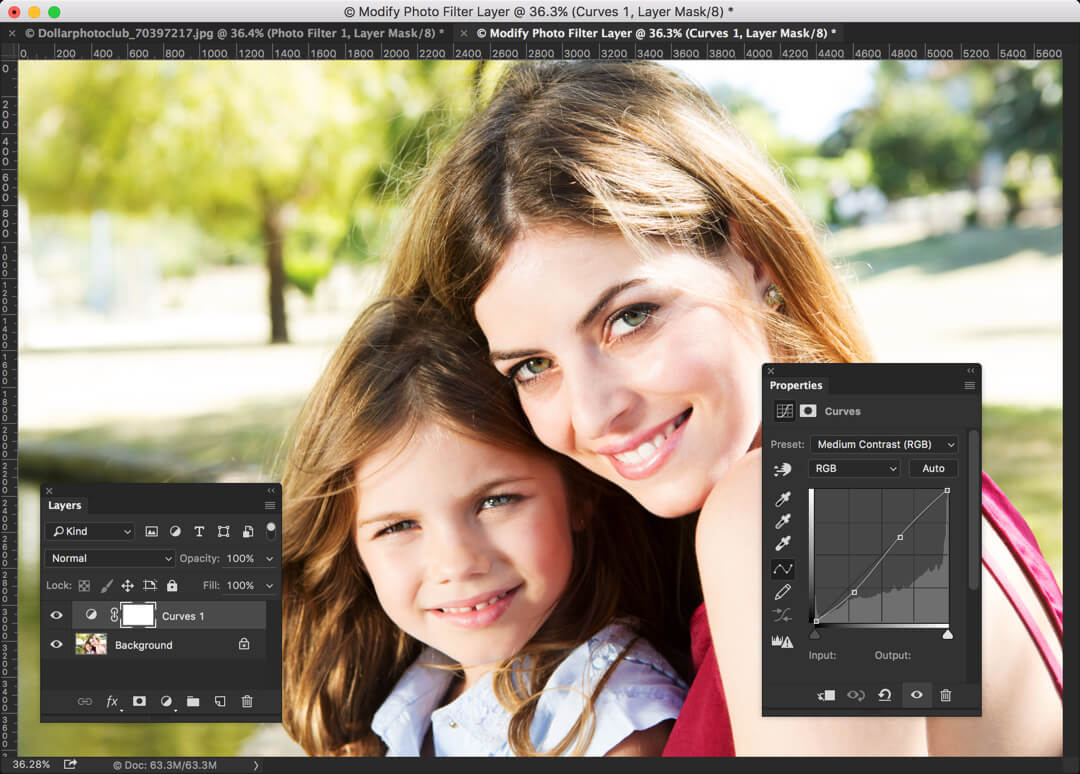
Go to Layer>New Adjustment Layer>Curves.

In the preset dropdown menu in Curves, choose Medium Contrast. It’ll very beautifully increase the contrast of the image.

1

Step 2: Brighten the Image

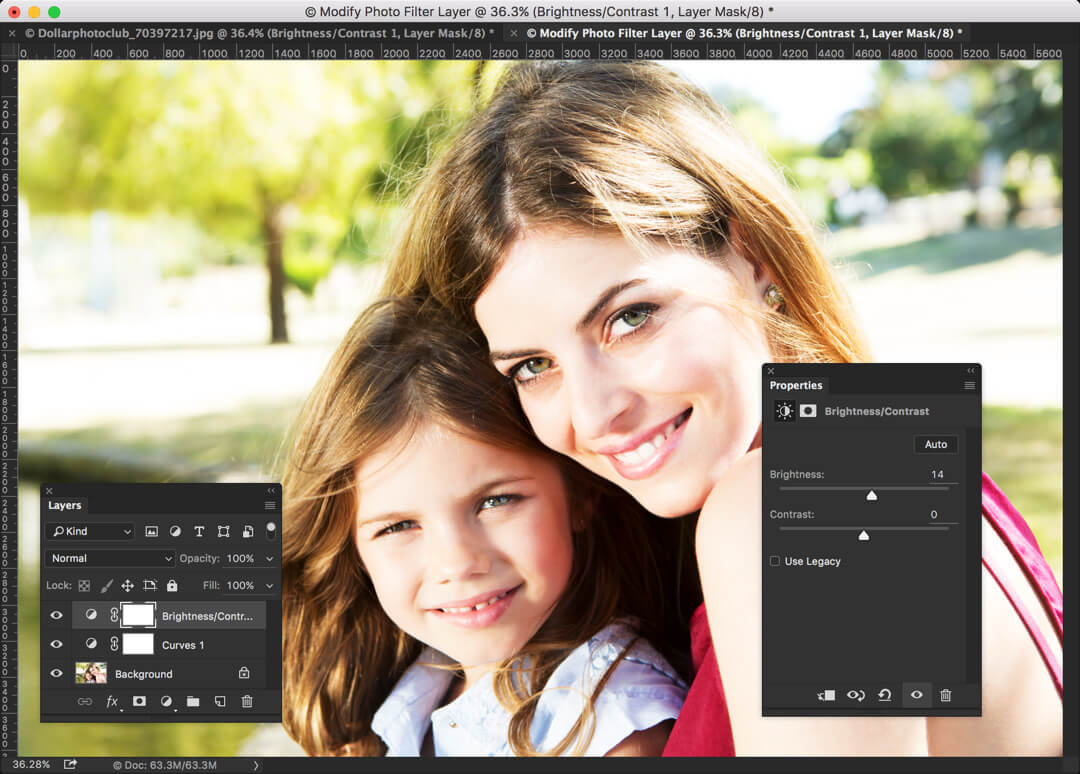
Let’s increase the brightness of the photo. We are not going to overexpose the photo but slightly more exposed than a perfectly lit photo. So if there are three regions i.e. underexposed, perfectly exposed, and overexposed, the image will lie between perfectly exposed and overexposed.

Go to Layer>New Adjustment Layer>Brightness/Contrast. Increase the brightness to 14.

2

Step 3: Increase the Saturation

Time to saturate the image. In other words, let’s increase the vibrancy.

Saturating an image dramatically increases the look and feel of an image. Almost every filter of Instagram either increases or decreases the saturation of an image.

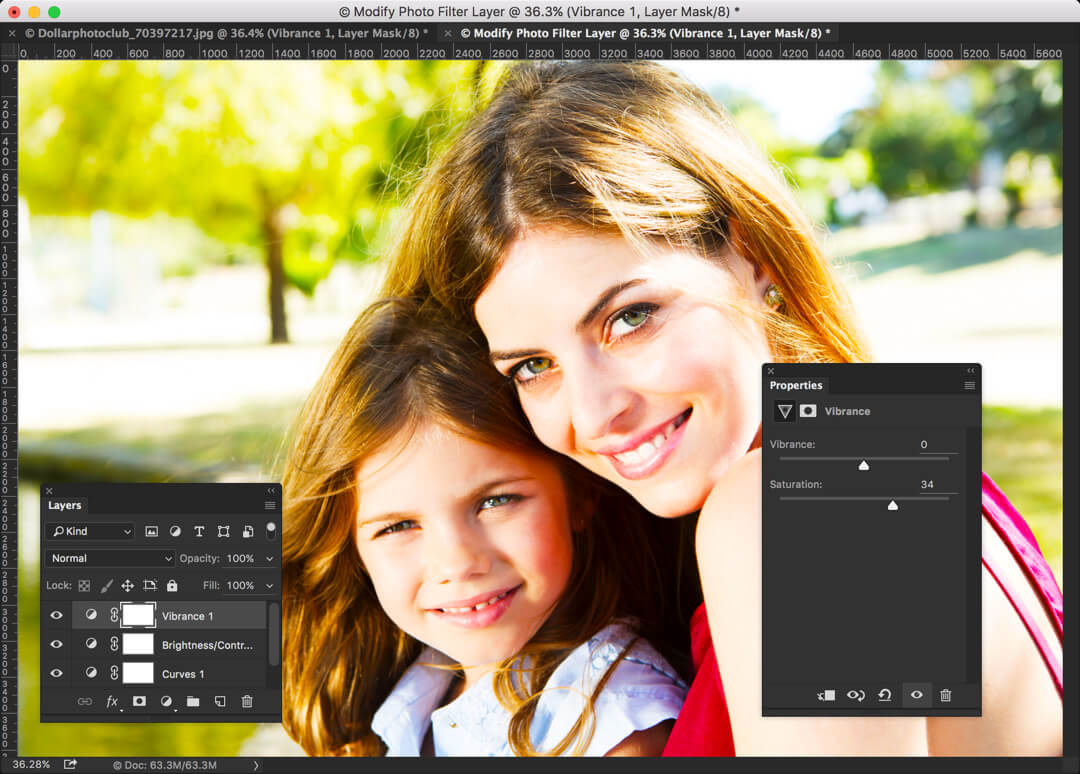
Go to Layer>New Adjustment Layer>Vibrance. Increase the saturation to 34.

3

Step 4: Finally Achieve Instagram Juno Effect in Photoshop

Time to add a nice warm looking effect to the image.

Go to Layer>New Adjustment Layer>Photo Filter.

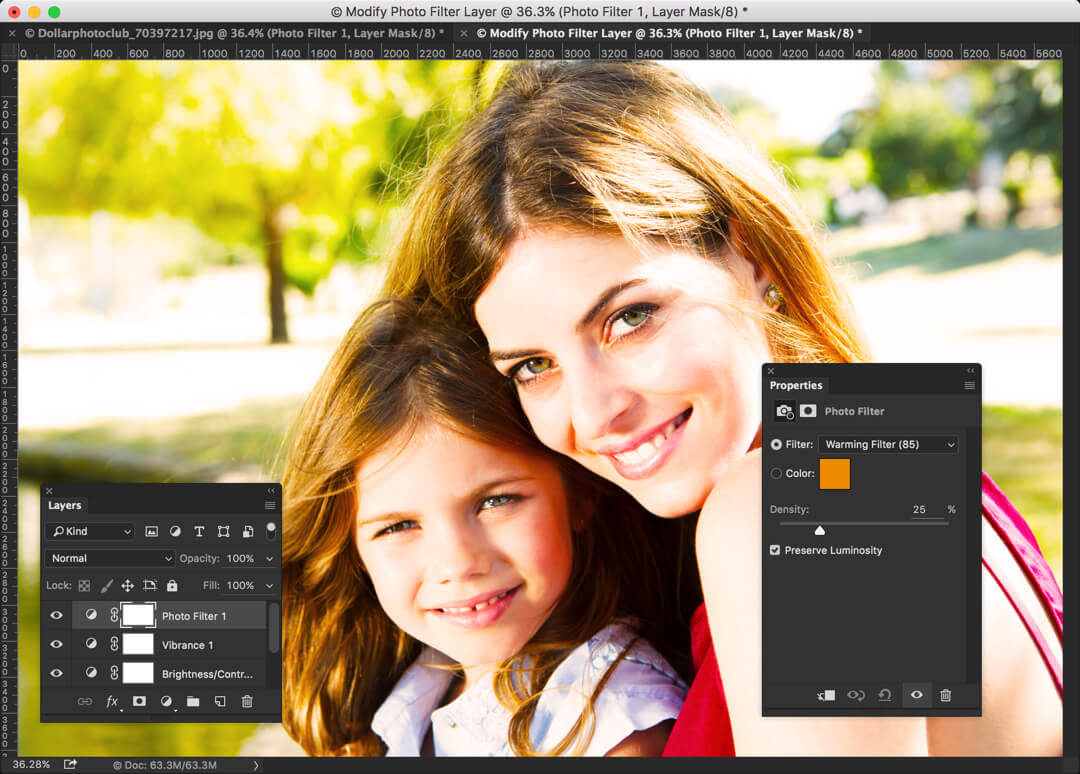
Choose the preset as Warming Filter (85), and increase the density to 25%.

4

And we are done here. We have successfully created Instagram Juno Effect in Photoshop. Let me show you the final picture again.

FINAL

Final

Create Instagram Reyes Effect in Photoshop

Hey there, welcome to my another tutorial on Instagram Effects. Last time I showed you how to Create Instagram Lark Effect in Photoshop. Today I’ll be showing you How to Create Instagram Reyes Effect in Photoshop. To be very frank, I am not a fan of Reyes Effect but some of my readers are asking me to upload a tutorial on Reyes Effect. As I love my readers a lot, of course I cannot deny their request.

Instagram Reyes effect is much like washing out color and reducing the contrast. It works great with photos that are taken on harsh sunlight.

Let’s go straight to the tutorial. But before I go any further, I would like to show you the final image.

FINAL

Final.jpg

Step 1: Decrease the Contrast

The first thing that you need to do is to decrease the contrast of the image.

Go to Layer>New Adjustment Layers>Brightness/Contrast.

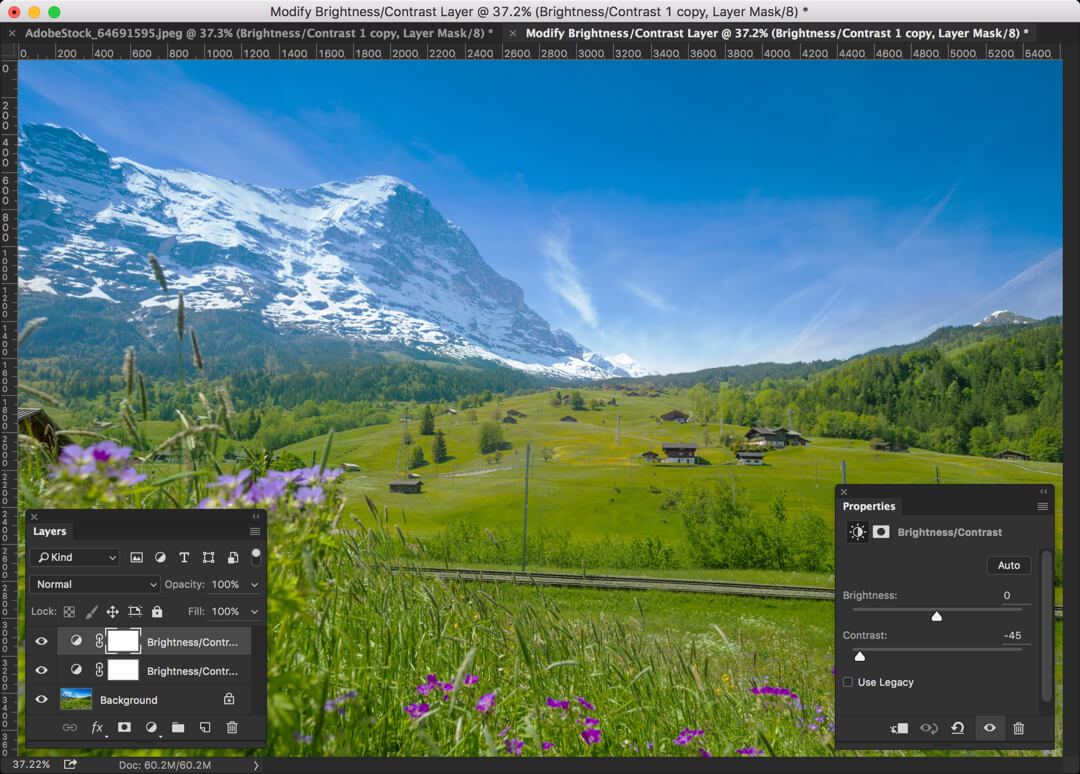
Decrease the contrast to -45.

1.jpg

Step 2: Repeat it One More Time

We even need to decrease the contrast more time. The best way is to duplicate the adjustment layer that we created in last step.

To duplicate a layer, press Ctrl+J/Cmd+J.

2.jpg

Step 3: Reduce the Color

Now we are going to reduce the color so that it appears washed out.

To do so, go to Layer>New Adjustment Layer>Vibrance

Decrease the vibrance all the way down to -100. This will give a washed out effect to the photo.

3.jpg

Step 4: Add Warm Look

Time to give a warm look to the image.

Go to Layer>New Adjustment Layer>Photo Filter.

Rather than going with a preset, we are going to choose a color by ourselves. Select color and then click on the color thumbnail.

4.jpg

Put the HEX color code as #f8b558. Click OK.

5.jpg

Now increase the density to 44%.

6.jpg

Step 5: Increase the Brightness

The image is pretty much dark. Don’t you think so?

We are going to increase the brightness to make it more attractive. But the thing here is that we are going to over-brighten it.

Go to Layer>New Adjustment Layer>Brightness/Contrast.

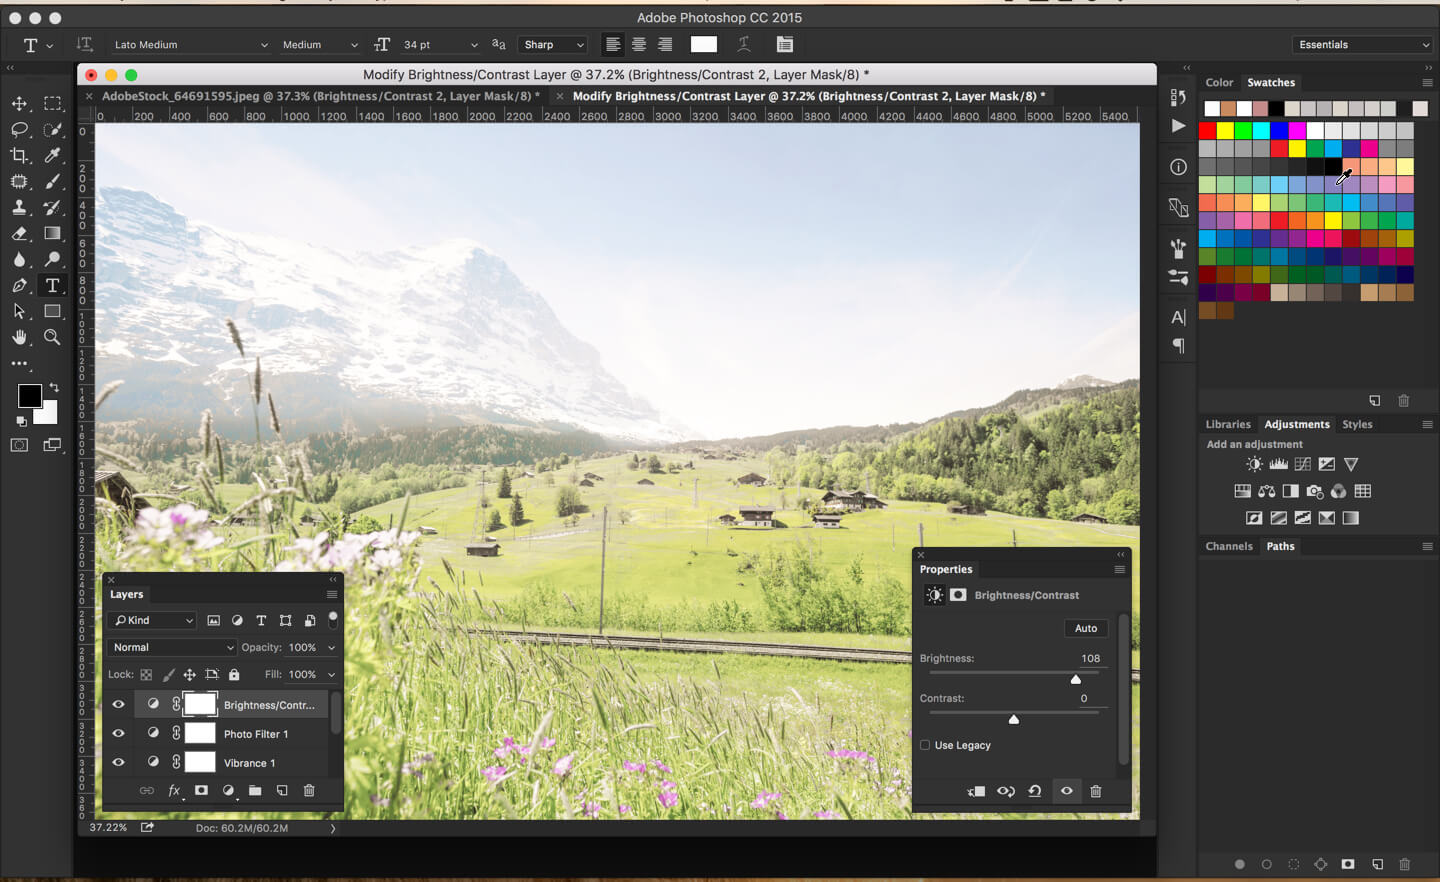
Increase the brightness to 108.

7.jpg

And now we are good.

I hope that you have enjoyed the tutorial.

Here’s the final image again.

Final: Instagram Reyes Effect in Photoshop

Final

Please support TrickyPhotoshop by sharing this tutorial with your friends and family on Facebook, Twitter, or Google+.

Create Instagram Lark Effect in Photoshop

Hey guys, welcome to my another tutorial on Instagram Effects. Last time I wrote on Instagram Moon Effect that became quite a popular on Instagram. This time I am writing on how to Create Instagram Lark Effect in Photoshop. Lark Effect is somewhat same as other Instagram’s effect. The only thing that separate Instagram’s Lark effect is that it makes the image a little bit saturated.

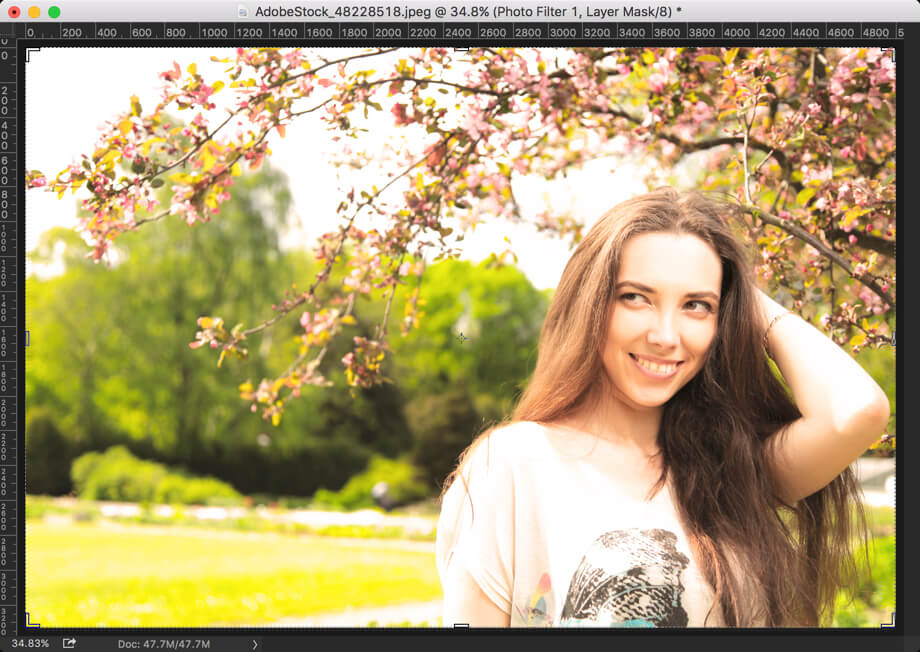
So without discussing anything more, let’s dive straight to the tutorial. But before we go any further, I’d like to show you the final image.

FINAL

Final.jpg

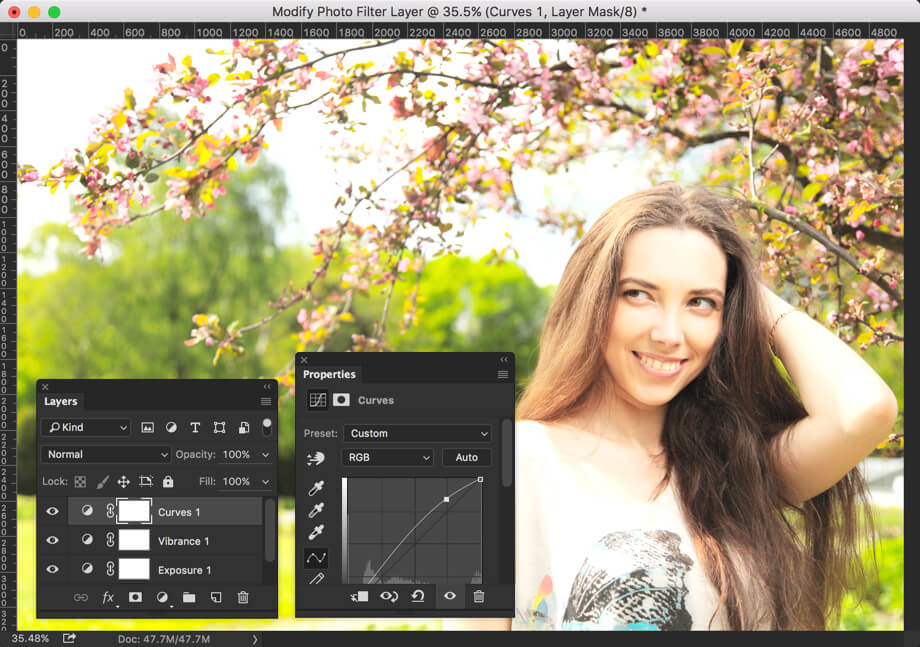
Step 1: Increase Exposure

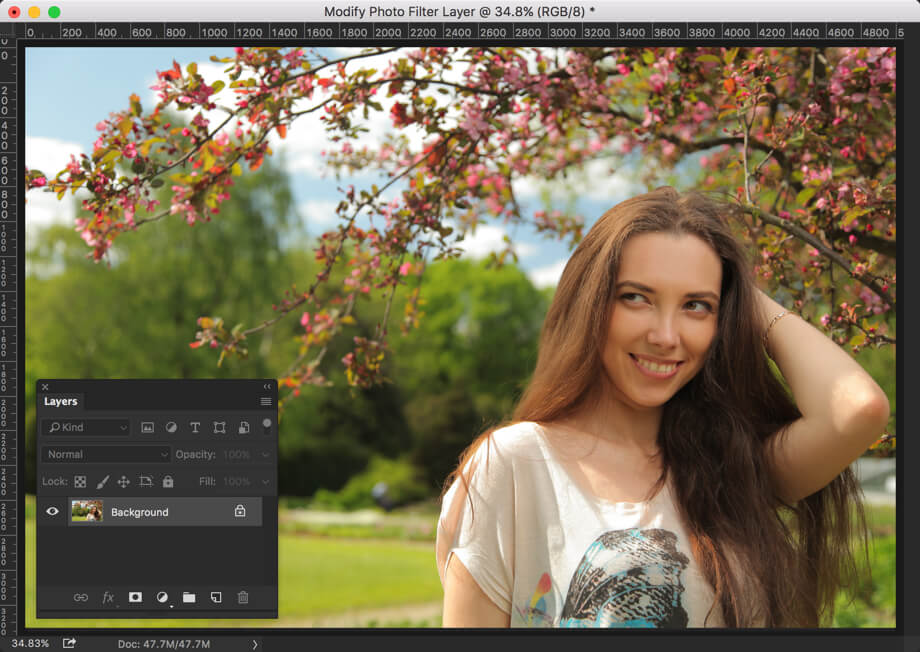
Here’s the initial image.

2.jpg

To increase exposure, go to Layer>New Adjustment Layer>Exposure. Increase the exposure so that it looks well-lit or a bit over-lit.

2.jpg

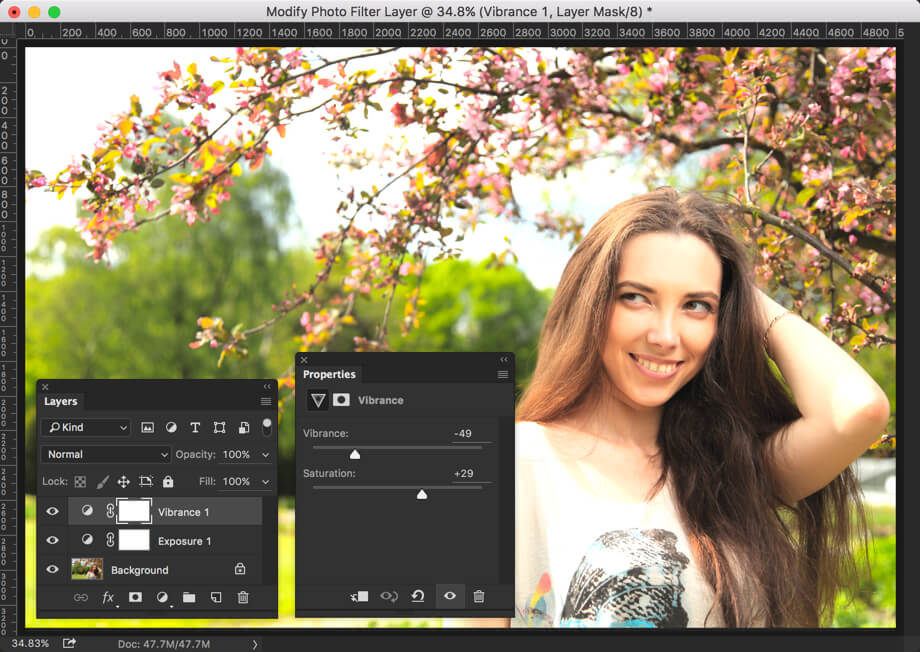
Step 2: Decrease Vibrance but Increase Saturation

Now we are going to decrease vibrance but increase saturation. You might not know the difference between vibrance and Saturation.

Vibrance: Deals only with the colors in an image that are over saturated. It doesn’t deal with every color in a image. For example, in above image, her skin looks a bit oversaturated. So if I decrease the vibrance, her skin color gets unsaturated rather than the whole image.

Saturation: Doesn’t bother with the colors that are over or under saturated. Simply considers that whole image and increase of decrease its saturation.

3

Step 3: Increase the Highlight

Time to increase out highlights of the image. Yes, you read it correctly. Rather than decreasing the highlight, we are going to increase it. For that, we are going to use Curves.

Go to Layer>New Adjustment Layer>Curves.

4.jpg

Step 4: Create Instagram Lark Effect in Photoshop

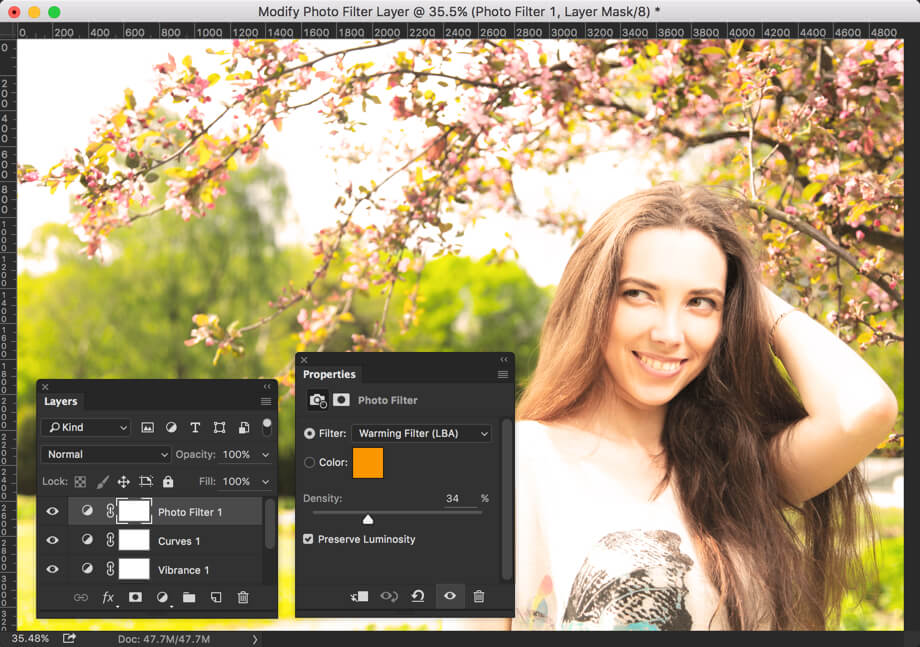
Now we are going to give a little bit warm effect our image.

Go to Layer>New Adjustment Layer>Photo Filter.

5.jpg

And your image is ready to post on Facebook. Time to tell your friends that you know the Grandma’s secret recipe behind Instagram’s Lark effect.

I hope that you enjoyed this tutorial.

Please support TrickyPhotoshop by sharing this tutorial with your family and friends on Facebook, Twitter, and Google+.

Final

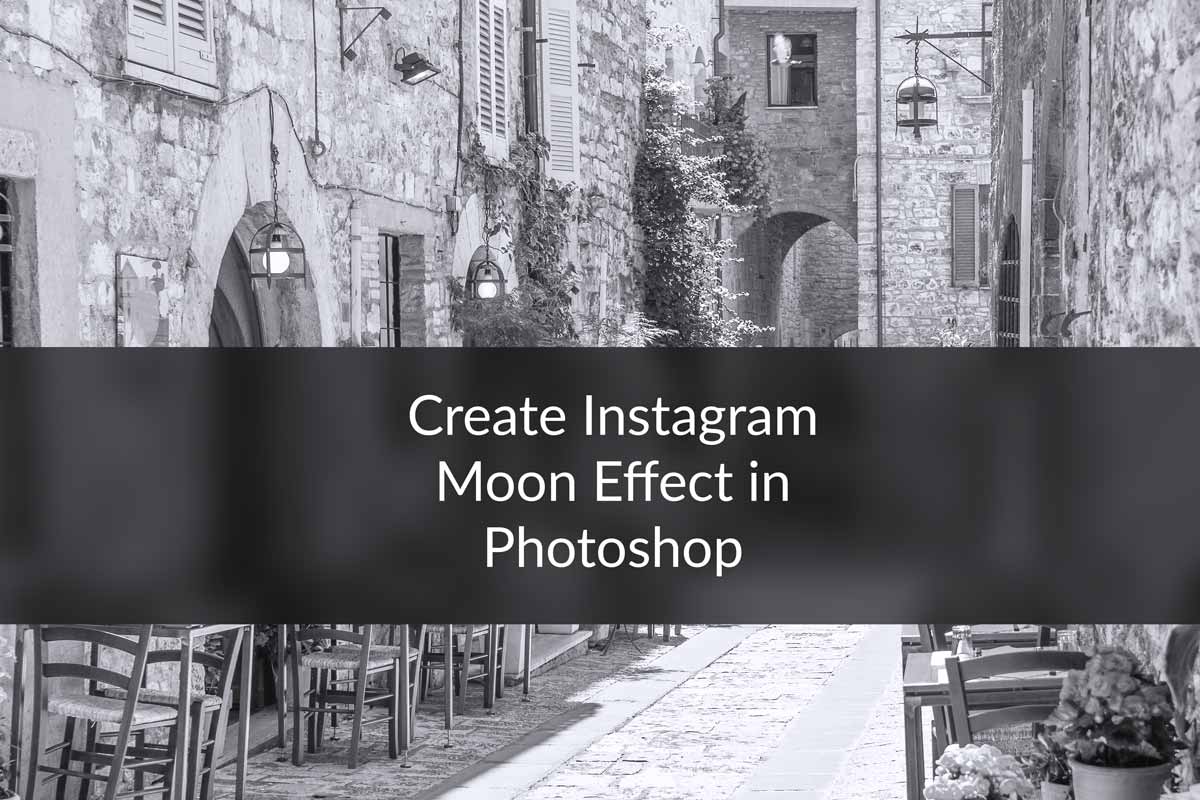
Create Instagram Moon Effect in Photoshop

Hey Guys, welcome to my another tutorial on creating Instagram Effects in Photoshop. This time, I will be showing you How to Create Instagram Moon Effect in Photoshop. Couple of weeks ago, I wrote a post on Creating Instagram Gingham effect and I must say that I received a big cheer on that post, and that motivated me to write my another on Instagram.

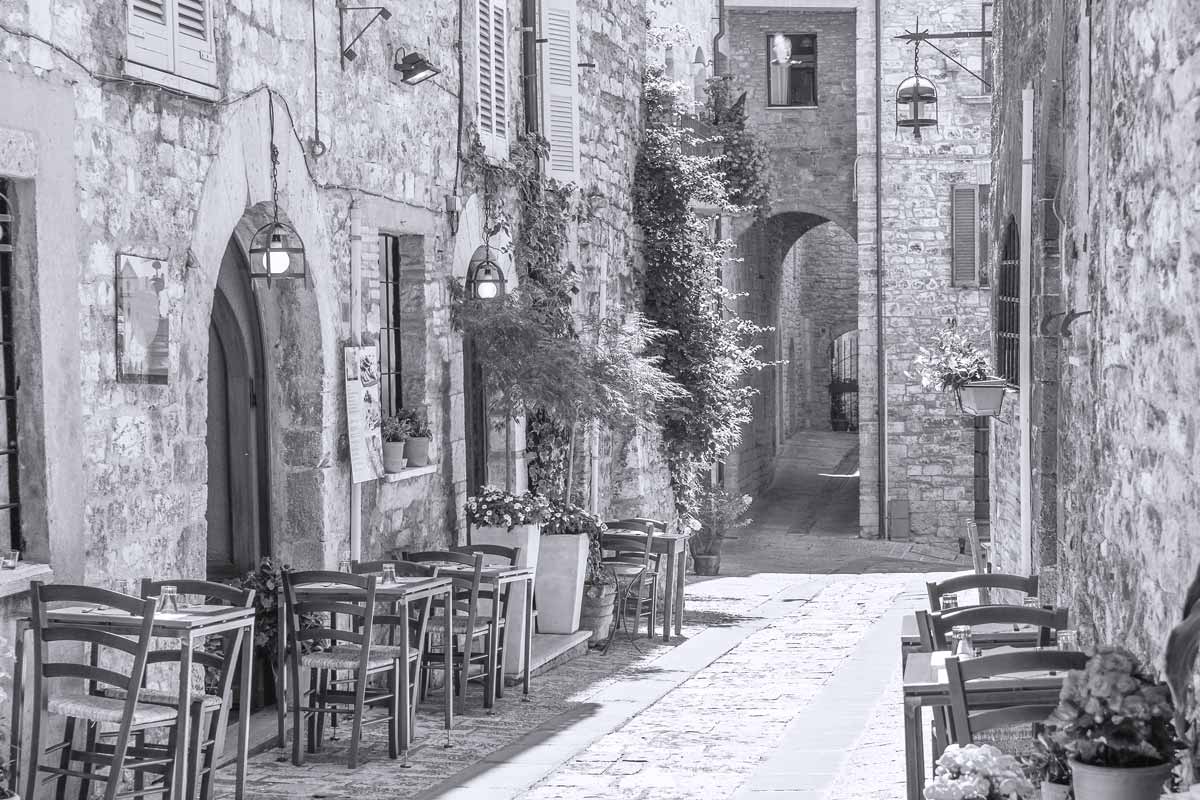
Moon effect is pretty much subtle like almost all other Instagram effects are. But what makes it different is that it is unsaturated which means it is Black and White.

Before we go further, I would like to show you the final image of the effect when applied on an image.

Final

Final.jpg

So let’s begin the tutorial.

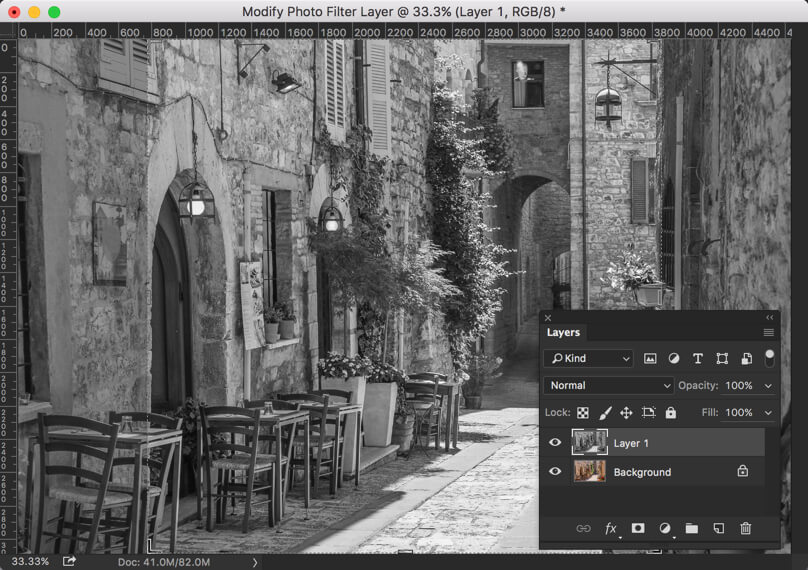
Step 1: Desaturate the Image

The first thing we need to do is to desaturate the image. Duplicate the layer by pressing Cmd+J/Ctrl+J. Press Cmd+Shift+U/Ctrl+Shift+U.

1.jpg

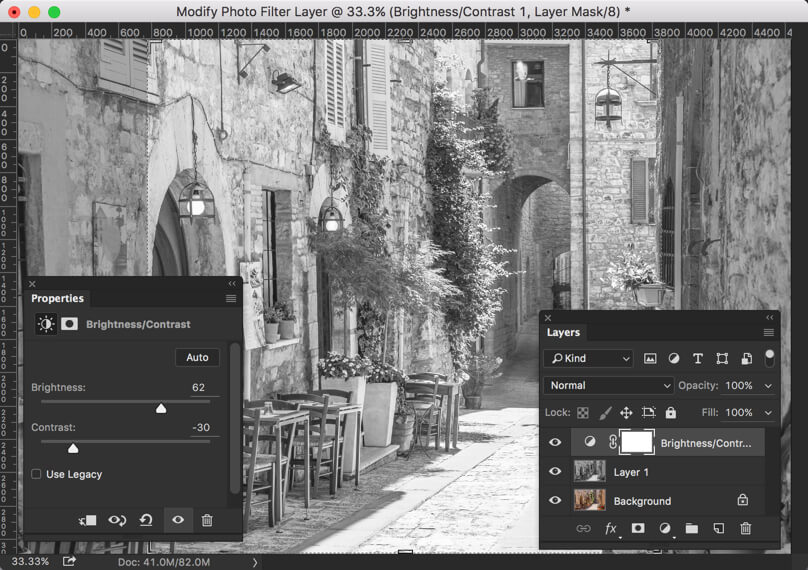
Step 2: Play with Brightness and Contrast

Moon Effect generally brightens the image and decreases the gap between highlights and shadows. We are going to do the same. Go to Image>Adjustment>Brightness/Contrast.

Increase the brightness to 62% and decrease the contrast to -30%.

2.jpg

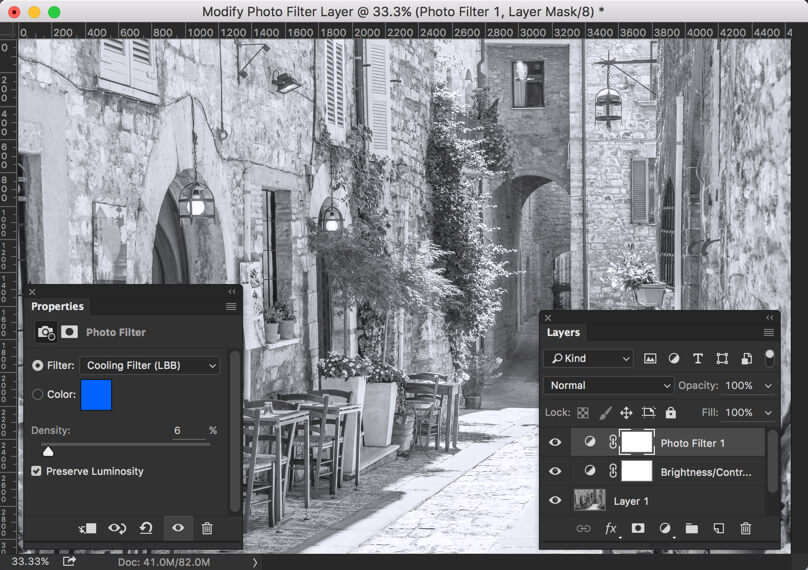
Step 3: Add Blue Tint

Time to add a very subtle, even unnoticeable blue tint. Go to Layer>New Adjustment Layer>Photo Filter.

Choose the filter as Cooling Filter (LBB). Keep the density at 6%.

3.jpg

Step 4: Add Vignette

Time to add nice looking black vignette.

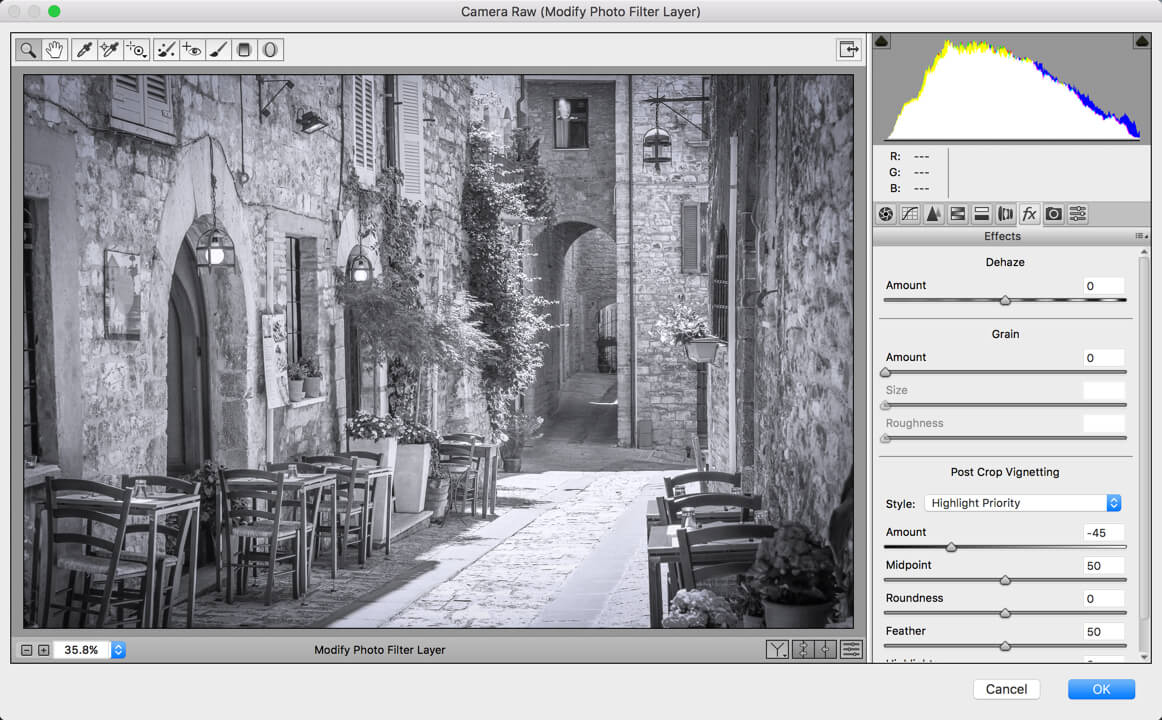
Press Cmd+Opt+Shift+E/Ctrl+Alt+Shift+E  to stack all the layer into a new layer in Photoshop. Go to Filter>Camera Raw Filter.

Switch to Effects tab. Decrease the amount o -45. It will add a nice looking black vignette.

4.jpg

And  we are done.

I hope that you have enjoyed this tutorial. Don’t forget to check my other tutorials on Instagram effect in Photoshop.

Please support TrickyPhotoshop by sharing this tutorial with your friends and family on Facebook, Twitter, and Google+.
Here’s the final image for your reference.
FINAL

Final

Create HDR Image in Photoshop

Hi Guy, I hope that you had enjoyed my last tutorial on Creating Instagram Gingham effect on Photoshop. This time I am shifting a little bit to write on How to Create HDR Image in Photoshop. Lately I have been receiving a lot of requests to write a tutorial on Creating HRD Effect, and here’s one.

HDR stands for High Dynamic Range. To achieve HDR effect, we need special kind of photos called as bracketed photos. You shoot same scene 3 or 5 times with exposure difference of 1 or 2. For example, you shoot 3 images of same scene with its exposure value as -1, 0, and +1, or -2, 0, and +2. You can also shoot 5 images with its exposure value as -2, -1, 0, +1, and +2. This feature comes by default in most of the DSLR cameras. But we are humans and we forget to take bracketed images and go to create a HDR and realize how foolish we are. To keep those people is mind, I am going to start with 1 image and make some adjustments such that they’ll look like bracketed images.

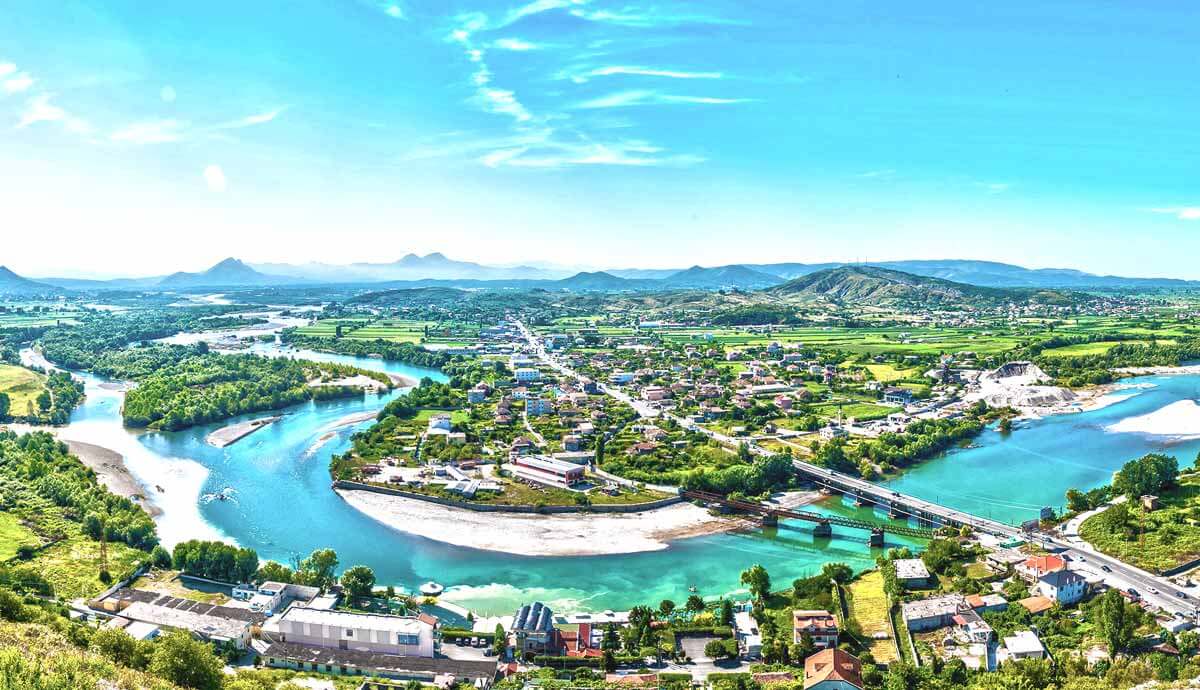
Before we go further, I’d like to show you how the final image will look.

FInal.jpg

Step 1: Change Exposure to Create Bracketed Photos

Open your image.

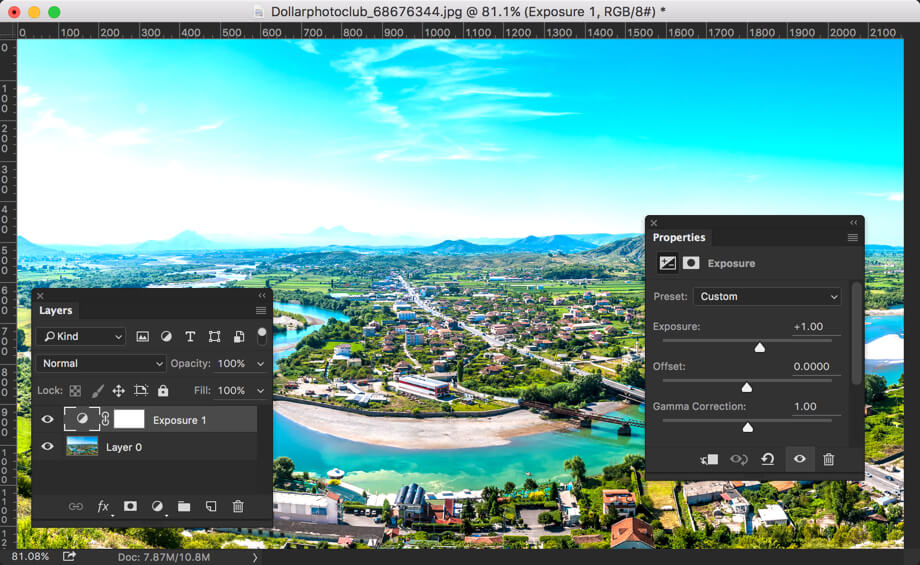
Go to Image>Adjustments>Exposure. Increase the Exposure by 1 value.

1.jpg

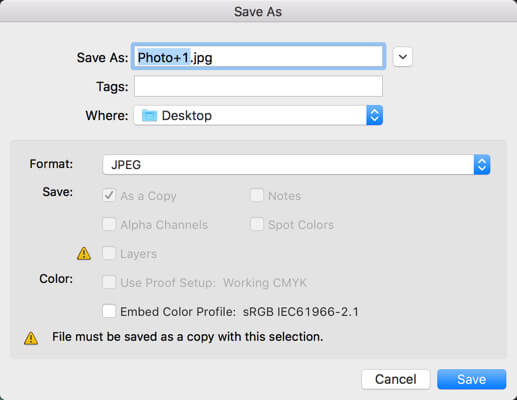
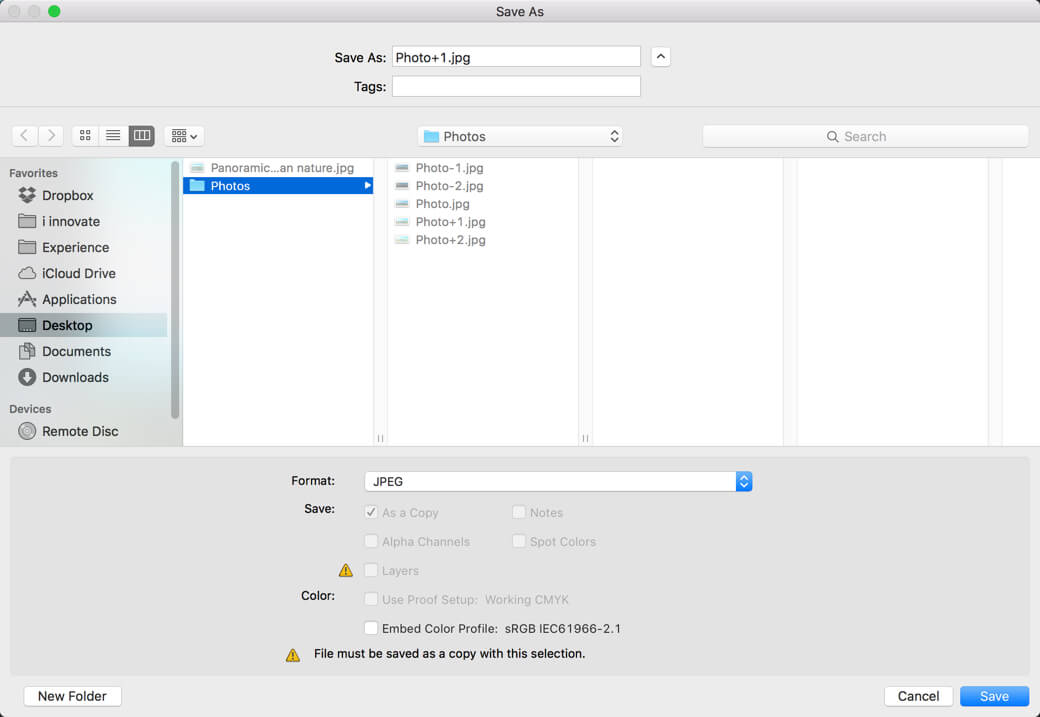
Now save the image with an easily recognizable name. Photo stands as prefix and +1 stands for +1 value of exposure.

2.jpg

In same way, create 4 photos with their exposure value as -2, -1, +1 and +2. In the end, you will have total 5 images including the original and 4 images that we just created.

3.jpg

Step 2: Open HDR in Photoshop

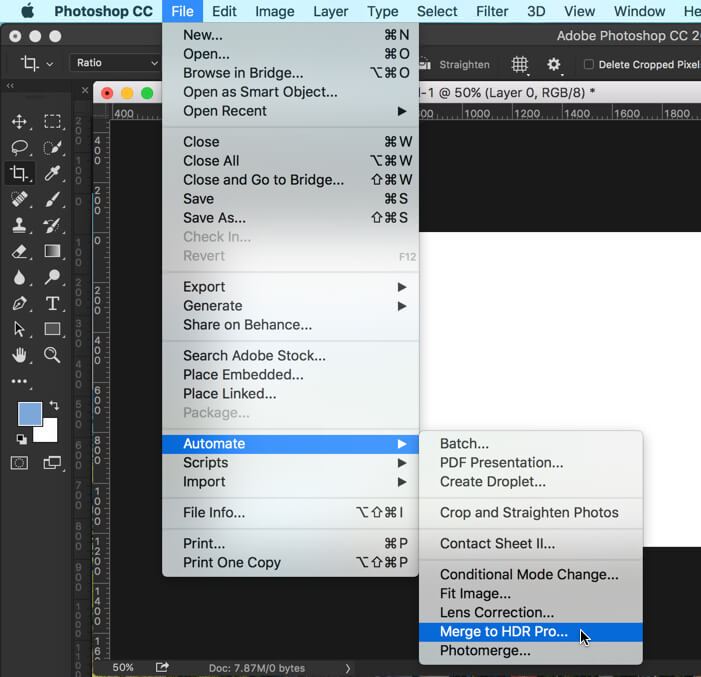
Go to File>Automate>Merge TO HDR Pro.

4.jpg

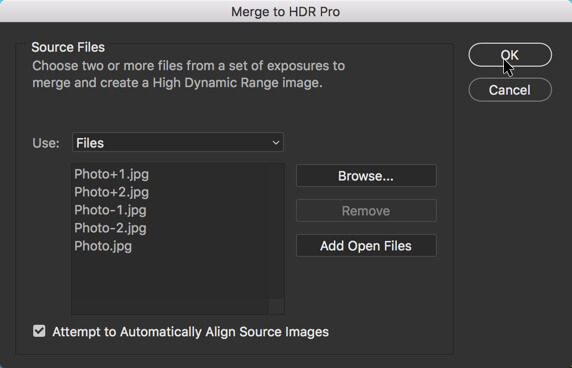
Click on Browse and select all photos. Press OK.

5.jpg

Now wait for few seconds till Photoshop finishes its magic.

Step 3: Create HDR Image in Photoshop

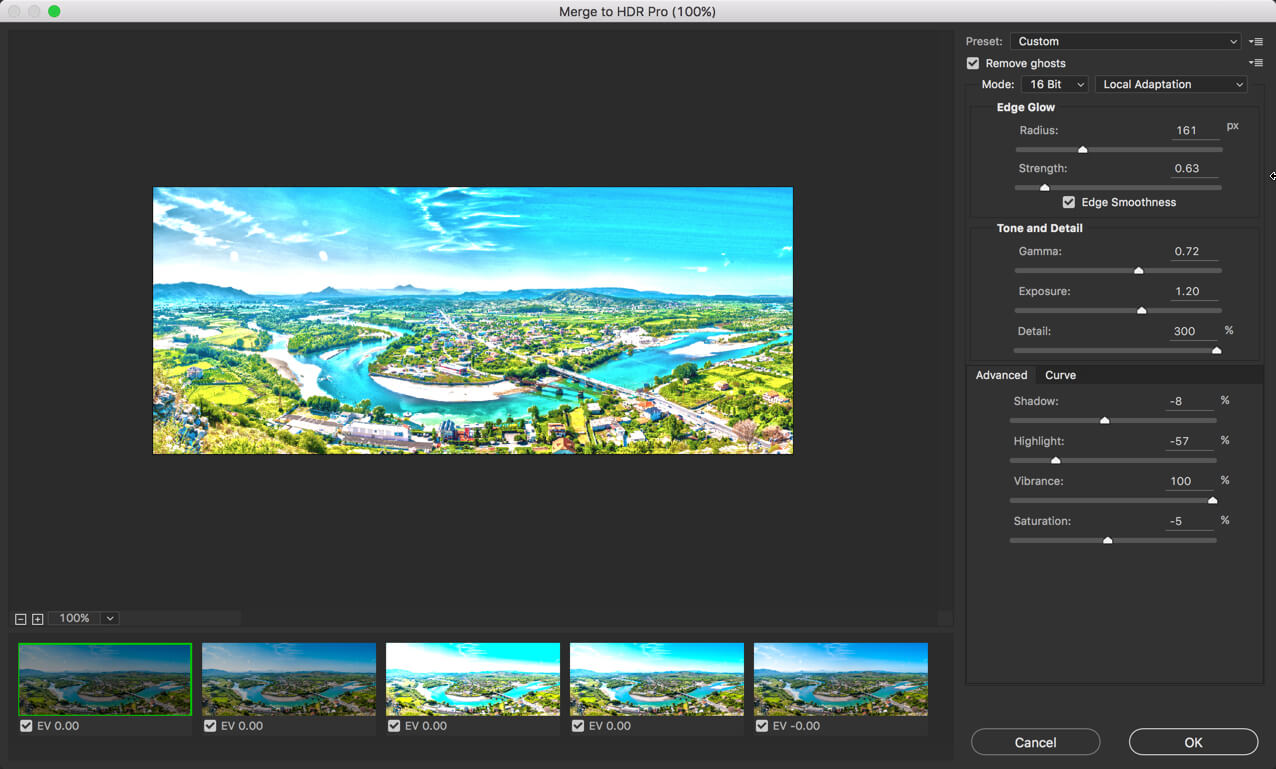
Photoshop will show below screen when it complete processing.

6.jpg

It’s looking beautiful, isn’t it?

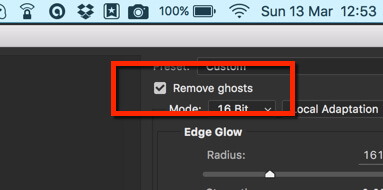
The first thing you wanna do to turn on Remove Ghosts.

This will clean up all the unnecessary extra highlights present in the image.

7.jpg

Step 4: Choose the Image

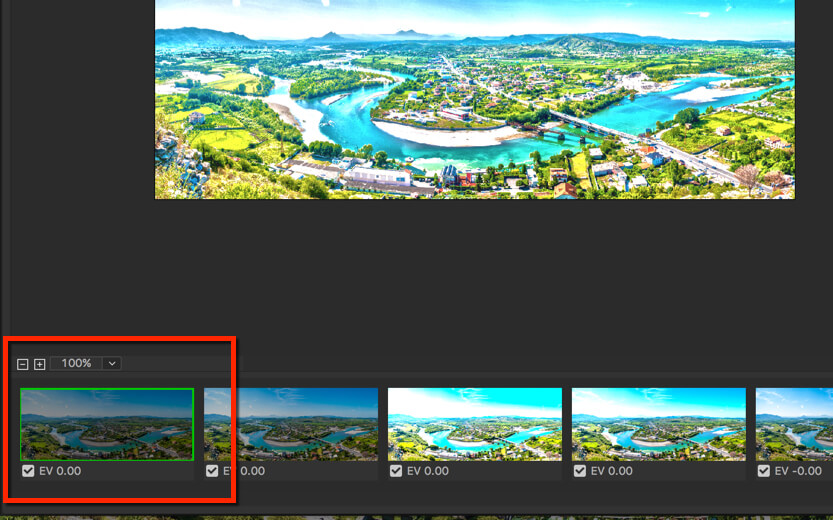
You can choose which image to use as reference image to create HDR image at the bottom of your screen.

I am choosing the image that has exposure value of -2. Don’t worry about the exposure value that Photoshop is showing now. it’s because changed the exposure value in Photoshop. Had we done it with our camera, Photoshop would’ve shown us the correct value.

8.jpg

Step 5: Play with Sliders

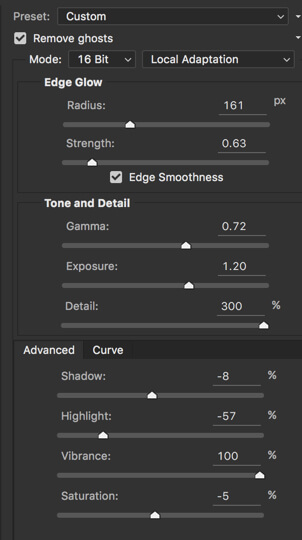
There’s no such magical settings in HDR. Each image looks perfect with a different adjustments of sliders. Below is the setting that I used. I am not saying this is the perfect adjustment.

9.jpg

And we are done with the image. I hope that you enjoyed the tutorial.

FInal

Please support TrickyPhotoshop by sharing this tutorial with your friends on Facebook, Twitter, and Google+.