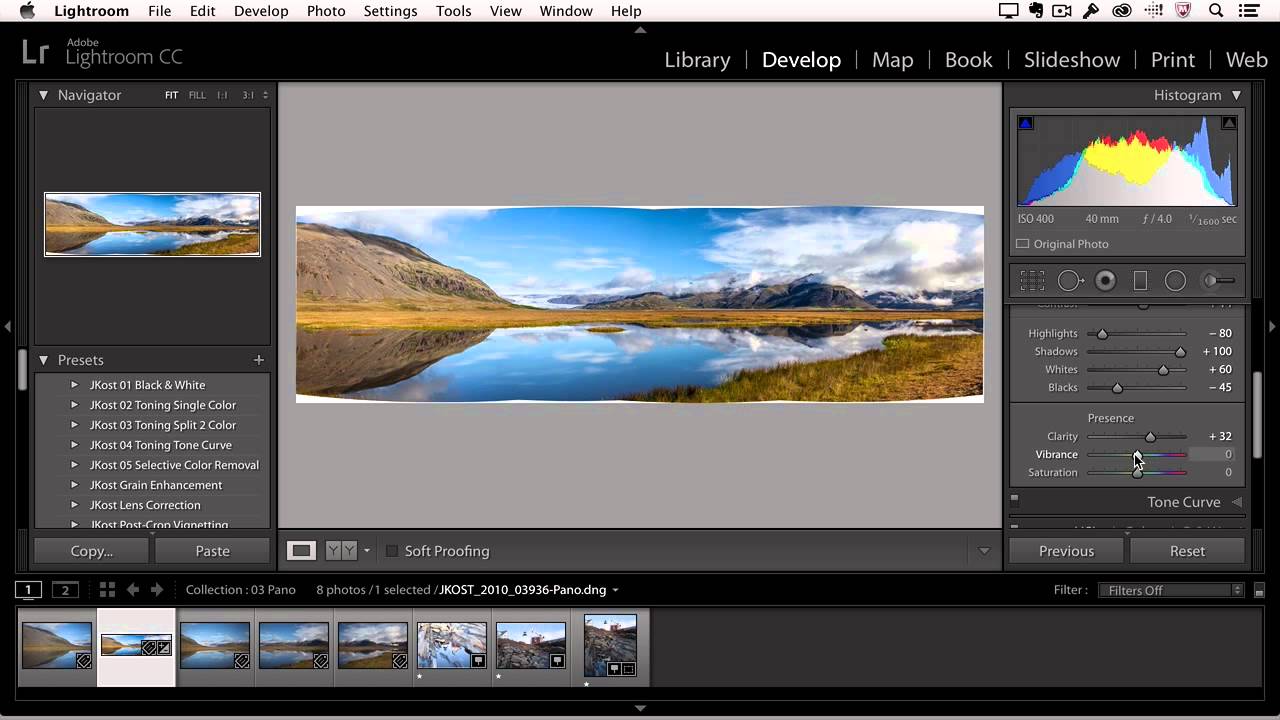
Adobe Lightroom is a powerful image editing tool that can edit your images with a variety of features. Now, there are two versions of Adobe Lightroom, namely Lightroom CC and Lightroom Classic CC. There is a considerable difference in functionality as well as overall workflow.
Between the two, Lightroom CC is the latest version. Adobe Lightroom CC is server-based, whereas Lightroom Classic CC is the one which works offline mostly, Using Adobe Creative Cloud, you can have all your work seamlessly synchronized across different platforms.
What’s new in Lightroom CC?
While some features are missing from Lightroom CC, but present in Lightroom Classic CC, there is a lot to get excited for. With new features such as Auto keyword adding, a geotagging map, a slideshow feature, you have the liberty to do more with your photos. In Lightroom CC, you can even apply presets to metadata as well as new imports. Another useful feature in Lightroom CC is the smart collections tool.
Let’s discuss some points that set the two versions apart:
1. Image categories:
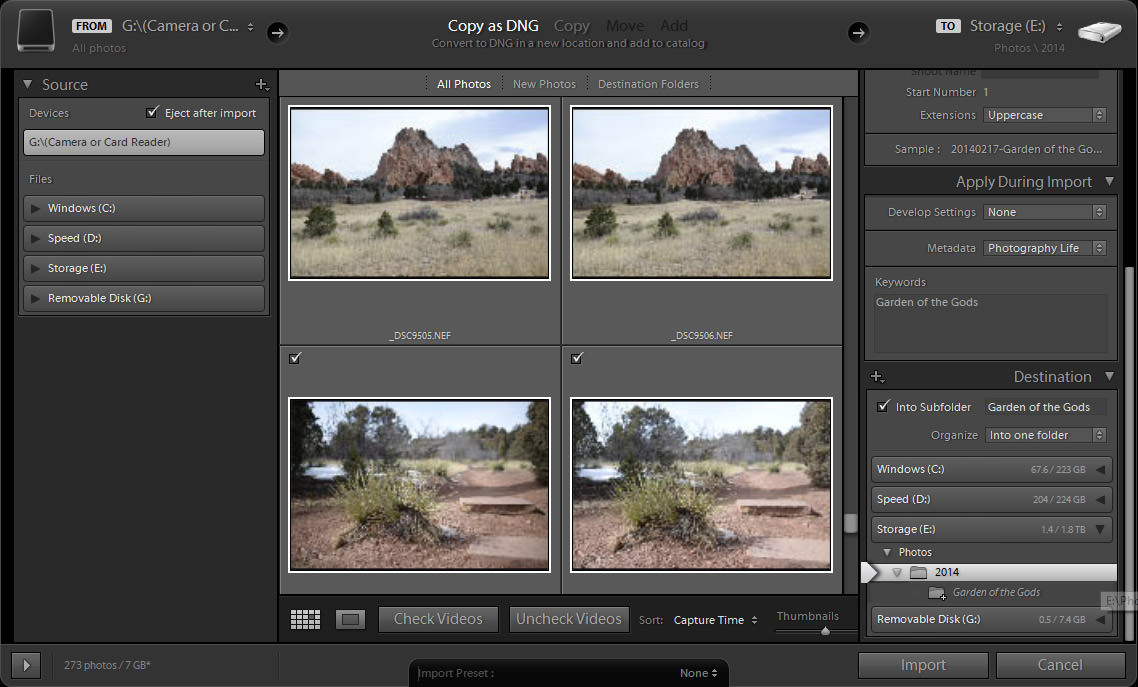
There are two views, in which your images are organized in Lightroom Classic CC. One is the virtual preview aka Collections, and a folder view. The virtual view is a collection of images as per the software’s import and other presets and settings. The folder view lets you see where your photos are present on the hard drive. On the other hand, in Lightroom CC thee is only one method of organization which is Albums. The Albums folder is a virtual categorization of photos under different names and doesn’t appear this way on the hard drive.
2. Keywords:
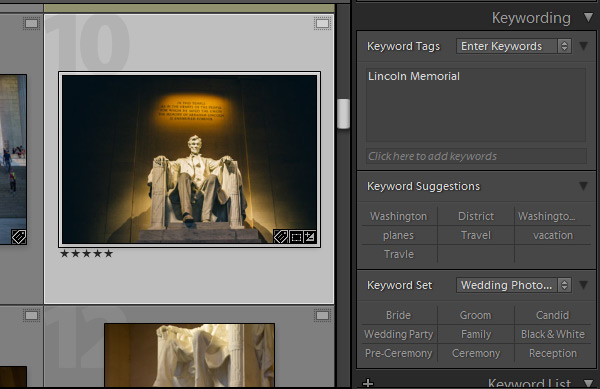
In both the versions, you have the option to differentiate an categorize photos by using keywords in the metadata of the file. In Lightroom Classic CC you can add structured keywords based on a hierarchy. You can manually add them and work accordingly. Whereas in the newer Lightroom CC, the Adobe AI assistant ‘Sensei’ does most of the work and organizes your images by assigning keyword as per the content of the photo. It is a great feature that works fast and lets you come back to them later.
3. Editing Tools:
The editing tools present in both versions set them apart in how they function. The Lightroom Classic CC has powerful features such as Tone Curve or Split Toe panels. These features are missing from the Lightroom CC, although some updates have changed it to some extent.
4. Panorama:
Lightroom Classic CC has its own powerful stitching panorama tool which lets you make panoramas out of overlapping frames in photos. Lightroom CC, on the other hand, doesn’t have this feature yet.
Conclusion:
There are many features and design elements that separate Lightroom Classic CC from Lightroom CC. In some ways, Classic CC has an edge over the newer version and in other vice versa. The newer version seems like a more streamlined tool to process and work faster and avoid the in-depth tools of Lightroom Classic CC. Overall, Lightroom CC is a great upgrade, but leaves something back in Lightroom Classic CC, to move forward in functionality.
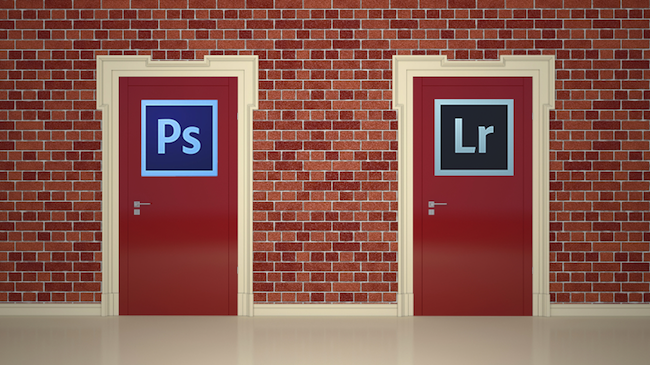
Adobe is a household name to professionals and hobbyists of all kinds. Adobe software can handle many things, whether it is image editing, management, graphic design or countless other utilities. Let’s discuss Lightroom vs Photoshop today.
Now, when it comes to their most widely used software – Photoshop and Lightroom, there is bound to be a comparison. Both are equally capable pieces of software but excel at different functions.
Adobe Lightroom:
Lightroom is more of a starter’s tool to use for image editing, fixing, and management. It is capable enough to fix and change the smallest details in RAW and other formats in images. And at the same time, it is an easy to use software, which one can learn fast. You can use Adobe Lightroom easily and make your edits quickly. Lightroom is an all in one package to batch edit your photos down to the last detail.
Adobe Photoshop:
Photoshop is a general creation and designing tool that can also do the same things that Lightroom can do. But, its functionality to use as a substitute for Lightroom is incredibly limited in terms of ease of use. Its unique functionality makes it possible to do millions of things like background swap, painting, web design, something that Lightroom cannot do. You have to master all the basics to be able to apply presets, modify images, create from scratch as well as tune images.
Photo by creativelive.com
Lightroom vs Photoshop
Since each of them has its benefits and unique features, it is not a competition. Both are part of the Adobe Suite and in a photographer’s workflow, both are quality essential.
You start with applying color and other fixes on Lightroom. Then, you move to Adobe Photoshop to further edit and add any more changes. After all, photoshop is the Swiss Army knife for graphic design! Whether it is removing, adding or modifying elements, you can do it all with Photoshop.
You can play wit layers, lighting, artificial effects, elements, and a lot of artificial edits in Photoshop. Whereas, in Adobe Lightroom, you cannot add elements and artificial external elements or modify the image’s elements.
Surely, you can remove blemishes, spots, change colors, that too at an advanced level. Whereas you can easily edit and add images to Lightroom, Photoshop is as its name suggests. Photoshop lets you play around with photos and add layers of edits and edit each layer differently. You can even stitch images, and make panoramas, something that Lightroom cannot do. It is kind of like a garage for photos; Lightroom’s name also gives it purpose away clearly.
Much like a photographer’s darkroom, its main purpose is to process images into a fair level of the usable final product. You can show the output of a digital camera’s raw file into a natural-looking image with the tuning tools of Lightroom.
Conclusion:
Both are capable at their own functions and tend to different users. When it comes to ease of use, Lightroom takes the leading position. On the other hand, if it is graphic design or advanced image editing you are looking for, you should learn Adobe Photoshop.
You can edit photos down to the pixel level in Photoshop, and in Lightroom, you can edit everything which looks appealing to a layman looking at a photograph with perfect colors and removing all imperfections in lighting. You can even add multiple images into one image with Photoshop whereas Lightroom lets you apply your desired settings to a batch of your photos.
As a photographer, whether professional or hobbyist, you need to be able to take stunning pictures. Often times it is the skill and experience which can teach about what settings work best according to the scenery. But, camera and colors play an equally major role in this too! This is where Adobe Lightroom comes in. You can understand what is Lightroom below:
Simply put, a phone or digital camera is only good enough to decide what looks best as per its coding and sensor settings. Nowadays, machine learning can do a lot, but in the end, one needs to use their own judgment to take stunning shots. When you take a massive number of photos, it is hard to concentrate on capturing the perfect picture every single time.
What is Lightroom?
Adobe Lightroom is your companion if you find yourself too often in the above scenario. Lightroom, as the name indicates, is the photographer’s best friend. It can manipulate, process and edit photos as required into an amazing end product. Adobe has enabled everything one would ideally need in a traditional sense of a dark room.
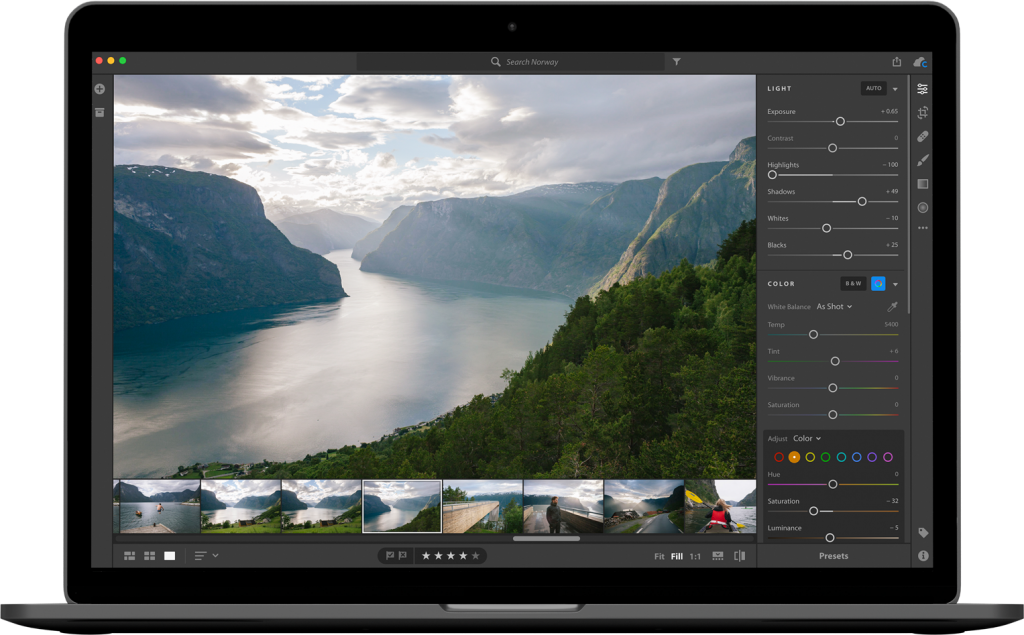
Whether it is pushing out amazing looking photographs or tuning intrinsic details about your capture digitally, Lightroom can do it all. You can change all the basic settings such as contrast, exposure, shadows, white balance among so many other available elements. There is a large number of data that a DSLR or even a smartphone captures in one photo.
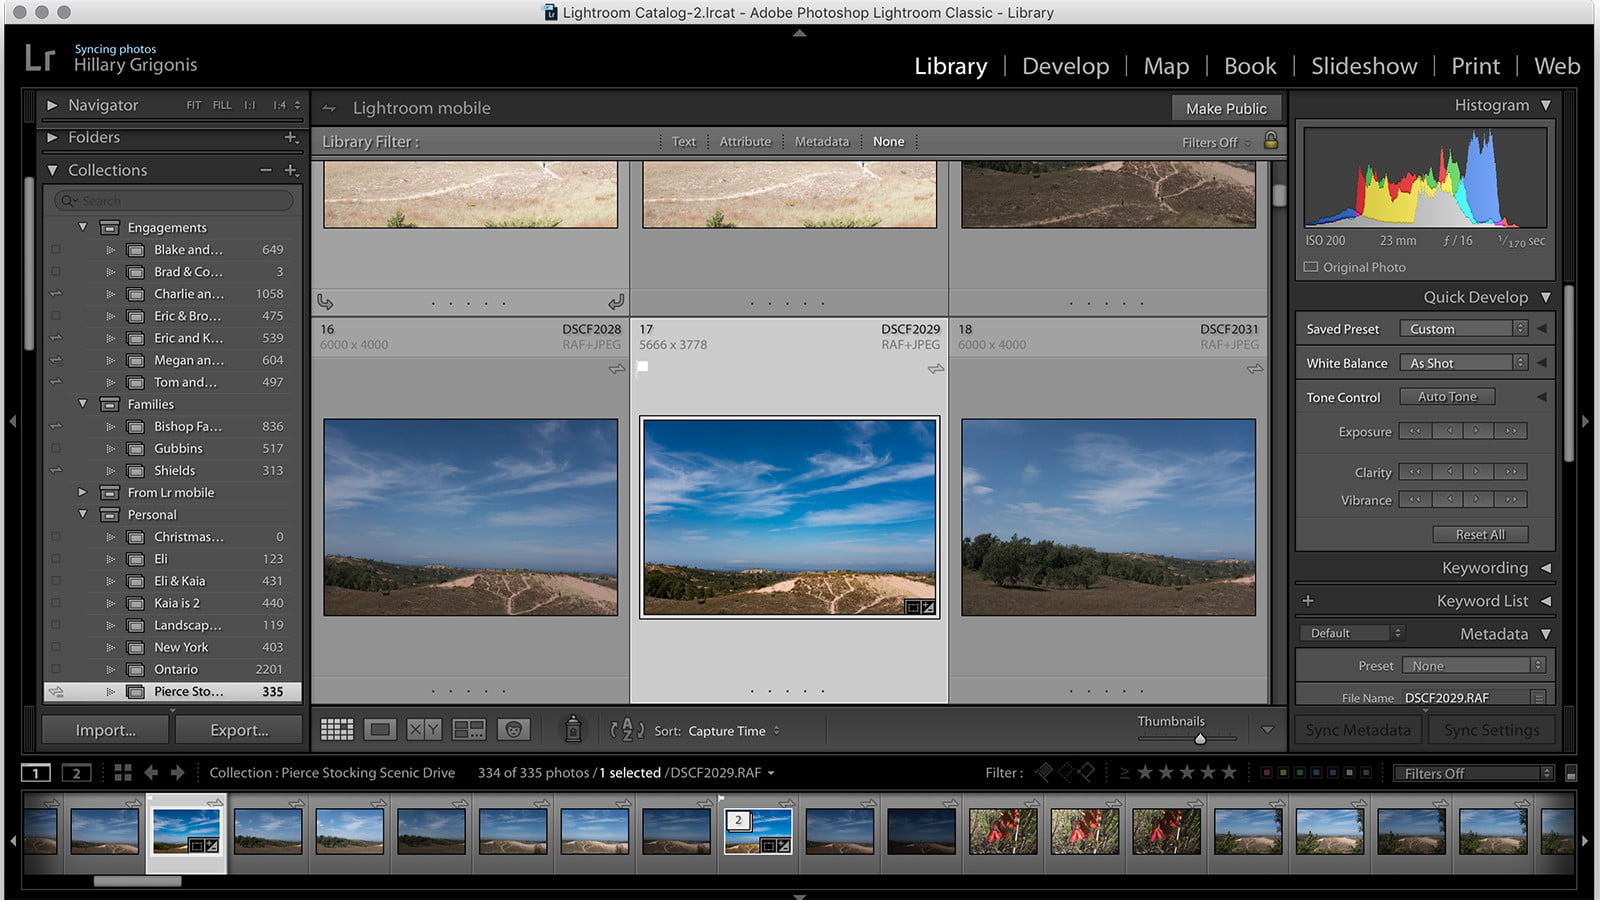
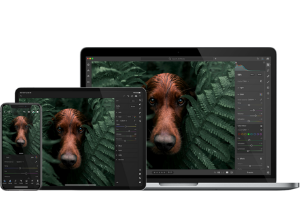
As a multi platform tool, Lightroom is ideal to use anywhere, be it your smartphone or your desktop computer. Both professionals and hobbyists are using this amazing software to get amazing looking photos. Moreover, it can process RAW files such as .NEF perfectly.
RAW file formats show you how much this amazing software can actually tune and edit in your image. Additionally, whether is is JPG files or RAW, the performance and capabilities of Lightroom give you full and easy to use control over photo editing.
Additional Features:
Lightroom is not only good at editing the basic and finer details of your photos, but also can add a bit of flair to your photos. You can use built in Lightroom presets to completely change the setting and background of an image. Additionally, you can also rely on it to give you an accurate sense of how images would look on any screen in general.
If you need to understand what is Lightroom more, you need to start practicing on it right away and play with the controls a bit. As an easy to use software, it is quite intuitive in how it operates and can be your best buddy in churning out a picture perfect photo session in no time. It can process a bulk of images and you can process them into any desirable format as well.
In addition to bulk processing, Lightroom is perfect in sorting through your library and applying any number of edits to your portfolio. As an all in one package this is the ultimate tool to edit your photos irrespective of size, format, or even quality!
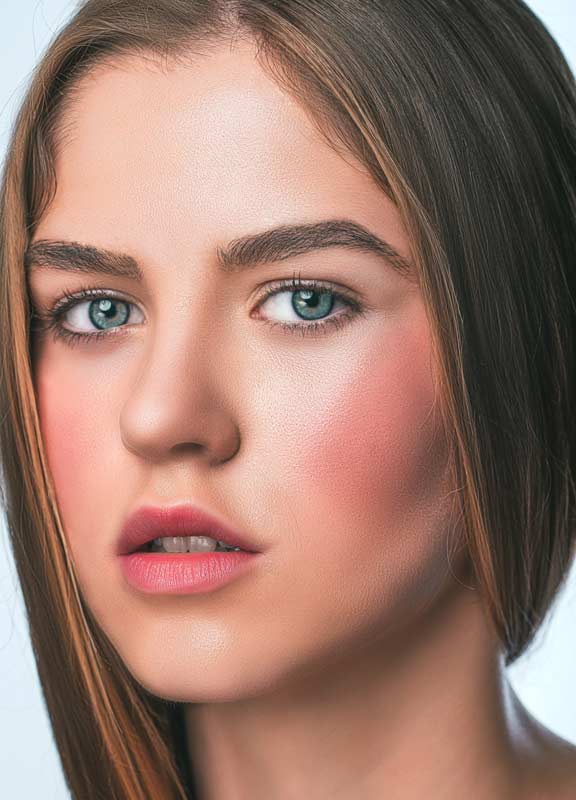
In this age of social media, looks can be very deceiving. The photos on social media often bear little resemblance to when they were taken because they can be digitally manipulated.
A skilled Photoshop master is able to do just about anything to a photo, including making someone look a whole lot better than in real life. A broad nose becomes slim, a thick waist turns into a thin one, flabby upper arms become smooth, eyes look brighter and teeth look whiter.
“Photoshop Holy” – digital manipulation for perfection
A Photoshop master and Weibo user named Kanahoooo has mad photo-editing skills that will make you question those stunning photos you see of people on social media.
She has a huge following on Chinese social media, where she is referred to as “Photoshop Holy.” She says you shouldn’t believe the perfection you see online. People reportedly ask her to make their images look more ‘shiny’ on social media.
The people in the after photos can hardly be recognized from the before photos, often looking slimmer and more beautiful. Her images show just how thin the line is between the beautiful and the not-so-beautiful.
People comment that the photos look unnatural and don’t necessarily make everyone look better. Her response is that what she does is a type of entertainment and that she thinks it is fun to try and make people look different.
Her wizard-level photo editor’s skills are in demand and she is really good at making young girls look perfect. They seek perfection because they feel it is necessary if they want to get ‘likes’ and followers on social media.
Becoming a Photoshop master requires practice
An integral part of digital photography is the post-processing stage. Even when you’ve taken an acceptable photo, there is usually room for some photo editing magic if you want to take it to the next level.
Using Photoshop tools, you can correct issues like slight over-exposure that can wash out skin color and features but it is possible to go a great deal further than that.
Mastering the basics first
Simply learning how to use some of the basics of Photoshop can take time. Adele Markus, a graphic designer who works for Best Essays, says she battled at first to learn how to use the layer panel. She says her early attempts looked as though a child had been busy and it took practice to get the best quality from a photo by applying layering.
Some of the tools in Photoshop are fairly straightforward and easy for beginners to use, whereas others are much more complex and it may take time before you’re ready to use them.
For example, Brightness/Contrast, Exposure, and Shadows/Highlights simply require moving sliders to the right or left to make adjustments. However, more advanced edits require learning how to read a histogram or a chart that shows the tonal range in the photo you’re editing.
Dealing with slight imperfections
Photoshop has many photo-editing tools, such as a Spot Healing Brush you can use to get rid of blemishes and a Clone Stamp tool that allows you to copy pixels from a selected area and then clone it on to another area.
This makes it easy to remove imperfections like a stain on a model’s clothes you didn’t see during a shoot, a spot on the skin, any odd patterns, or a dirty background.
Working on the eyes
One element in photos that can be tricky to get right is the eyes. The less you do to them, the more natural the effect. It’s fine to work on them if they appear a little puffy or have bags under them. However, adding too much sparkle tends to look unnatural and may even make them look unearthly.
Perhaps you’re working on a photo where the model’s eye bags give away the fact that she got little sleep the night before the photoshoot. It takes some practice to improve photos without the changes you make being easy to notice.
Learning how to reduce puffy eyes in Photoshop is not that difficult, but there are different ways to accomplish this and some ways offer a better result than others.
Adjusting colors and shadows
When you start adjusting colors and shadows, you have to understand curves, how to layer and create contrast without creating a collage of blurred colors and overlapping shadows.
Practice makes perfect
When you’re new to a photo-editing program, it is easy to either avoid or overuse fascinating features. The more you use the photo-editing software, the more adept you become.
Kanahoooo or “Photoshop Holy” shares tricks on how to retouch images on her homepage and launches challenges that give other Weibo users a chance to practice and to show off their Photoshop talents. Perhaps your idea of perfection is different from hers – but you still need to put in the time and practice if you want to improve your skills.
Transform photos in Lightroom
Many professional photographers are able to transform photos in Lightroom. This popular photo editing software has many compelling editing functionalities. It allows you to apply your own style, be creative and differentiate your work from other photographers.
Using Lightroom does have a learning curve, but it is not as difficult as learning Photoshop. It is fun to play around with all the features and see what kind of results you can achieve.
When you are learning various editing programs, it takes time to understand how and when to use the various features. Trying too hard to incorporate them too soon is a mistake that beginners often make.
Keep comparing with the original image
A good rule of thumb when photo editing is to make the final images look as natural as possible. In the beginning, it is often tempting to over-contrast or over-saturate a photo, but with time it becomes easier to recognize when an image is well balanced.
Comparing the original image with the edited version while making changes helps you to quickly realize when a photo begins to look unrealistic. For instance, when you want smooth skin, take it slow and work next to the original image so you can see when the skin starts to look plastic.
Less is often more when it comes to photo-editing. For instance, having a bright smile is engaging but over-whitening teeth can make a photo look fake. You don’t want the focal point of the photo to be glaring white teeth.
Conclusion
Editing photos can be fun but you don’t want to fall victim to over-editing. Too many edits will make your photos look unnatural. Of course, if you’re like Kanahoooo, your brief may be to make someone look completely different and you will have great fun doing it. However, if you want to keep your photos looking natural, make only changes you feel are necessary and leave it at that.
About author
Tiffany Harper is a talented writer from New York, an extremely active woman, and a real leader. She began her career as a journalist and later proceeded as an educational writer and editor. Now she works as an experienced subject matter expert with best writing services, sometimes she works as the content consultant dissertation writing service and thesis writing service, like essay writing service in UK, mostly in technology, business, and marketing area. Please do not hesitate to contact her on Twitter.
Here comes the awaited tutorial. Many of the people demanded me to write a tutorial on creating a silhouette effect in Photoshop. So, here you go.
This is a short tutorial. I’ll be showing you how to create a silhouette effect in Photoshop. I’ll just be using a selection tool and adjustment layers.
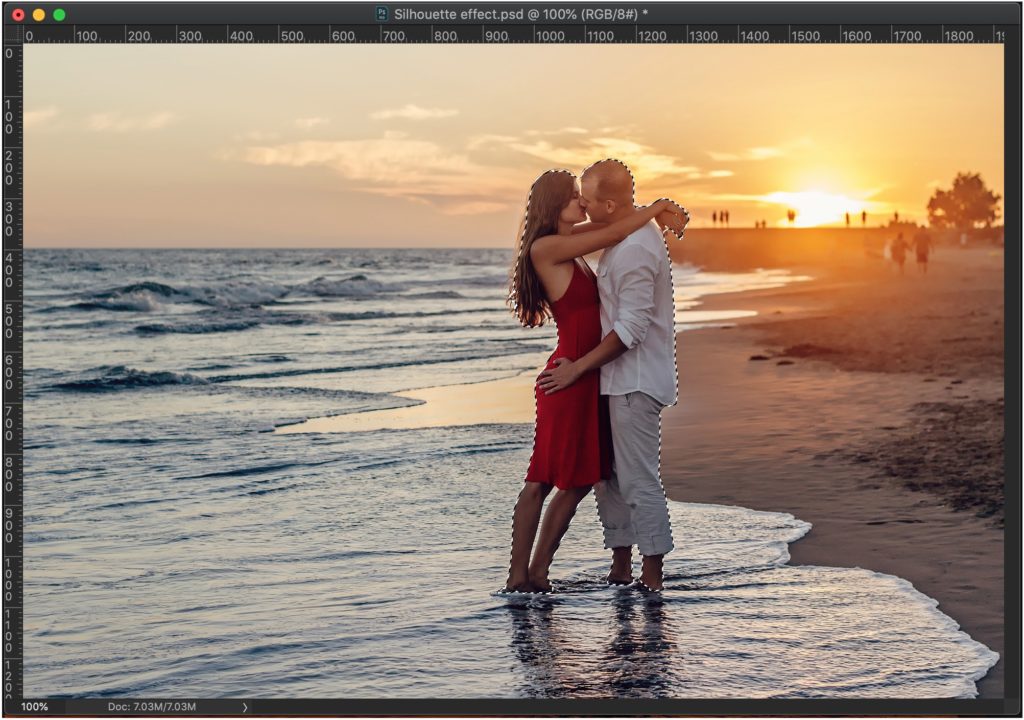
Before we begin, let me show you the before and after photos.
We’re going to use Select Subject to quickly select the people. If you’re using old Photoshop and don’t have Select Subject then you can use the Quick Selection Tool to select the people.
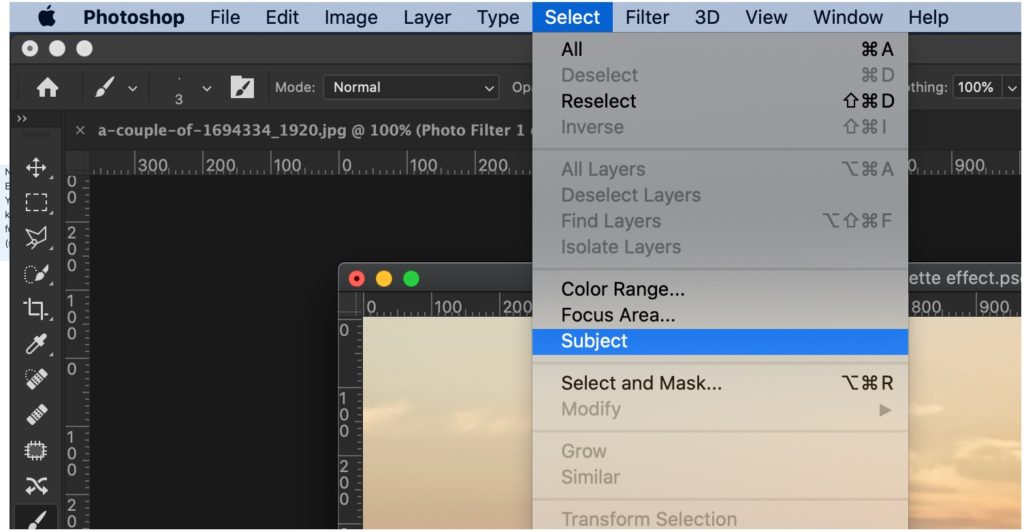
Go to Select > Subject.
This will roughly select the people. The selection is not at all perfect. See the ocean between their chins, chest, and between her legs. Those areas should not have been selected.
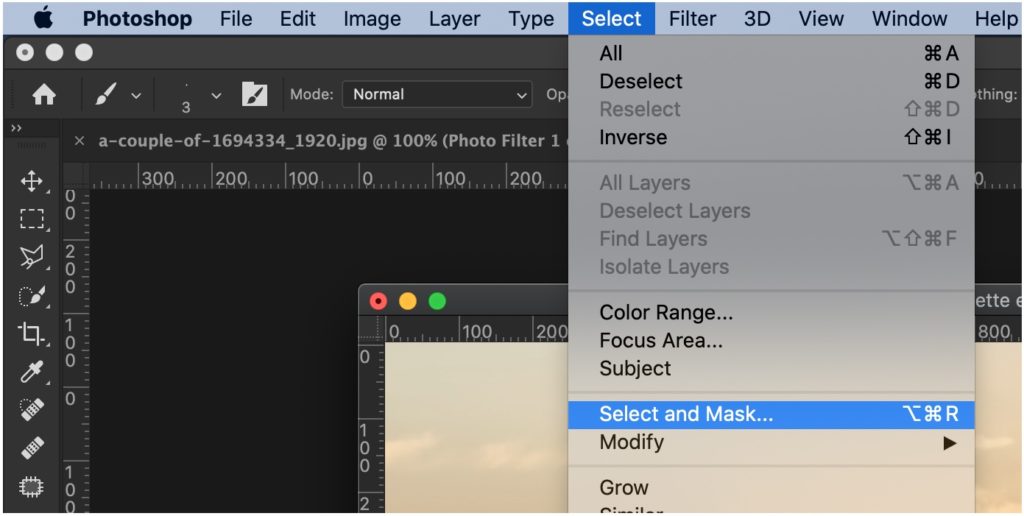
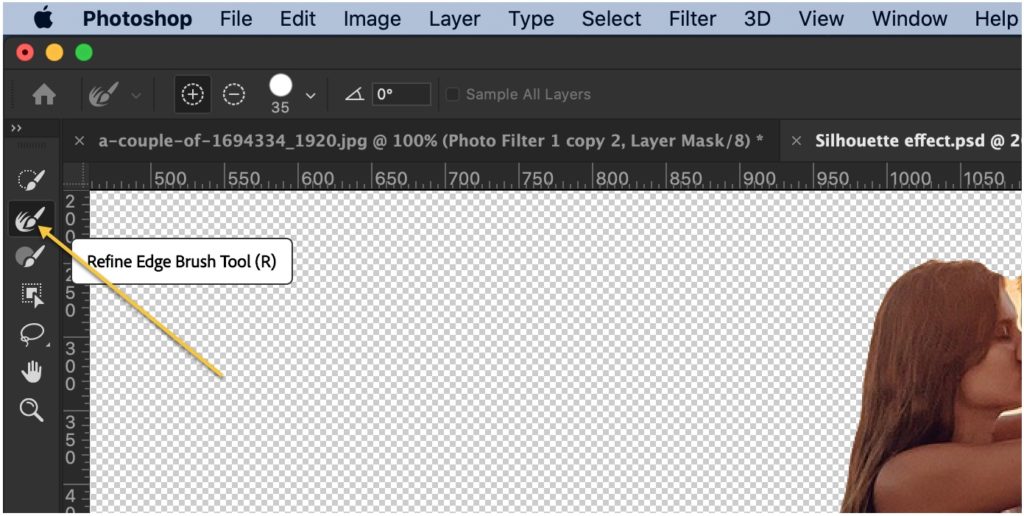
Step 2 – Refine the selection in Photoshop
We’re going to refine the selection to deselect the unwanted areas and select the wanted areas. We’re going to do with the help of the Select and Mask tool.
Go to Select > Select and Mask.
Grab the Refine edge brush from the panel. This will show up once Select and Mask is turned on.
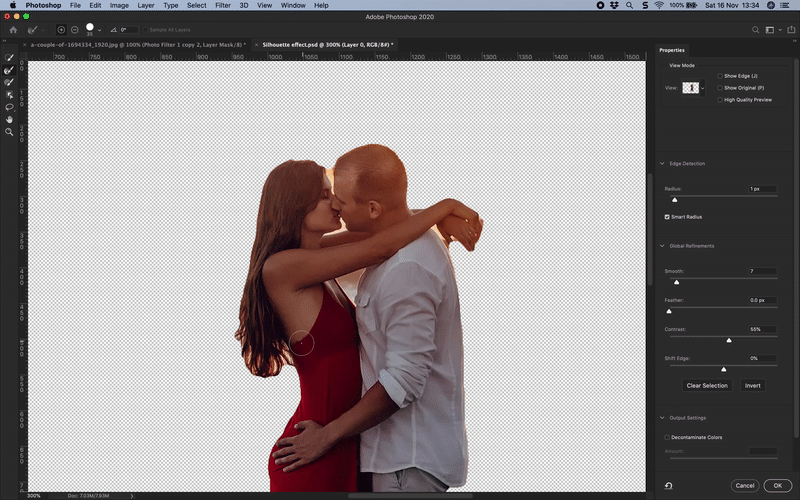
Now, start brushing on the edges. See the GIF below. GIF is of 4 MB in size. Give it some time of load. Also, I have increased the speed to two times.
Once that is done, you’ll see the photo without the background.
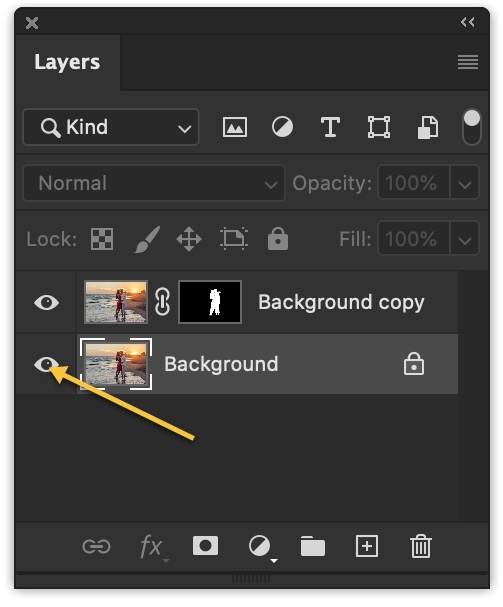
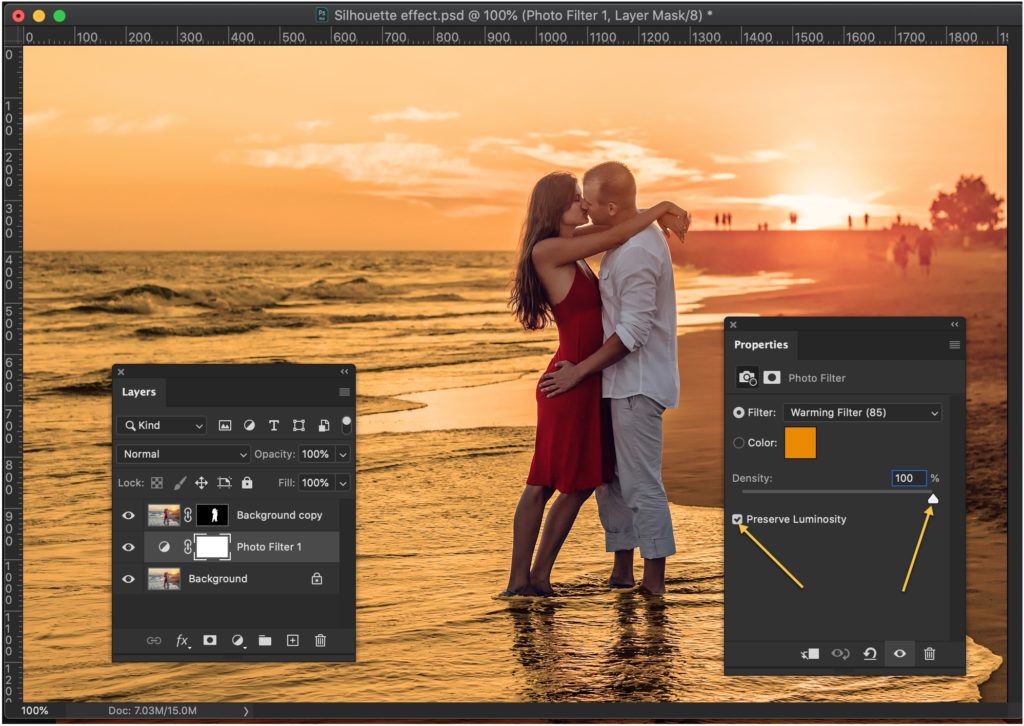
Step 3 – Give a nice dark effect to the background
Open the layer panel by going to Window > Layer.
Activate the background layer by clicking on the eye icon.
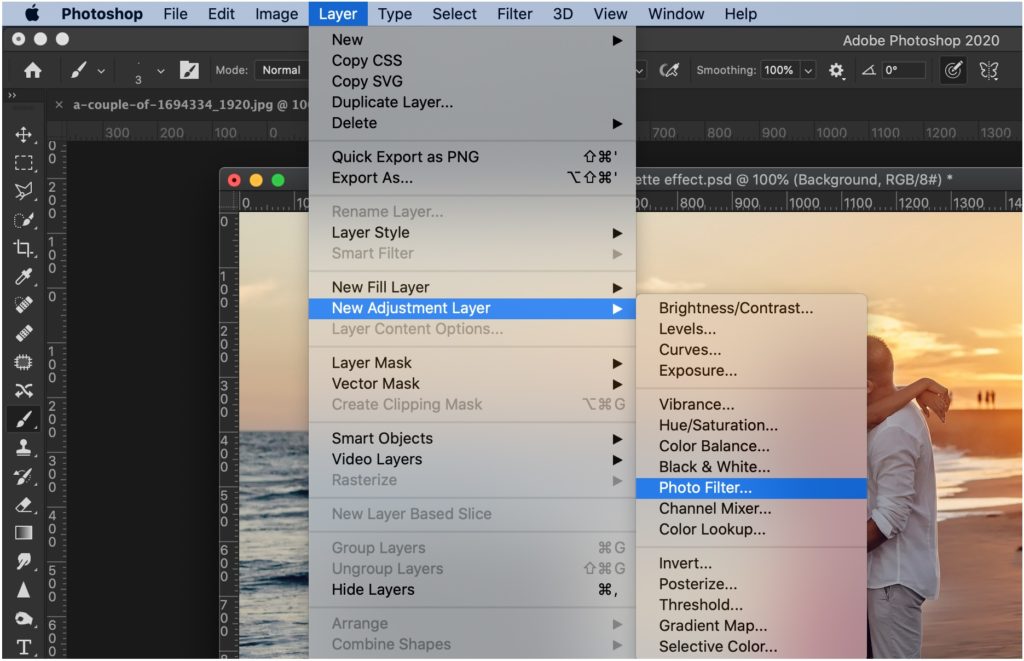
Go to Layer > New Adjustment Layer > Photo Filter
Click on Preserve Luminosity and drag the slider all the way to the right.
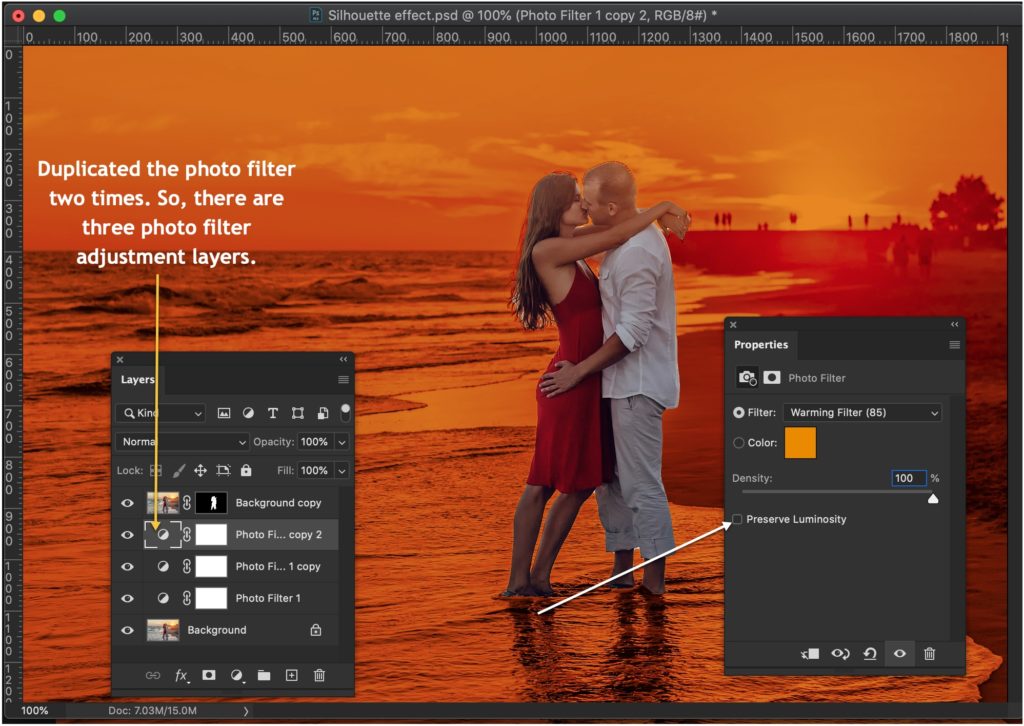
Now, duplicate the photo filter adjustment layer 2 times by pressing Cmd + J / Ctrl + J. In the topmost photo filter layer, turn off the preserve luminosity.
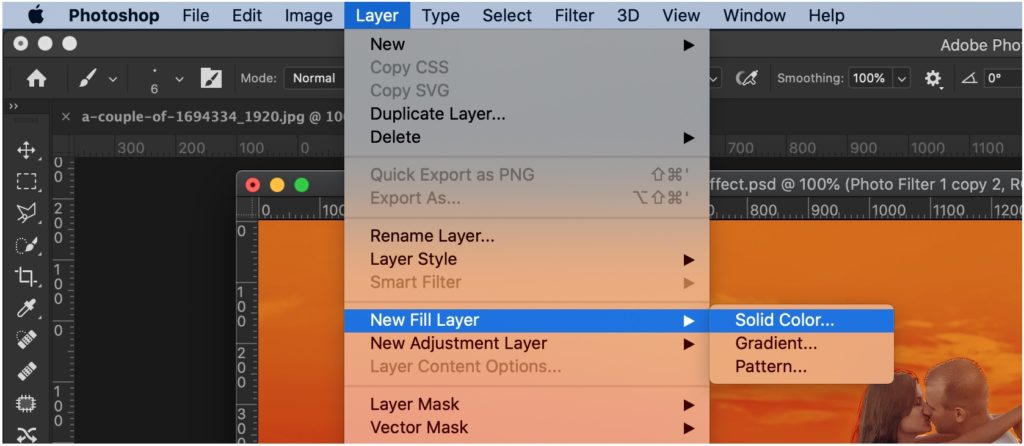
Step 4 – Create a silhouette effect in Photoshop
Time to make the people black.
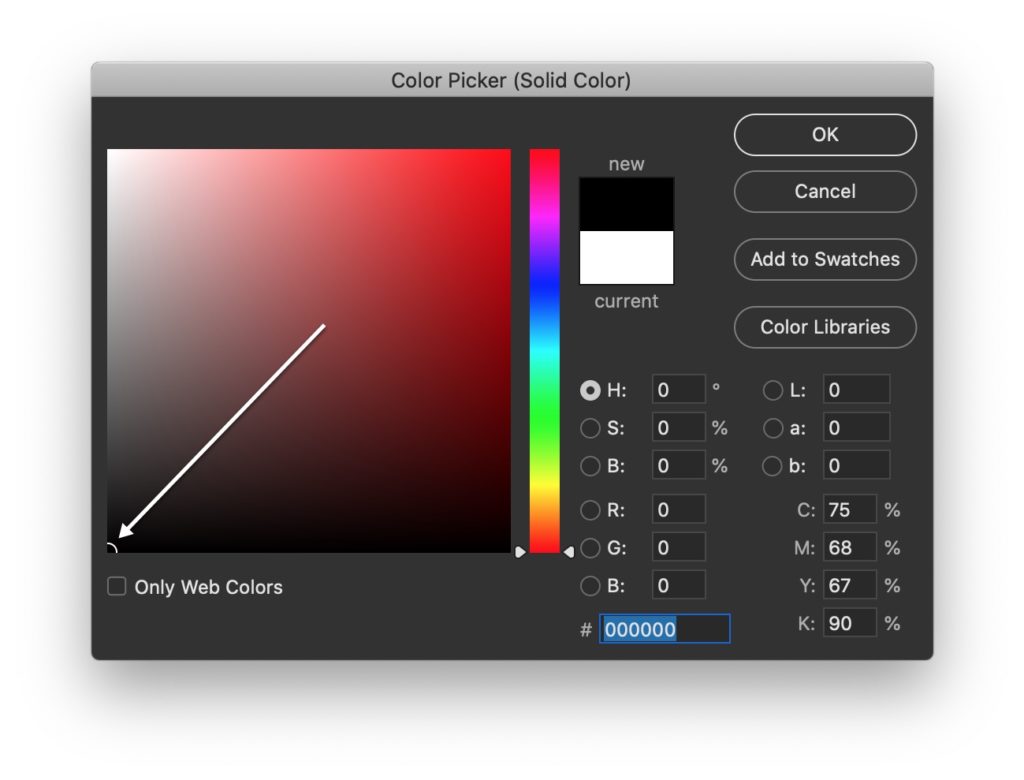
Go to Layer > New Fill Layer > Solid.
In the next window, choose the black color. Press OK.
In the layer panel, drag the solid color fill layer to the top. Now, hold down Opt / Alt and place the cursor between the Solid Color fill layer and the people layer. The cursor will change to an arrow. Click as soon as the cursor changes. See the below GIF.
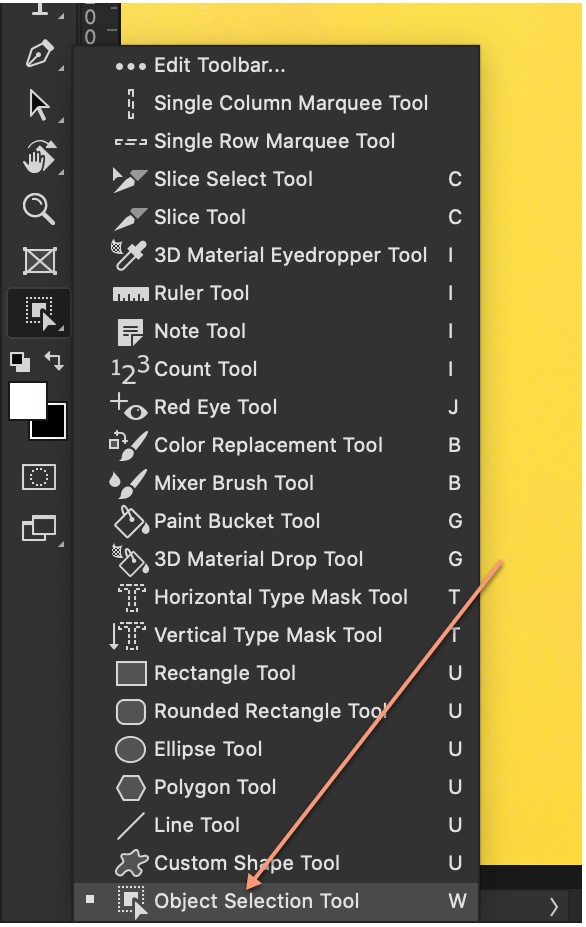
Adobe Photoshop 2020 is out. With it, Adobe has launched so many new features and one of them is the brand new Object Selection Tool. Let’s see what we have got in this brand new Object Selection Tool in Photoshop.
Let’s begin the tutorial.
What is the Object Selection Tool in Photoshop?
The Object Selection Tool in Photoshop is a tool to select anything in Photoshop. It can be a face, car, tree, house, or basically anything. As of November 2019, the accuracy of the selection is not that perfect for complex edges like hair, but it works pretty well for sharp edges like a house, car, etc.
Where do I find the Object Selection Tool in Photoshop?
You can find it on the tool panel. It’s present along with the Quick Selection Tool or press Shift + W again and again until it activates.
How to use the Object Selection Tool in Photoshop?
The Object Selection tool in Photoshop is easy to use. Though it’s not as easy to use as the Select Subject, but it gives better results than the Select Subject.
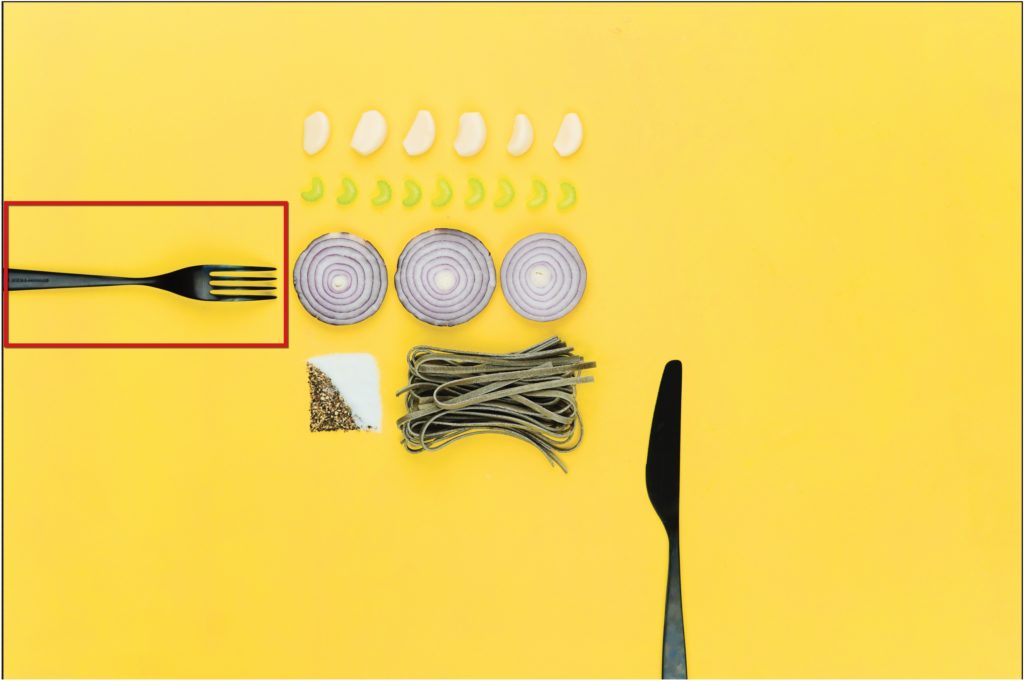
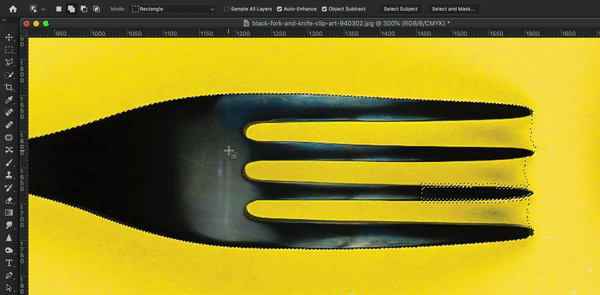
In the below photo, I am going to select the fork.
Step 1 – Select the Object Selection Tool in Photoshop
Either press Shift + W or grab the Object Selection Tool from the tool panel.
Select the rectangle from the option panel. I’ll explain the rest of the features in the option panel later.
Now, draw a rectangle around the fork.
This is the result. You can see that it’s nowhere perfect.
Step 2 – Refine the selection using the Object Selection Tool in Photoshop
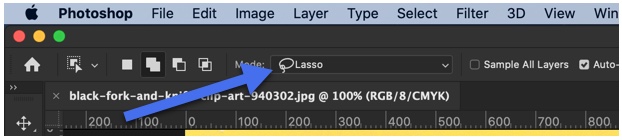
It seems that Adobe knows that the result doesn’t give perfect results always. So, it has added one more feature in this tool. You can add or subtract something to or from a selection using the same Object Selection Tool.
I am going to show you how you can do it.
Firstly, change the mode to Lasso.
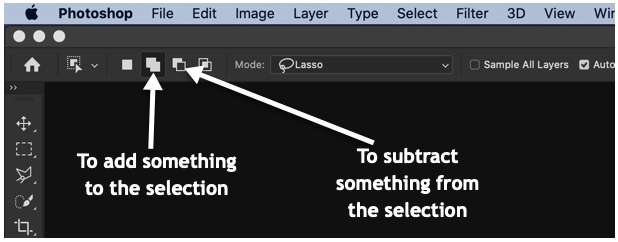
In the option panel, you’ll see four icons on the left side. These icons come handy now.
If you look at the screenshot below, you’ll see that I have marked the things that we want to add to the selection or subtract from the selection.
Fixing the handle
The handle of the fork needs to be added and the slots between the points need to be subtracted from the selection.
We’ll first add the handle to the selection. Click on the second icon in the option panel. See the below screenshot.
When refining the selection, I found it really hard to use the Object Selection Tool because of its inaccuracy. I needed to use it multiple times and had to spend a lot of time which could easily be saved using the Quick Selection Tool.
So I decided to use the Quick Selection Tool instead.
Fixing the slots
Again make use of the Add to Selection and Subtract from Selection icon to do this.
See the below GIF. Yes, you could do the same work in probably half of the time using the Quick Selection Tool. But, I stuck with the Object Selection Tool because this tutorial is on it. Give some time to Adobe and I know that it’ll optimize this tool.
An image speaks a thousand words, right? And with social media becoming more image-based, it is a proven fact that people respond to compelling imagery. There are many tools out there, such as Photoshop which facilitate image-making that is tailored for social media sites.
Posts accompanied by a good image are to be far more engaging than text-only images which is why you should get acquainted with tools that simplify the process of creating images for social media campaigns.
Even Twitter, which was once only text-based, has been pivotal in transforming how we use images on social media. Here are some online tools you can use to create stunning online imagery to keep your audience engaged.
1. Canva
Canva is one of the simplest software to use out there for novice designers. It comes complete with templates and beautiful layouts for social media images. Canva is simpler to use than Photoshop and it is also a great foundation to get to know the basics if you are graduating to Photoshop any time soon.
No project is too big or small for Canva and it is versatile. The only snag with Canva is that photo quality can tend to be compromised and images might not be suited for printing due to a low resolution.
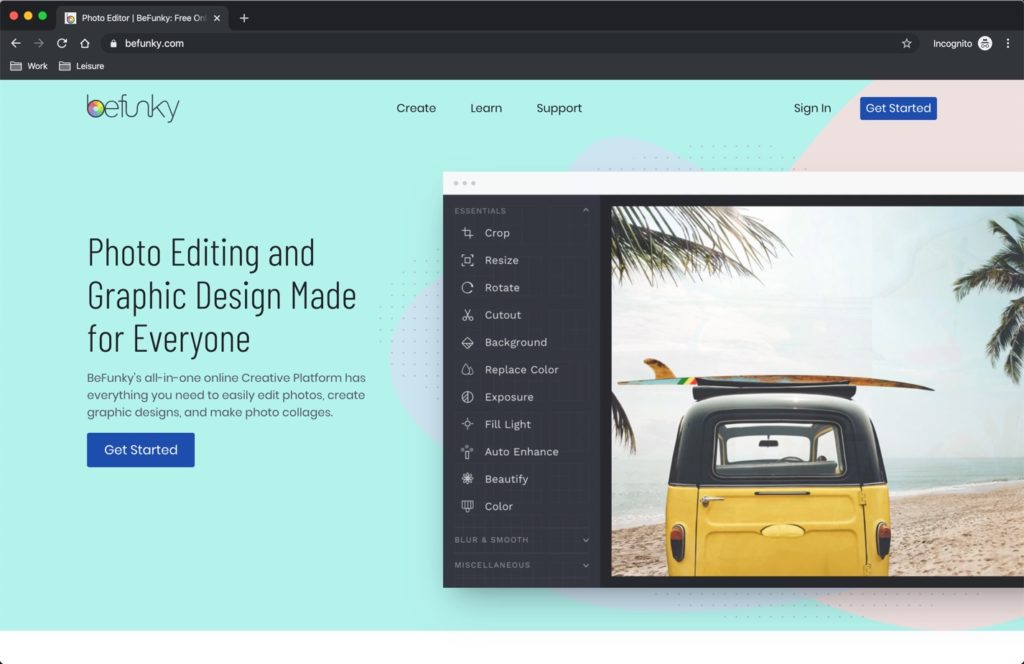
2. BeFunky
BeFunky is an online software similar to Canva that allows you to customize images for different uses. You can also create beautiful collages and it is relatively simpler to use than Canva. It also allows you to add elements to a photo, and make special effects on a photo.
For instance, you can turn an image into a cartoon. Similar to the transform feature in Photoshop. BeFunky is an easy tool to use because it allows the user to create headers and social media images with ready-made templates in the right sizes.
3. Creative Market
As its name implies, Creative Market is a digital resource filled with assets that are assembled by creators from all over the world. The features are an excellent way to become more acquainted with designs for social media graphics and include amazing fonts, stock photos, patterns, graphics, clipart, and mockups.
The creative market is designed to put aside the hard work for you and simplify image making for any social media platform. It offers a wide range of options, meaning that there is a variety for the average user.
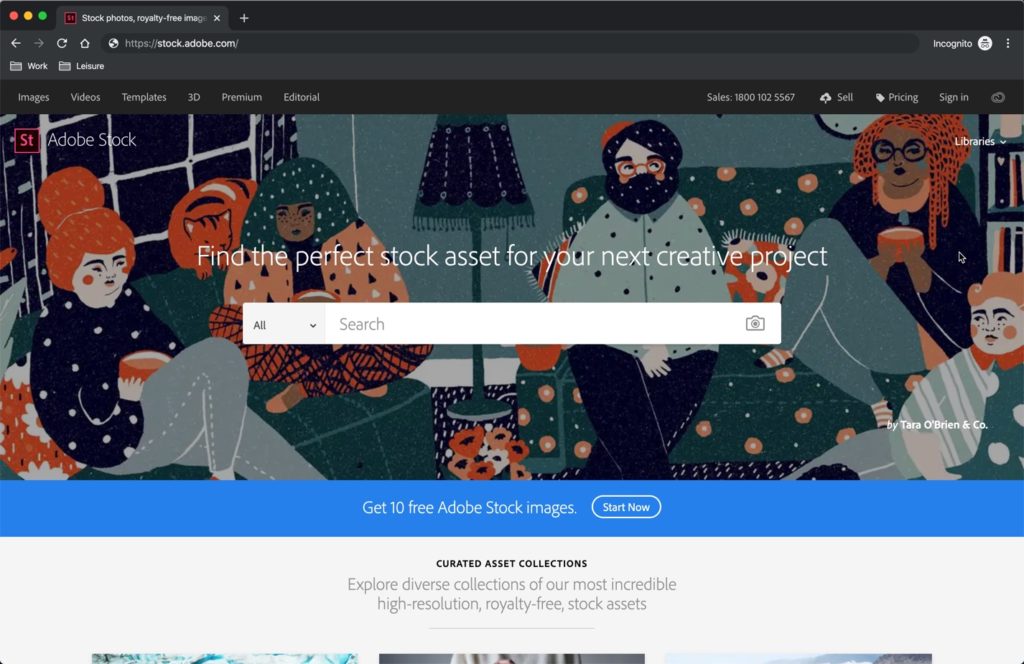
4. Adobe Stock
Adobe Stock offers a wide range of assets that you can use in your social media for your products or services. The online service offers a collection of 90 million assets including photographs, drawings, videos, and templates.
With these, you can easily change background with Photoshop to suit your brand and establish unique visibility. As a digital marketer, it is important to acquaint yourself with using tools like this because it is less time-consuming. Your online campaigns are sure to shine using this amazing tool.
5. iStock
iStock presents a beautiful range of royalty-free photography, drawings, and videos that you can employ in your social media campaigns. To find plenty of photos and drawings that look great, yet not so mainstream.
iStock offers less mainstream products, and more artistic ones to suit your needs for your brand. You can also save images for future use, and mark things that you like to create a storyboard.
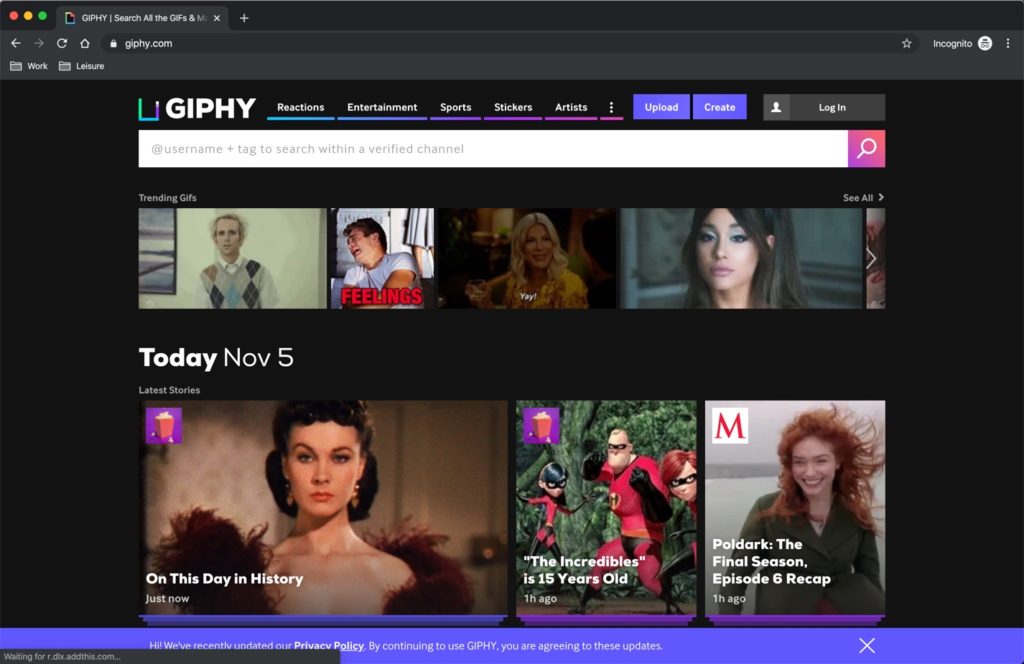
6. GIPHY
Gifs have become an excellent way to easily create animations, as well as download free animated gifs. This is an exciting way to broaden your audience and amplify your brand voice and engage your social media audience.
These moving images can be humorous or serious, but they can make a huge impact on your audience. However, it is important to use these images wisely to avoid overwhelming your viewer. The GIF is an excellent way to solicit chuckles and brighten up the day for clients who follow you on social media.
7. Infogram
Infogram is an excellent way to visualize information, statistics, and reports and it is an app that exists online. The online software includes charts, graphics, dashboards, and maps and it is ideal for creating images that share information.
Infographics are also a way to show off your knowledge, thus securing confidence in the client that you know what you are doing. It is also an excellent way to display, for example, a dissertation writing service. There are over 35 types of charts to choose from that ease working with data. Infogram has a free package and three options for a paid upgrade.
8. Hootsuite Composer
Hootsuite is one of the most established tools out there for social media managers and digital marketers. It allows you to edit images and schedule posts for different networks. The advantage of using Hootsuite is that you get to manage both your social media and image-making in one place.
The ease of not having to log in to all your accounts to upload content one by one makes it very easy to use and saves time. Hootsuite also offers a library of images you can use and customize. Posting is as simple as setting a time or posting it immediately.
It also recommends sizes and dimensions for certain images. The platform is free to use and comes with a host of features that make digital marketing much simpler.
9. Stencil
Stencil is an ideal image editor for marketers, bloggers and small businesses which is very easy to use and features millions of images, backgrounds, icons, and graphics. It also features thousands of quotes and fonts, as well as hundreds of templates.
Stencil is easy to use and in as little as a minute, you can create amazing images using features such as drag and drop, image editing and font editing. Stencil also allows you preselect the platform the image will be featured on so you can select a pre-sized format.
10. PicMonkey
PicMonkey is an excellent way to completely transform a bland photo into the quality and attractive image. The online app allows you to work with a wide range of features to create an effect you are looking for.
The app features amazing editing features that include color blending, exposures, filters, and more editing features. You can either choose to use a template or create your own image. PicMonkey is a paid-for service, and it costs between $7.99 to $39.99 per month.
Conclusion
As a digital marketer, your brief varies from time to time, and these tools accommodate various projects you are briefed to complete. These tools are amazing, but it is always important to expand on your knowledge, and understand that Photoshop is ultimately the best tool to create and edit breathtaking imagery.
About author
Tiffany Harper is a talented writer from New York, an extremely active woman, and a real leader. She began her career as a journalist and later proceeded as an educational writer and editor. Now she works as an experienced subject matter expert with best writing services, sometimes she works as the content consultant dissertation writing service and thesis writing service, like essay writing service in UK, mostly in technology, business, and marketing area. Please do not hesitate to contact her on Twitter.
Not all of us can become professional photographers; neither can we keep providing every picture to one of the pros out there. The era of smartwatches and iPhones has made lives easier for all of us with emerging technologies and handy apps designed for everyday peeps. Similarly, we iPhone lovelies keep thinking of ways pictures get in control without the involvement of any experts.
The crazy vacation photos you captured with your family are most of the time blurred because of the backstories they carry with them. More probably, you can’t bring a DSLR everywhere, especially when you’re not planning to take any snaps.
Photography is the story I fail to put in words.
Carrying an iPhone in hand is always about photography no matter what you like. The hobby gets interesting every day because we have countless apps that can edit pictures for us. Nonetheless, not every app comes up with all the features possible. For this reason, you need to look into these seven iPhone photography apps that can make you a capture pro in no time.
1. Snapseed (Rating 3.8 out of 5)
Snapseed is one of the best recognized online apps that can entertain iPhone users very effectively. Its latest version is the 2.19.3 and supports iOS 12, iPhone XR, XS and XS Max, iPad Pro 11 and 12.9. With the help of swiping gestures, you can effectively add diversified effects and enhancements to photos anytime.
It lets you rotate, crop, and straighten images for iPhones and also makes it worthy for iPhone users with a free download. It also has brushes and healing tools that can add more to its texture filters. A beginner can quickly get familiar with this app and have fun.
2. VSCO (Rating 4.4 out of 5)
It’s properly pronounced ‘Visco’ and is one of the most utilized apps used by iPhone users for editing photos. The latest version of this app is 136.0 that involves the fix to stop crashes. The app is a favorite among pro photographers and is highly-rated among iPhone users. It also comes with the feature of a classical look filter.
Moreover, it’s a free app that has a subscription fee for additional tools and filters. You’ll be enticed to know its subscription can unlock more than 130 filters for you to use anytime you like. It will always let you fine-tune the pictures and effects you’ve added to the photos.
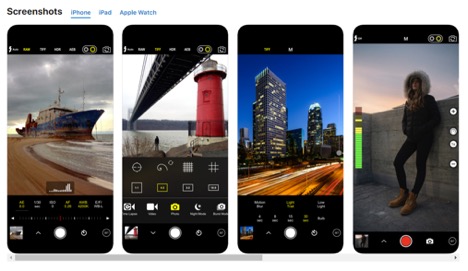
3. Halide Camera (Rating 4.6 out of 5)
Supportive and surprising, the Halide Camera app includes high-tech tools for thoughtful photo capturing. Any user will love to download this must-have app in their sets of latest iPhone models. Appreciably, the app is updated according to trends and has a fast lens switcher in its most recent version 1.15.0 especially designed for the iPhone 11 pro.
It allows you to manually control the white balance, shutter speed, and ISO. You can always review your last few shots quickly with this app and work on live histograms to the peak of excitement. It captures TIFF, HEIC, JPG or RAW for users.
4. ProCam 7 (Rating 4.6 out of 5)
Similar to other advancements and features of photo editing apps, an iPhone user can opt for ProCam 7 with the latest version being 12.1.4. You will be enticed to find out about all the bug fixes and improvements of this app along with its four different photo shutter options like self-timer, anti-shake, screen shutter, and interval.
The app supports seven different shooting mods for adding an excellent touch to your picture and has sixty impossible-to-believe filters. Moreover, the app comes with an attractive feature that adds good background music for you in no time.
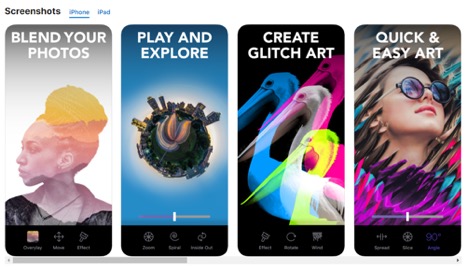
5. Enlight Photofox (Rating 4.7 out of 5)
Of all the iPhone apps, this is one of the most artistic. You’ll always find Enlight Photofox to be one of the most recommended iPhone apps of the year because it has a feature that can turn a picture into a drawing or painting.
Though it’s a paid app, it has the option for photomontages, double-exposure, and tilt-shift. Its best function involves multi-layer creative editing through which you can find any picture in the transparent and blend mode. You can add a doodle onto your image or create impressive graphic designs to your images anytime.
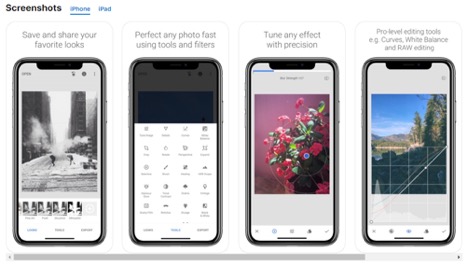
6. Adobe Lightroom (Rating 4.7 out of 5)
Downloading an app with such good ratings, free of cost, has always been an exciting idea. The latest version of this app is 4.4.1, and it has been adding further advancements for iPhone people on every step. It also has an iPad version for iPad users.
With the help of the premium version of this app, you’ll always find exciting features to edit photos. With a single tap, the app allows you to manage magically striking changes to your profile pictures. Its premium version comes with an AI power that harnesses and sharpens people and objects.
7. Instagram (Rating 4.8 out of 5)
Instagram is one of the most utilized apps for photography nowadays. Of course, who doesn’t know about Instagram and use it one way or the anther? A photographer may know all the types of cameras and their use in photography, but anyone will be familiar with the purposes of Instagram along with its benefits for photo editing.
The latest version of this app (117.0) includes a bunch of black & white filters along with a great selection of colorful filters, plus it has sharpening adjustments and high-quality exposure. You will always add the last edit to your picture before uploading it on Instagram. The option of adding boomerang, canvas, collage, and reposting also exists on Instagram.
Conclusion
Using an iPhone is a luxury in itself but handling it is a harder step. You will always find these apps on the app store whenever you plan to edit pictures. Capturing an image is something everyone wishes to do all day; therefore, such apps have always been useful for everyone around the world. As they say,
Photographs are return tickets to moments otherwise gone.
About Shane
Shane Radcliffe is a passionate blogger who writes for the sake of providing information about everything related to the virtual market of today. He works with Couponado, an online coupon website platform, and lets people save time by writing about everything a customer wants. Reading and gaming are his main hobbies.