Lightroom Enhance Details is a hidden feature that was released with Lightroom 2.2 (back in 2008). Today, we’re going to see what is Enhance Detail in Lightroom and how can you use it?
What is Enhance Detail in Lightroom?
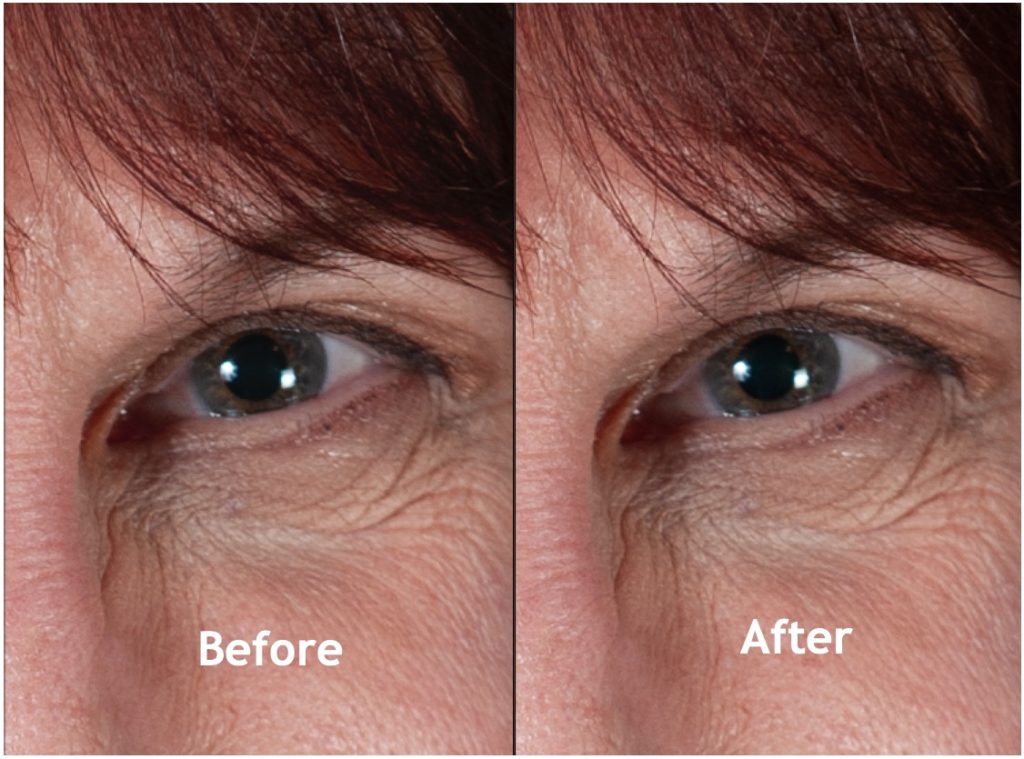
Adobe says that Enhance details uses Adobe Sensei technology and produces crisp detail, improved color rendering, more accurate renditions of edges, and fewer artifacts. Enhance Details is particularly useful for making large prints, where fine details are more visible.
Does Enhance Details actually make a photo crispier?
I really didn’t see any visible difference. See the below screenshot. Both photos look the same.
You can use Enhance Details using two ways. It’s not like a slider that we see on the right hand side. Rather, it’s an option that we get in the menu.
How to use Enhance Details for multiple photos?
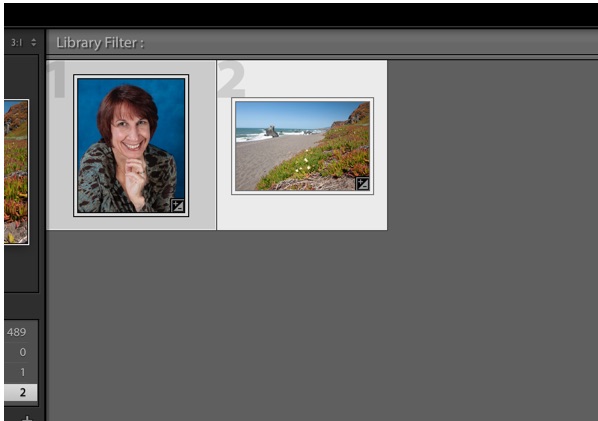
Select the photos by pressing Shift.
Now, go to Photo > Enhance Details. This will create a copy of your existing photo and the “enhanced” details. You can see the newly created copy in the Library section.
How to use Enhance Details for a single photo?
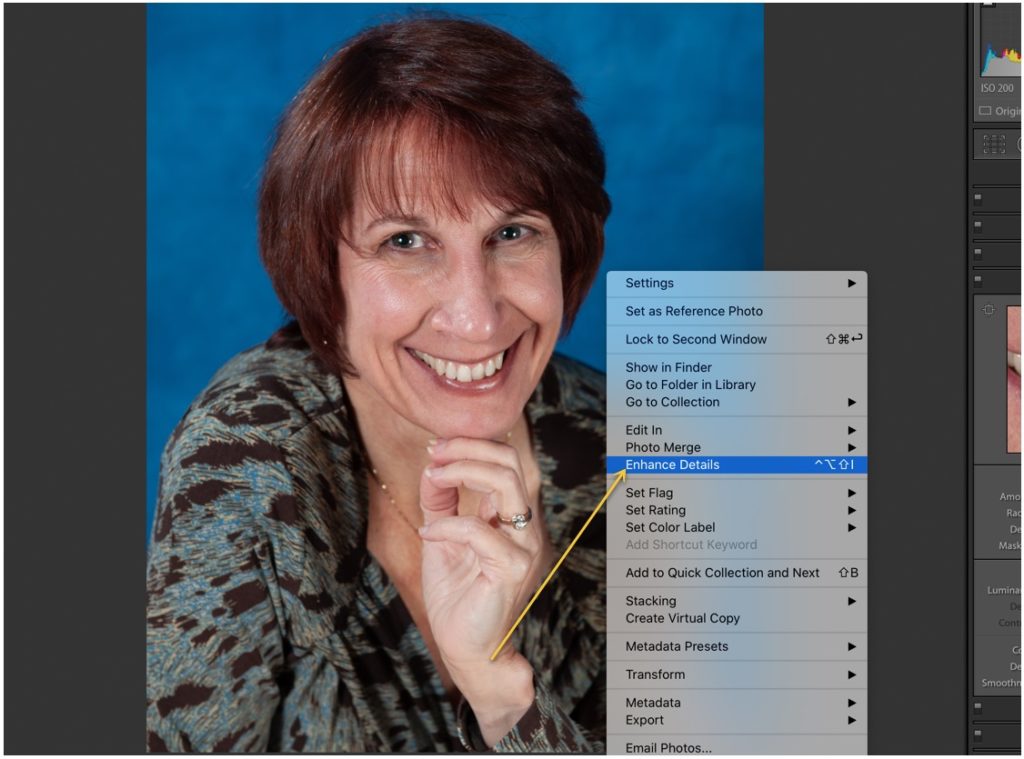
After opening the photo, right-click on the photo and click on Enhance Details. This will create a copy of your existing photo and the “enhanced” details. You can see the newly created copy in the Library section.
You just started learning Photoshop and you want to how can you draw a straight line in Photoshop. Though Photoshop is basically designed for photo editing, it also works great for graphic design.
In this tutorial, we’re going to see how to draw a straight line in Photoshop.
You can use three methods to draw a straight line in Photoshop. These are
Brush Tool: easiest to use.
Line Tool: easy to use but not as easy as the Brush Tool. But it’s more flexible than the Brush Tool
Pen Tool: Toughest to use but gives maximum flexibility
Let’s draw a straight line using all these three tools
Brush Tool – Draw a straight line in Photoshop using the Brush Tool
Difficulty: Easiest
Flexibility: Least
The first thing we need to do is to grab the Brush tool from the Tool panel or press Shift + B again and again until it activates.
Now, choose the color of the line. I am going with a shade of blue which is also the brand color of my site.
First, click on the dropdown which is marked with “1”. After that, increase the hardness to 100.
Time to change the Spacing to 0. You might already have set it as 1% but let’s double-check that. Go to Windows > Brush Setting.
Grab the round brush (orangish pink arrow) and set the spacing to 1% (yellow arrow).
Hold down Shift, press and drag the cursor to draw a straight line. Note that you can draw a line only at an angle of 0o, 45o, and 90o.
Line Tool – Draw a straight line in Photoshop using the Line Tool
Difficulty: Easy but more difficult than the Brush Tool
Flexibility: Lesser but more than the Brush Tool
Grab the Line Tool from the tool panel or press Shift + U again and again until it activates.
In the Option panel, change it to Shape (yellow arrow) and set the color of the line (blue arrow). Set the width of the line (red arrow).
Now click and drag the mouse cursor to draw a straight line.
Pen Tool – Draw a straight line in Photoshop using the Pen Tool
Difficulty: Toughest
Flexibility: Most flexible
Grab the Pen Tool from the tool panel or press Shift + P again and again until it comes.
Now, make sure that Path is selected.
Now, click somewhere and then click somewhere else. Photoshop will automatically draw a path (this is not a line yet).
Now, go to Window > Paths. This will open the Paths window.
Now, right click on the only layer and click on Stroke Path.
This will create a line with the settings of the Brush Tool.
If you can’t get a perfect smile in photos, don’t worry, as you can easily change that with a little bit of effort. Some people were born photogenic. Others weren’t that lucky.
With all the advanced technology around us, it’s possible to edit for the perfect smile using powerful software tools.
One of the best tools that will surely give you the results you’re after is Photoshop. So, let’s see how you can use it to get that perfect smile in every photo.
Portrait of a beautiful young woman with a perfect smile. Isolated on white.
Using Photoshop to Edit for the Perfect Smile
Photoshop is probably the most popular software for image editing. People love it because it’s a powerful tool that provides a wide range of effects that you can apply in photos for consistent results.
With so many useful features at your disposal, you can create high-quality photos very quickly.
Here is how this image-editing software can benefit you:
Face-Aware Liquify – if you want to add creative character to make an image more fun or enhance a single detail like your smile, the Face-Aware Liquify Photoshop feature is the right tool to do it. It automatically recognizes key facial features and provides options to adjust them.
Organization – Adobe Photoshop allows you to import videos and photos into the software, quickly and easily. This allows for a much better workflow as you can handle all files on the screen according to your needs, using features and editing tools.
Time efficiency – the most popular effects like red-eye removal, skin tone adjusting, and teeth whitening are just a click away. If you have the skill to use Photoshop, it takes mere minutes to complete these tasks. This makes the software the most favorite editing tool in graphic and web design, marketing, and advertising.
How to Use Liquify Filter for Editing Smile in Photoshop
The following steps will turn you into a professional that uses Photoshop, just like seasoned professionals do when providing graphic design services.
Converting the Background Layer
To convert the background layer into a smart object, open the upper right corner of the Layer panel.
Choose the Convert to Smart Object option to safely place your image inside a smart object.
Renaming the Smart Object
Once the image is inside a smart object, its name will change from Background to Layer 0. You can name it ‘Smile’.
To rename it, highlight the new name by double-clicking on it. This will allow you to change the name to “Smile” and press Enter when you are done.
Selecting the Liquify filter
To adjust the smile, go to the Filter panel and select Liquify to open the image in a separate dialog box for the Liquify filter.
Use the features to zoom in on the detail you want to enhance.
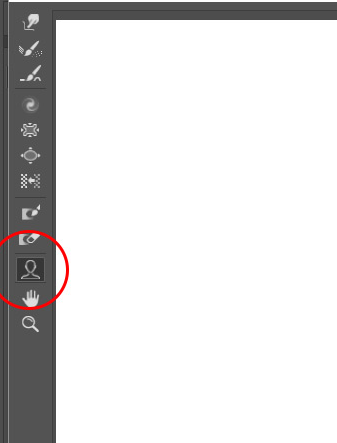
You will notice a toolbar on the left side of the dialog box. Use the features in the toolbar to position the image in the center of the dialogue box.
Selecting the Face Tool
With the face tool, point to the subject’s mouth with your mouse cursor to get additional options. Each of these options represents a different mouth property that you can adjust the way you see fit.
If you want to adjust the upper lip, click and drag on its icon.
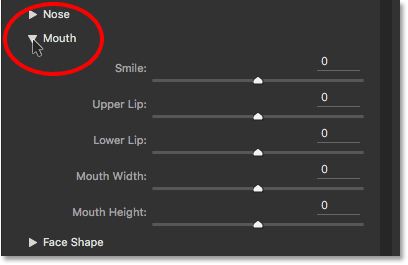
As for the smile adjustments, there are two “Smile” icons that you can use to reshape and bend the curve of the mouth. There is also the Smile slider, which allows you to reshape the smile.
You can find it on the right side of the dialog box. By dragging the slider to the left, you reduce the curve of the smile and, to add more curve, drag it to the right. This will make your subject’s smile friendlier and warmer.
Using the Mouth Width Slider to Widen the Smile
Go to the mouth width slider in the Properties panel.
Drag the slider to expand the sides of the mouth outward. It’s important not to overdo it, though, as this can reshape the face of the subject beyond the point of recognition.
You can see your new results on the right side of the preview area.
Using the Lower and Upper Sliders to Adjust the Lip Thickness
Move the upper and lower lip sliders to adjust the lip thickness.
They behave opposite to each other as you will notice if you drag them to the left or right.
Dragging the Cheeks Upward
Just like adjusting the mouth, you need to adjust the cheeks as well. To do this, hover over the cheek.
When your mouse cursor becomes a four-pointed arrow, you’ll get the Move Cheek options.
Move the cheek but follow the natural curve of the mouth. Do the same with both cheeks until you’re satisfied with the result.
Lowering the Height of the Eyes
If you adjust the cheeks, you also must alter the height of the eyes. One goes with the other. By lowering the height, you make a smile look more relaxed. Just like with the cheeks, hover over the eye area to display the Move Eye option and position the eyes to go naturally with the rest of the face.
You can compare your image to the original by pressing P on your keyboard. Keep your adjustments subtle to get the best results. Once you finish your edits, click OK to save your changes.
Conclusion
Editing a smile in Photoshop is an entirely normal thing as not all of us are photogenic. Making photographs is an excellent way to memorize and share all the great moments you had with your friends, family, and loved ones.
If you aren’t happy with how your smile turned out in a photo, you can quickly fix it with the right tool. Change your facial impression with quality software or hire professional graphic design services to do it for you. The choice is yours.
Lately, I have started posting more on Instagram Filters because I see a rise in people who want to create Instagram filters in Photoshop. More and more users are reading Instagram filters on my website every month. Today, we’re going to see how to create an Instagram X-Pro II filter in Lightroom.
Step 1 – Add Vignette and Grains to create Instagram X-Pro II filter in Lightroom
Let’s add a black vignette to the photo. If you see Instagram filters, almost all of them add a black vignette. And, the Instagram X-Pro II filter is one of them.
Go to Effects > Post-Crop Vignette > Amount and reduce the amount to -51. This will add a black vignette.
Let’s add some noise. Unlike Photoshop which calls the noise as a noise, Lightroom calls the noise as grains.
Go to Effects > Grain > Amount and reduce the amount to 30. This will add some grains.
Step 2 – Add a yellowish gree hue
Let’s add a yellowish-green tone to the photo. We’ll do it using the Split Tone.
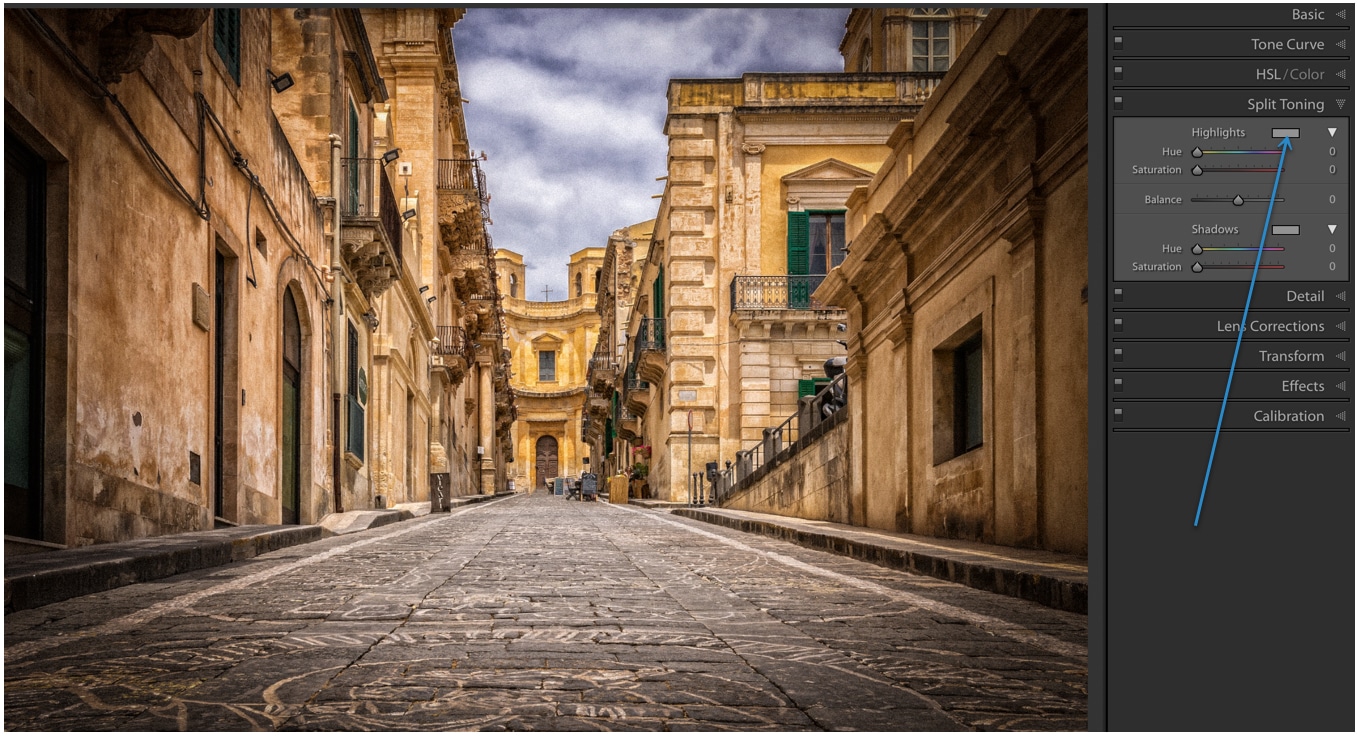
Go to the Split Toning section.
Click on the gray rectangle next to the highlight.
Choose any yellowish-green color. You can either use the numerical that I have shown in the below screenshot or you can choose the one that you like.
Click outside of the box after you choose the color.
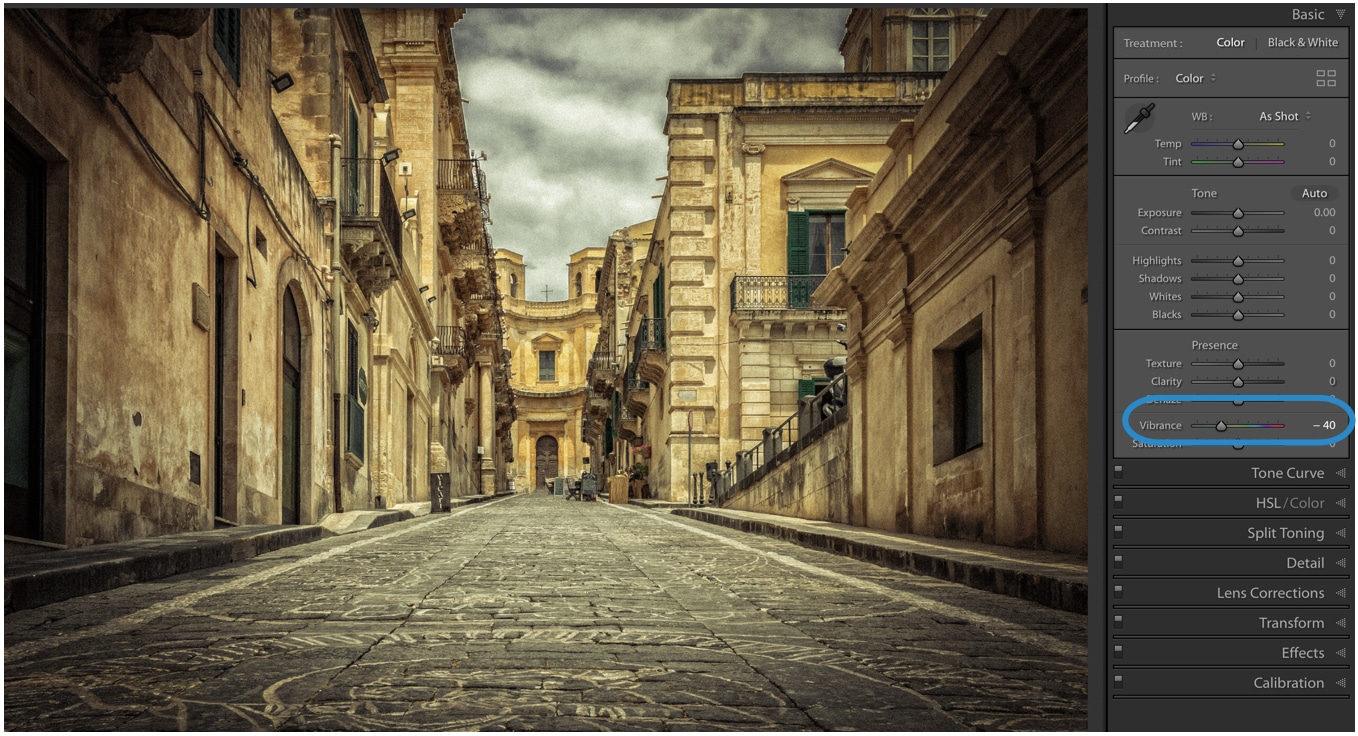
Step 3 – Decrease the vibrance to create Instagram X-Pro II filter in Lightroom
Almost all Instagram filters decrease the colors in a photo. Instagram X-Pro II is again one of them. To achieve Instagram X-Pro II in Lightroom, we’re going to decrease the color. But, we’ll do it using the Vibrance slider.
Once upon a time, when you took a picture, that was all there was to it. There were no filters, enhancers nothing! There was no method for enhancing an image to remove things like red-eye. What you captured was it. Like all things in the modern world, photography has adapted and changed. Photo editing has been a welcomed approach to getting the photo you wanted without being a professional photographer.
While it does take skill to capture an image, it might not always come out as you’d hope. After playing around with lighting effects, trying different angles, and readjusting, you may want to be done. It happens. With photo editors, you can achieve success, changing it with slight enhancements. In the context of social media, the images you post must be attractive to the eye and capture users’ attention. But the good news is that there are small changes you can make to take a so-so image to a cut above. You can also take free stock images to the next level, reinventing for your purposes.
Before delving into what are proper techniques to use and what bad ones to avoid, you should know what types of image editing are available. Here’s a basic breakdown of the options available through most photo editing software:
If you look online, you’re bound to run into a poorly edited photo. These are everywhere. Often bad photo editing comes down to a rush job. However, it can also be from inexperienced users. Whatever the reason may be, here are some examples of bad photo editing, and things you should avoid.
1. The Over Crop
Cropping is essential. Many issues with photos can be solved with a good crop job. But there is a point where you can take cropping to far. When a photographer or designer cuts too much of an image that it loses an important balance, this can be a negative for the picture.
Also, a side note, be careful with resizing. Images that have been dragged to become a new shape can be easily spotted a mile off. If you want to resize your image go from corner to corner and not side from side. This will give you a much better-shaped image!
2. Too Much White Space
Similarly to overcropping, it is leaving to much white space or ‘edges.’ This type of photo editing simply means you didn’t crop enough. White space isn’t always a bad thing and can be a valuable part of any image. It also doesn’t need to be white; it can be any tone or pattern. You need to make sure your image is aligned and not too crowded or sparse.
You want people to focus on the key elements of your photograph or image. With too much whitespace people may be distracted and unable to tune their senses into the focus aspects. Use your white space to guide them, not deter them.
3. Over Saturated Image
If you play with the contrast on the editing software, you may be thinking the photo now looks more professional, or artistic. However, refrain from over saturating an image, where applicable. It doesn’t look good, and much of the detail can be lost.
Pro-tip; If you’re adjusting your contrast or adding a filter, less is always more. It’s always good to alter images little by little. You should also keep an unedited version of the image open so you can compare it. Also only change one thing at a time and log your changes, You can always go back.
Colour Changes That Make The Grade
Colour is at the heart of every great picture. Depth is expressed with brights and shadows. When colors are true, a picture is more relatable. Colour theory is great for images and photography and can use the science of color to improve your content.
If your image uses bold colors you should work to enhance these or dull them depending on the overall feel of the photograph. Too much color can be distracting, too many bright colors can be off-putting so it’s best to focus on 2-3 per image. To really grab attention though use one focus color to stand out.
Photo editors, whether you’re using social media filters like Instagram or Snapchat, can enhance the quality of the image. You can add warmth with a vintage look filter such as ‘vintage,’ or cool it down ‘cream.’ Make sure the colors vibe with your theme!
Tips For Photo Editing
By now, it’s pretty clear as to what makes a not-so-great photo. Things like inconsistent color, overuse, or underuse of white space, and not utilizing the right contrast can all play a part. But what can you do to make it better, achieving the quality image you need? What are some excellent tips to follow? How color changes can make a significant difference in the quality of your pictures, what are some good tips to follow?
1. Noise Reduction
Sometimes photos can appear too busy. In these situations, take a look at the picture and ask if it looks like there is simply too much going on. If you honestly answer yes, a suitable correction for this is to reduce the pixels.
Noisey pictures will no doubt cause people to ignore it, people like to figure out what is going on but if something is too difficult to look at, chances are people won’t bother. Reduce the noise and you should immediately notice a difference in the quality of your image.
2. Eliminating Unwanted Tones
One thing many people hate when taking selfies, or photographers find annoying is capturing an overly saturated image. By this, we mean too much red or too much blue tones. While you certainly don’t want to hide the natural beauty of the subject, you can enhance it by canceling out unwanted tons.
For example, let’s say you or your subject has naturally red skin tones. To cancel this out, using a filter during or after taking the picture that has cooling tons will give a more optimal result. Colors can be cool, warm or neutral, to reduce one option head to the other side of the color wheel.
Pro Tip; Complementary shades should be used in multiple things from home decor, branding and of course photography. If you need to make some changes to your image, add a new color by mixing a focus color from your image with a complimentary neutral tone. There are numerous tools online to mix or blend colors to create new shades.
3 Use The Color Wheel- Making Color Adjustments.
Colour Wheels show the relationship between primary, secondary and tertiary colors. You can build color schemes and alter images by simply looking at this wheel. If you need to tone down the color, use a shade from the opposite side of the wheel.
Often many of the problems designers would like to solve with pictures come down to the basic principles of color theory. What cancels out what and what is a complementary color, are just a couple of questions to keep in mind when editing a picture. If you notice there are too many red tons, cool it down.
Depending on what you want out of your image, like truer, accurate color, photo editing can be the best way to get the results you desire. Photoshop has a ton of options for editing the color contrasts, but there are also free tools available online as well as through the App Store.
4. Go Pro with Blurring and Sharpening
So you’ve played around with color contrast, brightening up an image and getting the tones you like. One of the highlights of using photo editing software is being able to take the picture to the next level with blurring and sharpening the image. This is typically done to enhance and draw attention to the subject. Think about the design and purpose of the image before starting this photo editing for optimal results.
Images, even those with perfect focus, can benefit from a tiny bit of sharpening. Bringing more attention to the subject is typically never a bad thing. To top it off, blurring and sharpening will give the image a more polished look, when done correctly. It is essential not to go heavy-handed, instead use tasteful moderation.
Conclusion:
Of all the photo editing options available to you, don’t overthink it. Use your eyes to decide what looks best. This is often the best pro tip of them all. A photo that you think looks to busy or think the colors are off, probably is. Subtle changes, meant for enhancing are the best rules to follow. If you distort an image past the point of knowing what you were trying to capture, this is where editing failures have occurred. You’re the master of your photo!
Author Bio: Currently working as a Marketing Executive at Design Wizard, Claire is passionate about creating amazing content and bringing people together. Having recently graduated with her master’s degree in Marketing she is keen to impact the digital world. Outside of work you can catch Claire taking photos of her rescue dog Storm and checking out social media.
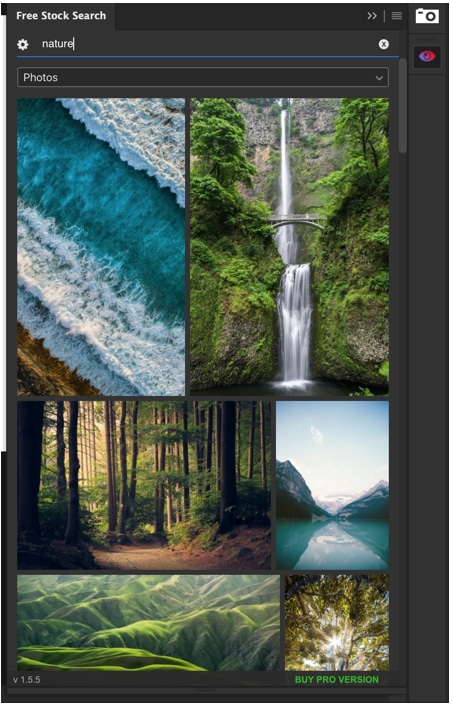
Hello guys, we’re going to see how can you install an extension in Photoshop. I’ll show you this with an example of the Free Stock Search extension developed by Thomas Zagler. This extension can help you find free stock photos.
By the way, this is not a sponsored post by Photoshop or Free Stock Photos extension.
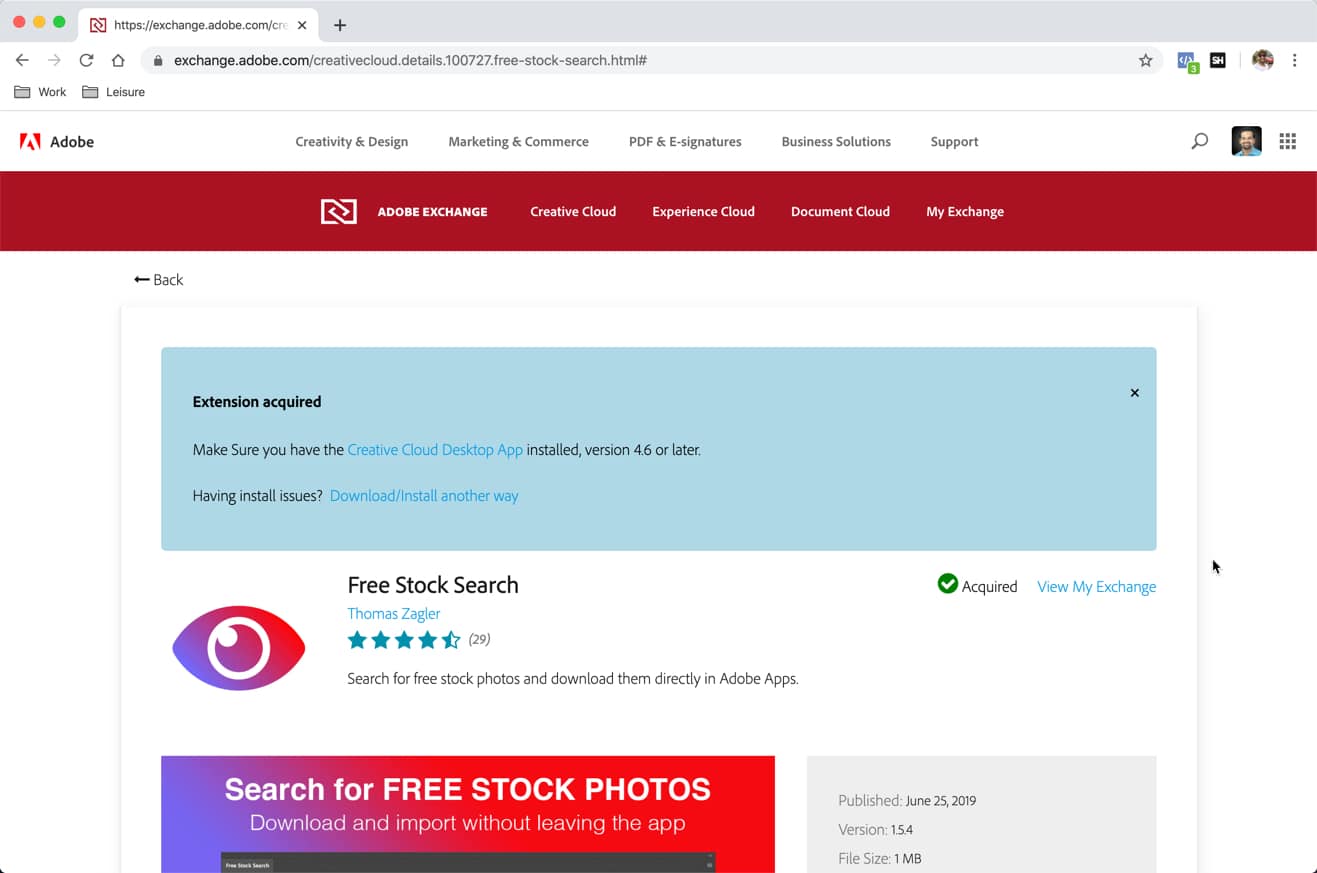
Go to the site and download the plugin. I am on the Free Stock Search page of the Adobe’s extension site.
You can go to Adobe Extension home page to search the Photoshop and other Adobe products extensions.
Click on “Free” to download the extension.
Accept the Terms and Conditions.
Note – Make sure that you have Adobe Creative Cloud installed. Otherwise, the download will not work.
Adobe Creative Cloud is a software that authenticates your Photoshop and lets you manage (install/uninstall) Adobe software. You can download Creative Cloud here.
After clicking on the “Free” download button, Adobe’s site will show you a notification to make sure that the Creative Cloud is installed. This is the text.
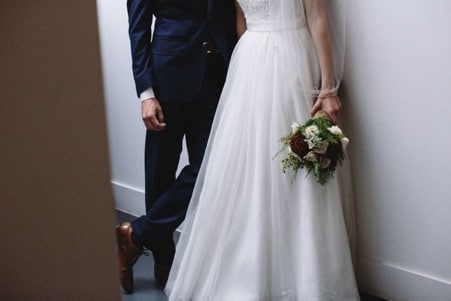
Wedding photography is mostly known as one of the most challenging shoots nowadays. As of 2019, you can witness couples appreciating innovative styles for capturing the moments of their big day. Photography is a susceptible profession when it comes to the eyes of the viewer and the story that will recall with every picture.
Here are some fantastic and exciting secrets that reveal fabulous wedding photography tips. They can assist a cameraperson and also let couples add charm to their wedding day effortlessly. If you are already arranging two photographers for your wedding day, things may be handy for you.
Adding the Best Tips to Wedding Day Photography
Besides focusing on the guests and planning group shots, there is much more that adds sparks to the photos of this adorable occasion. No wonder, your wedding album is one of the most important and worthy photo albums you can ever create.
Always Be Sure Of Capturing the Firsts
Wedding pictures are memorable for many reasons. While planning the bridal photoshoot, make sure of confirming the photographer about some important moments you want pictured.
Best wedding photographers always look out for the couples’ firsts on the marriage day. Besides capturing the entry of the bride and groom, some crucial firsts come only once in an individual’s life. The first look of the bridal gown and the first view of the groom’s attire is important.
Everything is recordable about the firsts. From the first touch to the first hold, and later on to the first kiss. Capturing every move matters!
Friends Are Real People Who Add the Zing
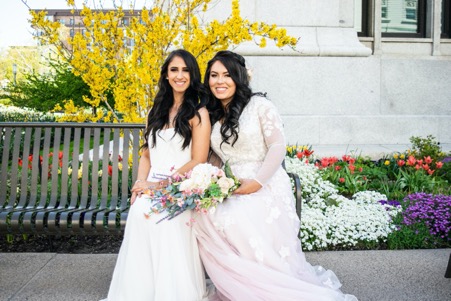
Giving priority to the bride’s girls and groom’s buddies is essential. Do not miss girly poses of the bride with the bridesmaids or the manly looks of the groom and his groomsmen.
Along with emotional hugs and tears, capture the funny teasing moments with pals. Adopt unique ways that can add more laughter to bridal photography. Opt for the hilarious poses that friends plan for wedding day photography.
Do not miss the bride’s picture will all the groomsmen that can add a unique flair in the album. Similarly, let all the chicks gather around the groom and make sure to click the best of photos.
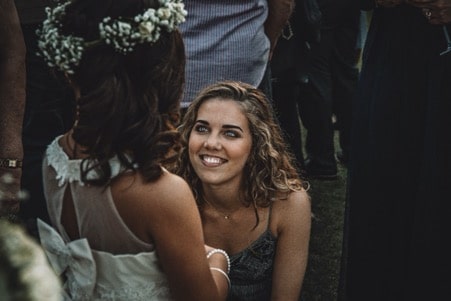
Look Out For the Unseen Precious Smiles
Smiles are an essential glitter for every occasion. You cannot opt even one out if you start noticing. The important smiles that can make others happy are picture worthy ones.
While focusing on the couple is crucial, concentrating on the guests is important too. Along with the shy, intimate, and emotional smiles of the couple; gathering pictures of family members, friends, and kids also glams up the album.
Always mark sudden moments and the important ones in the best wedding photography tips.
Fake It Exact And Make It Perfect
Unless you opt for fake poses, the trending groom photography flairs or bridal photoshoot attitude is impossible to achieve. Nowadays, best wedding photographers have their list of items and pose that highlight the feelings of the couple.
Assure all the fake romantic looks that trend in 2020 and go for the desirable ones. Also, practice a fake wedding shoot before the occasion to look perfect on the big day.
In case the couple wants every move to happen for the first time on marriage day only, get some practice with friends. Ask married couples for the right steps and make the best out of your wedding day photography.
Notice All the Little Unnoticed Moments
Marriage is one of those days when you can notice a lot of small moments that carry deep meaning along with. The mother holding a hand or the father shedding that precious tear. Capture it all!
The moments in a wedding where the couple change vows are made up of enormous intimate poses. Focusing on all of them can result in a heartfelt wedding photography album. Best wedding photographers always concentrate on the couple around the tables.
Leaving the couple alone is essential but taking eyes off them will surely miss the most vital reaction from the album.
Capture Moments before the Wedding
Before the event starts, there are many ideas that must be added to the best wedding photography tips. The groom greeting his important people and the bride dressing up for the big day are some of the most important captures.
The decorative interior set up and the flowers hanging from the table. The final look of the event right before it starts. Some adorable poses that are captured when no one’s around. The glittering silence of the party about to start.
Everything about the wedding day photography is exceptional. For those who know how to make the best of time can bring in the most beautiful of marriage albums.
Do Not Miss Any of the Family Members
The families of the bride and groom are the second most important people to focus on. All the bridal photography moments are incomplete without the bride’s shot with her mom and dad. Photoshoot with siblings is also an important part.
Similarly, the groom photography is incomplete without the groom’s best picture with his father and an emotional capture with his mother.
Every family has some significant members. Locking them in the wedding photography album is essential for the moments to cherish all life even after they are not around.
Wedding Photography Tips as a Challenge
Many people think of wedding photography as the most difficult of jobs for photographers. There may be a point when you can think the same. Yet, it is not such a rocket science if one knows the right tips.
Of course, experience comes with time, and every couple will not always find that highly expert professional way. Opting smart means will help both the ends during a wedding day photography.
The cake cutting ceremony also is an essential time for the bride and groom. Everything about the marriage day is outward; however, all of it depends on how the photographer and the couple put forward their efforts. Just remember,
“The cake gets eaten, the flowers will die, but the wedding photos will last forever.”
Author – Mark Coblin is a content marketer who works for Coupon and discount codes Platform. A writer by day and a reader by night; He is striving to make the most of the new opportunities that come in his way and excels in everything he does.
The world is on Instagram and so should your business be. But just being on the app doesn’t help. You need to offer your audience unique, impressive pictures to keep them engaged. Wondering how? Well, the right photo editing apps for Instagram can help you, which, we’ve listed in this blog.
We all have heard the phrase ‘Pictures say a lot’, and this is particularly true in the era of Instagram. Even you must be sharing pictures and stories regularly on this interesting and popular social media platform as an individual, influencer, or a business.
But the question is, are the photos you’re sharing impressive enough? Are your posts creating good engagement? Are you achieving a good conversion rate?
If your answer is “No, not really there” then, it’s time for you to start using Instagram photo editing apps. And no, you don’t need to do a course to be a pro at it!
Why Should You Use an Instagram Photo Editor?
As per the statistics, there are over 1 billion monthly active users on Instagram with more than 500 million Instagram stories every day. Out of those 1 billion+ users, over 25 million accounts belonging to a range of different businesses.
What’s even more interesting is the fact that 60% of people have said they discovered new products on this platform. Moreover, out of the most viewed stories, 1/3 come from business accounts while a minimum of one business profile gets visited by over 200 million Instagram users daily, per the official figures.
Now, that’s a clear indication of how vital the platform has become over the years and it’s only going to go up in the future. That means, the competition is going to get tougher and you have to stand out among the crowd.
Though Instagram already comes loaded with decent photo-editing features, those are just the basics. To get the most out of Instagram, it’s best to use an Instagram photo editor that accentuates your images, making it more appealing to your audience.
5 Instagram Photo Editors You Should Know About
While there are many Instagram photo-editor apps on both iOS and Android, you can’t afford to miss the following. So, let’s get started.
1. VSCO
The VSCO app, available on both Android and iOS platforms, is completely free for the basic set of functions it offers. The app is packed with exciting preset features that make your photos and videos more stylish and fine-tuned. Applying adjustments like saturation, brightness, contrast, and Grain becomes easy with VSCO’s robust editing tools.
The app has a lot more to offer if you’re up for a paid membership. From video coloring and exclusive editing tools to a library of 200+ presets, VSCO helps transform the photos into a work of art.
It also has its own creator community where users can discover tutorials, follow each other, and share their images.
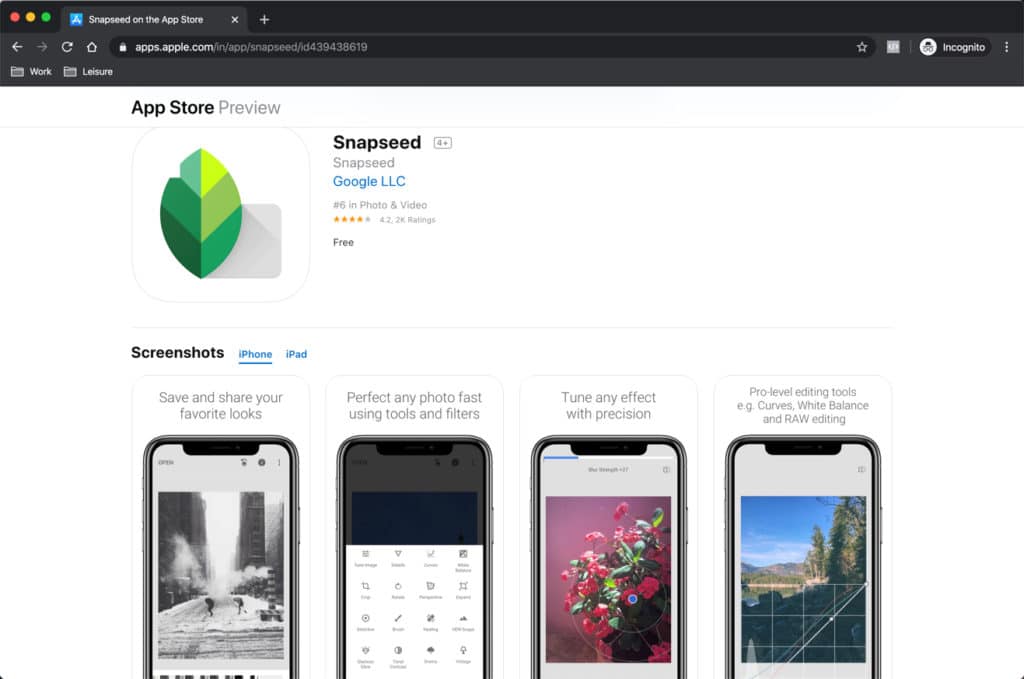
2. Snapseed
Struggling to remove distracting elements from your images in a simple way? Then Snapseed is the photo editor you should try. The app, now owned by Google, makes an equal appeal to both the casual and professional photographers with its great effects and filtering options. The app is available for download on iOS and Android at no cost.
In addition to the regular rotate and crop tools, Snapseed provides its users with advanced image editing features such as double exposure, tonal contrast, HDR Scape, Black & White, lens blur, as well as white balance.
With Snapseed, you can also share your stunning images directly through the app’s social sharing feature on any social network, including Instagram.
3. Layout
The Layout is Instagram’s own photo-editing application that caters to both the Android and iOS users. With Layout, you can select an image to edit from your photo gallery or click a cool shot instantly with its built-in Photo Booth. Layout becomes a great choice if you’re the one who loves making collages out of your beautiful photos.
The app lets you mix-up up to 9 photos at a time to create personalized, fun collages and layouts. Whether it is flipping and mirroring the image or replacing and resizing it, Layout lets the users be as creative as they want to tell a story of their own.
Moreover, you can also edit images through the filter tools of Instagram and share it immediately on the social network.
4. Square Sized
If you use Instagram, then you already know that you can only share photos on the app if they are square in size. The Square Sized app has taken this basic requirement and turned it into its primary feature.
As the name suggests, Square Sized helps you resize your photo in an Instagram-worthy square size. The same is applicable to videos. In addition to the photo-resizing, Square Sized also allows you to take new pictures without leaving the app. Moreover, the app enables you to add wonderful backgrounds, layer filters, overlays, and typography to your shots.
Square Sized is available on iOS with basic features for free.
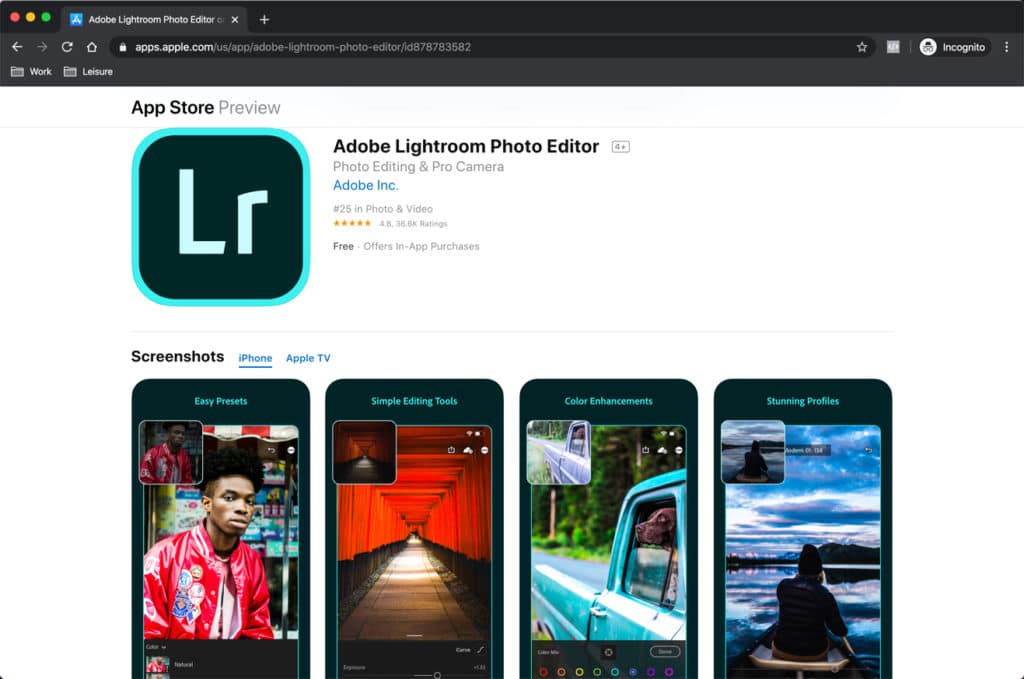
5. Adobe Photoshop Lightroom CC
With Adobe Photoshop Lightroom CC app, you can edit photos on your phone as well as desktop. The editor, available freely for its basic features on Android and iOS, lets you edit and take photos without hassles and share them instantly on Instagram and other social networking sites. Aside from the free version, Lightroom also offers premium features, including syncing functions across devices.
With this image editing app, you can modify color, contrast, and exposure of the photo. It is even possible to copy the edits across various snaps for consistency. One more interesting feature? You can do selective editing of the photo with this editor and let the rest of the image be as it is.
Conclusion
So, now that you have a list of the 5 best Instagram photo editing apps, impressing your audience won’t be a headache anymore. Confused which one among these would prove to be the one for your business? For that, all you need to do is download any of the above apps and give it a try.
Author Bio:
Varsha Solanki is a Digital Marketing Strategist at Space-O Canada, a Software development company. She has 3 years of experience in the Information Technology industry. She spends her time reading about new trends in Digital Marketing and the latest technologies.
error: Selection is disabled. The content is protected!!