Photo Skills Need Work? How to Edit Your Photos on iPhone

iOS 13 and iPadOS have made photo editing easy for one and all. But as users of this premium brand, most of us are not aware of the nuances of photo editing. 

There is a step-by-step process to edit photos in the best possible way. This article will walk you through the same. But before that, let’s understand some of the basics.

Using the In-built Photos App

Just as Android comes with Google Photos, iOS has its flagship Photos app. Many of us are guilty of not understanding the different functions and features of this app. Even though companies involved in iPhone app development have come up with other apps, the default app is still good.

It’s now possible to easily view and sort the photos and videos by days, months, and years. You’ll find that the photos are displayed as thumbnails and the important ones are larger than the rest. 

The For You section shows photos related to special events and memories. You can also search for your favorite pictures using keywords. 

We’ll discuss these features in more detail.

Viewing Your Photos and Videos

Viewing the photos properly is important before editing them. Viewing doesn’t mean just tapping on the photo. There’s more to it.

Tap the icon of Photos located on the bottom toolbar. Instead of sorting your photos by date, the app displays everything like thumbnails one row after another. You can swipe up and down the photos. The date is shown at the top and it changes based on the photos being displayed.

Adjusting thumbnail size

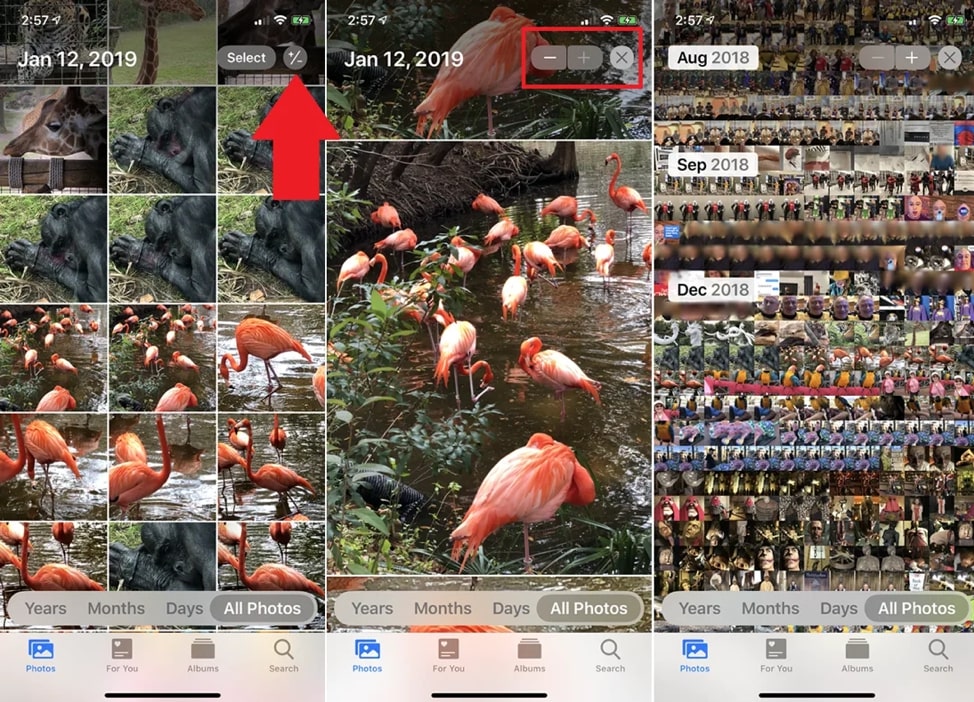
This is done by tapping the plus (+) or minus (-) symbol in the upper right. You can zoom in on your photos by tapping the plus sign whereas the minus sign will zoom out the image. Tap the X next to these symbols when the view is set the way you’d like.

Sort Photos by Date

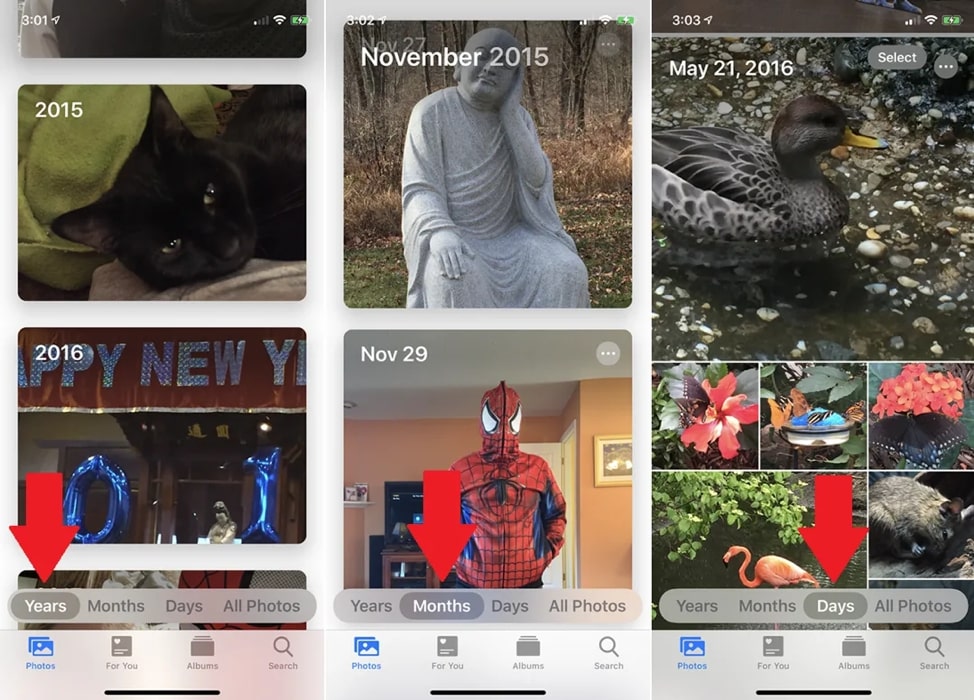
Tap the Years option at the bottom and swipe to switch between different years; follow the same thing for the Months and Days options. In the Days view, you will observe a large thumbnail for certain photos and smaller for others. This is done by the app automatically.

Select Photos and Videos

Selecting particular photos and videos is possible in the Days View or All Photos View. Click on the Select icon at the top and tap on each entry you want to select. You can also click on Select All in Days View to select all the photos for a given day.

Here is an alternate way to select photos and videos: 

  1. Tap the Select icon. 
  2. Drag your finger across the thumbnails you want to select. 
  3. Tap the Delete icon to remove them or the Share icon to share them via email, messaging, or another app.

View For You Page

We live in a world of personalization. The For You feature personalizes everything for you. Tap on the For You icon at the bottom navigation bar to see the featured photos and photographic memories. Tap Play after selecting a specific memory to see an automated slideshow of all the photos for that memory. This slideshow is complemented by music.

View Albums Page

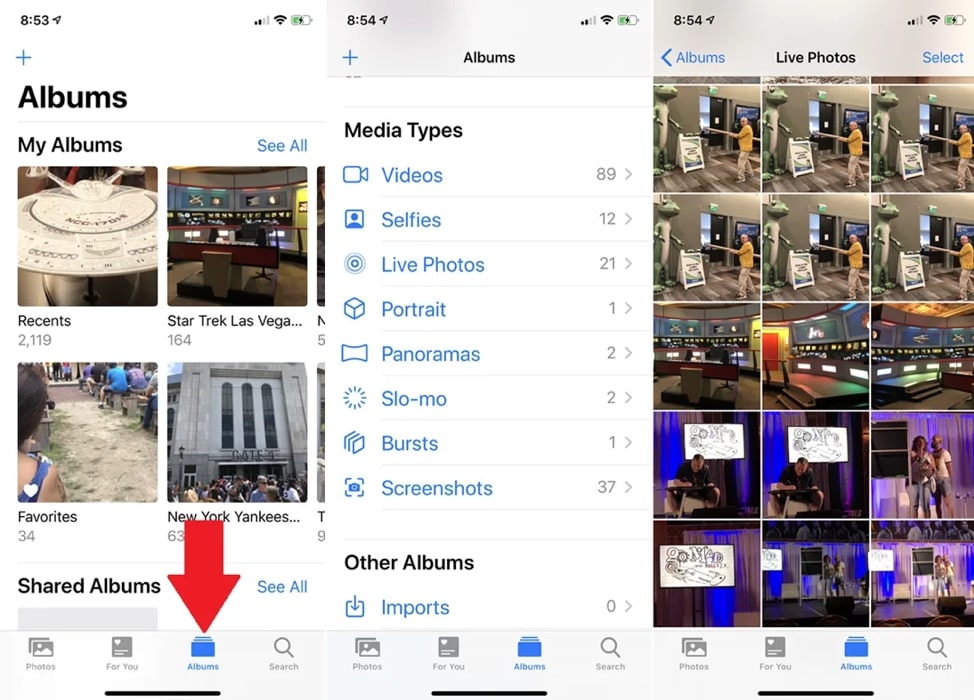
This option present in the bottom navigation bar lets you see the albums of media you have created. After scrolling down the screen, you get to view different media categories such as photos in Portrait Mode, videos using Slo-mo, and much more.

Searching for Photos and Videos

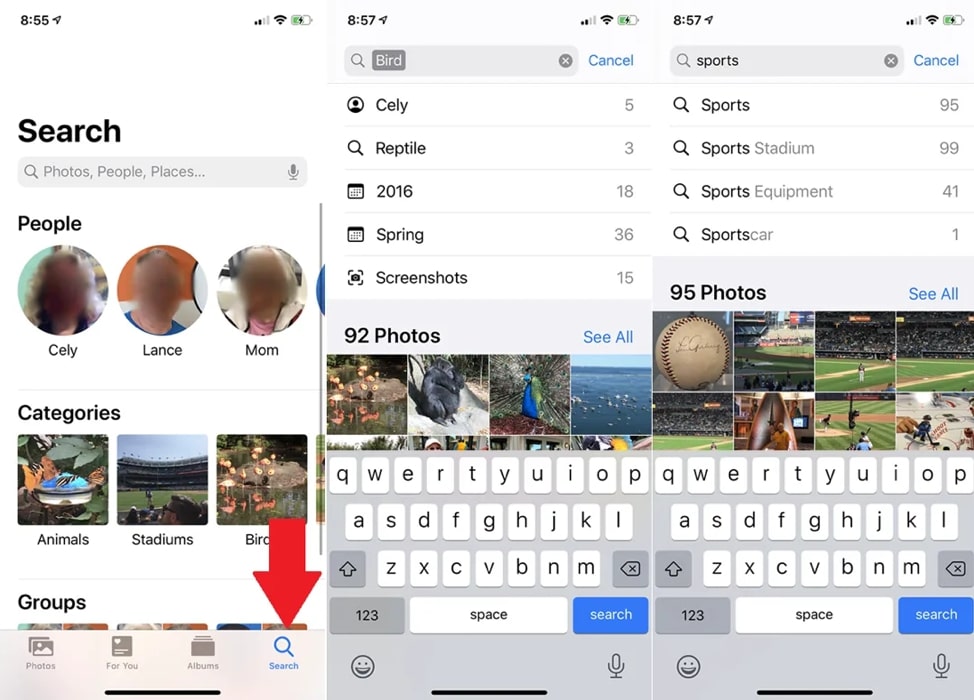
With this option, you can view photos based on specific people, categories, and groups. Tap the Search icon on the bottom navigation bar. Type a name or phrase in the search field to find relevant photos.

These were the basics of the Photos app available on iOS 13 and iPad. Now, it’s time to learn how to edit photos like a pro.

Hone Your Photos Editing Skills in an iPhone

Get started by tapping on Edit in the upper right. The Adjustment option will be selected by default. Clicking the Auto button in the center will automatically adjust your photo’s brilliance, exposure, and other attributes. You can then start adjusting other parameters at once by moving the slider bar to the right or left.

If you want to adjust each attribute separately, tap on the appropriate icon to edit exposure, highlights, brilliance, contrast, shadows, brightness, saturation, vibrancy, black point, warmth, sharpness, tint, definition, noise reduction, and vignette. When you pick an attribute, move the slider bar left or right to adjust it accordingly.

Adding Filters

You will find the Filter icon next to the Adjustment icon. Tap on it and try different options, including Dramatic, Vivid, Mono, Noir, Silvertone, and more. Adjust the slider bar to increase or decrease the intensity of each filter.

Crop Photos

You will find the Crop icon as the last option on the bottom toolbar. Drag the highlighted corners to select your desired portion of the image. Directly below the image, there are three icons with a slider bar. The first icon can tilt the image, the second one can change the vertical perspective, and the last icon will change the horizontal perspective. After selection, drag the slider bar to the left or right.

Changing the Image Orientation

Flip the image horizontally by clicking on the first icon in the top-left corner. Now tap on the second icon to rotate the image. The square icon in the top-left corner is used to change the aspect ratio of the image. You can choose a specific ratio below the image.

Tapping Done will save the changes and Cancel will undo them. Even if you change your mind later, tap on the Edit option and then on Revert to restore the photo back to its original form.

Besides editing photos, you can also crop or trim videos on your iPhone.

Summing it up

Using the features available on the iPhone, you can surprise everyone with your photo editing skills. Once you get a good hand on the basic editing skills, try using a premium app to edit photos. This will make you nothing less than a professional photographer. So grab your iPhone now and start editing right away!

Freya Jacob is a content specialist, worked formally for Brainvire.com. She is an adept content strategist with expertise in curating meaningful content. In addition, she is also an avid reader who loves to binge a variety of books and informative articles. She can amazingly convert boring content into something engaging.

Photoshop Master Reveals Why You Should Never Trust Photos You See On Social Media

Immediately Do About Photoshop

In this age of social media, looks can be very deceiving. The photos on social media often bear little resemblance to when they were taken because they can be digitally manipulated.

A skilled Photoshop master is able to do just about anything to a photo, including making someone look a whole lot better than in real life. A broad nose becomes slim, a thick waist turns into a thin one, flabby upper arms become smooth, eyes look brighter and teeth look whiter.

“Photoshop Holy” – digital manipulation for perfection

A Photoshop master and Weibo user named Kanahoooo has mad photo-editing skills that will make you question those stunning photos you see of people on social media.

She has a huge following on Chinese social media, where she is referred to as “Photoshop Holy.” She says you shouldn’t believe the perfection you see online. People reportedly ask her to make their images look more ‘shiny’ on social media.

The people in the after photos can hardly be recognized from the before photos, often looking slimmer and more beautiful. Her images show just how thin the line is between the beautiful and the not-so-beautiful.

People comment that the photos look unnatural and don’t necessarily make everyone look better. Her response is that what she does is a type of entertainment and that she thinks it is fun to try and make people look different.

Her wizard-level photo editor’s skills are in demand and she is really good at making young girls look perfect. They seek perfection because they feel it is necessary if they want to get ‘likes’ and followers on social media.

Becoming a Photoshop master requires practice

An integral part of digital photography is the post-processing stage. Even when you’ve taken an acceptable photo, there is usually room for some photo editing magic if you want to take it to the next level.

Using Photoshop tools, you can correct issues like slight over-exposure that can wash out skin color and features but it is possible to go a great deal further than that.

Mastering the basics first

Simply learning how to use some of the basics of Photoshop can take time. Adele Markus, a graphic designer who works for Best Essays, says she battled at first to learn how to use the layer panel. She says her early attempts looked as though a child had been busy and it took practice to get the best quality from a photo by applying layering.

Some of the tools in Photoshop are fairly straightforward and easy for beginners to use, whereas others are much more complex and it may take time before you’re ready to use them.

For example, Brightness/Contrast, Exposure, and Shadows/Highlights simply require moving sliders to the right or left to make adjustments. However, more advanced edits require learning how to read a histogram or a chart that shows the tonal range in the photo you’re editing.

Dealing with slight imperfections

Photoshop has many photo-editing tools, such as a Spot Healing Brush you can use to get rid of blemishes and a Clone Stamp tool that allows you to copy pixels from a selected area and then clone it on to another area.

This makes it easy to remove imperfections like a stain on a model’s clothes you didn’t see during a shoot, a spot on the skin, any odd patterns, or a dirty background.

Working on the eyes

One element in photos that can be tricky to get right is the eyes. The less you do to them, the more natural the effect. It’s fine to work on them if they appear a little puffy or have bags under them. However, adding too much sparkle tends to look unnatural and may even make them look unearthly.

Perhaps you’re working on a photo where the model’s eye bags give away the fact that she got little sleep the night before the photoshoot. It takes some practice to improve photos without the changes you make being easy to notice.

Learning how to reduce puffy eyes in Photoshop is not that difficult, but there are different ways to accomplish this and some ways offer a better result than others.

Adjusting colors and shadows

When you start adjusting colors and shadows, you have to understand curves, how to layer and create contrast without creating a collage of blurred colors and overlapping shadows.

Practice makes perfect

When you’re new to a photo-editing program, it is easy to either avoid or overuse fascinating features. The more you use the photo-editing software, the more adept you become.

Kanahoooo or “Photoshop Holy” shares tricks on how to retouch images on her homepage and launches challenges that give other Weibo users a chance to practice and to show off their Photoshop talents. Perhaps your idea of perfection is different from hers – but you still need to put in the time and practice if you want to improve your skills.

Transform photos in Lightroom

Many professional photographers are able to transform photos in Lightroom. This popular photo editing software has many compelling editing functionalities. It allows you to apply your own style, be creative and differentiate your work from other photographers.

Using Lightroom does have a learning curve, but it is not as difficult as learning Photoshop. It is fun to play around with all the features and see what kind of results you can achieve.

When you are learning various editing programs, it takes time to understand how and when to use the various features. Trying too hard to incorporate them too soon is a mistake that beginners often make.

Keep comparing with the original image

A good rule of thumb when photo editing is to make the final images look as natural as possible. In the beginning, it is often tempting to over-contrast or over-saturate a photo, but with time it becomes easier to recognize when an image is well balanced.

Comparing the original image with the edited version while making changes helps you to quickly realize when a photo begins to look unrealistic. For instance, when you want smooth skin, take it slow and work next to the original image so you can see when the skin starts to look plastic.

Less is often more when it comes to photo-editing. For instance, having a bright smile is engaging but over-whitening teeth can make a photo look fake. You don’t want the focal point of the photo to be glaring white teeth.

Conclusion

Editing photos can be fun but you don’t want to fall victim to over-editing. Too many edits will make your photos look unnatural. Of course, if you’re like Kanahoooo, your brief may be to make someone look completely different and you will have great fun doing it. However, if you want to keep your photos looking natural, make only changes you feel are necessary and leave it at that.

About author

Tiffany Harper is a talented writer from New York, an extremely active woman, and a real leader. She began her career as a journalist and later proceeded as an educational writer and editor. Now she works as an experienced subject matter expert with best writing services, sometimes she works as the content consultant dissertation writing service and thesis writing service, like essay writing service in UK, mostly in technology, business, and marketing area. Please do not hesitate to contact her on Twitter.

5 Simple Ways to Transform Your Photos in Lightroom

We all want beautiful photos. Who doesn’t strive towards the perfect Instagram profile? Who doesn’t want to improve those vacation photos that are supposed to get printed?

But most of us are too busy. We have our jobs, our homes, and an exercise routine to take care of. Hey, students even buy assignment help because they can’t handle all the pressure. Time for complex photo editing on Photoshop? Not so much. So we opt for the usual Instagram filters that make our photos look tacky.

What if I told you there was a better solution? Lightroom has some pretty cool presets that are just as quick as Instagram filters. The tool is simpler than most people assume. So let’s get out of our tiny little boxes and do something cool to our photographs for a change.

1. Start by Choosing the Best Photos

Do you remember the good old days when we had to use photographic film for our cameras? We could take a limited number of photos on it. It was expensive, so we were saving it. We’d stage the scene, get our model to strike the perfect pose, and snap. That was it. No second attempts, since the film was too precious to use for similar photos.

The digital world is so much better! We can take as many photos of a scene as we want. We have tons of memory, so we don’t mind snapping several similar photographs. But when the time for choosing the one comes, it’s a problem. Lightroom has a simple feature to help us solve it.

  • Highlight all similar photos in a folder.
  • Press N – a shortcut key that takes you to Survey view mode.
  • You’ll see all similar photos in a single window, so you can eliminate them one by one until you end up with the perfect shot to edit.

2. Try Different Presets

Did you choose the right photo? Cool! Are you ready to start editing it?

When you choose the photo to edit on the Lightroom smartphone app, you’ll see the option Presets in the bottom menu. Tap it. It will lead you to cool effects that work exactly like Instagram filters. The difference? They are better and they don’t look like the majority of Instagram photos.

Play around with these presets. You know how to do that. Experiment with different ones (you’ll just press the X if you don’t want to save the last one you tried). The cool thing about Lightroom is that you can layer on different presets, so you get a unique effect for your photo.

3. Adjust the Features

The preset will do a lot for you. When chosen properly, it will brighten up the photo. Light is Lightroom’s forte!

But why don’t you try to make it even better? Most of the work is done; you just need to adjust a few elements to see if you can improve the result.

When you choose Light, you can play with the highlights, contrasts, shadows, and exposure of your photograph.

4. You Want to Maintain a Theme? Save Your Settings!

If you analyze some of the most popular Instagram accounts, you’ll notice they all follow a theme.

Why would you stick to the same style of photographs when there are so many opportunities to experiment? No one is forcing you to do so. If you like versatility, you can play with lightness and darkness and make a unique story out of each image you post. But if you want your Instagram profile to be impressive and recognizable, that’s not the right way to go.

Instagram stars engage in the branding process. The photographers and editors to help them with the photos, and they hire writers from a college paper writing service to create the perfect captions. You don’t have to go that far. But you can maintain a theme, which will make your visuals recognizable for your followers.

Before you set a theme, you should play around with Lightroom. Try different settings on your favorite photos, so you’ll see how they look. Is there a particular style of editing that you love? Save those settings! Once you’re sure you got a photo to perfection, click on the + button (located in the Presets panel when you’re using Lightroom on a computer). Name your preset and click OK.

When you have a new photo to edit, apply your very own preset. It’s your style. It’s your character expressed through image features. You can’t do that on Instagram!

5. Make Subtle Adjustments

There’s a thin line between professional-style editing and absolute tackiness.

For example, if you try to brighten the model’s skin on a portrait photo, the Adjustment Brush will do a good job. But if you go too far, the photo will lose its vibe.

The difference between an amateur and a pro photographer is in the dose of edits. The amateur is so excited with the new features they discover that they want to use them all… on a single photo! There’s a word to describe this result: kitsch. Look it up.

The pro, on the other hand, will invest in high-quality gear and do minimal editing once the photo is taken. Their photography looks more natural, even if there’s a fantasy vibe to it. It looks real. Even average cameras and smartphones take good photos today, so there’s no need to brush the realism layer away. Do the needed editing, but keep them real!

Lightroom Gets Better As You Practice More

Like any other editing tool, Lightroom also has a learning curve. But it’s not Photoshop. It’s way simpler and less overwhelming. If you don’t understand how it works when you first use it, don’t despair! Just practice. It’s fun to play with your photos and see where you can get them with a couple of edits.

Presets are the coolest thing for beginners. If you know how to apply filters on Instagram, you’ve got this! From there on, you’ll build upon your photo editing skills and the results will keep getting better!

Lauren Adley is a writer and editor at Australia writings and best paper writing service. She is dedicated to her family, work and friends. She is keen on reading, playing the guitar and traveling. She is interested in educational, marketing and blogging issues. Feel free to connect with her on Twitter if you need bestessays review.

6 Tips To Choosing the Best Travel Camera

Cameras are normally depicted as one of the essentials of traveling. This is why many brands today are now offering various cameras designed mainly for traveling. While almost all cameras, in recent times, even your smartphones, can be utilized for outdoor photography, there are still those specific cameras that are innovated for the purpose of traveling. 

If you have a great love for traveling and you are still finding the best travel camera, then this piece might just be for you. Aside from pointing you the right direction in which cameras these are, this post will also let you know what factors are the most important to consider when choosing or buying your travel camera. 

6 Important Tips When Choosing Your Best Travel Camera

There are a lot of factors that you must first consider, especially when you are still searching for your best travel camera. But among these factors, here are the six best tips that you may want to ponder on before you head out and make a purchase:

Weight and Size

Some of the most important things you must consider are the weight and size of your desired travel camera. Keep in mind that cameras come in different sizes and weights. So, you must consider this aspect, especially if you are the type of traveler who wants to keep everything light. 

Even so, it is worth noting that the smaller the size, the more limited the features are. Nevertheless, there are still those lightweight and small travel cameras that already function as an all-inclusive type.

Durability

Travel cameras or any other cameras on the market today are pretty hefty in terms of their price. And you don’t want for your newly purchased camera to get broken just after one use. Hence, it is very essential that you regard the materials used in the structure and build. In short, the overall durability of the camera.

Budget

As mentioned, cameras, especially the innovative and high-tech types are relatively expensive. And if cost plays a huge role in your decision-making, then you must very well consider your budget. 

You must understand that not all expensive cameras are durable and fully-featured. And not all inexpensive kits are cheaply built and low-quality types. 

Use

Are you using a travel camera for simply taking photos? Or are you using it for recording videos? Do you intend to utilize it for your blogging and/or vlogging? Is the camera meant for a wildlife trip? Hiking travel? An underwater adventure?

These questions will help you understand more what camera you will need in your travels. And it will also help you answer the main use of your travel camera. 

Camera Lenses and Graphic Resolution

Depending on your subjects and setting, the lenses of your camera will vary. Through the lenses, your camera’s ability to take zooms and wide-angle shots will depend. So, if you want to take big shots, then you may opt to have a travel camera that features big lenses.

But keep in mind that it is easier to get bigger zooms when the camera has a smaller sensor. Therefore, you must choose between resolution and zoom. Most outdoor photographer experts today recommend either Sony RX10 or Panasonic FZ1000 since both cameras have big sensors and yet still feature good zoom functions.

Additional Features

Travel cameras that are widely available on the market have their distinct features. And each of them would offer various features and functions. If in the instance that you already reached this part wherein you are now weighing your options by considering the additional features, then think of versatility. 

Versatile travel cameras are very convenient. Not only that they are very cost-effective but they are also worth it. Not to mention, such cameras can be used in almost all sorts of travels.

The 5 Best Travel Cameras of Today

Once you’ve considered and regarded all the of the essential factors, not to mention, you’ve applied as well the given tips above, there is only one thing left to do. And that is to choose the best travel camera for you. 

It may be really challenging but to further help you in your search, here are the five best travel cameras of today as per most travelers and photographers:

 Panasonic Lumix ZS100 / TZ100


Panasonic Lumix ZS100 or TZ100 in other regions is one of Panasonic’s best travel cameras. With its significant 1.0-inch sensor size and 10x zoom, many photographers take it as today’s best compact travel camera. It also features a built-in wi-fi module, touchscreen control, and 4K capture.

Nikon D3500


Nikon D3500 is a DSLR that is depicted as an easy point-and-shoot travel camera. With its sensor that is 15x larger than any smartphone camera, it can capture much clearer and more vivid shots. For recording videos, it features a 1080P HD rating. Also, it comes with a dedicated application that you can utilize with and through your smartphone.

Canon PowerShot SX730 HS

For Canon, its newest PowerShot SX730 HS is one of its best travel cameras, especially for taking zoom photos and selfies. Thanks to its 40x optical zoom and 1/2.3-inch CMOS sensor, the brand takes this model as its latest “superzoom” compact camera for traveling. 

While it can capture great selfies, thanks to its tilting feature, and zoom photos, the video recording function can only reach a full HD rating. Even so, many vloggers still utilize this travel camera for their travel documentation and activities.

Sony a6400

For vlogging purposes, the Sony a6400 is largely pitched as the perfect compact travel camera for this area. With its built-in mic, 4K/30p video capture, 24-megapixel APS-C sensor, and 11 fps burst shooting, many pros see this as the most all-inclusive compact travel camera. 

However, this camera may cost a fortune. You may need to shell out at least $1500 for a single kit. But even so, many actual users consider it as an investment.

Fujifilm XF10

If you are on a budget but you want a similar set of features like what the Sony a6400 offers, then you may want to go with the Fujifilm XF10. It features a 24-megapixel APS-C sensor, 4K/15p video capture, 6 fps burst shooting, and the 91-point hybrid autofocus system. It is also much easier to use, thanks to its simple controls.

Your Best Travel Camera

Searching for your best travel camera is a very tricky and challenging thing to do. But considering all of the essential factors, along with your needs and wants for your camera, you will surely arrive with the best option at hand. And in the end, you will be the one who can get you the best travel camera for your needs. So, keep on researching and learning new things. And most of all, enjoy your search!

By – Dhaval Patel.

I have two passions: Travel & Photography. Lucky for me they go hand in hand. My goal is to inspire and encourage others to get out into nature — it’s a beautiful and enlightening experience. Be sure to check back often to learn the various ways I photograph nature. If you have any requests feel free to contact me 🙂 

How Adobe Photoshop Has Changed the History of Photography

It is apparent that Photoshop has changed the history of digital photography and its practice. Before this software, there was extreme patience needed for going into digital photography. To capture something remarkable a camera had to be carried around everywhere. This changed instantaneously with the invention of Photoshop. If you come across an enticing image today, you will be in awe of it but your second thought is always, “This has to be photo-shopped.”

In 2019 Photoshop turned 31. There is a lot to be noted about its influence on the world of photography. It has not only changed the game but also how we view the world. Digital artists and manipulators know how to take a regular snapshot and transform it into something wholly diverse and extraordinary.

Before Digital Photo Manipulation

Several centuries of hard work has led to enhancing the effects of photography. These changes are now considered to be an art form.

Once the notion was made public, photo manipulation came to be used quite widely by artists and photographers. The trick that most photographers used in the early days was the use of dual exposure to combine different negatives into one and give the photograph a touch of humor.

The alterations done were obvious and even funny, which gave rise to typecast such as the two-headed man.

According to today’s standard, this is a pretty rudimentary use of manipulation but the speed with which this novel system was used gained a lot of popularity. Photo manipulation soon became broadly used in architectural mapping, concept design, marketing, and even simple photography.

The commercial sector made a fortune out of this equipment, making several products in advertisements and infomercials look better than they were.

The Start of Photoshop

Photoshop was released in the 1980s. It soon became the primary image processing software to go into photography. The initial versions were quite mediocre compared to today. There were only basic filters and image modifications, and no layer support. There was still some substantial flexibility when associated with traditional photo development that took place in the dark rooms.

Soon enough, Photoshop offered creators, illustrators, and photojournalists the instrument of choice to make their mark. Besides photography adjustment and manipulation, the importance of Photoshop is both hands-on and historical.

Its growth and use have changed the way we see the world and it has helped edit and familiarize millions of different photography techniques around the globe. It opened people’s minds for more and enabled the introduction of renewed outlooks and inventive expressions.

A New Perspective

Photo-shopped images can disrupt reality and the way we see it. Whether it alters aspects of people, places, or things, there is a certain amount of creativity and time that goes into these changes. You get a new perspective of the world.

Before Photoshop, digital photo manipulation relied heavily on expensive machinery and skillful production staff. Photoshop has lifted this heavy workload and excessive limitations and has brought about many significant changes in conventional photography.

Photographs are not just documentations of our environment. They allow artists to express their perceptions of life. With Photoshop, this vision can be molded to fit a photographer’s specific taste the message they want to send into the world.

Here are some ways Photoshop has changed aspects of photography.

The Appearance of Models

Hollywood stars and fashion models do not look like real people anymore. When you see their heavily altered faces in magazines, their skin and curves are perfect in every way. This leads us to believe that beauty equals perfection.

Photoshop has led beauty to become an unrealistic goal, and while we cannot blame the software for this dynamic social issue, it has contributed a large amount.

A person’s appearance can be changed drastically through Photoshop to reach an unattainable standard of beauty. This can range from lengthening necks and legs to cutting out ribcages even, or raising cheekbones, filling in hair and changing skin color.

Media Images

Whenever you look at an extraordinary image your first reaction is, “Wow, this is amazing!”

However, the perfection of the image makes you wonder how accurate it is when compared to real life. “Must have been photo-shopped!” is what most people say now. The perception of media images has been molded by the use of Photoshop by using colors and editing to make graphics more beautiful and worth seeing.

The issue with media organizations all over the world doing this is that there are no overall criteria for how much news photos can be edited. Every editorial office has a different perspective but most of them opt to do as much as possible, which changes photography culture entirely.

Advertisements

The advertising industry has been completely changed due to image manipulation. Looking through a magazine means coming across dozens of photo-shopped ads.

This means that companies that used to run text ads and hire photographers to take good quality photos have an easy way out. For example, if corporations need someone to design a logo they can now just pay someone to make their ad on a Mac or PC. Photoshop has offered the advertising business more booming business with half of the workload than before.

Social Media

Since the complete takeover of social media, Photoshop has found a new avenue for change. Viral content, such as memes, has become a general source of entertainment. Photoshop is used to curate these pictures and animation videos.

There are hashtags and websites all about Photoshop fails and disasters and examples of the images and videos produced. Pop culture has taken in the software and become intricately laced with it over the years.

Natural Landscapes

Watching channels like Planet Earth on the Discovery Channel has changed the way you look at natural landscapes of the world even. Yes, there are many beautiful places all around the planet with some wild and fascinating looking creatures.

However, Photoshop has allowed artists to get even more creative with nature. Photography features new species and landscapes that are not even real and may never exist.

Author

Sarah Jay works are a freelance content writer for Logonado Design Australia. She feels passionate about topics such as graphics, logos, and illustrations. Whether you want to learn how to design a logo or what the new trends in graphic illustrations are, she has probably written about it. In her free time, Sarah Jay likes to travel and read fiction books.

Guest Post: Why Photoshop?

In the present day, people love taking photos and keeps it with them as it stands as a great tool to keep some loving memories forever. People always love to take some quality images and they used to do everything to make their images look like as excellent as possible. People have a good amount of mediums available to them to make their image of top quality. People can edit their images these days with most modern technologies in order to make their image look as it great. One of the top tools available to people to make their images top quality is Photoshop.

Photoshop is good software that allows people to organize, edit, and create images. Photoshop and its tools are well known for its ability to edit and make changes to the picture that you have already taken. There are many people in the world who make use of Photoshop mediums in order to make their photos in exceptional quality. Photoshop is wonderful software as it can be used to edit the digital image application, assists you to perk up the quality of a photograph and let’s make special effects to the image.  It aids the artists to make the artwork and give a final touch to the images to give fresh visual effect.

Here is a look at how Photoshop graphics helps you to make special effects for your images:

Great Finishing Touch

Photoshop graphics can give a great finishing touch to the images. The images and photos that you created or edited in Photoshop let you make a great finishing touch. As far as the people are concerned, there is a need to give finishing touches to the content because it not only helps them to make the image better quality but also look as it professional. The finishing touches can come in the type of editing their work down to a superior cut, blending the audio, and even building up the titles or graphics for the content.

Do Wide Range of Tasks

Photoshop helps people to do a wide range of tasks with ease and effectively as well. Photoshop persists to be the design software of option for millions of designers across the world for a number of people to carry out their wide range of tasks. Some of the most notable tasks that they do with the help of Photoshop include photo editing, graphic design, typography, illustration, 3D modeling, and animation. Photo editing, graphic design, typography, illustration, 3D modeling, and animation are common that can be seen in the entertainment industry. However, you can make use of these tools to retouch your marriage photos or other photos that you took during some other important functions.

Improves Creativity

Photoshop is a good tool for the people to improve their creativity when it comes to editing their images. Creativity is an essential thing for the editors and people who are closely associated with photo editing to make their tasks as effective as possible. With the most recent tool of Photoshop, people can improve a lot of features of a photo that they have already taken. Photoshop has some potent facial detection skills, allowing it to identify parts of the face, such as the eyes, mouth, and nose and on the whole face shape.

Digital Effects

Photoshop helps people to make some special effects in their images. Today, we live in a digital world and the field of photo taking has become attached to the changes made by the digital world. With the Photoshop tools, people can make digital effects in their chosen images. Photoshop elements make it effortless to touch up your digital photos and make it exceptional by adding special effects, filters, and styles. Photoshop lets you make Animated GIFs which is a great method to make your designs more stunning. With the use of Photoshop tools, you can modify any animated GIF to go well with the style of your task.

Other Notable Features:

  • Photoshop helps you to improve your skills and knowledge in editing images. Some of the most notable tools of Photoshop allow people to resolve the blemishes and the defects that are common in the photos.
  • Photoshop is a great medium that assists you to improve the overall nature of a picture. You can take away and adjust the backgrounds in the photos in order to look the image as perfect as possible.
  • Photoshop is a better tool that allows you to fix the issues found in your photo and using it, you can make your image error free. The images can be amended to repair the faults. It is possible for you to give a professional look to your images using Photoshop. It also has techniques to create images and edit the images for its better look.
  • It is very effortless to start editing the photos using Photoshop even for beginners. It helps people to help you to amend the skin tones of people in your pictures.
  • You can bring into play Photoshop to import the videos and the photos into the software rapidly and without difficulty.
  • You can set photos in a neat and orderly way using Photoshop. You can keep your images in an organized way especially when you take care of hundreds or thousands of photos and videos.
  • Using Photoshop tools, you can change photos to black and white, resize them, generate diverse effects, and unite stylish techniques and a lot of others.
  • Photo manipulations and photo special effects are amusing. There are a lot of people who love to manipulate and bring in special effects in photos. By Using Photoshop you can carry out lots of innovative, ingenious and incredible special effect to your photo.
  • Being capable of layering multiple layers, filters, effects and much more, Photoshop is one of the finest editors and manipulators of images around. It has progressed to generate and edit video, make 3-D images and make an easy graphic design.

This is a guest post from Stephen. Should you have any queries, please reach out directly to him. You can find his details in the author box below.