If you can’t get a perfect smile in photos, don’t worry, as you can easily change that with a little bit of effort. Some people were born photogenic. Others weren’t that lucky.
With all the advanced technology around us, it’s possible to edit for the perfect smile using powerful software tools.
One of the best tools that will surely give you the results you’re after is Photoshop. So, let’s see how you can use it to get that perfect smile in every photo.

Using Photoshop to Edit for the Perfect Smile
Photoshop is probably the most popular software for image editing. People love it because it’s a powerful tool that provides a wide range of effects that you can apply in photos for consistent results.
With so many useful features at your disposal, you can create high-quality photos very quickly.
Here is how this image-editing software can benefit you:
- Face-Aware Liquify – if you want to add creative character to make an image more fun or enhance a single detail like your smile, the Face-Aware Liquify Photoshop feature is the right tool to do it. It automatically recognizes key facial features and provides options to adjust them.
- Organization – Adobe Photoshop allows you to import videos and photos into the software, quickly and easily. This allows for a much better workflow as you can handle all files on the screen according to your needs, using features and editing tools.
- Time efficiency – the most popular effects like red-eye removal, skin tone adjusting, and teeth whitening are just a click away. If you have the skill to use Photoshop, it takes mere minutes to complete these tasks. This makes the software the most favorite editing tool in graphic and web design, marketing, and advertising.
How to Use Liquify Filter for Editing Smile in Photoshop
The following steps will turn you into a professional that uses Photoshop, just like seasoned professionals do when providing graphic design services.
Converting the Background Layer
- To convert the background layer into a smart object, open the upper right corner of the Layer panel.
- Choose the Convert to Smart Object option to safely place your image inside a smart object.
Renaming the Smart Object
- Once the image is inside a smart object, its name will change from Background to Layer 0. You can name it ‘Smile’.
- To rename it, highlight the new name by double-clicking on it. This will allow you to change the name to “Smile” and press Enter when you are done.

Selecting the Liquify filter
- To adjust the smile, go to the Filter panel and select Liquify to open the image in a separate dialog box for the Liquify filter.
- Use the features to zoom in on the detail you want to enhance.
- You will notice a toolbar on the left side of the dialog box. Use the features in the toolbar to position the image in the center of the dialogue box.

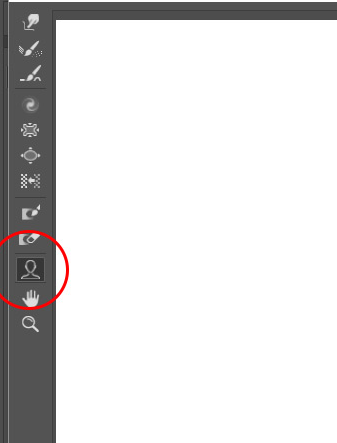
Selecting the Face Tool
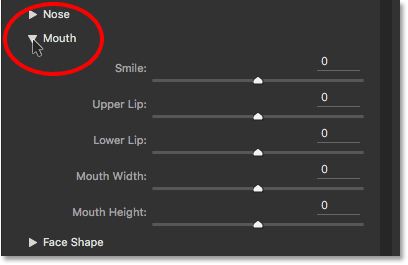
- With the face tool, point to the subject’s mouth with your mouse cursor to get additional options. Each of these options represents a different mouth property that you can adjust the way you see fit.
- If you want to adjust the upper lip, click and drag on its icon.
- As for the smile adjustments, there are two “Smile” icons that you can use to reshape and bend the curve of the mouth. There is also the Smile slider, which allows you to reshape the smile.
- You can find it on the right side of the dialog box. By dragging the slider to the left, you reduce the curve of the smile and, to add more curve, drag it to the right. This will make your subject’s smile friendlier and warmer.
Using the Mouth Width Slider to Widen the Smile
- Go to the mouth width slider in the Properties panel.
- Drag the slider to expand the sides of the mouth outward. It’s important not to overdo it, though, as this can reshape the face of the subject beyond the point of recognition.
- You can see your new results on the right side of the preview area.
Using the Lower and Upper Sliders to Adjust the Lip Thickness
- Move the upper and lower lip sliders to adjust the lip thickness.
- They behave opposite to each other as you will notice if you drag them to the left or right.
Dragging the Cheeks Upward
- Just like adjusting the mouth, you need to adjust the cheeks as well. To do this, hover over the cheek.
- When your mouse cursor becomes a four-pointed arrow, you’ll get the Move Cheek options.
- Move the cheek but follow the natural curve of the mouth. Do the same with both cheeks until you’re satisfied with the result.
Lowering the Height of the Eyes
- If you adjust the cheeks, you also must alter the height of the eyes. One goes with the other. By lowering the height, you make a smile look more relaxed. Just like with the cheeks, hover over the eye area to display the Move Eye option and position the eyes to go naturally with the rest of the face.
- You can compare your image to the original by pressing P on your keyboard. Keep your adjustments subtle to get the best results. Once you finish your edits, click OK to save your changes.
Conclusion
Editing a smile in Photoshop is an entirely normal thing as not all of us are photogenic. Making photographs is an excellent way to memorize and share all the great moments you had with your friends, family, and loved ones.
If you aren’t happy with how your smile turned out in a photo, you can quickly fix it with the right tool. Change your facial impression with quality software or hire professional graphic design services to do it for you. The choice is yours.


