Hey, guys! Welcome to my another tutorial on 30 Days to Learn Photoshop series. This time we’re going to learn everything about Text Tools that a beginner should know. We’ll cover what is it, how are we going to use it, and its option bar.
Last time we learned: Dodge and Burn Tool in Photoshop. If you want to know about it then check it out. The link will open in another tab.
The text tool is one of the most important tools in Photoshop. Be it adding a caption, write something, and creating a design (yes, design!), you can use text tools. If you’re a web designer, you can add icons also using this text tool. You probably heard of Font Awesome. Those icons can be used in Photoshop using Text Tool. The title and cast names that see in movie posters are written with the help of Text Tool in Photoshop.
Below is probably the easiest thing that you can do with a text tool.

I just wrote a text with black color against a 30% gray background.
What is Text Tool in Photoshop?
Text tool in Photoshop helps you write texts. Be it adding a caption, some fancy title, or beautiful text effect, Text Tool got it covered.
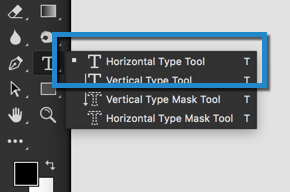
Where is Text Tool Located in Photoshop?
You can grab Text Tool by pressing Shift+T again and again until it comes or by grabbing it from the Tool Panel.
How to Use Text Tool in Photoshop?
Now let’s learn how to use the Text Tool
Step 1: Grab the Tool
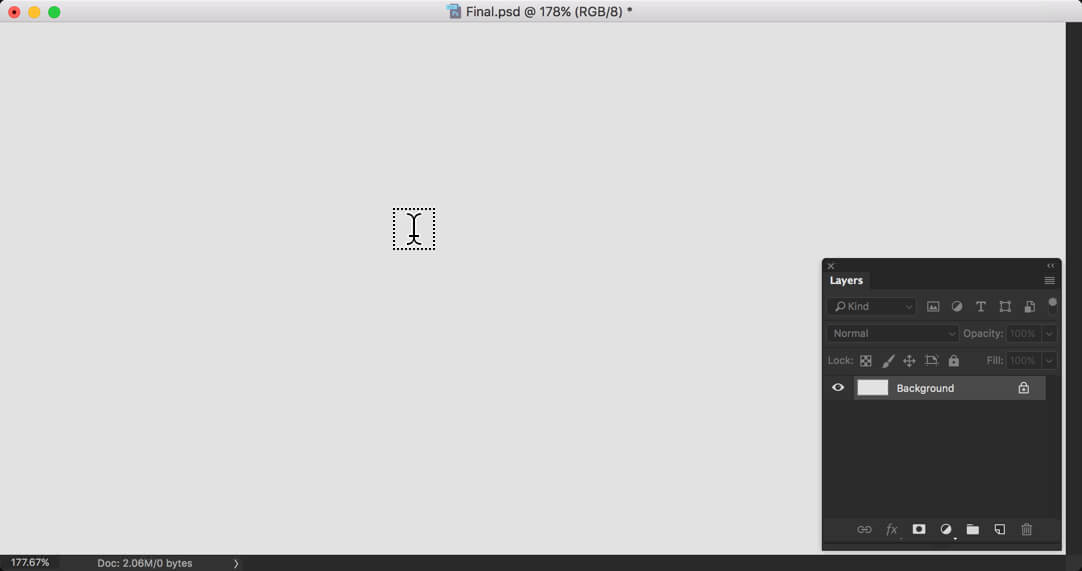
Using a text tool is very much simple. You just grab the tool and start writing it.
As soon as the tool gets activated, your cursor will change.
Step 2: Write the Text
Wherever you click, your text will start from there. I know that you want to write a text at a certain place. Usually what I do is that I write text anywhere in the Photoshop document and then move it.
The shortcut to move is here: Make sure that text layer is activated. Hold down Cmd/Ctrl and start dragging the text.

Step 3: Align the Text
Photoshop CC has a very cool feature that is Snap To. What it does is that it gives you a hint whenever your text is aligned to some boundaries or layers. In the example shown below, you’re seeing two lines. The vertical line shows that my text is at center. The horizontal line also shows that my text is at center.

Option Bar of Text Tool in Photoshop
Below is the option bar of Text Tool.
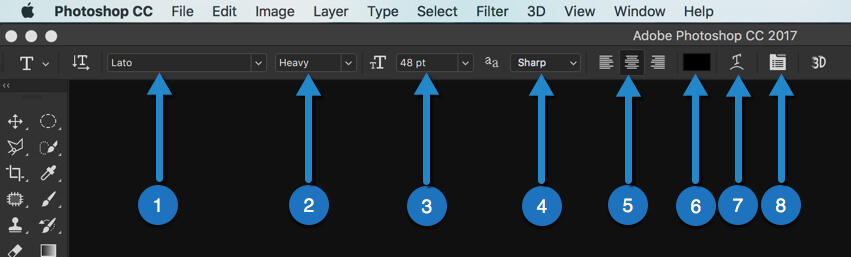
Let’s start understanding one by one.
Note: We’re not going to touch 3D as it is for extremely advanced users and out of the scope of this article. I have written a separate tutorial for 3D. You can check that out.
- Font: This is where you select the font. The font, Lato, that I am using is a paid font that I downloaded from TypeKit (Adobe repository for fonts). You can find all the fonts on your desktop here. If you have installed a new font and want it to show up here, you need to restart Photoshop
- Font Type: This is the type of font. Your bold, regular, heavy fonts come here.
- Font Size: Here you can define the font size.
- Optimize Text: You can optimize the text for LCD, print, web here.
- Alignment: You can align the text to the left, center, or right aligned. There are more options to the alignment that comes when you can click on the 8th icon.
- Font Color: You define the font color here
- Wrap Text: You can give funky effects to your font here.
- Character and Draft Panel: Here you’ll find more options for text tool like space between characters, cases, more alignment options.
This is all about Text Tool.
This article is a part of 30 Days to Learn Photoshop.


