How to Adjust the Image Size in Photoshop?

Hey, guys! Today, I am going to show you how to adjust the image size in Photoshop. It has been one of the most requested tutorials and I am surprised that I have never written one. And yes, you can enlarge the image with this tool.

The agenda is for today’s tutorial is very simple. The procedure is very simple and I’ll tell you more few things.

  1. How to adjust the size of an image.
  2. How image sizing is different than cropping.
  3. How image sizing is different than canvas sizing.

Let’s begin with resizing an image.

Step 1 – Adjust the Image Size in Photoshop

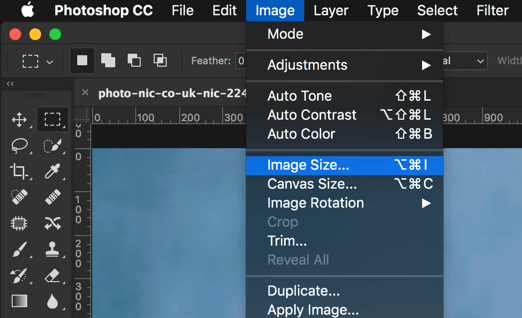
Go to Image>Image Size. You can also press Cmd+Opt+I/Ctrl+Alt+I as a keyboard shortcut.

Fig. 1

Step 2 – Tweak the Settings

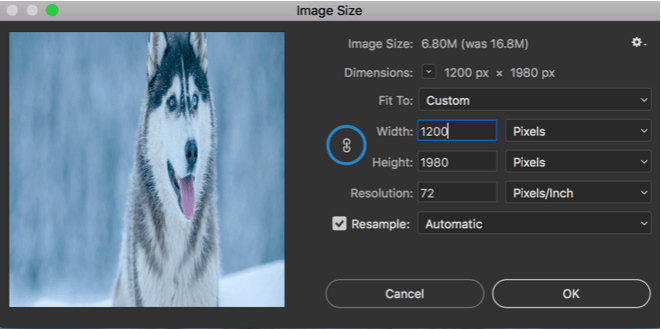
You’ll see a dialog box like Fig. 2. I’ll explain you all the things in this dialog box.

Fig. 2
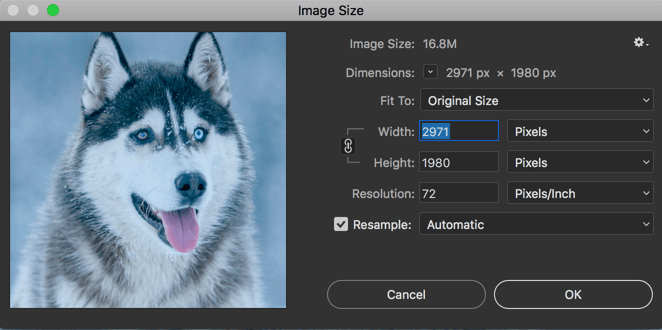
  1. Image Size: This tells you the image size on disk as per the current dimension. If you change your dimension, the image size will also change. In short, it tells you the real-time data.
  2. Dimensions: This tells you the width and height of the original image. You can change the scale to pixels, cms, inches, or whichever scale you’re convenient with. I use my images for web purpose so I keep the scale in pixels
  3. Fit To: Here you can find some predefined sets or templates with some industry standards. You may find it useful if you need to alter your images as per the industry standards.
  4. Width: This defines the wideness of the image. You can change the scale here also. I usually keep it to either Pixels or Percent.
  5. Height: This defines the height of the image. If you change your width, Photoshop automatically changes the height to maintain the aspect ratio. I’ll show how can you stop Photoshop from automatically adjusting the height later in this tutorial.
  6. Resolution: This defines the number of pixels in an inch. The photography standard is 300 and the web standard is 72. The positive side of having a high resolution is that if you zoom in the image, it will not pixelate. The drawback is that more the pixels per inch, higher the image size.  You can also change the scale here.
  7. Resample: There are eight resampling methods in Photoshop. Whenever you change the size of an image, Photoshop needs to resample (basically process) all the pixels in your image. I have already written a tutorial on Resample in Photoshop. If you ask me which method should you choose to enlarge the image, I’d suggest “Preserve Details 2.0”. If you ask for scaling down the image, I’d say “Automatic”.

Additional Tips

In point 5, I mentioned that Photoshop automatically changes height is you change the width or vice versa. My image width was 2971 pixels and when I changed it to 1200 pixels, my height got changed automatically. Photoshop does it to maintain the aspect ratio otherwise your photo will look stretched.

Fig. 3

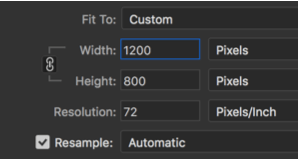
A quick way to disable this feature is to click on the chain icon that is shown in Fig. 4. This will unlink the height with the width. I know it distorts the image that can be seen in the preview pane.

Fig. 4

Some Common Differences

You may confuse this with few other things in Photoshop like Canvas size and Crop Tool. I’ll compare each of them so that you can use this feature like a pro.

  1. Crop Tool vs. Image Size: Crop tool is used to crop an image. It reduces the dimension but a part of the image will be cropped out. Image resizing doesn’t crop out anything. All part of the image will be same. You can either scale down the image or scale up the image.
  2. Canvas Size vs. Image Size: Canvas size can be used to increase your image work area. It doesn’t increase your image size. If you can increase the canvas size, it’ll fill the newly added area with white color (or any color you like). Image size doesn’t add or remove any white color to the added area. Instead, it enlarges or shortens the actual image.

This sums up today’s tutorial. See you next week.

As always, more good stuff coming soon.

Difference Between Adobe Photoshop and Lightroom

One of the hottest queries that keep beginners awake is regarding the software that should be used to edit photos professionally. While the free options have Picasa and iPhoto among other commercial software like Pixelmator, the most popular ones are the Adobe Photoshop and Lightroom. They have a lot in common but they still possess a few unique features sufficient to boost “What’s the actual difference between Adobe Photoshop and Lightroom?” query.

Today, I am going to share few of the differences between Adobe Photoshop and Lightroom. So, let’s begin.

1: File Handling Varies

The first case where the Lightroom differs from the Adobe Photoshop is the way it handles the file fed to it. It neither edits your photos nor can be used to transfer them between multiple locations. The changes you make in a photo via Lightroom gets stored in a separate file named “Catalogue”. This means that while you are altering or modifying any pic, Lightroom will record this sequence of alterations into the Catalogue. It leaves the original file intact.

Photoshop on the other hand has no Catalogue and does edits on the same image. The original image is altered without any scope of re-modifying it from the initial state again. There is a way called as “non-destructive” editing where you get to preserve your image.

2: Workflow

Lightroom offers end-to-end workflow solutions to the photographers stepping newly into this profession. From importing pictures from your storage to organising, editing, sharing and finally printing them, Lightroom takes care of almost everything that you expect from it. It even has virtual folders to track the images being edited and organised.

Photoshop, however, fails to transfer files and doesn’t even organize them into slide shows or photo books. It’s editing is still better and powerful than the Lightroom. Photoshop Bridge is something which is can be engaged to import and organize photos in Photoshop (if urgently required). The workflow is not as streamlined as in Lightroom, but Photoshop is undoubtedly a great deal to compromise with a few points.

3: Variety in the Tools

Lightroom’s quickly editing feature helped it gain a major popularity over Photoshop. It was specifically designed for editing hundreds of pictures in one-go. Lightroom basically has all the tools from Photoshop bundled together in an easy to handle package.

From adding Adjustment Layer to the Blend Mode and Dodge Layer, Photoshop truly has made real editing possible. Lightroom however has a few features less than the Advanced Photoshop program. Photoshop also supports adding 3D support and text to your pictures. This is why it is ideal for every editing situation. Lightroom is a collection of only those editing tools which shutterbugs or professionals utilize the most.

Wrapping Up

So this was all about the difference between Adobe Photoshop and Adobe Lightroom. Thanks to the Adobe’s Creative Cloud Option under which you can own these two at $10 monthly subscription.

Both the programs have a lot to offer. The choice depends upon the type of modifications you want to implement to your snaps. If you too are familiar with these two programs, do share your feedback with us. There might be more differences which we need to spread. I hope you guys enjoyed this. Share this piece with as many as you can. We’ll be back with more such articles. Till then, good luck and stay tuned.

What is Histogram in Lightroom – A Simple Guide

If you are new to photography or photo editing, there may have been times when you were editing a photo and decided to bring down the highlights slider as they were completely blown out in some areas. While doing so, you realized that even though the image looks better than before, you’re not sure if you should continue to work on it. Where should you stop to make sure that the image looks… normal? or you may wonder what is histogram in Lightroom.

What is Histogram?

What if there was a way that Lightroom could show you that you have extremely overexposed areas in your image that need to be adjusted or an indicator that could tell you that the shadows (or highlights) aren’t clipping anymore so you can stop moving the slider?
Well, Lightroom does have such a tool and it’s called a histogram. In simple words, a histogram is a graph on which every single pixel of the image has been plotted. Being familiar with a histogram helps you edit images in a way that you don’t lose any details in it.

Where Is Histogram Located in Lightroom?

The histogram can be found in both the library and develop modules at the top of the panels on the right. The version in the develop module is more interactive than the one in the library module because it lets you adjust your images directly from the histogram and also shows you any clipped pixels that the image might have. If you open Lightroom and cannot see the histogram for some reason, you can view it by going to Window> Panels> Histogram or by pressing Ctrl+O/Cmd+O.

What Does Histogram in Lightroom Show?

The histogram is a graph of all the pixels in your image and typically, the pixels are spread over the whole width of the histogram where the left side shows the shadows and the area on the right shows the highlights. So, if the histogram is concentrated in the middle with barely any pixels on the far right or left, it means that it has hardly any strong highlights or shadows and mostly contains mid-tones resulting in a dull image with low contrast.

The histogram also show if you have any clipped pixels; clipping is the loss of detail in pixels which means the shadow is so dark that it has no detail and is completely black or the highlight is so bright that it is completely white.

Right above the histogram, there is a triangle in a small square on the left, which is the shadow clipping indicator while the triangle on the right indicates highlight clipping. Whenever you have any clipping in either the shadows or highlights, the respective indicator becomes white. Then, you can either click on the indicator or hover your mouse pointer over it and it will show you the clipped pixels in the image.

Is There a Right Histogram?

There are no perfect right or wrong histograms and it all depends on the kind of picture that you’re working with. Typically, if your histogram has a gap on either the left or right side, it means that most of the pixels in your image are either white/highlights or blacks/shadows. In this case, you may check for clipping and adjust it but you can’t say that it is a bad picture or that the picture has problems just because most of the pixels are concentrated on one side.

Let’s say that you have taken a picture of a black dog in front of a black gate. If you look at the histogram, most of the pixels will be on the left with a gap on the right. You don’t really need to worry about fixing it because that’s just how the image is and it is not a wrong histogram. All you need to do is make sure that the image is exposed correctly and that there aren’t a lot of pixels getting clipped; adjust for that (and for the contrast if you want) and you’ll be good to go.

Moreover, you might not need to adjust every single pixel for clipping if it’s not feasible. Again, it all depends on the kind of picture and where the clipping is occurring. So, for example, if your subject is a little boy and most of the frame is occupied by him with only a tiny area of the background getting clipped, you don’t need to sacrifice on the quality of the editing of the boy’s face just to save those few irrelevant clipped pixels. In the end, it’s up to you to decide whether you want to adjust the pixels or leave them as they are, depending on the image.

Using the Histogram Directly to Adjust Photos

The histogram is divided into five different sections which correspond to either one of the following characteristics of the image: blacks, shadows, exposure, highlights and whites. Normally, the area right below the histogram displays information about your image but if you hover your mouse pointer over it, this information will be replaced by the name of the section depending on where the pointer is hovering. The slider corresponding to that section will also be highlighted in the Basic panel. Moreover, the mouse pointer will turn into a two-directional arrowhead indicating that you can move it either way by clicking.


There are two ways to adjust any of the five characteristics; you can either use the sliders, or you can click on the section on the histogram and move the mouse left or right to change the values. If you’re using the histogram to adjust your photos, you will notice that as you move the mouse, the slider corresponding to the section also moves. So, in short, you are just moving the sliders directly from the histogram instead of scrolling down and moving them.

Color Histograms

If you’re working with a colored photograph, there will be parts in your histogram with various colors. These correspond to the red, green and blue channels of your image. So, there is a red histogram, then on top of it is a green histogram, and over it is the blue histogram. The other colors that you see are the overlapping of two colored channels. Then, there is a gray histogram right at the front which is like an average or a composite of all the channels. These colored histograms have pixels of the respective color plotted on it.

Moreover, you’ll notice that sometimes the highlight and shadow indicators above the histogram also turn into different colors which shows that there is clipping only in that specific channel. For example, if the shadow clipping indicator has turned blue, it means that there is clipping in the shadows but only in the blue channel.

To Sum It Up…

The histogram has many uses; it is a graph that tells you whether your image majorly consists of highlights, shadows or mid-tones. You can also use it to see if the image is well-balanced or if it has high or low contrast. It is most commonly used to check if you have any clipped pixels in your image and it helps you decide if you need to make adjustments to your photographs or correct any problems with it. If you are someone who regularly edits images, familiarity with the histogram and knowing how to read it can be extremely helpful in identifying problems and making quick fixes to your photographs.