How to сreate a GIF in Photoshop

This tutorial is written by William Benetton who is a photographer. You can connect with him on his site.

The Graphics Interchange Format, or GIF for short, has risen to become one of the biggest tools in the internet’s arsenal of expressions. You can find these short, looping video clips adorning social media and web forums all over. Their genius lies in their simplicity and power of repetition: in an internet crammed with sparkling high definition assets, the humble GIF has stood the test of time to become a language of reactions and one of the pillars of memedom. If you’re looking to dip your toe in these waters and start making your own GIFs then Photoshop is probably the best choice of software around, so let’s look at the easiest way to use it to put a GIF together.

Step 1 – Pick Your Video

First thing is to find a video you’ll want to derive your GIF from. Ideally, you’ll be looking for a clip that’s only a few seconds long, as brevity is the life and soul of the GIF. Imagine it as a sentence from a novel, or a rhyming couplet in a song: a GIF is just meant to be a small snapshot or amuses bouche, rather than a fully extrapolated idea. Now comes time to get the video into a useable format for Photoshop. A .mov or .mp4 file is the easiest format to handle. If you’re looking to get the source material from an internet video, a free conversion tool like ClipConverter can let you save the video to the desired format so long as you have the right URL.

Step 2 – Import the Video to Photoshop

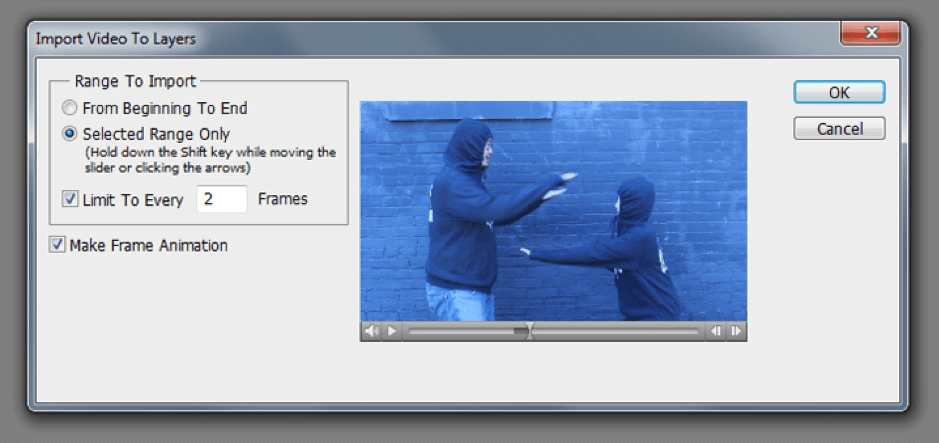
Open Photoshop and import your chosen video by clicking File> Import> Video Frames To Layers. This will lead to an options window where you can set your document up and pick which part of the video you want to make the GIF from.

Step 3 – Configure Your Document

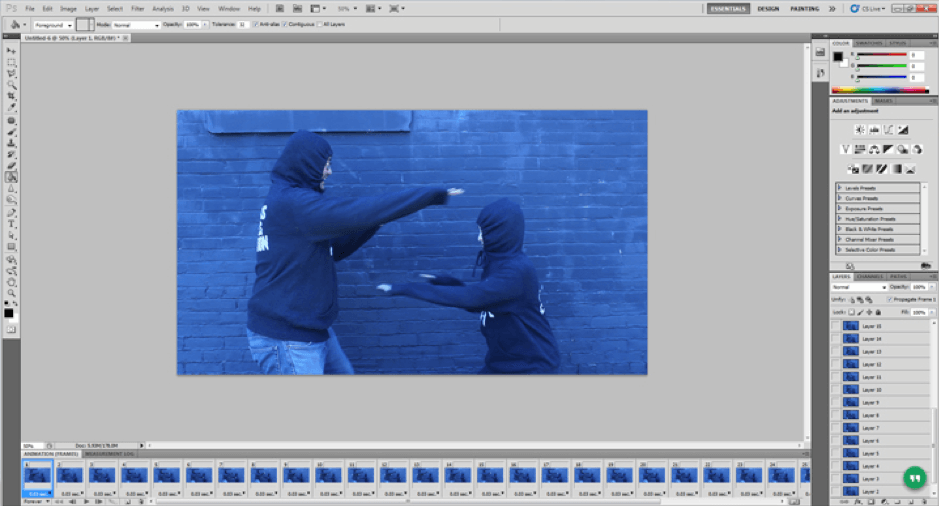
With your document imported, make sure that you have the animation window up and running by clicking on Window> Animation. Now, before doing anything else, calibrate your image size to 500 pixels in width. The reason this is essential is that GIFs are designed to load quickly, often with multiple GIFS open at once on a single page. If your GIF file is too large then this can become cumbersome and lead to long loading times and have your GIF stuttering, which will take away from its impact. It’s one of the reasons that platforms like Tumblr won’t accept GIFs above a certain size.

Step 4 – Frame Editing

With your document ready and your video of choice imported, you can now start editing the frames you want the GIF to be composed of. These can be located in the aforementioned Animation window. The first thing to do is press play to see how the document runs in its current form. From there you can select the frames you want to keep and delete everything else. By the end of the process, you should end up with something between ten and twenty frames. This might seem like a low amount, but remember, you want to keep things short and sweet. If you do end up with more than twenty frames selected, delete either odd or even numbered frames to cut the frame count in half. This will result in choppier playback, but this is something that can be fixed later on.

Step 5 – Loop Your GIF

Whilst this step isn’t technically necessary, it’s one of the biggest appeals of the GIF format, and helps give the format its repetitious, flick-book quality. Plus, if someone laughs once at your GIF, chances are they’ll want to see it more than once. To do so, copy all frames apart from the first and last ones, then re-paste them back into the animation window and drag them over to the far right. Following this, click on the options panel and click “Reverse Frames”.

Step 6 – Select Your Frame Rates

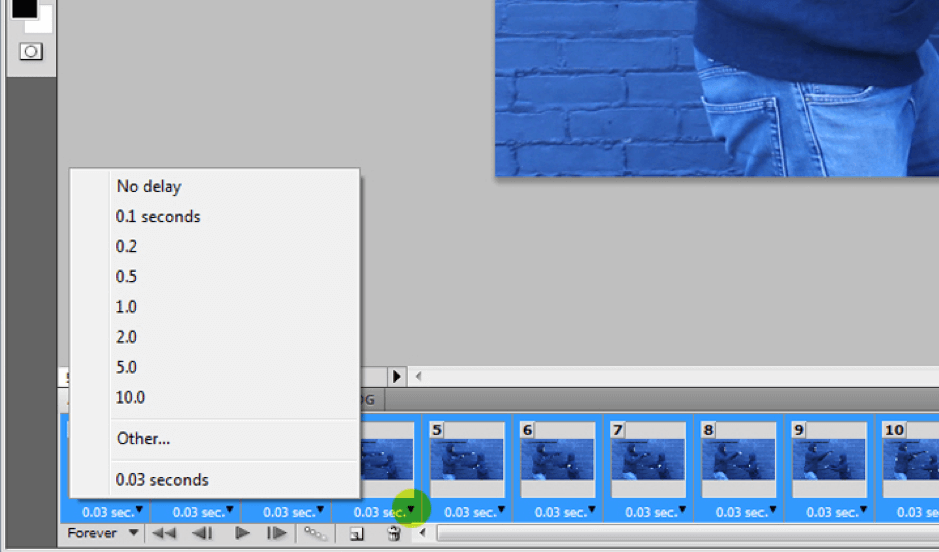
The frame rate affects how long each frame will be displayed for. The default setting on Photoshop is 0.03 seconds, but this can be a little too fast for the GIF format. The frame rate best for you will invariably come down to personal preference and the nature of the content of the GIF in question, but setting the frame rate between 0.08 and 0.1 seconds can often prove very effective. The frame rate can be altered in the animation window, by clicking on the small arrow shown within each frame. Be sure to have all of your frames highlighted before altering the frame rate. Note that if you deleted half your frame rates previously, the clip will run much faster, so you’re probably going to need to set your frame rate to somewhere between 0.1 and 0.2 seconds. Bear in mind that the speed of your GIF might not be completely accurate in Photoshop. It’s not until you export it that you’ll be able to tell exactly how fast it plays.

Step 7 – Export Your GIF

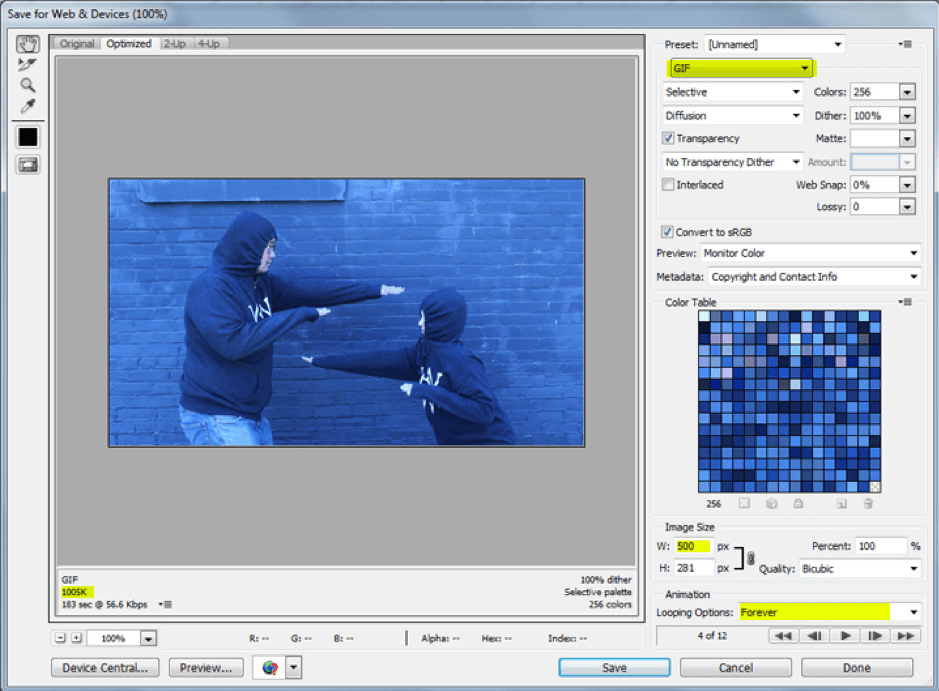
Your GIF should be finished and ready to export to file by this point. You can do this by clicking File> Save for Web & Devices, and complete the rest of the file saving options. Remember to keep your GIF small (ideally 2 MB or under), which you can help achieve by lowering quality settings as well as reducing frames. Once saved, you’ve successfully made a GIF, and now it’s just a question of finding a suitable destination for it. Good luck!

2 Steps to Change Eye Color in Photoshop

Eyes are one of the most beautiful parts of a human body. Having a beautiful eyes makes the face very attractive. Well, the shape of the eye matters. But, what matters most is the color of the eyes. No wonder that models wear colored contact lenses during photo shoots to look more attractive. And, the workaround of having a beautiful color eye without wearing lenses is Photoshop. In this tutorial, I am going to how to change eye color in Photoshop.

The tutorial is very easy. All we are going to do is to use the Brush tool.

Before I begin, I want to show you the initial and final pictures.

Initial

Initial.jpg

Final

Final

Let’s begin

Step 1 – Grab the Brush tool

There are many ways to change eye color in Photoshop. I am going to show you the fastest and the easiest one.

Grab the brush tool from the tool panel or press Shift+B again and again until it comes. Reduce the hardness to 0%.

Change the foreground color to the color you would the eyes to have. I am going to change it to #0076a3.

1.jpg

Step 2 – Change the Eye Color in Photoshop

Press F7 to open the layer panel. Alternatively, you can also open it by going to Window>Layers.

Create a new layer by pressing Cmd+Shift+N/Ctrl+Shift+N.

Change the blend mode to Color.

2.jpg

Start brushing the eyes.

If you want, you can first select the iris with the Elliptical Marquee tool and then start brushing. I am skipping that because the end result in my case would be almost same and my hands pretty much know how much should they move the cursor for perfect coloring.

3.jpg

Do it for the second eye also. The second eye is not present in my image so I need to skip that.

Your image should look like this.

4.jpg

I think that the blue is very vibrant. So, I am going to reduce the opacity to 59% in the layer panel.

5.jpg

That’s it.

Here’s the final picture again.

Final.jpg


3 Steps to Darken Iris Rim in Photoshop

Hey, guys! Welcome to my another tutorial from the portrait series. Today, I am going to show you a tutorial on eyes again. Yayy! This time I am gonna show you how to darken iris rim in Photoshop.

You know that I don’t like long tutorials. This one is also going to be a short one again. I am going to use the Marquee tool and layer styles.

But, before I begin, I want to show you the before and after photo.

Before

After

Step 1 – Select One Eye

We need to create a circle around the iris first. Grab elliptical marquee tool from the tool panel or press Shift+M until it comes.

We’re going with the left eye first. Create a circle around the iris. You can hold down the spacebar to move the selection from one point to another.

Now, we need to copy the iris to a new layer. Press Cmd + J/ Ctrl + J for that.

Step 2 – Darken Iris Rim in Photoshop

Time to darken iris rim in Photoshop. We’re going to do this with the help of layer styles. Go to Layer > Layer Style > Inner Glow. 

Change the settings to the one shown below.

Your photo will look something like this.

Step 3 – Finetune the Layer Style

Rather than darkening the iris rim, we have darkened the entire eye. Of course, you and I don’t want that. Time to fix it using the layer mask.

Go to Layer > Layer Mask > Reveal All.

Grab the Brush Tool from the tool panel. Increase the hardness to somewhere around 90%. Now start brushing the area which is blocked by eyelids.

Your photo should look like this.

Change the foreground color to black. Reduce the brush hardness to 0. Put it in the center. Set the size in such a way that it covers roughly around 70% of the iris. Now click 7-8 times.

Now, we have completed one eye.

Repeat the steps for the second eye. This is all.

Here you go with the final image again.

1 Step Tutorial to Change Eye Size in Photoshop

Changing eye size has always been difficult in Photoshop before 2015. I needed to go the Liquify tool and then use Wrap tool or Bloat tool to enlarge the eyes. After 2016, life has become easier. Photoshop has given a dedicated Face tool to change the face including eyes, nose, lips, jawline, Mouth, and Face Shape. I know that some of you still use the old version of Photoshop so I am going to show you both ways to change eye size in Photoshop.

Let’s see how would the image look like.

Let me show you how to do it.

For Photoshop Versions that launched after 2016

The process is very simple if you have Photoshop CC that launched in 2016 or later. We will be using the dedicated Face tool for the job.

Step 1 – Go to the Face Tool and Change Eye Size in Photoshop

Go to Filter > Liquify. 

Activate the face tool which is highlighted with the Yellow color.

Now, Photoshop will automatically detect all the faces in the photo. I have only one face in the above photo. If you have multiple faces, you can select which face to modify by selecting the face using the drop-down that is highlighted with the red color.

Now, you have two options. Do you want to adjust both eyes synchronously or you don’t? Let me explain it one more time? If you increase the size of right eye by 20%, do you want the size of the left eye to be increased by 20% automatically? If yes, turn on the link button which is highlighted by the blue rectangle. If not, turn that link button off.

Adjust the eyes using 5 sliders that Photoshop gives you. I have done mine.

That’s it, guys! This is the way you can change eye size in Photoshop.

For Older Version

You are reading this means you own the older verion of Photoshop. Forget everything that you read earlier. That was not for you. I am going to start from the beginning to show you how to do it.

Step 1 – Open Liquify Tool

We need to go to the Liquify tool. This is the only step common between newer versions and older versions. Go to Filter > Liquify.

Choose the Bloat Tool that is highlighted with the Blue rectange in the above image. Now make sure that the Rate is very low (highlighted with red color in the above image). If you keep the rate high then one click will rapidly increase the eye size. By keeping the rate low, you will actually see the eye enlarging.

Now put the cursor the eye (preferably pupil) and start clicking. Don’t hold. If you hold down the mouse button then size will keep on increasing. If you just click then size will increase in a controlled way. Do it with both eyes.

You can always press Cmd + Opt + Z/Ctrl + Alt + Z to repitativly undo if you have made any mistake.

Step 2 – Refine the Enlargement

Chaning the eye with older verion of Photoshop takes time. You need to use undo many times to refine the enlargement. Keep on using Bloat tool and Undo to get the perfect result.

This is all guys, See in you in the next tutorial.