Gradient Tool in Photoshop

Hey, guys! Welcome to my another tutorial from 30 Days to Learn Photoshop series. Last time, we discussed Clone Stamp Tool in Photoshop and today, we’re going to discuss the Gradient Tool in Photoshop. You’re not going to use it much but you may use it when you want to give some artistic effect to your photos. Just look at the image below. The image is made with just 3 clicks.

Final.jpg

So, let’s start with few basic questions.

What is Gradient Tool in Photoshop?

A gradient is a tool in Photoshop which helps you make a combination of two or more colors where you can see the subtle transformation from one color to another.

FYI – You can also use Gradient with one one color.

Where is Gradient Tool Located in Photoshop?

You need to grab Gradient Tool from the tool panel or activate is by pressing Shift+G again and again until it activates.

2.jpg

How to Use Gradient Tool?

If you use Gradient Tool at the beginner level, this tool is probably the easiest tool you can ever use.

You just need to draw a line. That’s it!

Refer to the below image, are you seeing a line? That’s all you need to draw.3.jpg

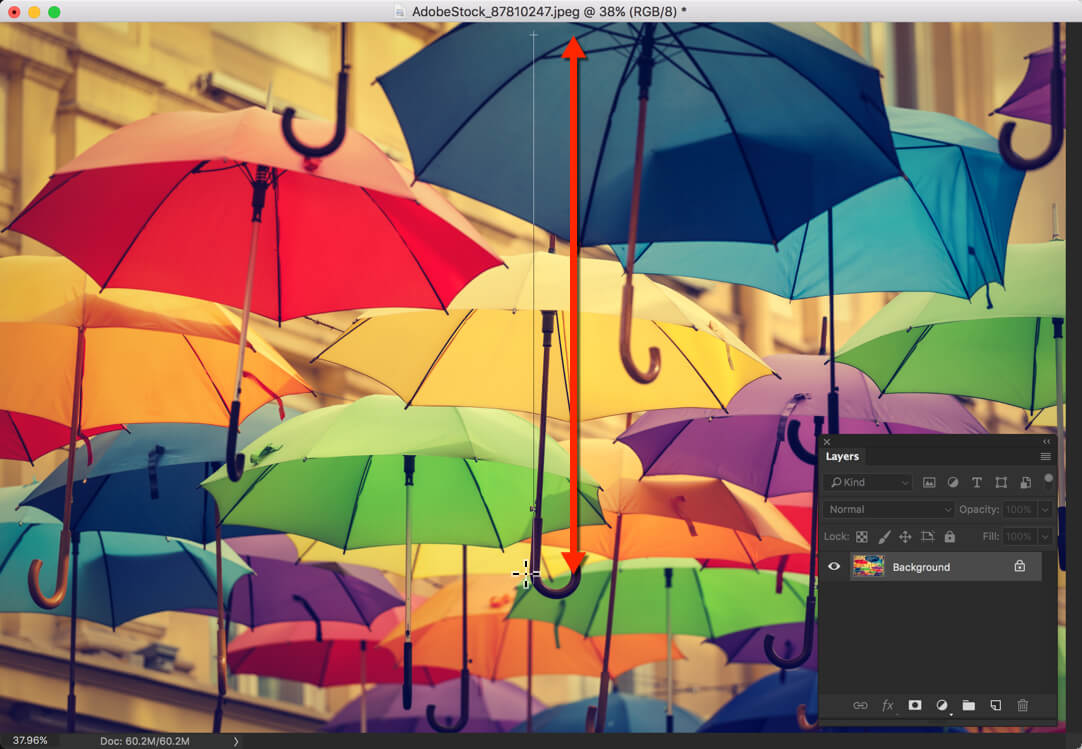
So, let’s begin with step by step.

Step 1: Choose the Starting and Ending Point

As you’ve grabbed the Gradient Tool, time to check the foreground and background color.

I am going with Black as my foreground color and White as my background color.

4.jpg

Now, whenever you draw a line, the starting point will have 100% of your foreground color and the ending point will have 100% of your background color. The middle area will have a transition from the foreground to the background color.

You can see it in the image below.

5.jpg

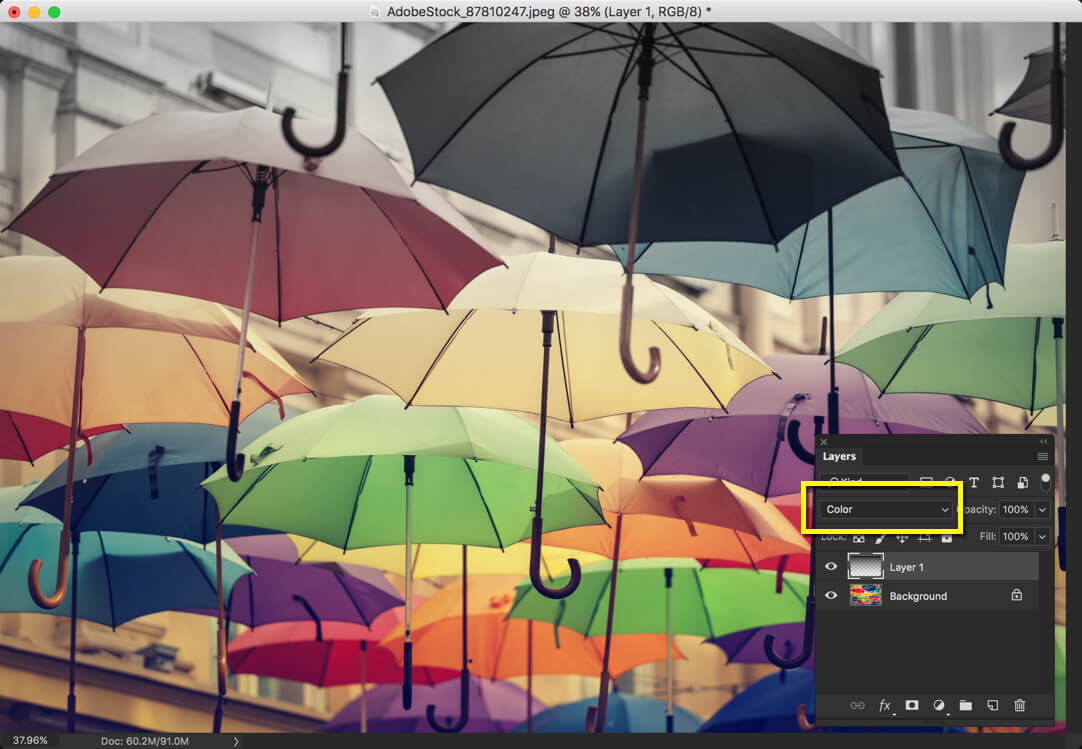
Step 2: Creative Effects with Gradient Tool

Now let’s do some creative effects.

Create a new layer.

Head over to Option Bar and click on the drop-down button first and then click on the second option. Unlike the previous one, this gradient goes from the foreground color to transparent.

6.jpg

Now again make a gradient.

7.jpg

Now, change the Blend Mode to Color.

8.jpg

The possibilities with Gradient Tool are seamless. You can get more creative by playing with this tool.

Time to head over to the menu bar of Gradient Tool.

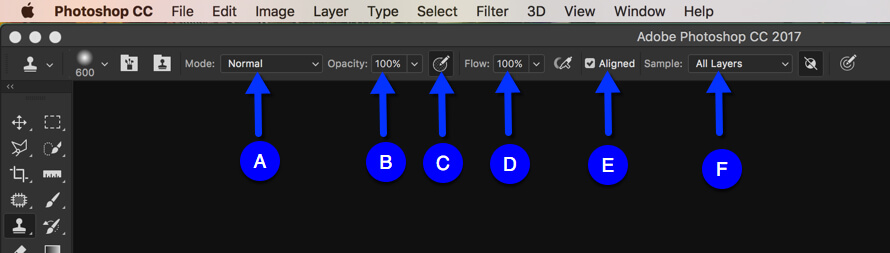
Option Bar of Gradient Tool

9.jpg

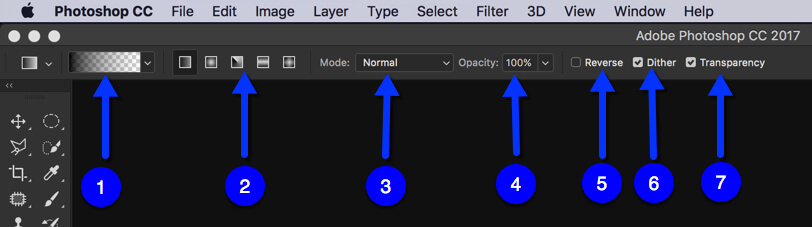
  1. Gradient: This is where you can choose your gradient. Just click on the drop-down arrow and you can see a lot more possibilities.
  2. Type of Gradient: Photoshop comes with 5 types of gradients. Linear, Radial, Angle, Reflected, and Diamond. The one that was shown is above example is Linear.
  3. Mode: Of course, this is Blend Mode.
  4. Opacity: This determines the opacity of your gradient. I’d like to keep it as 100%.
  5. Reverse: This one is cool. If it’s not checked, the gradient goes from Foreground color to Background color. If checked, the gradient goes from background color to foreground color.
  6. Dither: Dithering is the process of using two colors to simulate the shade of a third color by placing dots of the two colors close together. The application using the dithering process can use several strategies of placing the dots over the region showing the third color. It can place dots in particular patterns or at random. – by Chron.com
  7. Transparency: Remember that we created a cool effect in Step 2 where the gradient went from the foreground color to transparent? This is because the transparency was turned on. If it’s not, the result would’ve been a black image.

I hope that you enjoyed this tutorial.

Please support TrickyPhotoshop by sharing this tutorial with your friends and family on Facebook, Twitter, and Google+.

Day 18: Remove Objects with Clone Stamp Tool in Photoshop

Hello! Welcome to my another tutorial from 30 Days to Learn Photoshop series. Last time I wrote on Brush Tool in Photoshop. This is one is a bit different. Today, I’ll show you what’s the secret behind the removal of objects in Photoshop. Yes, you saw it right. Today, you’ll see how do Photoshoppers remove objects in Photoshop. They do it with the help of the Clone Stamp Tool. Although, there are many ways and tools available in Photoshop to remove objects, the most famous one is Clone Stamp Tool.

Remember what you learned in Healing Brush Tool, you have source and target. The same things are also present here. You have a source and a target. You choose source by holding down Opt/Alt key and you choose the target by clicking with the mouse.

I’ll share everything in more details in this tutorial. But before we proceed, let me show you the before and after pic of an image where I magically removed chairs and umbrella.

Before

Clone Stamp Tool in PhotoshopAfter

Clone Stamp Tool in Photoshop

Now let’s begin with few questions

What is Clone Stamp Tool in Photoshop

Clone Stamp is a tool from which you can copy one part of the image and paste it on another part.

Where is Clone Stamp Tool Located in Photoshop

You need to grab Clone Stamp Tool from the tool panel or activate is by pressing Shift+S again and again until it activates.

Clone Stamp Tool in Photoshop

How to Use Clone Stamp Tool in Photoshop

Now. let’s learn how to use the Clone Stamp Tool in Photoshop.

Step 1: Define the Source

As said earlier, Clone Stamp is used to copy pixels from one part of the image and paste them on another part. To use the Clone Stamp Tool, you first need to define the source pixels. This will be pixels are going to be copied. You can do them by holding down Opt/Alt key.

Once you hold it down, the cursor will change to a sniper cursor.

Clone Stamp Tool in Photoshop

I need to remove the chairs and umbrella. What I’ll do is to copy the nearby pixels of beach sand, water, and sky, and paste them on the area where chairs and umbrella are present.

So, for now, I am choosing my source as the sand.

Step 2: Paint the Target

Now that I have selected my source, I am going to paint those pixels onto my target. When you do that, you’ll see a cursor that moves synchronously with your cursor. This cursor denotes the pixels that are being copied.

Clone Stamp Tool in Photoshop

Simply, do this for all over the image.

For best result, you may need to define your source multiple times.

Step 3: Refine the Result

If you do it multiple times, your result should look like below.

Clone Stamp Tool in Photoshop

But you have noticed a very big flaw in the image. As I have basically copied and pasted pixels from one place to another, I have created a design that repeats itself and this looks fake.

To fix this, usually, I make some random designs by choosing some random areas as the target. In this case, I am choosing the left cloud as my target. If you want, you can choose something else.

Clone Stamp Tool in Photoshop

And I am going to fill the cloud adjacent to it with my newly chosen target.

Clone Stamp Tool in Photoshop

Like it? I bet you would.

Now, let’s go a bit deeper.

Option Bar of Clone Stamp Tool

Before we proceed, let me show you the option bar of the Clone Stamp Tool.

Clone Stamp Tool in Photoshop

I have given a name to important of them. You can leave the rest.

A: Mode – This is probably the most common option you get when you use any tool that is related to Brush Tool. This is nothing but the Blend Mode. I have written a vast tutorial on Blend Mode in Photoshop.

B: Opacity – Opacity is used define the opacity of the brush. If it’s 100%, the copied pixels are opaque. If it’s 0%, the copied pixels are transparent, and if it’s anywhere between 0% to 100%, the copied pixels will be translucent.

C: Pressure – This is something you can use when you use pressure sensitive pads like Wacom tablets. If turned on, the harder you press, the harder your target gets brushed.

D: Flow – For now, you can think that flow works exactly the same as opacity (but it doesn’t). The proper use of Flow comes in the advanced version.

E: Aligned – This is what I keep turned on most of the time. What this keeps is that it keeps the Source brush and Target brush aligned. In case you are having difficulty understand this feature, simply turn it off and try to use the Healing brush tool.

F: Sample – This lets you decide which layer to choose while taking your source as a reference. If you work non-destructively like me, it’s better to go with “All Layers”.

That’s all. I hope that you like it.

Check out other tutorials from 30 Days to Learn Photoshop series.

Please support TrickyPhotoshop by sharing this tutorial with your friends and family on Facebook, Twitter, and Google+.