Create Instagram Moon Effect in Photoshop

Hey Guys, welcome to my another tutorial on creating Instagram Effects in Photoshop. This time, I will be showing you How to Create Instagram Moon Effect in Photoshop. Couple of weeks ago, I wrote a post on Creating Instagram Gingham effect and I must say that I received a big cheer on that post, and that motivated me to write my another on Instagram.

Moon effect is pretty much subtle like almost all other Instagram effects are. But what makes it different is that it is unsaturated which means it is Black and White.

Before we go further, I would like to show you the final image of the effect when applied on an image.

Final

Final.jpg

So let’s begin the tutorial.

Step 1: Desaturate the Image

The first thing we need to do is to desaturate the image. Duplicate the layer by pressing Cmd+J/Ctrl+J. Press Cmd+Shift+U/Ctrl+Shift+U.
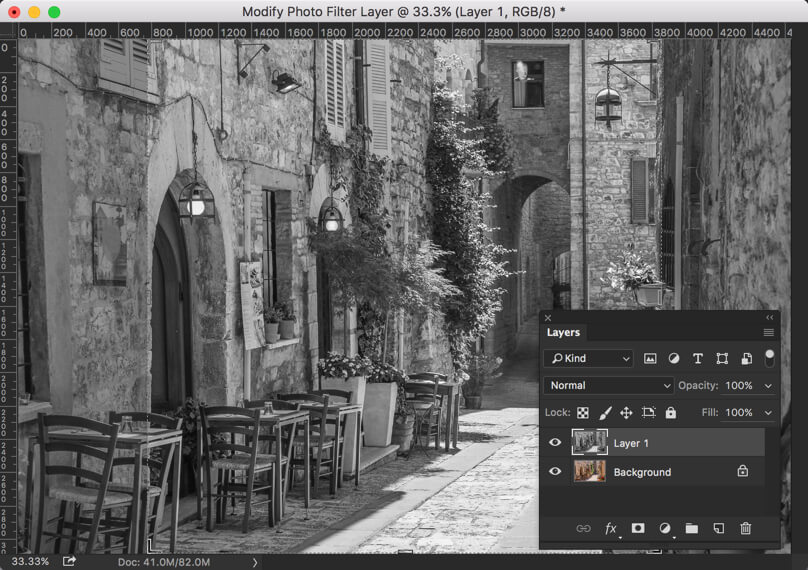
1.jpg

Step 2: Play with Brightness and Contrast

Moon Effect generally brightens the image and decreases the gap between highlights and shadows. We are going to do the same. Go to Image>Adjustment>Brightness/Contrast.

Increase the brightness to 62% and decrease the contrast to -30%.
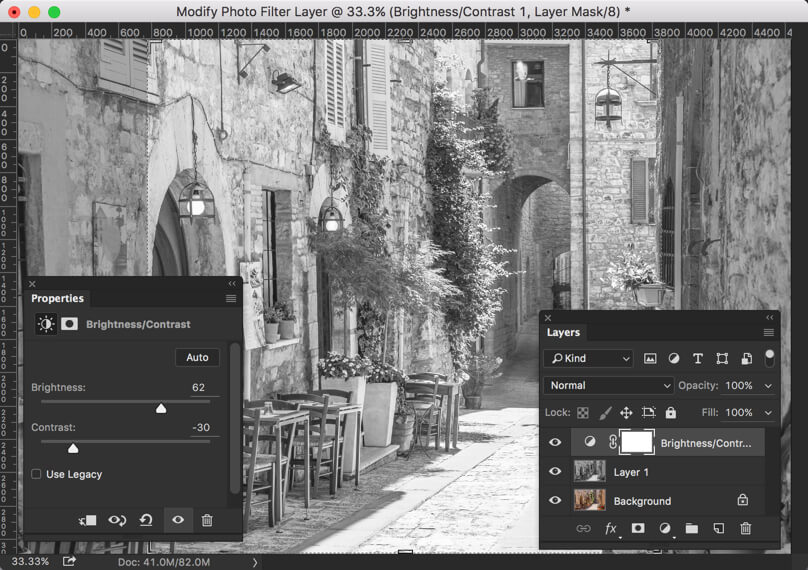
2.jpg

Step 3: Add Blue Tint

Time to add a very subtle, even unnoticeable blue tint. Go to Layer>New Adjustment Layer>Photo Filter.

Choose the filter as Cooling Filter (LBB). Keep the density at 6%.
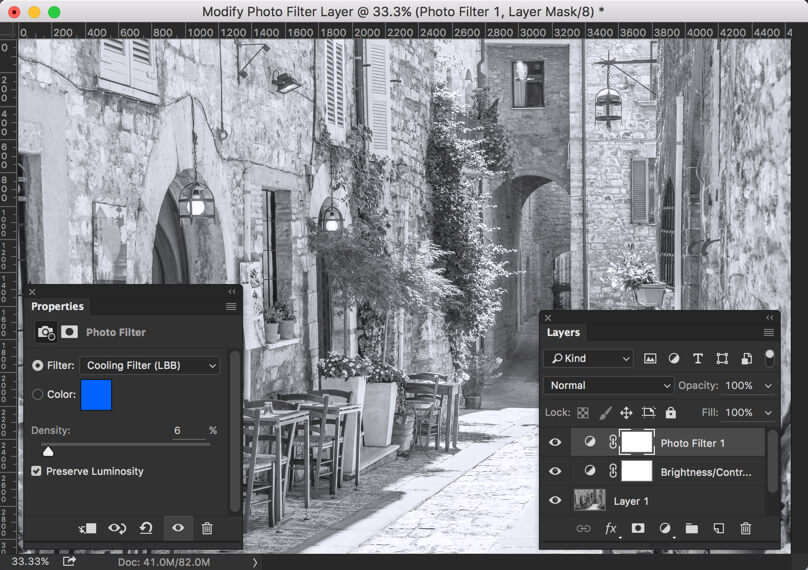
3.jpg

Step 4: Add Vignette

Time to add nice looking black vignette.

Press Cmd+Opt+Shift+E/Ctrl+Alt+Shift+E  to stack all the layer into a new layer in Photoshop. Go to Filter>Camera Raw Filter.

Switch to Effects tab. Decrease the amount o -45. It will add a nice looking black vignette.
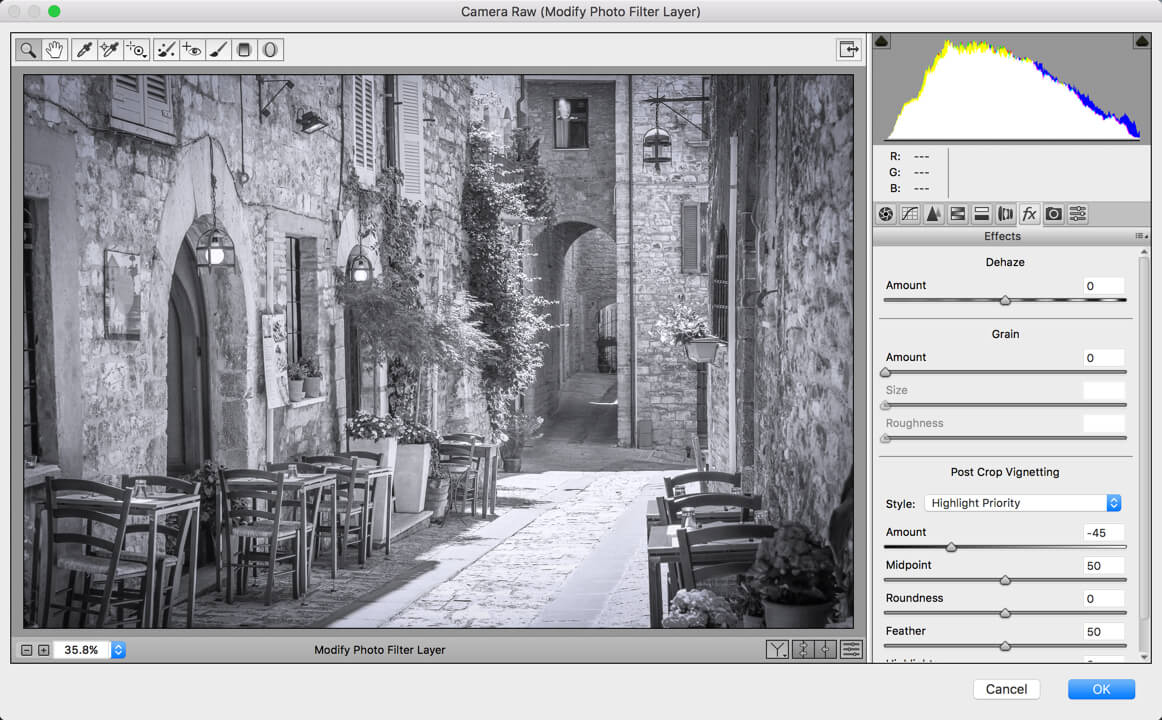
4.jpg

And  we are done.

I hope that you have enjoyed this tutorial. Don’t forget to check my other tutorials on Instagram effect in Photoshop.

Please support TrickyPhotoshop by sharing this tutorial with your friends and family on Facebook, Twitter, and Google+.

Here’s the final image for your reference.

FINAL

Final

Create HDR Image in Photoshop

Hi Guy, I hope that you had enjoyed my last tutorial on Creating Instagram Gingham effect on Photoshop. This time I am shifting a little bit to write on How to Create HDR Image in Photoshop. Lately I have been receiving a lot of requests to write a tutorial on Creating HRD Effect, and here’s one.

HDR stands for High Dynamic Range. To achieve HDR effect, we need special kind of photos called as bracketed photos. You shoot same scene 3 or 5 times with exposure difference of 1 or 2. For example, you shoot 3 images of same scene with its exposure value as -1, 0, and +1, or -2, 0, and +2. You can also shoot 5 images with its exposure value as -2, -1, 0, +1, and +2. This feature comes by default in most of the DSLR cameras. But we are humans and we forget to take bracketed images and go to create a HDR and realize how foolish we are. To keep those people is mind, I am going to start with 1 image and make some adjustments such that they’ll look like bracketed images.

Before we go further, I’d like to show you how the final image will look.

FInal.jpg

Step 1: Change Exposure to Create Bracketed Photos

Open your image.

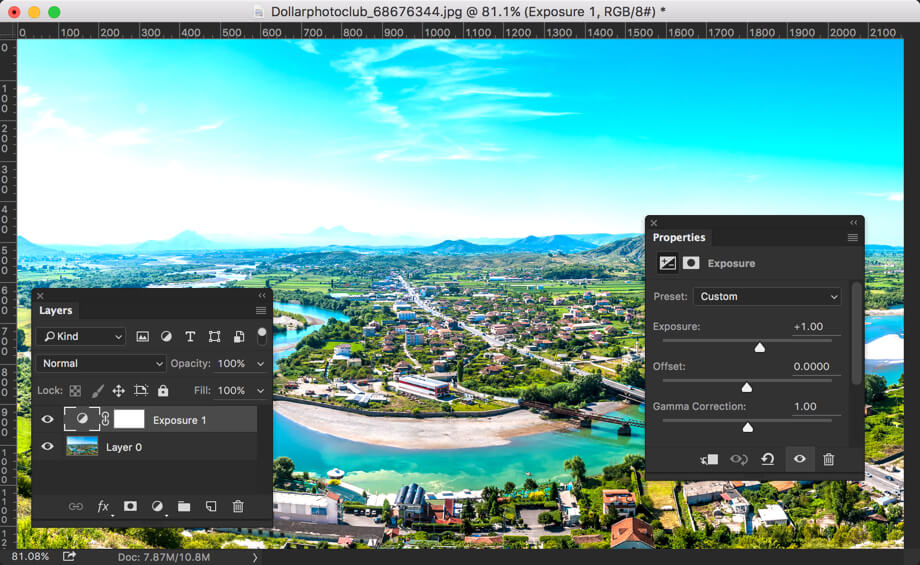
Go to Image>Adjustments>Exposure. Increase the Exposure by 1 value.

1.jpg

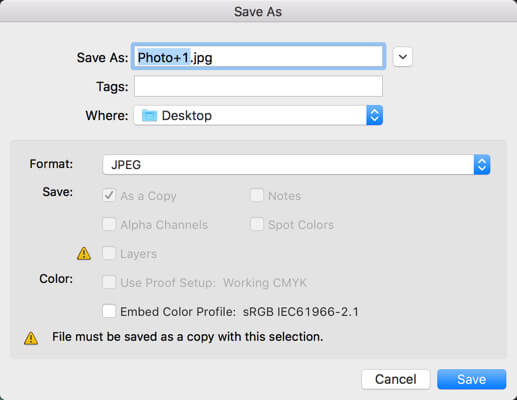
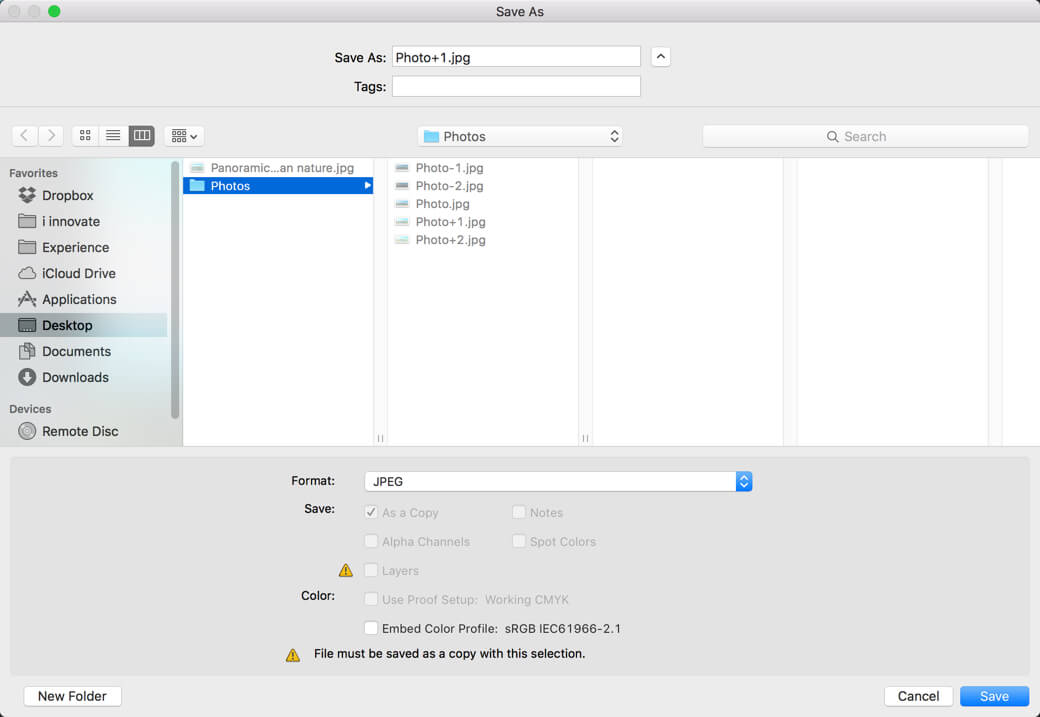
Now save the image with an easily recognizable name. Photo stands as prefix and +1 stands for +1 value of exposure.

2.jpg

In same way, create 4 photos with their exposure value as -2, -1, +1 and +2. In the end, you will have total 5 images including the original and 4 images that we just created.

3.jpg

Step 2: Open HDR in Photoshop

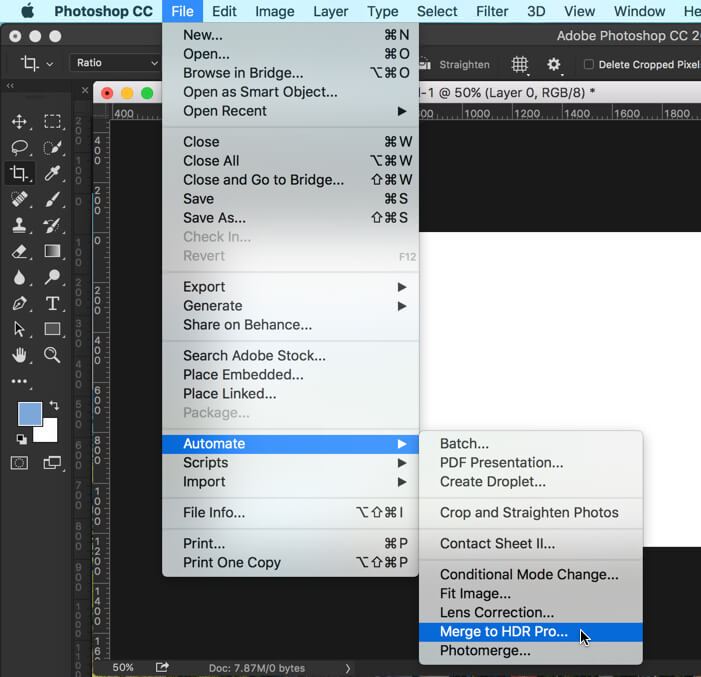
Go to File>Automate>Merge TO HDR Pro.

4.jpg

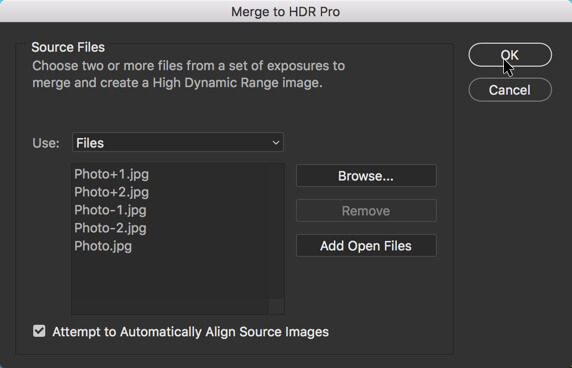
Click on Browse and select all photos. Press OK.

5.jpg

Now wait for few seconds till Photoshop finishes its magic.

Step 3: Create HDR Image in Photoshop

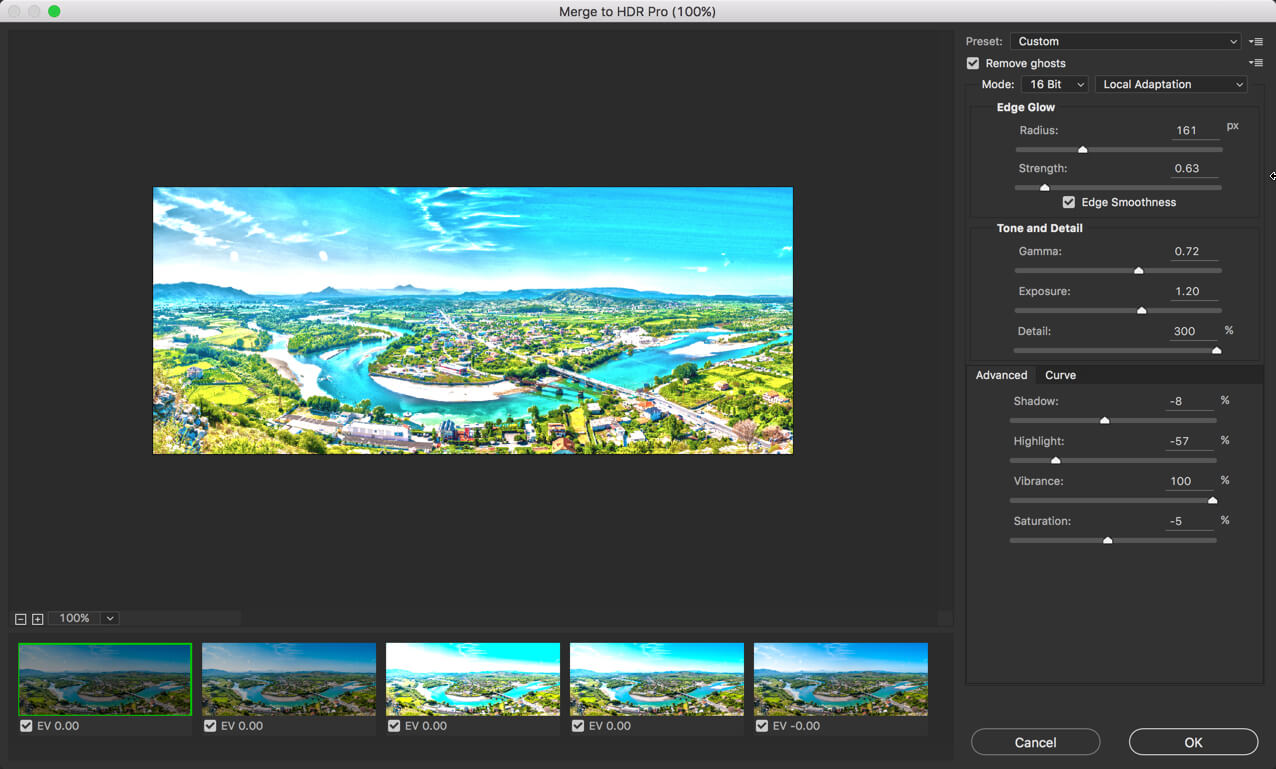
Photoshop will show below screen when it complete processing.

6.jpg

It’s looking beautiful, isn’t it?

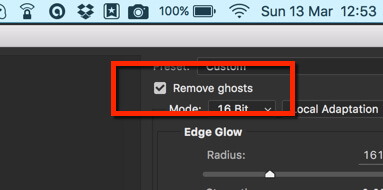
The first thing you wanna do to turn on Remove Ghosts.

This will clean up all the unnecessary extra highlights present in the image.

7.jpg

Step 4: Choose the Image

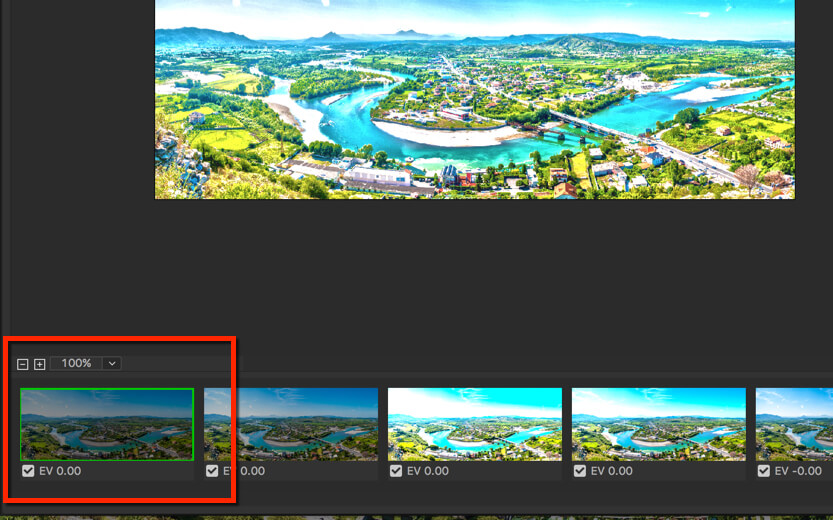
You can choose which image to use as reference image to create HDR image at the bottom of your screen.

I am choosing the image that has exposure value of -2. Don’t worry about the exposure value that Photoshop is showing now. it’s because changed the exposure value in Photoshop. Had we done it with our camera, Photoshop would’ve shown us the correct value.

8.jpg

Step 5: Play with Sliders

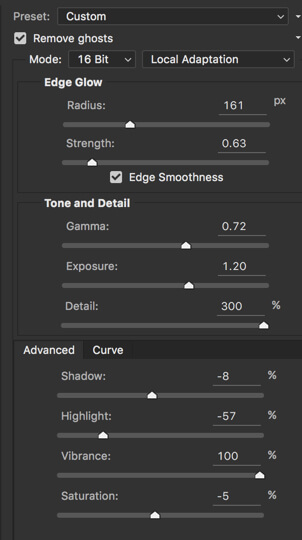
There’s no such magical settings in HDR. Each image looks perfect with a different adjustments of sliders. Below is the setting that I used. I am not saying this is the perfect adjustment.

9.jpg

And we are done with the image. I hope that you enjoyed the tutorial.

FInal

Please support TrickyPhotoshop by sharing this tutorial with your friends on Facebook, Twitter, and Google+.

Create Instagram Gingham Effect on Photoshop

Hey guys, welcome to my another tutorial on Instagram Effects. A few weeks ago I shared a tutorial on Creating Instagram Claredon Effect and today I’ll be sharing How to Create Instagram Gingham Effect on Photoshop. Instagram is getting popular day by day, and it has crossed 400 million users worldwide. Yes, I know that’s huge. Given that the total world’s population is around 7 billion, around 5% of all people in this world uses Instagram. Considering that, it’s quite obvious that enthusiasts like you would search for Creating Instagram effects on Photoshop, and here’s the end of your search.

Before we go any further, I’d like to show you the final image.

FINAL

Final

So let’s begin the tutorial.

Step 1: Reducing Highlights

The key feature of this filter is that it suppresses every single highlight present in an image, and we are going to do the same.

Open your image on Photoshop and go to Image>Adjustments>Shadows/Highlights.

Reduce the highlights as shown below. I’ve reduced it by 48%. Please note that what settings suit your image best, might be different than mine. Make sure that you decrease the tone as reduction of highlight will also affect the face which we don’t want.

1.jpg

Step 2: Reduce Colors

The next thing we need to do is to reduce saturation.

Go to Image>Adjustments>Vibrance. Reduce the Saturation to -31.

2.jpg

Step 3: Apply Vignette

Press Cmd+Opt+Shift+E/Ctrl+Alt+Shift+E to stack all layers onto top of the layer panel.

Go to Filters>Camera Raw Filter.

Head over to the FX section. Increase the Amount and Midpoint in the Post Crop Vignette section.

3.jpg

This will add a nice white vignette to the image.

I hope that you enjoyed this tutorial. Please share TrickyPhotoshop by sharing this tutorial with your friends and family on Facebook, Twitter, and Google+.

And now we are done. Below is the final pic.

FINAL

Final.jpg